If you’ve ever tried customizing a WordPress site, you probably know that making changes directly to the main theme can be risky. That’s where child themes come in! A child theme is a separate, lightweight theme that inherits properties from a parent theme, allowing you to tweak your site without touching the core files. Think of it as a safe sandbox — you can experiment, add custom styles, or tweak functions without worrying about losing your modifications when the parent theme updates. It’s a smart way to keep your customizations organized, safe, and easy to manage.
Benefits of Using a Child Theme for Customization
Using a child theme offers a bunch of advantages that make customizing your WordPress site much simpler and safer:
- Preserves Your Changes During Updates: When the parent theme gets updated, your customizations in the child theme stay intact. This prevents you from losing your hard work or having to redo everything after each update.
- Safer Customizations: Since you’re not editing core theme files directly, it’s much less likely you’ll accidentally break your site. Your custom code lives separately in the child theme, reducing risks.
- Organized and Maintainable: Keeping your custom code in a dedicated child theme makes it easier to troubleshoot and update later. Everything related to your customizations is in one place.
- Easy to Switch or Remove: If you decide to change themes later, your customizations are isolated in the child theme, making it easier to switch without losing your work.
- Flexibility for Custom Features: Want to add custom functions, styles, or templates? A child theme makes it straightforward to extend your site’s capabilities without messing with the parent theme’s files.
In short, a child theme is like having a personal workshop for your website tweaks — it keeps things tidy, safe, and flexible, so you can focus on making your site uniquely yours without the stress of breaking something or losing updates. It’s the smart way to customize WordPress sites with confidence!
3. Prerequisites for Creating a WordPress Child Theme
Before diving into the exciting world of creating a child theme, it’s important to make sure you’ve got everything in place. Think of this as laying a solid foundation for your customization adventure. Here’s what you’ll need:
- Basic knowledge of WordPress: Familiarity with the WordPress dashboard, themes, and how to install or activate themes will make the process smoother.
- Access to your website’s files: You’ll need either FTP access or a file manager provided by your hosting service. This is essential for creating and editing theme files.
- Understanding of PHP and CSS: While you don’t need to be a coding wizard, knowing some basics of PHP and CSS will help you tweak your child theme effectively.
- Parent theme installed and active: Your parent theme (like Twenty Twenty-Three or Astra) should be installed and activated. The child theme will depend on it.
- Text editor: A good code editor such as VS Code, Sublime Text, or even Notepad++ will make editing files easier and more efficient.
Once you have these essentials, you’re all set to start creating a child theme that will allow you to customize your website without worrying about losing changes during updates. Remember, creating a child theme is about making your site uniquely yours—safely and easily.
4. Step-by-Step Guide to Creating a WordPress Child Theme
Now that you’re ready, let’s walk through the process step-by-step. Creating a child theme is simpler than it sounds, and I’ll break it down into manageable parts so you can follow along without any stress.
Step 1: Create a New Folder for Your Child Theme
First, access your website files via FTP or your hosting’s file manager. Navigate to wp-content/themes. Here, create a new folder and give it a name that clearly indicates it’s a child theme—something like mytheme-child.
Step 2: Create a style.css File
Inside your new folder, create a file named style.css. This file will contain important information about your child theme. Add the following code at the top:
/ Theme Name: MyTheme ChildTemplate: mytheme/
Important: Replace MyTheme with the exact name of your parent theme. The Template line must match the folder name of your parent theme.
Step 3: Enqueue the Parent Theme Stylesheet
To make sure your child theme inherits styles from the parent, you need to enqueue the parent theme’s stylesheet. Create a new file called functions.php inside your child theme folder and add this code:
This code tells WordPress to load the parent theme’s CSS, ensuring your child theme looks just right.
Step 4: Activate Your Child Theme
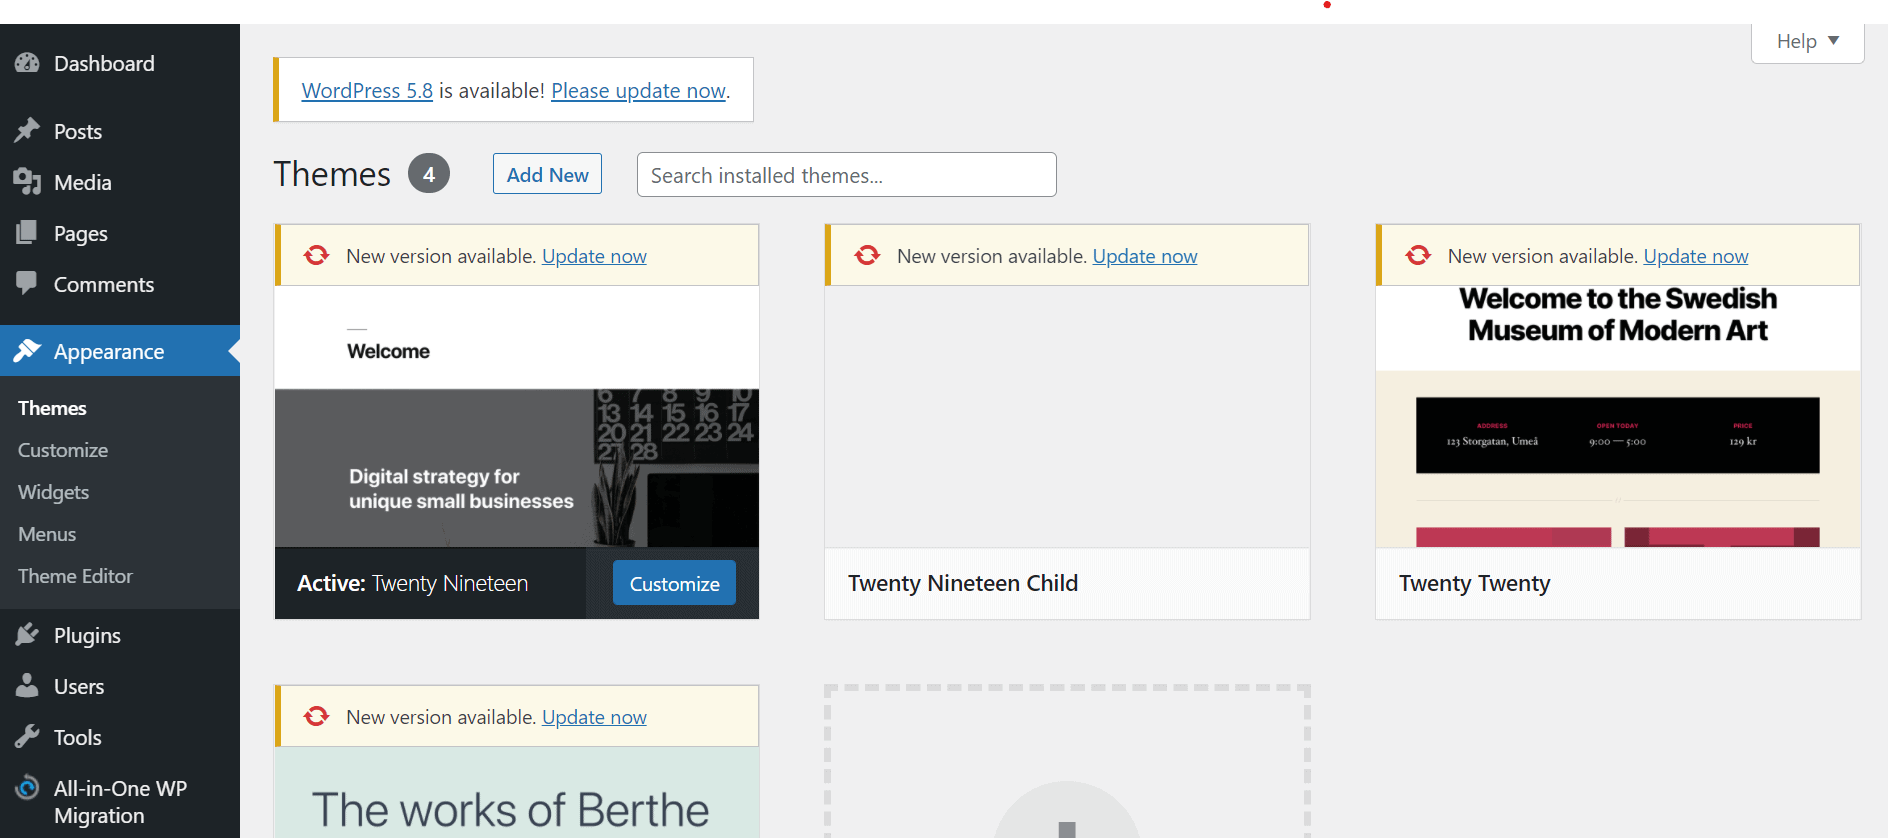
Go to your WordPress dashboard, navigate to Appearance > Themes. You should see your new child theme listed. Click Activate.
And voilà! Your child theme is now active. You can start customizing by adding new CSS rules to your style.css or creating new template files.
Optional: Customize Further
If you want to override specific templates or add new functionality, create new PHP files in your child theme folder and modify as needed. Remember, only include the files you want to change; other files will fall back to your parent theme.
That’s it! With these simple steps, you now have a functional child theme ready for your personal tweaks. Experiment, learn, and enjoy customizing your WordPress site safely and efficiently!
5. Activating Your Child Theme in WordPress
Now that you’ve set up your child theme files, it’s time to activate it so WordPress can start using your customizations. Don’t worry—activating a child theme is straightforward, and it’s just like switching to any other theme in your WordPress dashboard.
Here’s a quick step-by-step guide:
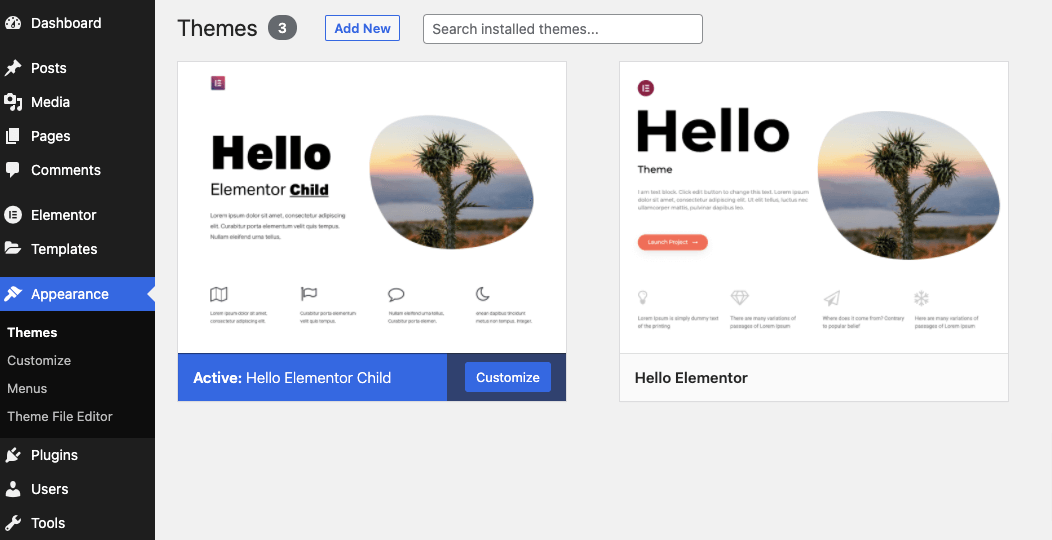
- Log in to your WordPress dashboard. Once you’re logged in, navigate to Appearance > Themes.
- Locate your child theme. If you’ve uploaded your child theme correctly (usually via FTP or the WordPress theme uploader), it should appear among the available themes.
- Hover over the child theme thumbnail. You’ll see a few options, including Activate.
- Click Activate. WordPress will now switch to your child theme, and you’ll see it in action on your site.
Once activated, your site will start using the styles and templates defined in your child theme. Remember, if you don’t see immediate changes, try clearing your cache or refreshing your browser. Also, it’s a good idea to double-check your website’s frontend to ensure everything looks as expected.
Tip: If your site looks broken after activation, don’t panic! You can easily revert to the parent theme by going back to Appearance > Themes and activating the parent theme. This way, you can troubleshoot your child theme files without any hassle.
6. Customizing Your Child Theme Safely
With your child theme activated, it’s time to start customizing! The beauty of using a child theme is that you can make changes without risking the core files of your parent theme. Here are some best practices to ensure you customize safely and effectively:
Use the Correct Files for Customization
Most of your customizations will happen in the style.css and functions.php files. For styling, add your CSS rules to style.css. For PHP modifications, use functions.php. Remember, these files override or extend the parent theme’s files, so you don’t need to modify the original theme.
Keep Your Customizations Organized
As your site grows, so might your custom code. To stay organized:
- Comment your code generously so you remember what each part does.
- Use separate CSS classes for different styles to avoid conflicts.
- Create custom template files when necessary, like page-templates or specific PHP files.
Test Changes First
Before deploying any customization on your live site, test it thoroughly on a staging or local environment. This way, you can catch bugs or conflicts early without affecting your visitors.
Backup Before Major Changes
It’s always wise to back up your site before making significant modifications. Use a reliable backup plugin or hosting backup feature. This safety net allows you to restore your site if something doesn’t go as planned.
Use Child Theme Hooks and Filters
WordPress offers hooks and filters that let you modify functionality without editing core files. Incorporate these into your functions.php for clean, upgrade-safe customizations.
Stay Updated and Documented
Keep a record of your custom changes and stay updated with theme and WordPress updates. This practice helps you troubleshoot issues and maintain your site over time.
Remember, the goal is to customize your site while preserving the ability to update your parent theme safely. With a bit of care and organization, your child theme can become a powerful tool for creating a unique, professional-looking website that’s easy to maintain.
7. Best Practices for Managing and Updating Your Child Theme
Creating a child theme is a fantastic way to customize your WordPress site safely, but managing it properly is just as important to keep things running smoothly. Here are some best practices to follow so your child theme remains healthy and easy to maintain:
Keep Your Child Theme Organized
Maintain a clean and logical file structure. Only include files that you actually modify or add. For example, if you’re customizing styles, keep your style.css at the root of your child theme folder. For custom functions, create a functions.php file. Avoid clutter by removing unnecessary files or code snippets.
Use Proper Enqueue Methods for Styles and Scripts
Instead of directly editing parent theme files, enqueue your styles and scripts properly in your child theme’s functions.php. This way, updates to the parent theme won’t overwrite your customizations. For example:
function my_child_theme_scripts() { wp_enqueue_style('parent-style', get_template_directory_uri() . '/style.css'); wp_enqueue_style('child-style', get_stylesheet_directory_uri() . '/style.css', array('parent-style'));}add_action('wp_enqueue_scripts', 'my_child_theme_scripts');This approach ensures your styles load correctly and remain intact after updates.
Document Your Changes
Keep a simple changelog or comments within your code. This helps you remember what you customized and why, especially if you revisit your site after some time or pass it on to someone else.
Test Before Updates
Before updating the parent theme, test your child theme on a staging site or local environment. This helps catch conflicts early. Also, regularly back up your site so you can restore it if something breaks after an update.
Leverage Version Control
If you’re comfortable with tools like Git, use version control for your child theme. This allows you to track changes, revert to previous versions, and collaborate more effectively.
Stay Informed and Keep Backups
Follow the updates from your parent theme developers and WordPress core. Sometimes, updates can affect your child theme. Always keep backups before applying updates, so you can quickly recover if needed.
8. Troubleshooting Common Issues with Child Themes
While child themes are designed to be safe and straightforward, you might encounter a few hiccups along the way. Here’s a rundown of common issues and how to solve them:
Issue: Styles Not Applying
Cause: Sometimes, styles from the parent theme or your child theme aren’t loading correctly.
- Check if your
functions.phpproperly enqueues styles, especially the parent style. - Ensure your
style.cssin the child theme has the correct header information and includesTemplate: parent-theme-folder. - Clear your browser cache and refresh the page.
Issue: Custom Functions Not Working
Cause: Functions in your child theme’s functions.php might be overridden or conflicting.
- Make sure your functions are properly hooked into WordPress actions or filters.
- Check for syntax errors or typos that can break the PHP code.
- Use debugging tools or enable WP_DEBUG in your
wp-config.phpto get error messages.
Issue: Changes Not Visible After Update
Cause: Cache can prevent new changes from appearing.
- Clear your website cache if you’re using caching plugins.
- Clear your browser cache.
- If using a CDN, purge the cache there too.
Issue: Child Theme Not Activating
Cause: Incorrect folder structure or missing header info in style.css.
- Ensure the child theme folder is in
wp-content/themes/. - Verify that your
style.cssheader has the correctTemplateline referencing the parent theme folder. - Activate the theme through the WordPress admin dashboard.
Additional Tips
If you’re stuck, consult the WordPress documentation or community forums. Often, others have faced similar issues and can offer solutions. Remember, patience and careful troubleshooting go a long way in maintaining a healthy child theme!
Conclusion and Additional Resources for WordPress Customization
Creating a child theme in WordPress is a powerful way to customize your website without risking the core files. By following the steps outlined above, you can safely modify your site’s appearance and functionality while maintaining the ability to update the parent theme. Remember, always back up your site before making significant changes and test your customizations in a staging environment if possible.
To deepen your understanding and expand your customization skills, consider exploring the following resources:
- Official WordPress Theme Developer Handbook: Comprehensive guide on theme development and child themes. https://developer.wordpress.org/themes/child-themes/
- WordPress Codex: Extensive documentation on theme development and customization tips. https://codex.wordpress.org/Child_Themes
- Online Tutorials and Courses: Platforms like Udemy, Coursera, and YouTube offer step-by-step tutorials on creating and customizing child themes.
- Community Forums: Engage with the WordPress community on forums such as WordPress.org Support or Stack Exchange for practical advice and troubleshooting.
By leveraging these resources, you’ll be well-equipped to customize your WordPress site effectively and confidently. Happy customizing!