In today’s globalized world, having a website that speaks multiple languages can really open doors. Whether you’re targeting international customers or just want to reach a broader audience, offering content in various languages makes your site more accessible and user-friendly. WordPress, being incredibly flexible, makes it possible to add multilingual support, but sometimes you want more control over how visitors choose their language. That’s where a manual language selector comes into play — giving you the ability to customize the user experience exactly how you want.
Why You Might Want to Manually Add a Language Selector
While there are plenty of plugins that can automatically add language switchers, sometimes they don’t quite fit your website’s style or functionality needs. Manually adding a language selector gives you several advantages:
- Full Customization: You control the design, placement, and behavior of the selector, ensuring it matches your site’s look and feel.
- Performance Benefits: Avoid unnecessary plugin bloat, which can slow down your site.
- Better User Experience: Tailor the language switcher based on your audience—whether that’s a dropdown, flags, or simple links.
- Learning Opportunity: It’s a great way to understand how multilingual setups work behind the scenes.
Plus, if you’re comfortable with some basic coding, adding a manual language selector can be a fun project that enhances your website’s professionalism and flexibility. Whether you want a simple toggler or a more complex solution, doing it manually means you’re in the driver’s seat—making your multilingual support truly your own.
Step 1: Choose a Location for Your Language Selector
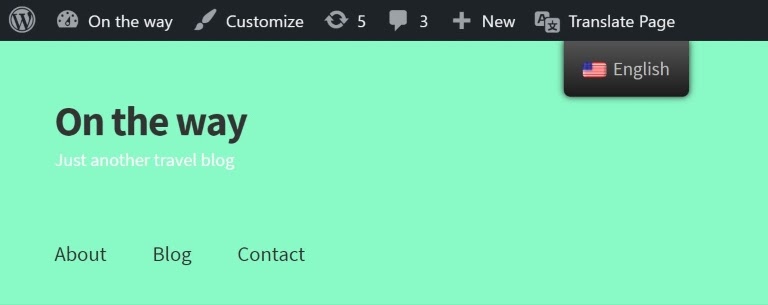
Before diving into the technical details, the first thing you want to do is decide where you want your visitors to see the language selector. Think about your website’s layout and user experience. Do you want it in the header so it’s visible on every page? Or perhaps in the footer for a cleaner look? Maybe a sidebar makes sense if you want it to be accessible but not intrusive.
Here are some common spots to consider:
- Header: Top of the page, visible immediately when visitors land on your site.
- Footer: Bottom of the page, subtle but accessible from every page.
- Sidebar: On the side of your content, easy to find without cluttering the main area.
- Within the menu: Adding it to your main navigation can make it highly visible and user-friendly.
When choosing the perfect spot, think about your site’s design and how prominently you want the language options to appear. Keep in mind that the goal is to make it easy for visitors to switch languages without disrupting their browsing experience. Once you’ve decided on the location, note down the exact spot in your theme files or where you want to insert the code later. This will make the next steps smoother!
Step 2: Create the Language Selector Code
Now that you know where you want your language selector to go, it’s time to create the code that will display the language options. Since we’re doing this manually, you’ll need to write some simple HTML and PHP snippets, which you can add to your theme files.
Here’s a basic example of what your language selector might look like:
<div class="language-selector"> <ul> <li><a href="path-to-language-1">English</a></li> <li><a href="path-to-language-2">Spanish</a></li> <li><a href="path-to-language-3">French</a></li> </ul></div>
Replace path-to-language-1, path-to-language-2, and so on, with the actual URLs of your translated pages. If you’re using a multilingual plugin or have separate pages for each language, these URLs should point to those pages.
To make your selector dynamic and easier to manage, you might want to wrap this code into a PHP function. Here’s a simple example:
<?phpfunction custom_language_selector() { echo '<div class="language-selector">'; echo '<ul>'; echo '<li><a href="/en">English</a></li>'; echo '<li><a href="/es">Spanish</a></li>'; echo '<li><a href="/fr">French</a></li>'; echo '</ul>'; echo '</div>';}?>
This way, you can insert custom_language_selector(); into your theme files where you want the selector to appear. Remember to update the URLs to match your site’s structure.
And that’s it! With these two steps, you’re well on your way to offering a manual language switcher on your WordPress site. In the next steps, you’ll learn how to style it to match your website’s look and feel, and how to make it more interactive if needed. Stay tuned!
Step 3: Add the Code to Your WordPress Theme
Now that you’ve got your language selector ready, it’s time to make it appear on your website. This step involves adding some code to your WordPress theme files. Don’t worry—if you’re comfortable editing code, it’s straightforward, but always remember to back up your website before making changes!
First, decide where you want your language selector to show up. Common spots include the header, footer, or a sidebar. Once you’ve chosen the location, you’ll need to insert your code there.
Here’s a simple example of the code you might use. It creates a basic dropdown menu with your language options:
<?php// Replace 'en', 'fr', 'es' with your language codes and 'English', 'Français', 'Español' with your language names$languages = array( 'en' => 'English', 'fr' => 'Français', 'es' => 'Español');// Get current URL$current_url = home_url(add_query_arg(array(), $wp->request));echo '<form method="get" action="' . esc_url($current_url) . '">';echo '<select name="lang" onchange="this.form.submit()">';foreach ($languages as $code => $name) { // Check if this language is the current one $selected = (get_query_var('lang') == $code) ? ' selected' : ''; echo '<option value="' . esc_attr($code) . '"' . $selected . '>' . esc_html($name) . '</option>';}echo '</select>';echo '</form>';?>Paste this code into your theme’s header.php, sidebar.php, or footer.php file, depending on where you want the selector to appear. If you’re using a child theme (which is recommended), edit the child theme’s files to prevent your changes from being overwritten during updates.
Remember, this code is a starting point. You might want to customize the options or integrate it more tightly with your existing multilingual setup. For example, if you’re using a plugin like Polylang or WPML, they often provide their own functions to generate language switchers, which you can adapt into this code.
Once you’ve added the code, save your changes, clear your cache if needed, and visit your website to see your new language selector in action!
Step 4: Style Your Language Selector for Better User Experience
Great! Your language selector is now on your site, but it might look a bit plain or out of place. To make it more appealing and user-friendly, it’s time to add some custom styling. This step is all about making your selector blend seamlessly with your website’s design and ensuring visitors find it easy to use.
Start by identifying where you placed the selector and inspecting its current appearance using your browser’s developer tools. This will help you target the correct elements in your CSS.
Here are some tips to style your language selector effectively:
- Use consistent colors and fonts: Match your site’s theme so it doesn’t stand out awkwardly.
- Add some spacing: Ensure there’s enough padding around the dropdown for easy clicking, especially on mobile devices.
- Enhance visibility: Use contrasting colors for the dropdown background and text to improve readability.
- Make it responsive: Ensure the selector looks good on all screen sizes.
Here’s a simple example of CSS you can add to your stylesheet (style.css) or through the Customizer’s Additional CSS section:
/ Style the language selector form /.language-selector-form { display: inline-block; margin: 10px;}/ Style the dropdown menu /.language-selector-form select { padding: 8px 12px; font-size: 14px; border: 1px solid ccc; border-radius: 4px; background-color: fff; cursor: pointer; transition: border-color 0.3s, box-shadow 0.3s;}/ Add hover effect for better UX /.language-selector-form select:hover { border-color: 999; box-shadow: 0 0 5px rgba(0,0,0,0.1);}To apply these styles, wrap your form with a class like language-selector-form in your PHP code:
<form class="language-selector-form" method="get" action="..."> ... </form>This way, your CSS targets only your language selector, avoiding unintended styling issues elsewhere.
Feel free to customize the styles further—add icons, change colors, or even animate the dropdown to match your website’s vibe. Remember, a well-styled selector not only looks good but also enhances user experience by making language switching intuitive and accessible.
Once styled to your liking, test it on different devices and browsers to ensure it looks great everywhere. Happy styling!
7. Additional Tips for Managing Multilingual Content
Managing content across multiple languages can sometimes feel overwhelming, but with a few handy tips, you can make the process much smoother and more organized. Here are some strategies to keep your multilingual site running like a well-oiled machine:
Use Consistent Naming Conventions
When creating pages, posts, or categories in different languages, stick to a consistent naming pattern. For example, if your English pages are titled “About Us,” translate the title directly to “À propos de nous” in French and so on. This consistency helps you quickly identify corresponding content across languages.
Leverage Language Tags and Categories
Assign specific tags or categories to your multilingual content, such as “English,” “French,” or “Spanish.” This way, you can filter and manage your content more easily within your WordPress dashboard. It also helps in generating language-specific menus or listings.
Maintain a Content Inventory
Keep a simple spreadsheet or document listing all your pages and posts alongside their translations. Include URLs, publication dates, and status updates. This inventory helps you track what’s translated, what needs updating, and ensures nothing falls through the cracks.
Sync Content Regularly
If you update your main content, remember to update its translations accordingly. Consider setting up reminders or workflows to review and synchronize content periodically. This practice keeps your multilingual site fresh and accurate.
Utilize Translation Management Tools
While manual addition is great, managing multiple languages can get complex. Tools like WPML, Polylang, or TranslatePress offer features to streamline translation workflows, assign translators, and manage language switches more efficiently. Even if you’re handling translations manually, these tools can help organize your process.
Test Your Multilingual Site
Periodically, browse your site in different languages and devices to ensure the language selector works seamlessly, and the content displays correctly. Small issues can sometimes slip in, so regular testing helps maintain a professional appearance.
8. Conclusion and Next Steps for Multilingual Website Optimization
Congratulations! You now have the know-how to manually add a language selector to your WordPress website and manage your multilingual content effectively. Remember, providing content in multiple languages opens your site to a broader audience and enhances user experience, so it’s worth investing time into proper management.
As your next steps, consider:
- Refining the User Experience: Make sure your language selector is easy to find and use. Test it across different devices and browsers.
- Optimizing SEO for Multilingual Content: Use hreflang tags and localized SEO strategies to help search engines serve the right language version to users.
- Monitoring and Analyzing: Keep an eye on your site’s analytics to see how visitors interact with different language versions. This data can inform future content and design decisions.
- Expanding Your Multilingual Content: As you grow, add more languages or improve existing translations to better serve your audience.
Managing a multilingual website is an ongoing journey, but with the right tools and habits, it becomes much more manageable. Keep exploring new ways to enhance your site, listen to your visitors’ feedback, and adapt your content strategy accordingly. Happy multilingual managing!