If you’ve ever needed to add a large amount of content—like products, users, or posts—to your WordPress site, you know it can be a time-consuming task if done manually. That’s where data import tools come into play, making the process much smoother and more efficient. Whether you’re updating a store with new products or migrating content from another platform, knowing how to import data correctly is a game-changer. In this guide, we’ll walk you through where to find the CSV template you need to streamline your data import process and ensure everything transfers over seamlessly.
Understanding the Importance of a CSV Template for Data Import

So, why is having a CSV template so crucial when importing data into WordPress? Think of it as your blueprint or map—it ensures that all your data is organized in a way that WordPress can understand and process correctly. Without a proper template, you risk mismatched fields, missing information, or even corrupted data, which can be a real headache to fix later on.
Here’s why a CSV template is so valuable:
- Standardization: It provides a consistent format for your data, making sure everything lines up perfectly.
- Time-saving: Instead of figuring out the right columns or data structure on the fly, you have a ready-made template to fill in.
- Error Reduction: Using a standardized template helps prevent common mistakes like misaligned data or missing fields.
- Compatibility: Most import plugins and tools require a specific CSV format; the template ensures your data matches these requirements.
Many plugins or tools used for importing data into WordPress—such as WP All Import, WooCommerce CSV Import Suite, or custom scripts—either provide their own CSV templates or specify the required format. Using these templates guarantees that your data transfer goes smoothly without hiccups. So, finding and understanding where to get your CSV template is a key step in making your data import process hassle-free and efficient.
3. Steps to Locate the CSV Template in WordPress
Finding the CSV template in WordPress might seem a bit tricky at first, especially if you’re new to data import processes. But don’t worry—once you know the steps, it’s pretty straightforward. The first thing to remember is that most plugins designed for data import, like WP All Import or WooCommerce’s product CSV importer, often provide their own templates or sample files. Here’s a simple step-by-step guide to help you locate that template:
- Log into your WordPress dashboard. This is your starting point. Use your admin credentials to access the backend.
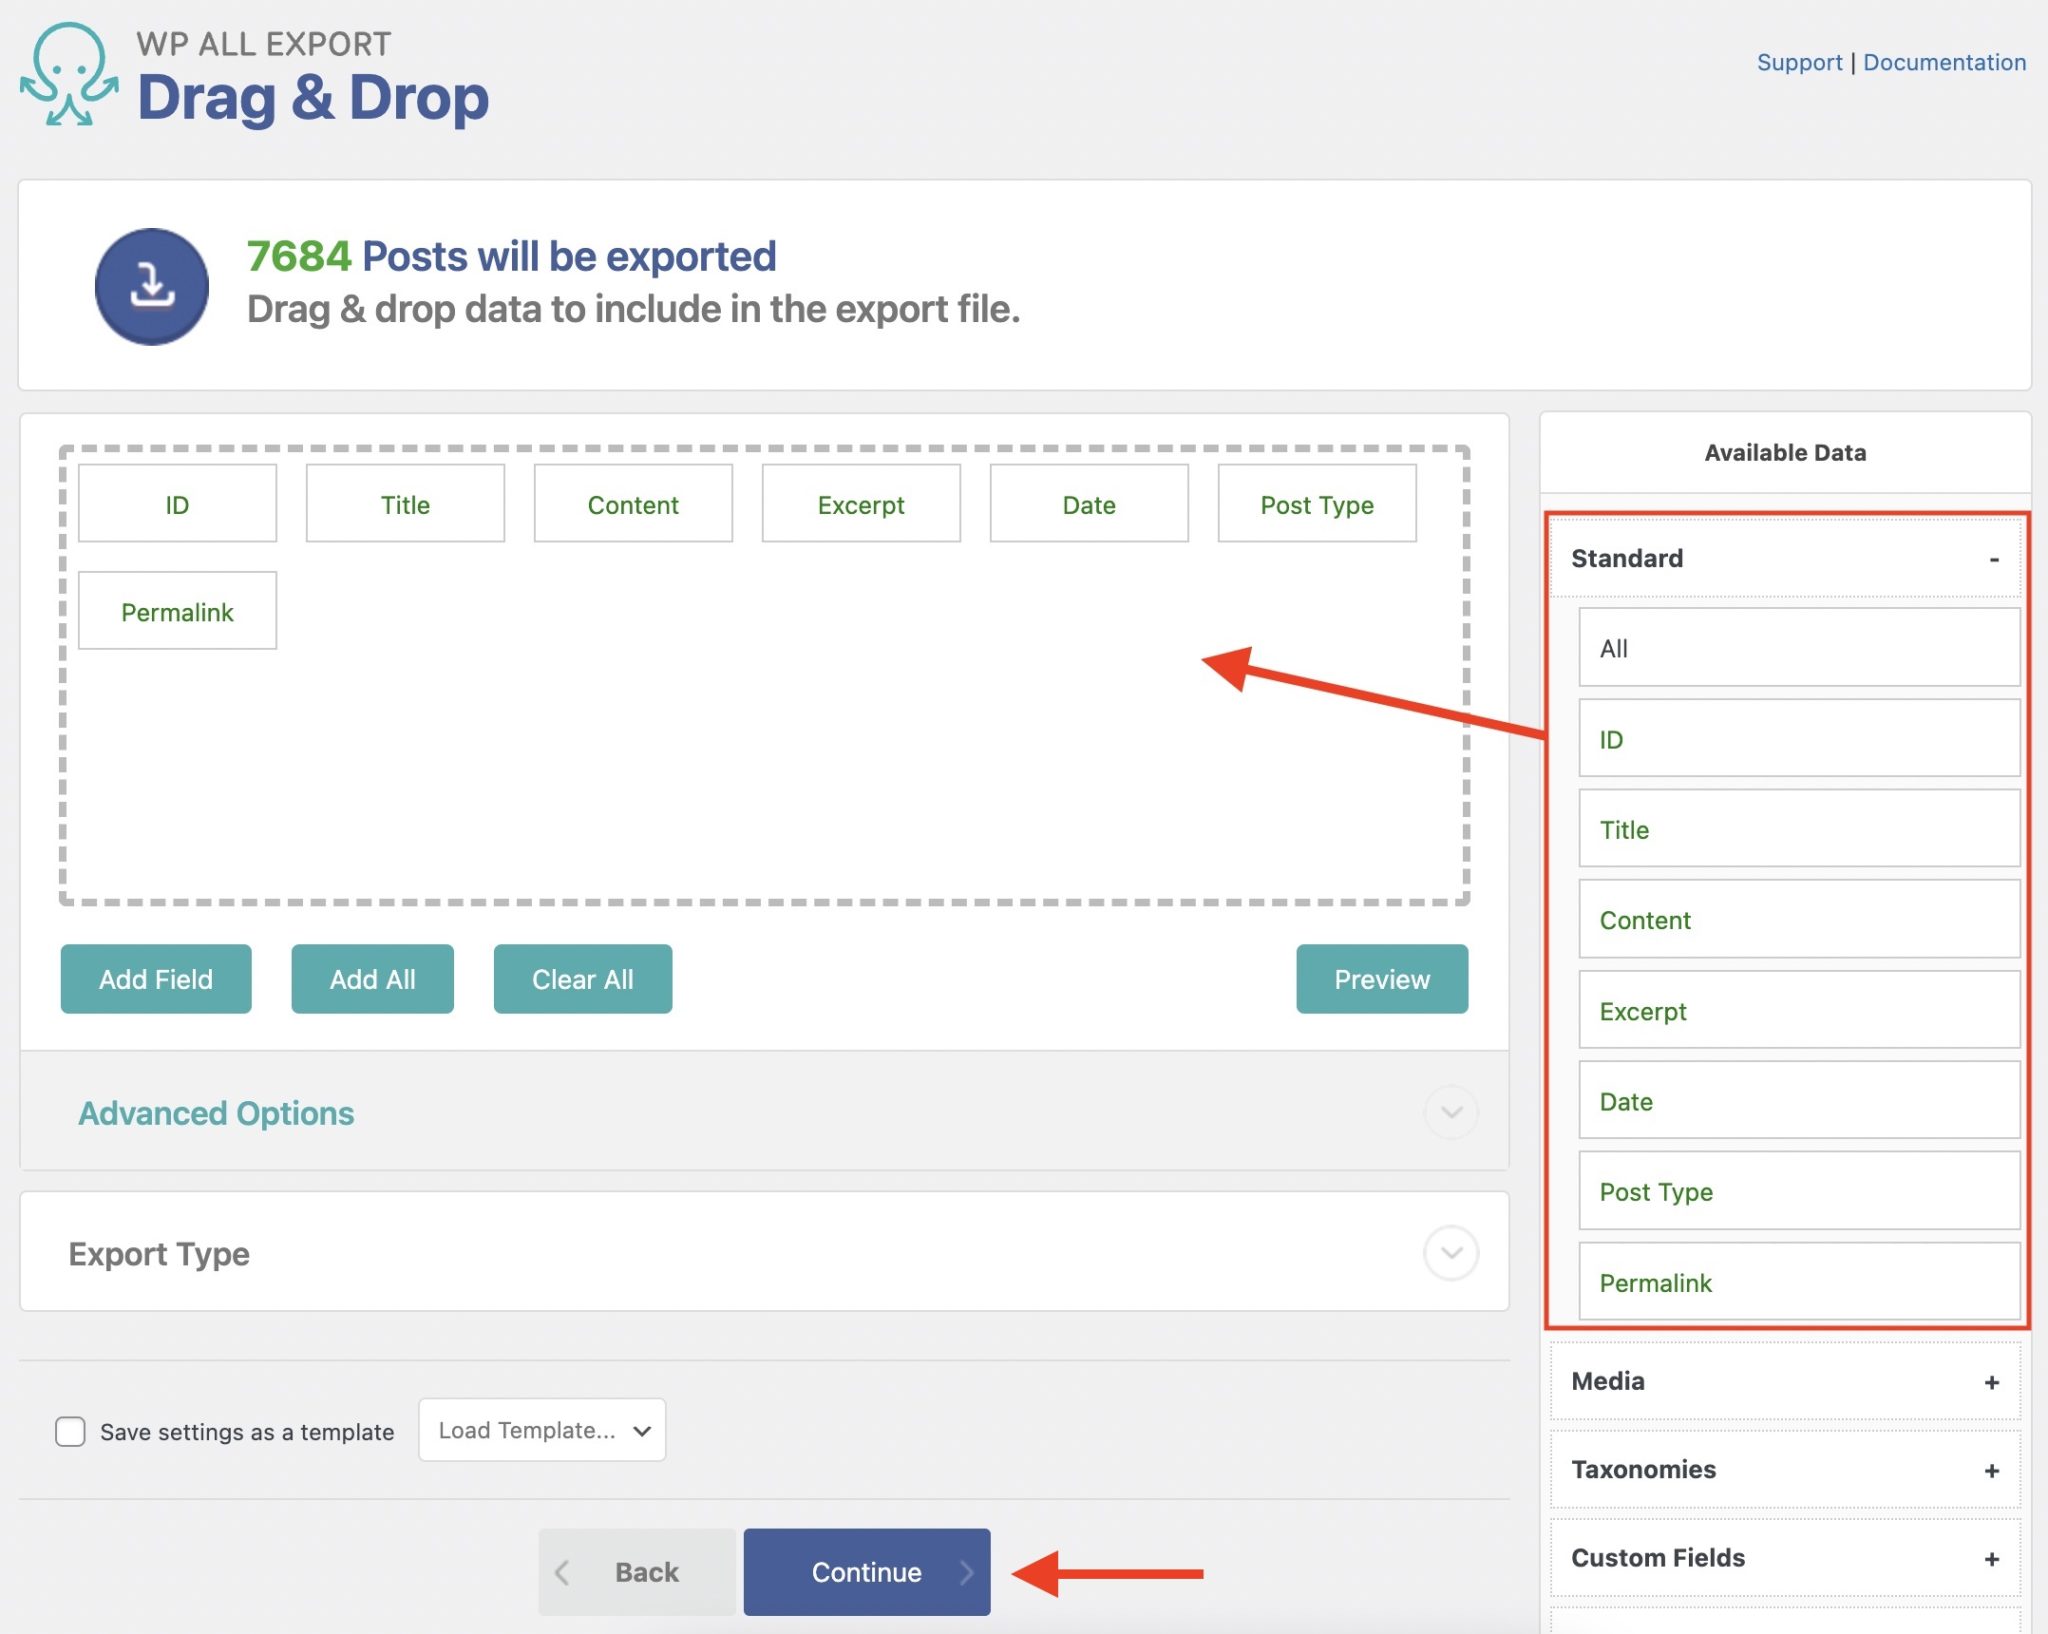
- Navigate to the plugin or feature you’re using for data import. For example, if you’re using WP All Import, go to All Import > New Import. If you’re importing products, it might be under WooCommerce > Products > Import.
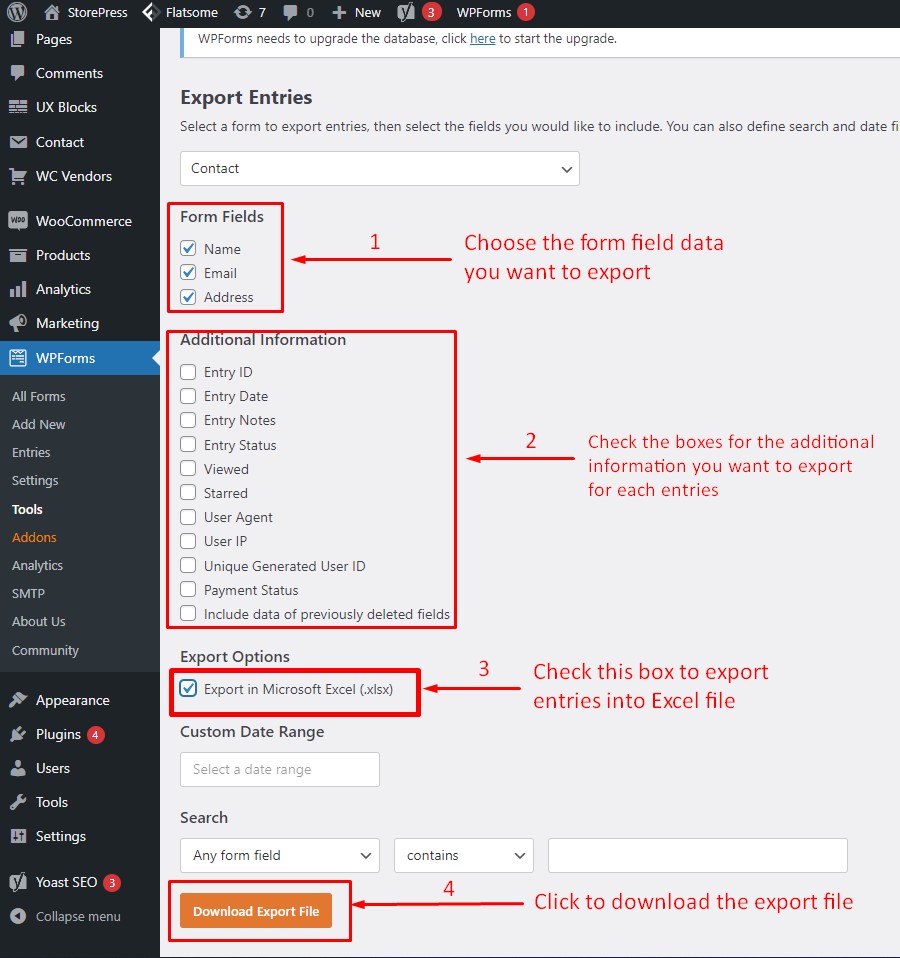
- Look for the ‘Sample Data’ or ‘Template’ option. Many plugins include a link or button labeled “Download Sample,” “Download Template,” or “Sample CSV” right within the import section.
- Check the plugin’s documentation or help section. If you can’t find the template directly, most plugins have detailed guides or FAQs that point you to where the sample file is stored or how to generate it.
- Inspect plugin folders if needed. Sometimes, the CSV templates are stored within the plugin’s directory on your server. Using an FTP client or file manager, navigate to wp-content/plugins/ and locate your specific plugin folder. Look for sample files or documentation there.
Remember, each plugin might have a slightly different way of handling templates. The key is to look for hints like “sample,” “template,” or “example” within the plugin interface or documentation. Once you find the template, you can open it in any spreadsheet program (like Excel or Google Sheets) to review its structure or customize it for your data needs.
4. How to Download or Generate the CSV Template
Now that you know where to look, the next step is actually getting your hands on that CSV template. Depending on the plugin or tool you’re using, there are generally two ways to do this: downloading an existing template or generating a new one. Let’s walk through both options.
Downloading an Existing Template
- Locate the download link. As mentioned earlier, many import plugins have a button labeled “Download Sample CSV,” “Get Template,” or something similar. Usually, this is prominently displayed during the import setup process.
- Click the download button. The file will typically be saved to your default downloads folder. It’s a good idea to rename it to something relevant (like “products_template.csv”) for easy identification later.
- Open the CSV file. Use a spreadsheet program like Microsoft Excel, Google Sheets, or LibreOffice Calc to review or modify the template before importing your data.
Generating a Custom CSV Template
If your plugin doesn’t provide a ready-made template, or if you need a template that matches your specific data fields, you might need to generate one manually. Here’s how to do it:
- Create a new spreadsheet. Open your preferred spreadsheet program and set up a new file.
- Define your headers. These are the column names that correspond to the data you want to import. For example, if you’re importing products, your headers might include SKU, Name, Description, Price, Image URL, Category.
- Format your data. Fill in some sample data under each header to ensure the structure works correctly. Remember, the CSV format is simple: comma-separated values in each row.
- Save your template. When done, save or export your spreadsheet as a CSV file. This can usually be done via the “Save As” or “Export” options in your spreadsheet program.
Pro tip: Keep your CSV template consistent. Use the same headers and data formats so that your import process goes smoothly. If you’re importing large datasets regularly, consider creating a master template that you can duplicate and fill with new data each time.
In summary, whether you’re downloading a ready-made template or creating your own, the key is clarity and consistency. Having a clean, well-structured CSV file will save you time and headaches during your data import process. Happy importing!
5. Tips for Customizing Your CSV File for Successful Import
Getting your CSV file just right is key to a smooth import process in WordPress. While it might seem a bit overwhelming at first, a few handy tips can make all the difference. Let’s walk through some practical advice to help you tailor your CSV file perfectly for a successful import.
Understand Your Data Structure. Before you start editing your CSV, take a moment to understand what data you’re working with. Are you importing products, posts, users, or custom fields? Each type has its own structure and required fields. Check your plugin or theme documentation to know what columns are essential.
Use Clear and Consistent Headers. The header row (the first row in your CSV) should clearly label each column. Stick to a consistent naming convention and avoid special characters or spaces—use underscores or camelCase if needed. For example, product_name or postTitle.
Match Your CSV Columns to WordPress Fields. Make sure your column headers match exactly what WordPress or the import plugin expects. For instance, if importing posts, headers like post_title, post_content, and post_status are common. Check your import plugin’s documentation for the exact field names.
Format Data Properly. Keep data in the correct format: dates in YYYY-MM-DD, prices as numbers, and categories as comma-separated lists if multiple. For example, 2024-05-01 for a date or Category1,Category2 for multiple categories.
Include All Required Fields. Omitting essential columns can cause the import to fail or produce incomplete data. Double-check which fields are mandatory—like title, content, or SKU—and ensure they’re filled in.
Use a Clean and Simple CSV. Remove any unnecessary formatting, formulas, or special characters. Save your file as UTF-8 encoded CSV to prevent encoding issues, especially if your data includes special characters or accents.
Test with a Small Sample First. Before importing hundreds of rows, create a small test CSV with just a few entries. This helps you catch errors early without wasting time fixing large datasets.
Following these tips can save you headaches down the line. Remember, the goal is to prepare a clean, well-structured CSV that aligns perfectly with WordPress’s expectations. That way, your data import will be quick, accurate, and hassle-free.
6. Common Issues and Troubleshooting During CSV Import
Even with the best preparation, issues can pop up during CSV import. Don’t worry—most problems are fixable once you know what to look for. Let’s explore some common issues and how to troubleshoot them effectively.
Import Fails or Errors. Sometimes, the entire import process halts with an error message. This often indicates issues like incorrect file encoding, missing required fields, or incompatible data formats.
- Check File Encoding. Ensure your CSV is saved as UTF-8 without BOM. Most spreadsheet programs allow you to select encoding when saving.
- Validate Your Data. Use a CSV validator tool or open your file in a text editor to look for irregularities or broken rows.
- Review Error Messages. Many import plugins provide error details—read them carefully to pinpoint the problem.
Missing Data or Incomplete Records. If some entries don’t appear after import, verify that all required fields were filled correctly. Sometimes, optional fields can cause issues if left blank or misformatted.
- Check for Empty Cells. Fill in missing info or remove incomplete rows from your CSV.
- Ensure Proper Formatting. For example, dates should follow the YYYY-MM-DD format, and categories should be comma-separated.
Duplicate Entries. Importing data with duplicate IDs or titles can lead to conflicts or overwriting existing content.
- Use Unique Identifiers. Consider adding a unique column, like SKU or custom ID, to avoid duplicates.
- Clean Your Data. Run checks for duplicate rows before import.
Special Characters and Encoding Problems. If your data includes accented characters or symbols, they might not display correctly after import.
- Save as UTF-8. Always export your CSV with UTF-8 encoding.
- Test Small Batches. If issues persist, try importing a small sample to identify problematic entries.
Timeouts or Server Errors. Large CSV files can sometimes cause server timeouts during import.
- Split Your CSV. Break large files into smaller chunks and import gradually.
- Increase Server Limits. If possible, ask your hosting provider to increase PHP memory limits and execution time.
Remember, troubleshooting is often a process of elimination. Take your time to review error messages, validate your data, and make small adjustments. With patience and the right approach, most CSV import issues can be resolved smoothly, getting your data into WordPress just the way you want.
Conclusion and Best Practices for Managing Data Imports in WordPress
Efficiently managing data imports in WordPress is crucial for maintaining a smooth and error-free website. By utilizing the CSV template available within your WordPress dashboard, you can streamline the process and ensure consistency across your data entries. Remember to always verify your CSV files for accuracy before importing to avoid issues such as duplicate entries or broken links.
Here are some best practices to keep in mind:
- Backup your website before initiating any bulk import to prevent data loss.
- Validate your CSV files using spreadsheet software to catch formatting errors or missing data.
- Use descriptive and consistent data to maintain clarity and facilitate future updates.
- Test import with a small dataset first to identify potential issues without affecting your entire site.
- Leverage plugins that support CSV imports, such as WP All Import, for enhanced flexibility and control.
| Step | Action |
|---|---|
| Locate the Template | Navigate to the plugin or import tool in your dashboard to find the CSV template. |
| Prepare Data | Fill in your data according to the template’s structure, ensuring accuracy and completeness. |
| Upload and Import | Upload the CSV file through the import tool, review the preview, and execute the import. |
By following these best practices, you can simplify your data management process, minimize errors, and keep your WordPress site organized and up-to-date.