So, you’ve built your WordPress site, but it’s not yet live on the internet. Maybe you’re working on a staging environment, testing new features, or fixing issues before going public. Accessing a non-live WordPress site might seem tricky at first, but don’t worry! In this guide, we’ll walk through simple ways to get to your site, whether it’s on a local server, a staging area, or behind a password. By understanding these steps, you’ll be able to review your work comfortably and ensure everything looks perfect before launching it to the world.
Understanding Why a WordPress Site Might Not Be Live
There are several reasons why your WordPress site might not be accessible to the general public. First, it could still be in development on your local computer or a staging server. Developers often do this to test new features without affecting the live site. Second, your hosting provider might have put the site into maintenance mode or scheduled a launch date. Third, security measures like password protection are often used to restrict access during development. Lastly, DNS settings or domain configurations might not be updated yet, so your site isn’t reachable through your domain name. Understanding these reasons helps you troubleshoot effectively and ensures you’re accessing the right environment at the right time.
3. Methods to Access a WordPress Site Before It Goes Live
So, you’ve been working hard on your WordPress site, and it’s almost ready to launch. But before hitting that “Publish” button, you might want to see how everything looks and functions. Luckily, there are several ways to access your site during development, even if it’s not yet live to the public. Let’s explore some of the most common methods:
Using a Local Server Environment
This is one of the most popular options for developers and designers. You set up a local server on your computer that mimics a live web server. Tools like Local by Flywheel, XAMPP, MAMP, or WAMP let you run your WordPress site locally. Here’s what you do:
- Download and install your preferred local server tool.
- Create a new site within the tool, which sets up a local server environment.
- Install WordPress, or migrate your existing development files.
- Access your site through a local URL like http://localhost/your-site.
This method is great because it’s fast, private, and doesn’t require an internet connection once set up. Plus, you can test features without worrying about affecting your live site.
Using a Staging Environment
Many hosting providers offer staging environments—these are private, clone versions of your live site where you can make changes and test before going live. If your host provides this feature, it’s a fantastic way to see your site in an environment that closely mimics production.
- Access your hosting control panel.
- Create or access the staging site—often just a click away.
- Make your modifications and review the site privately.
Once you’re satisfied, you can push the changes from staging to live with minimal hassle. It’s like having a sandbox that’s almost identical to your real playground.
Preview with Maintenance Mode or Coming Soon Pages
While working on your site, you might want to hide it from visitors but still allow yourself or team members to view it. Plugins like SeedProd or Coming Soon & Maintenance Mode let you create a password-protected or private version of your site. You can then access it via a special link or login credentials.
This is especially useful if you’re collaborating with clients or team members who need to review progress without seeing the unfinished site publicly.
4. Accessing a Local Development Environment

If you’re serious about developing your WordPress site and want full control, setting up a local development environment is the way to go. It allows you to build, customize, and test your site on your own computer without needing an internet connection. Here’s how to get started:
Step-by-Step Setup
- Choose a local server tool: As mentioned earlier, options like Local by Flywheel, XAMPP, MAMP, or WAMP are popular choices.
- Install the software: Download and follow the installation instructions for your operating system.
- Create a new site: Use the application’s interface to set up a new WordPress site. Usually, it involves specifying a site name, admin credentials, and server details.
- Download WordPress: If you’re migrating an existing site, export the files and database from your hosting environment and import them into your local setup.
- Access your site: Once installed, access your site via a local URL, typically http://localhost:xxxx or a similar address provided by your tool.
Benefits of a Local Environment
- Speed: Local environments are faster because they’re on your machine.
- Safety: No risk of breaking a live site or exposing unfinished work to visitors.
- Control: You can experiment freely without impacting the actual site.
- Cost-effective: No hosting costs during development.
Next Steps
Once your local site is ready and you’re happy with the design and functionality, you can migrate it to a live server. But for now, enjoy the flexibility and peace of mind that comes with working locally. Remember, setting up a local environment is a one-time process that pays off by making your development smoother and more secure.
5. Using a Staging or Test Server
So, you’ve been working hard on your WordPress site and you want to make sure everything looks perfect before making it live. One of the best ways to do this is by using a staging or test server. Think of it as a safe playground where you can experiment, tweak, and troubleshoot without affecting your live site. It’s especially handy if you’re planning big changes, updates, or new features.
Setting up a staging environment might sound complicated, but many hosting providers now offer it as part of their packages. If yours does, it’s usually just a few clicks to create a copy of your site. This way, you can make all your edits in a sandbox environment, test plugins, or try out new themes without risking breaking your live site.
If your host doesn’t offer built-in staging, don’t worry! You can also set one up manually using plugins like WP Staging or Duplicator. These tools help clone your site onto a subdomain or a subdirectory, creating a safe space to work. Once you’re happy with the changes, you can push them to your live site with a few simple steps.
Here’s why using a staging site is such a smart move:
- Risk-Free Testing: You can try out new plugins, themes, or code snippets without worrying about breaking things.
- Quality Assurance: Preview how your updates will look and function in a real environment before going live.
- Collaborative Work: If you have a team, everyone can work on the staging site, review changes, and provide feedback.
Remember, once you’ve tested everything and are satisfied, you’ll want to push your changes from the staging site to your live site. Many tools make this process straightforward, keeping your website safe and your visitors happy.
6. Previewing Your WordPress Site Before Launch
Before you hit the big “Go Live” button, it’s crucial to preview your site thoroughly. Think of it as the final dress rehearsal—checking every detail to ensure your website looks professional, works smoothly, and provides a great user experience.
WordPress makes it easy to preview your site in a couple of different ways:
- Preview in the Customizer: Navigate to Appearance > Customize. Here, you can see a live preview of your site as you make changes to themes, colors, menus, widgets, and more. It’s a great way to experiment without affecting the actual live site.
- Preview Posts and Pages: When editing a post or page, simply click the Preview button. This opens a new tab showing exactly how your content will appear once published. You can review formatting, images, links, and overall layout.
But don’t just rely on these previews! Here are some additional tips to ensure your site is ready:
- Check Responsiveness: Use your browser’s developer tools or tools like Google’s Mobile-Friendly Test to see how your site looks on different devices.
- Test Functionality: Click through all links, fill out contact forms, and test any interactive elements. Make sure everything works as expected.
- Review Speed and Performance: Use tools like Google PageSpeed Insights or GTmetrix to check load times and optimize where needed.
- Proofread Content: Double-check your text for typos, grammatical errors, or broken images.
- Gather Feedback: If possible, have a trusted friend or colleague review the site on different devices and browsers. Fresh eyes can catch issues you might miss.
By taking these extra steps, you’re ensuring that your website not only looks great but also functions flawlessly for your visitors. Remember, a little extra prep work now can save you headaches later and make your launch smooth and successful!
7. Troubleshooting Common Access Issues
Getting stuck trying to access your WordPress site before it goes live can be frustrating, but don’t worry—you’re not alone, and most issues have straightforward solutions. Let’s walk through some of the most common problems and how to fix them so you can get back on track quickly.
Website Not Loading at All
If your site isn’t showing up or displays a blank page, it could be due to server issues, plugin conflicts, or errors in your theme. First, try accessing your site from a different device or browser to rule out local issues. If it’s still not loading:
- Check your hosting provider’s status page for outages.
- Use FTP or your hosting file manager to disable plugins by renaming the plugins folder temporarily.
- Switch to a default WordPress theme like Twenty Twenty-Three to see if your theme is causing the problem.
- Enable debugging mode in wp-config.php by adding define(‘WP_DEBUG’, true); to see error messages that can guide you further.
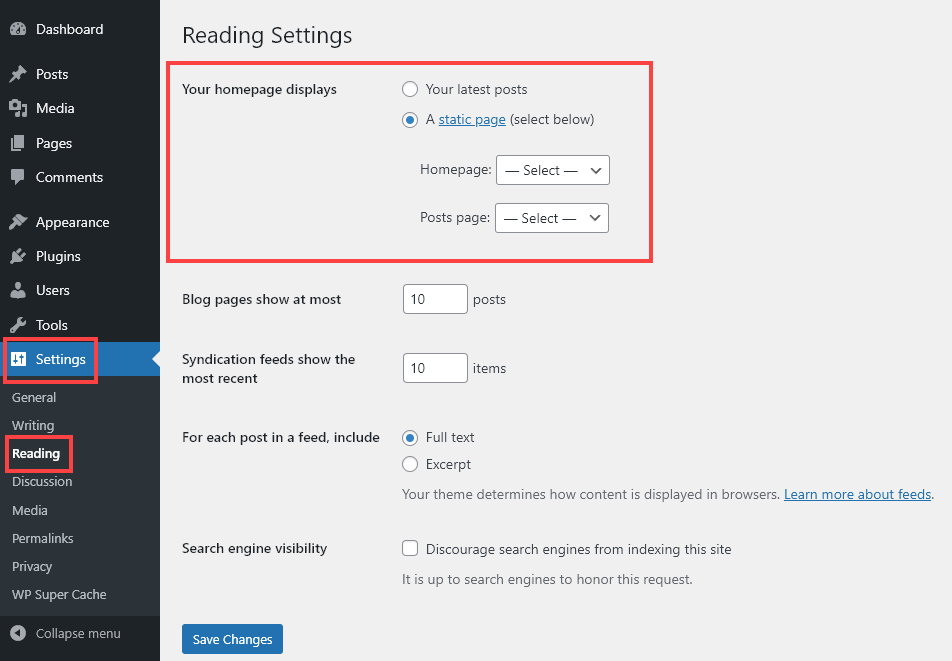
404 Errors or Page Not Found
This usually indicates a permalink or URL issue. To fix it:
- Go to your WordPress dashboard, then Settings > Permalinks.
- Click Save Changes to refresh your permalink structure.
- If that doesn’t work, check your site’s .htaccess file for proper rewrite rules.
Login Problems
If you can’t log in:
- Try resetting your password using the Lost your password? link.
- If that fails, access your database via phpMyAdmin and manually reset the password in the wp_users table.
- Clear your browser cache and cookies in case of session issues.
Access Restrictions or White Screen
If you encounter a white screen or access is restricted, it might be due to PHP errors or security plugins. To troubleshoot:
- Enable debugging mode (as mentioned above) to identify errors.
- Disable security plugins temporarily to see if they’re blocking access.
- Check error logs on your hosting control panel for clues.
Remember, patience is key! Most issues can be resolved with a little digging, and if you’re stuck, your hosting provider’s support team can often help troubleshoot server-related problems. Keeping regular backups before making changes is always a smart idea, so you can restore your site if something goes wrong.
8. Best Practices for Managing Your WordPress Site Before Going Live
Before you officially launch your WordPress site, it’s essential to tidy up and prepare everything to ensure a smooth launch and a positive experience for your visitors. Here are some best practices to keep in mind:
1. Secure Your Site
Security should be a priority from day one. Use a security plugin like Wordfence or Sucuri Security to scan for vulnerabilities. Also:
- Change default login URLs if possible.
- Use strong, unique passwords for all user accounts.
- Enable two-factor authentication if your hosting provider or plugins support it.
2. Optimize Performance
A fast-loading site improves user experience and SEO rankings. To optimize:
- Compress and optimize images using tools like TinyPNG or Smush.
- Implement caching with plugins like W3 Total Cache or WP Rocket.
- Minimize plugin usage—only keep essential ones active.
- Use a Content Delivery Network (CDN) to serve your content faster globally.
3. Clear Out Dummy Content
Remove placeholder posts, pages, and images that were used during development. Double-check your menus and widgets to ensure they’re set up correctly. This helps present a professional appearance right from the start.
4. Test Responsiveness and Compatibility
Preview your site on different devices—smartphones, tablets, desktops—to ensure it looks good everywhere. Use tools like BrowserStack or Chrome’s device simulator. Also, verify compatibility with various browsers like Chrome, Firefox, Safari, and Edge.
5. Set Up Essential SEO and Analytics
Install an SEO plugin like Yoast SEO or All in One SEO Pack to optimize your content for search engines. Set your permalinks, create a sitemap, and connect Google Analytics to track your visitors’ behavior from day one.
6. Implement Backup Solutions
Set up regular backups using plugins like UpdraftPlus or BackupBuddy. Test the restore process to ensure you can recover quickly if needed.
7. Final Checks and Launch Readiness
Before going live:
- Review all pages and posts for typos and errors.
- Ensure contact forms and email notifications work properly.
- Disable maintenance mode plugins or settings.
- Announce your launch on social media or via email if applicable.
- Backing up your website and database.
- Installing and configuring security plugins to protect against threats.
- Optimizing your site’s speed by caching and compressing images.
- Testing your website on different devices and browsers to ensure compatibility.
By following these best practices, you’ll set your WordPress site up for success from the very beginning. Taking the time to prepare thoroughly can save you headaches down the road and give your visitors a great first impression!
Conclusion and Next Steps for Launching Your WordPress Site
Launching a WordPress site that is currently not live can be a smooth process when you follow a clear set of steps. First, ensure that your website is fully developed, tested, and free of errors. Double-check all content, images, and functionalities to guarantee a seamless user experience. Once satisfied, you need to migrate your site from your local environment or staging server to your live hosting platform. This involves updating your domain settings, configuring DNS records, and ensuring that all URLs are correctly pointed to your new site.
Before going live, it’s crucial to perform essential preparations such as:
Additionally, consider setting up analytics tools like Google Analytics to monitor your site’s traffic post-launch. Remember to update your sitemap and submit it to search engines to facilitate indexing. After launching, continuously monitor your site’s performance and user feedback to make ongoing improvements.
In summary, moving your WordPress site from a non-live environment to a live setting requires careful planning and execution. Follow these next steps diligently to ensure a successful launch and a strong start for your website’s public presence.