If you’ve ever tried to upload a large image or a high-quality video to your WordPress site and hit a wall with a file size error, you’re not alone. The WordPress Media Library is a fantastic feature that helps you manage all your images, videos, and other media files easily. But there’s a catch: your hosting environment imposes a maximum upload size limit. Understanding this limit is essential so you can optimize your media uploads without frustration. Whether you’re a blogger, small business owner, or developer, knowing how large your files can be uploaded is the first step to managing your content smoothly.
Factors Influencing the Maximum Upload Size in WordPress
The maximum upload size in WordPress is not set arbitrarily; it depends on several key factors. Let’s break down what influences this limit so you can better understand how to increase it if needed:
- Server Configuration: Your hosting server plays a big role. Web servers like Apache or Nginx have default settings that limit upload sizes. These are often set in configuration files such as
php.ini,httpd.conf, or.htaccess. - PHP Settings: Since WordPress runs on PHP, the PHP configuration determines upload limits using directives like
upload_max_filesize,post_max_size, andmax_execution_time. If these are set low, your uploads will be limited accordingly. - Hosting Environment: Shared hosting plans tend to have stricter limits compared to dedicated or VPS hosting. Some hosts restrict maximum upload sizes to conserve server resources or for security reasons.
- WordPress Settings: While WordPress itself doesn’t set a maximum upload size, it displays the limit based on server settings. Certain plugins or themes can also influence this, but they can’t override server restrictions.
- File Size of Media: Naturally, larger media files like HD videos or high-resolution images will hit the limit faster. It’s important to optimize your media files beforehand to ensure smooth uploads.
To find out your current maximum upload size, you can navigate to your WordPress dashboard, go to Media > Add New, and see the upload limit displayed at the bottom. Alternatively, using a plugin like WP Maximum Upload File Size can give you detailed info and options to increase the limit.
In summary, the maximum upload size is determined by a combination of your server’s PHP configuration, hosting environment, and WordPress settings. If your media files are larger than the current limit, don’t worry—there are ways to increase it, which we’ll explore in future posts!
3. Default Upload Size Limits in WordPress
When you’re diving into your WordPress site and trying to upload images, videos, or other media files, it’s important to know that WordPress has some built-in restrictions. These limits are primarily set by your hosting environment and can vary quite a bit from one provider to another.
By default, most WordPress setups tend to have an upload size limit somewhere between 2MB to 8MB. This means if you’re trying to upload a high-resolution photo, a lengthy video, or a large ZIP file, you might run into a roadblock that says, “File size exceeds the maximum allowed.” That can be frustrating, especially if you’re not aware of what the limit actually is.
So, what determines this default limit? Well, it mostly depends on your web hosting provider and the server configuration. Some hosts set generous limits to accommodate larger media files, while others keep it tighter to conserve resources. Additionally, PHP settings like upload_max_filesize and post_max_size play a huge role here. If these are set low, they cap the maximum upload size regardless of what WordPress itself might allow.
Here are some common default limits you might encounter:
- Shared Hosting: Often around 2MB to 4MB
- Managed WordPress Hosting: Usually higher, around 8MB or more
- Local Development Environments: Can be configured to be very low or very high, depending on setup
It’s good to keep this in mind because if you’re trying to upload a file larger than the default limit, you’ll need to take some steps to increase it. But first, let’s see how you can determine exactly what your current upload size limit is.
4. How to Check Your Current Upload Size Limit
Knowing your current upload size limit is the first step toward managing or increasing it. Luckily, WordPress offers a simple way to check this without diving into server files or configuration files.
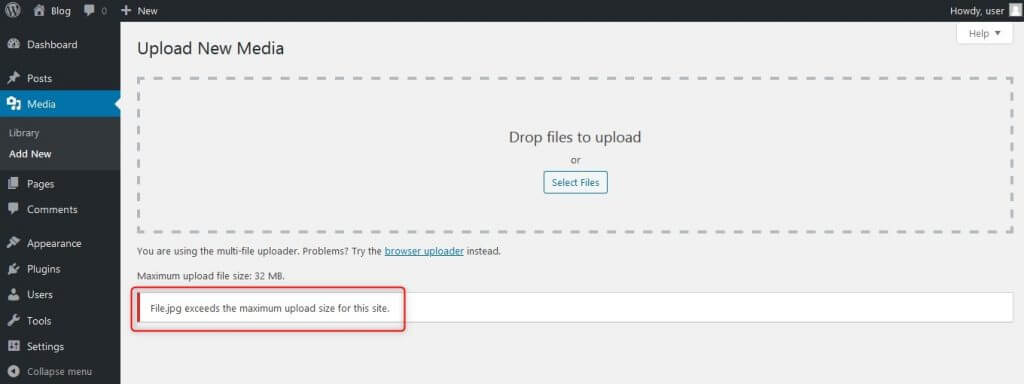
One of the easiest methods is to go to your WordPress dashboard and navigate to the Media Library. When you try to add a new file, you’ll see the upload area. Sometimes, the upload box might display the maximum upload size directly, but often it doesn’t.
To get a definitive answer, you can use the following methods:
Method 1: Using the ‘Media’ Upload Page
- Go to Media > Add New in your WordPress dashboard.
- Look for the message below the upload area that states the maximum upload file size. It might say something like, “Maximum upload file size: 8 MB.”
Method 2: Using a Plugin
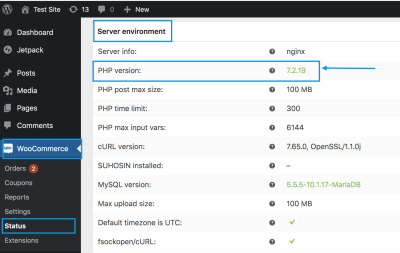
If the message isn’t clear or you want a more detailed overview, several plugins can display your PHP configuration details. One popular option is the Site Health feature in WordPress:
- Navigate to Tools > Site Health.
- Click on the Status tab.
- Scroll down to the Server section, where you’ll find details about PHP limits, including upload_max_filesize and post_max_size.
Method 3: Creating a PHP Info Page
If you’re comfortable with a bit of technical work, creating a PHP info file can give you comprehensive details about your server settings:
- Create a new file named phpinfo.php in your website root directory.
- Add the following code:
- Access this file via your browser (e.g., www.yoursite.com/phpinfo.php).
- Search for upload_max_filesize and post_max_size to see their current values.
<?php phpinfo(); ?>
Once you know where your limits stand, you can decide whether you need to take steps to increase your upload size. In the next section, we’ll discuss some common methods to raise this limit, ensuring you can upload those large media files without a hitch.
5. Methods to Increase the Maximum Upload Size in WordPress
So, you’ve hit the upload limit in WordPress and want to add those big images or videos? No worries! There are several ways to bump up the maximum file size limit, and I’ll walk you through some of the most effective methods.
1. Modify the php.ini File
This is one of the most direct ways, but it requires access to your server’s core files. If you have hosting that allows you to edit php.ini, you can add or update these lines:
upload_max_filesize = 64Mpost_max_size = 64Mmax_execution_time = 300
Just replace the values with whatever size you need. If you’re unsure where to find php.ini, your hosting provider’s support can usually point you in the right direction or do it for you.
2. Edit the .htaccess File
If your server uses Apache and allows overrides via .htaccess, you can add these lines to increase limits:
php_value upload_max_filesize 64Mphp_value post_max_size 64Mphp_value max_execution_time 300php_value max_input_time 300
This method is quick and effective but be careful—incorrect syntax can cause your site to break. Always back up the file before editing!
3. Use a Plugin
If tinkering with server files isn’t your thing, there are plenty of WordPress plugins designed to help you increase upload limits without touching code. Some popular options include:
- WP Increase Upload Filesize
- Increase Max Upload Filesize
- WP Max Upload Size
Just install and activate the plugin, then follow the settings to set your desired upload limit. Easy peasy!
4. Contact Your Hosting Provider
Sometimes, hosting providers set strict limits that you can’t change yourself. If none of the above methods work, reach out to your host’s support team. They might be able to increase the limit for you or suggest alternative solutions.
Quick Tip:
Always check your current upload limit before and after making changes. You can do this by going to Media » Add New in your WordPress dashboard and looking at the upload size info, or by using a plugin that displays server info.
6. Common Issues and Troubleshooting Upload Size Errors
Encountering an error when trying to upload large files? You’re not alone, and it’s usually fixable. Here are some common issues and how to troubleshoot them:
Issue 1: Error Message “The uploaded file exceeds the maximum upload size”
This is the most common problem. It means your upload is larger than your current limit. To fix it:
- Verify your current max upload size in the media uploader or with a plugin.
- Use one of the methods discussed earlier to increase the limit.
- Clear your browser cache and try uploading again.
Issue 2: Changes Not Taking Effect
If you’ve updated php.ini or .htaccess but the limit isn’t changing:
- Clear your server cache, if applicable.
- Restart your web server (if you have access) to ensure changes are applied.
- Double-check the syntax and placement of your code.
- Use a plugin to verify the current upload limit, ensuring your changes are active.
Issue 3: Server Restrictions
Some hosts impose hard limits that can’t be overridden easily. In these cases:
- Contact your hosting provider and ask if they can increase the limit.
- Consider upgrading to a hosting plan that offers higher limits or more flexibility.
- Use external cloud storage solutions like Amazon S3 or Google Drive for large files, linking to them from your site instead of uploading directly.
Issue 4: Timeout Errors During Upload
Large files can sometimes cause your upload to timeout. To prevent this:
- Increase the PHP execution time (via php.ini or .htaccess).
- Break large files into smaller chunks if possible.
- Upload via FTP, which often handles large files better than the WordPress media uploader.
Remember, patience and a bit of troubleshooting go a long way. If you’re unsure about editing core files, don’t hesitate to ask your hosting provider for help or consider using plugins designed to manage upload sizes. Happy uploading!
7. Best Practices for Managing Large Media Files in WordPress
Handling large media files in WordPress can be a bit tricky, especially if you’re working with high-resolution images, long videos, or extensive media libraries. But don’t worry—there are several best practices that can help you manage these files efficiently without hitting upload limits or slowing down your website.
First, consider compressing your media files before uploading. Tools like TinyPNG for images or HandBrake for videos can significantly reduce file size without sacrificing quality. Smaller files mean faster uploads and less strain on your server.
Next, think about using external media hosting services. Platforms like YouTube, Vimeo, or dedicated cloud storage (Google Drive, Dropbox) allow you to embed videos or store large files externally. This way, your WordPress site stays lean, and you avoid hitting upload limits altogether.
Another tip is to organize your media library with folders or tags. Keeping things tidy not only makes it easier to find files later but can also help you identify which assets are large and might need compression or replacement.
If you’re frequently uploading large files, consider adjusting server settings or using plugins that handle large media more efficiently. Plugins like WP Offload Media can automatically offload media to cloud storage, reducing server load and avoiding size restrictions.
Finally, always keep backup copies of your original media files before compressing or modifying them. This ensures you have high-quality originals if needed in the future.
In summary, managing large media files effectively involves a combination of compression, external hosting, organization, and leveraging the right tools. By adopting these best practices, you can keep your WordPress site running smoothly and provide a better experience for your visitors.
8. Conclusion and Final Tips on Upload Size Limits in WordPress
Understanding and managing upload size limits in WordPress is essential for ensuring seamless media integration and optimal website performance. Whether you’re adding high-resolution images, videos, or extensive media collections, knowing your limits and how to work within or around them can save you a lot of headaches.
Here are some final tips to keep in mind:
- Check your current upload limit regularly via the Media Library or by creating a simple phpinfo.php file. This helps you know what you’re working with.
- Adjust server settings if needed, especially if you’re comfortable with hosting configurations. Increasing ‘upload_max_filesize’ and ‘post_max_size’ can often solve size issues.
- Use plugins wisely. Plugins like ‘Increase Max Upload Filesize’ or ‘WP Max Upload Size’ can make the process easier without editing code.
- Consider external hosting or CDN solutions for large media files to reduce server load and improve delivery speed.
- Always optimize your media before uploading—compression, resizing, and choosing the right format make a big difference.
Remember, each hosting environment is different. If you’re unsure about making server changes, consult your hosting provider’s documentation or support team—they can often help you safely increase upload limits.
In the end, understanding the limitations and best practices for media uploads in WordPress empowers you to create a richer, more engaging website without running into technical roadblocks. Keep experimenting, stay organized, and don’t hesitate to leverage external tools and services to make your media management easier and more efficient.