Have you ever filled out a form online and wished some fields could just fill themselves in? When it comes to your website, especially if you use HubSpot forms on your WordPress site, autopopulating forms with user data can save your visitors time and make their experience smoother. It not only enhances usability but also increases the chances of form submissions. In this guide, we’ll explore how you can set up your WordPress site to automatically fill HubSpot forms with data from your users—making your forms smarter and more efficient.
Understanding the Benefits of Autofill in HubSpot Forms

Autofill isn’t just a fancy feature; it’s a powerful tool that can significantly improve how users interact with your website. Here’s why implementing autofill for your HubSpot forms is a game-changer:
- Enhanced User Experience: When visitors see their information already filled in, they feel valued and save time. No more repetitive typing—just quick submissions.
- Higher Conversion Rates: Simplified forms tend to have fewer abandoned submissions. Autofill reduces friction, encouraging more users to complete forms.
- Reduced Data Entry Errors: When data is pulled directly from your user database, there’s less chance of typos or incorrect information being submitted.
- Streamlined Marketing & CRM Processes: With accurate and complete data, your marketing automation and customer relationship management become more effective.
Imagine a returning customer visiting your site—if their name, email, and contact details are automatically filled, they can focus on what truly matters: engaging with your content or making a purchase. Plus, for your team, managing leads becomes much easier when the data you collect is consistent and up-to-date. Autofill is not just a convenience; it’s a strategic enhancement that helps you deliver a better experience and grow your business.
3. Prerequisites for Setting Up Autopopulation
Before diving into the exciting world of autopopulating your HubSpot forms with WordPress user data, it’s essential to ensure you have everything in place. Think of this step as laying a solid foundation for a smooth-building process. Here’s what you need to have ready:
- Active HubSpot Account: Make sure you have a HubSpot account with access to the Marketing Hub (preferably Professional or Enterprise). This is where your forms live, and you’ll need permissions to create and edit them.
- WordPress Website with User Accounts: Your WordPress site should have user registration enabled. Users need to have profiles with data such as name, email, and any other custom fields you want to pull into your forms.
- Access to HubSpot API Key or Private App: To connect WordPress and HubSpot, you’ll need API credentials. HubSpot now encourages using Private Apps for secure integrations. Make sure you generate and copy your API key or Private App token.
- Plugin or Custom Code for Integration: There are several plugins like HubSpot for WordPress or Gravity Forms with HubSpot integrations that can simplify the process. Alternatively, if you’re comfortable with code, you can write custom functions to fetch and insert user data.
- Knowledge of Basic Web Development: A little familiarity with WordPress plugin setup, PHP, or JavaScript will go a long way, especially if you’re customizing beyond basic settings.
Once you’ve confirmed these prerequisites, you’re all set to start connecting your WordPress user data with HubSpot forms. It’s like setting up your workspace — the more prepared you are, the easier and faster the process will be!
4. Step-by-Step Guide to Connecting WordPress User Data with HubSpot Forms
Ready to make your HubSpot forms smarter? Let’s walk through the process step-by-step. This guide will help you autopopulate your forms with data from your WordPress users, making your forms more personalized and efficient.
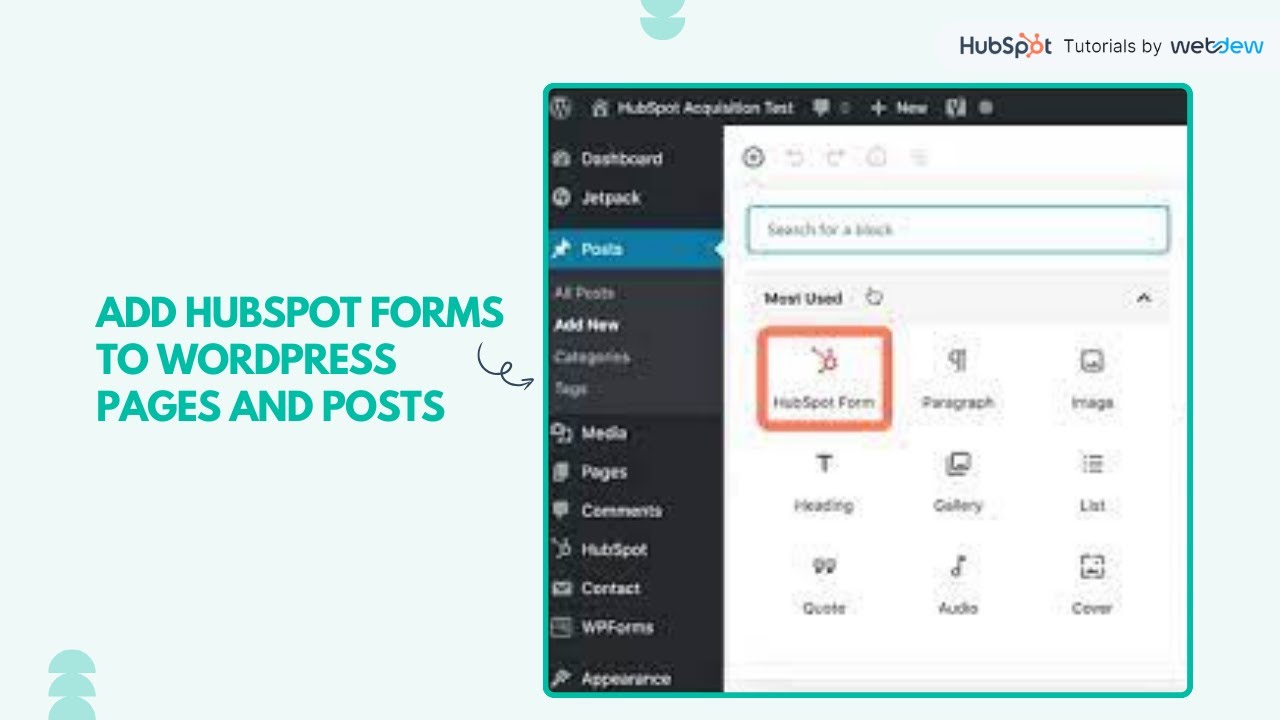
Step 1: Install and Activate the Necessary Plugins
If you prefer a plugin-based approach, consider installing HubSpot for WordPress or a form plugin like Gravity Forms with HubSpot integration add-ons. These plugins often come with built-in options to connect with HubSpot and fetch user data.
- Navigate to Plugins > Add New in your WordPress dashboard.
- Search for “HubSpot” or your preferred form plugin.
- Install and activate the plugin.
Step 2: Generate Your HubSpot API Key or Private App Token
Head over to your HubSpot account:
- Go to Settings > Integrations > API Key (or Private Apps if you’re using the latest method).
- Follow the prompts to generate a new API key or create a Private App with the necessary permissions.
- Copy this key/token — you’ll need it to connect your WordPress site.
Step 3: Connect Your WordPress Site to HubSpot
Using your plugin or custom code, input the API key or Private App token:
- In your plugin settings, locate the HubSpot connection section.
- Paste the API key or token into the designated field.
- Save your settings and verify the connection — most plugins will confirm successful integration.
Step 4: Map WordPress User Data to HubSpot Forms
This is where the magic happens. You want to tell your form to pre-fill fields with data from the logged-in user:
- In your form builder, look for options like Default Values or Pre-Fill Data.
- Use shortcodes or PHP snippets to pull data from the current user session. For example:
<input type="text" name="firstname" value="<?php echo wp_get_current_user()->user_firstname; ?>">If you’re using a plugin with a GUI, there’s often a way to select Current User Data from dropdowns or options.
Step 5: Automate and Test Your Setup
Once everything is connected and mapped:
- Log in as a user on your WordPress site.
- Navigate to the page with your HubSpot form.
- Check if the fields are autopopulated with your user data.
If it’s working, congratulations! Your forms are now smarter and more user-friendly. If not, double-check your API connection and field mappings.
Bonus Tip:
For more advanced setups, consider using custom PHP snippets in your theme’s functions.php file or a site-specific plugin to dynamically fill form fields based on logged-in user data. This approach gives you maximum flexibility, especially if you want to include custom user meta fields.
And that’s it! With these steps, your WordPress and HubSpot integration will be humming along, providing personalized experiences and capturing leads more effectively. Happy automating!
5. Using Plugins and Custom Code for Seamless Integration
Alright, so you’re probably wondering how to make this whole autopopulation thing as smooth as possible. Luckily, there are a couple of great ways to do this—either by leveraging plugins or by adding some custom code. Let’s break it down so you can pick the method that suits your skill level and website setup.
Using Plugins
If you’re not super comfortable with coding, plugins are your best friends. There are several WordPress plugins designed to help with form integrations and user data handling. For example:
- HubSpot All-In-One Marketing – Forms, Popups, Live Chat: This plugin seamlessly connects your WordPress site with HubSpot, allowing you to embed forms that can be pre-filled with user data.
- WPForms: With its HubSpot addon, you can map form fields to HubSpot properties and even set default values based on logged-in user data.
- Gravity Forms: Though a premium plugin, it offers hooks and add-ons to integrate with HubSpot and customize form data dynamically.
Using these plugins generally involves installing them, connecting your HubSpot account, and configuring the form fields to pull data from the logged-in user. Many of these plugins support “pre-fill” options or custom hooks that make autopopulation straightforward without writing a line of code.
Custom Code Approach
If you want more control or want to avoid relying heavily on plugins, custom code is your go-to. Here’s a quick overview of how you can do it:
- Hook into WordPress User Data: Use WordPress functions like
wp_get_current_user()to retrieve details such as name, email, or custom profile fields. - Pass Data to Your HubSpot Form: Use JavaScript to dynamically set the form’s input values when the page loads. For example, you can output user data into data attributes or inline JavaScript variables.
- Pre-fill the HubSpot Form: HubSpot forms support pre-population via URL parameters or JavaScript API. Use the
hbspt.forms.createmethod’s onFormReady callback to set field values programmatically.
Here’s a simplified example snippet to give you an idea:
<script> document.addEventListener('DOMContentLoaded', function() { // Assume user data is available via PHP variables var userName = 'display_name ); ?>'; var userEmail = 'user_email ); ?>'; // Initialize HubSpot form hbspt.forms.create({ portalId: 'your_portal_id', formId: 'your_form_id', onFormReady: function($form) { // Set the form fields $form.find('input[name="name"]').val(userName); $form.find('input[name="email"]').val(userEmail); } }); });</script>This approach requires some familiarity with PHP, JavaScript, and how HubSpot forms are embedded, but it offers maximum flexibility to tailor the autopopulation exactly how you want.
Whether you choose plugins or custom code, the key is testing thoroughly to ensure data flows smoothly from WordPress user profiles into your HubSpot forms without missing a beat. Now, let’s talk about how to verify everything is working as it should!
6. Testing and Troubleshooting the Autopopulation Process
Once you’ve set up your autopopulation method—be it through a plugin or custom code—testing is essential. You want to make sure that your forms are actually pre-filling with the correct user data before you start collecting leads or conversions. Here’s a simple checklist to guide you through testing and troubleshooting:
Step 1: Test with a Logged-In User
- Log in to your WordPress site with a test user account that has known data (name, email, etc.).
- Navigate to the page containing your HubSpot form.
- Check if the form fields are pre-filled with your user data.
If the data appears correctly, you’re on the right track! If not, proceed to the next steps.
Step 2: Check Console for Errors
Open your browser’s developer tools (usually F12 or right-click > Inspect) and look at the Console tab for any JavaScript errors. Errors here can indicate issues with the code or plugin conflicts.
Step 3: Verify Data Passing
Use your browser’s element inspector to verify whether the user data variables are correctly outputted into your scripts. If variables are blank or incorrect, double-check your PHP code or plugin settings.
Step 4: Review HubSpot Form Settings
Ensure that your HubSpot form has the correct field mappings and that pre-population is enabled. Sometimes, HubSpot forms require specific settings to allow pre-filled data.
Step 5: Test Different User Accounts
Test with multiple user accounts to confirm consistent autopopulation across different user profiles. This can help identify if the problem is specific to certain data or accounts.
Troubleshooting Tips:
- Clear caches: If you’re using caching plugins or CDN services, clear caches after making changes.
- Disable conflicting plugins: Temporarily disable other plugins that might interfere with JavaScript or form scripts.
- Check roles and permissions: Make sure the logged-in user has access to the necessary data.
- Consult documentation: Review HubSpot’s form pre-fill documentation and your plugin’s support resources for specific guidance.
Remember, patience is key! Debugging form integration issues can sometimes be a bit tricky, but with systematic testing, you’ll pinpoint the problem and get your autopopulation working seamlessly. Once everything is tested and working, you’ll save time and provide a better experience for your users, making your marketing efforts much more effective.
7. Best Practices for Maintaining Data Privacy and Compliance
When it comes to autopopulating your HubSpot forms with WordPress user data, one of the most critical aspects is ensuring you’re handling that information responsibly. Privacy laws like GDPR, CCPA, and others are in place to protect user data, and neglecting them can lead to hefty fines and damaged reputation. So, let’s talk about some best practices to keep your data privacy game strong.
First and foremost, always get explicit consent. Before auto-filling any user data, make sure your users are aware of how their information will be used. You can do this by including a clear privacy notice on your forms or during the sign-up process. For example, a simple checkbox that says, “I agree to the privacy policy,” not only builds trust but also ensures compliance.
Second, minimize data collection. Only autopopulate fields that are absolutely necessary for your purpose. If you’re just looking to personalize the experience or prefill contact info, avoid pulling unnecessary data like sensitive details unless required. Less data means less risk.
Third, implement secure data handling practices. When transferring user data from WordPress to HubSpot, use secure protocols like HTTPS. Ensure your website and plugins are up to date to prevent vulnerabilities. If you’re storing any user data locally, encrypt it at rest.
Fourth, give users control over their data. Allow them to update, delete, or opt-out of data collection whenever they wish. For example, include a link to their profile or preferences page, and make sure your forms support editing or unsubscribing options.
| Best Practice | Description |
|---|---|
| Obtain Explicit Consent | Use checkboxes or notices to inform users about data collection and get their agreement. |
| Limit Data Collection | Only autopopulate necessary fields to reduce risk and comply with regulations. |
| Secure Data Transmission | Use HTTPS and keep plugins updated for secure data transfer. |
| Allow Data Control | Provide options for users to update or delete their data easily. |
Remember, maintaining transparency and respecting user privacy isn’t just a legal obligation—it’s good business. When your users trust that their data is handled responsibly, they’re more likely to engage with your brand and become loyal customers.
8. Additional Tips for Enhancing Your HubSpot Forms with WordPress Data
Now that you understand the importance of privacy, let’s explore some extra tips to make your HubSpot forms even more effective by leveraging WordPress user data.
Personalize the user experience. Use the data you already have to prefill forms, making it faster and easier for users to complete their submissions. For example, if a user is logged in, autopopulate their name, email, and company details. This not only saves time but also reduces friction, leading to higher conversion rates.
Leverage conditional logic. HubSpot forms support field logic, so you can show or hide questions based on the user’s previous answers. Combine this with prefilled data to tailor the form dynamically. For instance, if a logged-in user has indicated they’re interested in a specific product category, you can show relevant follow-up questions.
Automate follow-ups and personalized content. Use the data you collect to segment users within HubSpot. Based on their WordPress profile info, you can send targeted emails, recommend products, or customize landing pages. This integration makes your marketing efforts more relevant and effective.
Optimize form design and placement. Make sure your forms are visually appealing and strategically placed. Embedding them on high-traffic pages or using pop-ups with prefilled data can boost engagement. Also, keep forms concise—only ask for what’s necessary to avoid drop-offs.
Test and monitor your forms regularly. Run A/B tests on form layouts, copy, and prefill strategies to see what resonates best with your audience. Use analytics to track form completion rates and identify any friction points.
Finally, consider integrating additional plugins or tools that enhance your form capabilities. For example, using a plugin that syncs WordPress user metadata with HubSpot in real-time can streamline the process and reduce manual work.
By applying these tips, you’ll not only improve the efficiency of your forms but also create a smoother, more personalized experience for your users. Remember, the goal is to build trust and provide value—using data intelligently and responsibly is key to achieving that.
Conclusion and Next Steps for Optimizing Your Forms
Optimizing your HubSpot forms with WordPress user data can significantly enhance user experience and increase conversion rates. By automatically populating form fields, you reduce friction, save time for your visitors, and gather more accurate information. To achieve the best results, ensure your integration is correctly set up, and regularly review form analytics to identify areas for improvement.
Next steps to further refine your forms include:
- Implementing conditional logic: Show or hide fields based on user responses to streamline the form.
- Testing your forms: Use A/B testing to compare different versions and determine which performs best.
- Enhancing data accuracy: Validate form inputs and set up auto-fill options where applicable.
- Utilizing analytics: Monitor form engagement metrics within HubSpot to understand user behavior.
- Integrating with other tools: Connect your forms to email marketing, CRM, or automation platforms for seamless workflows.
| Action | Benefit |
|---|---|
| Regularly review form analytics | Identify drop-off points and improve form design |
| Test different form layouts and fields | Increase user engagement and completion rates |
| Automate data population | Save user time and ensure data consistency |
By continuously optimizing your forms and leveraging user data effectively, you can create a more personalized and efficient experience for your visitors, resulting in higher conversions and better customer relationships.