Thinking about trying out WordPress without messing with your live website? Setting up a virtual environment is the perfect way to experiment safely, whether you’re a developer, designer, or just a curious user. And with PHP 7, you get a faster, more secure, and more efficient platform to run your WordPress site. In this guide, we’ll walk through everything you need to know to create a virtual
Prerequisites for Setting Up a Virtual WordPress Environment
Before diving into the setup process, you’ll want to make sure you have a few essentials in place. Think of these as your toolkit for building a smooth and hassle-free virtual WordPress environment:
- A Computer with Compatible Hardware – Whether you’re on Windows, macOS, or Linux, ensure your machine has enough resources. At least 4GB RAM and a decent processor will make your setup smoother.
- Virtualization Software – You’ll need a program to create virtual machines or containers. Popular options include:
- VirtualBox (free and open-source)
- VMware Workstation Player (free for personal use)
- Docker (if you prefer containerization)
- Operating System Knowledge – Basic understanding of your OS’s command line or terminal commands will help you troubleshoot and customize your setup.
- Download Necessary Software – This includes:
- PHP 7.x – The core scripting language for WordPress.
- MySQL or MariaDB – The database system for storing your site data.
- Web Server – Apache or Nginx to serve your WordPress site.
- WordPress Files – You can download the latest version from the official WordPress.org site.
- Text Editor – Tools like VS Code, Sublime Text, or Notepad++ to edit configuration files and code.
Having these basics ready will make your virtual setup process much smoother and more enjoyable. Don’t worry if you’re new to some of these tools; many tutorials and community forums are available to help you along the way. Now, let’s get everything set up and start building your virtual WordPress playground!
3. Installing and Configuring a Virtual Machine
Alright, so you’re ready to get your virtual WordPress environment up and running? The first big step is setting up a virtual machine (VM). Think of a VM as a computer inside your computer—it’s a safe, flexible space where you can install WordPress, PHP, and all the other stuff without messing up your main system.
There are a few popular tools to create VMs, but two of the most beginner-friendly options are VirtualBox and VMware Workstation Player. Both are free and work well across Windows, Mac, and Linux.
Getting Started with VirtualBox
- Download VirtualBox: Head over to the VirtualBox website and download the latest version for your OS.
- Create a New Virtual Machine: Open VirtualBox, click “New,” give your VM a name like “WP-Dev-Env,” choose Linux as the type, and select Ubuntu (or your preferred distro) as the version.
- Allocate Resources: Set your RAM (at least 2GB recommended) and create a virtual hard disk (20GB or more is good for WordPress).
- Install the OS: Download an ISO image of your favorite Linux distro (Ubuntu is popular and beginner-friendly). Mount the ISO in VirtualBox and start the VM. Follow the OS installation prompts just like you would on a real machine.
Configuring Your Virtual Machine
Once your OS is installed, it’s a good idea to tweak a few settings:
- Network Settings: Set the network to “Bridged Adapter” or “NAT” depending on your needs. Bridged allows your VM to be on the same network as your host, making it easier to access.
- Shared Folders: You can set up shared folders so your host machine and VM can easily share files—great for editing code without copying files back and forth.
- Install Guest Additions: For better graphics, mouse integration, and shared clipboard, install VirtualBox Guest Additions inside the VM.
With your VM set up and running, you’re now ready to install your web server, PHP, and WordPress. This isolated environment ensures you can experiment freely without risking your main system—perfect for learning and testing.
4. Installing PHP 7 and Necessary Extensions
Now that your virtual machine is ready, it’s time to install PHP 7. Since WordPress and many plugins rely on PHP, having the correct version and extensions installed is crucial. Let’s walk through the process step-by-step.
Installing PHP 7
If you’re using Ubuntu (or a similar Debian-based distro), open your terminal inside the VM and follow these commands:
sudo apt updatesudo apt install php7.4Note: Replace php7.4 with your preferred PHP 7 version if necessary. Some distros might have slightly different package names, but generally, php7.x works.
After installation, verify the PHP version:
php -vThis should output something like:
PHP 7.4.3 (cli) ...Installing Necessary PHP Extensions
WordPress and many plugins depend on specific PHP extensions. Here are some of the most common ones you’ll want to install:
| Extension | Description |
|---|---|
| php7.4-mysql | Enables MySQL database connectivity, essential for WordPress. |
| php7.4-xml | Provides XML parsing capabilities, used by many plugins. |
| php7.4-gd | Graphics library required for image processing. |
| php7.4-curl | Allows PHP to communicate over HTTP, necessary for many features. |
| php7.4-mbstring | Multibyte string functions, important for internationalization. |
| php7.4-zip | Supports ZIP file handling, used for plugin and theme packaging. |
To install all these extensions at once, run:
sudo apt install php7.4-mysql php7.4-xml php7.4-gd php7.4-curl php7.4-mbstring php7.4-zipAfter installation, remember to restart your web server (like Apache or Nginx). For example, if you’re using Apache:
sudo systemctl restart apache2And that’s it! Your PHP environment is now ready to support WordPress on your virtual machine. With PHP 7 and the right extensions installed, you’re all set to install WordPress and start building your site in a safe, controlled environment.
5. Setting Up a Web Server for WordPress
Alright, so you’ve got your PHP environment ready. The next step is to set up a web server that will serve your WordPress site. Don’t worry, this part is pretty straightforward, and I’ll guide you through it step by step.
Most people choose between Apache and Nginx for their web servers—they’re the most popular and well-supported options. For beginners, Apache is often easier to configure, so let’s start with that.
Installing Apache
If you’re on a Linux system like Ubuntu, installing Apache is as simple as running:
sudo apt updatesudo apt install apache2For Windows, you might want to consider using tools like XAMPP, which packages Apache, PHP, and MySQL together, making setup smoother.
Configuring Apache for WordPress
Once installed, you’ll need to configure your web server to serve your WordPress files. Here’s a quick rundown:
- Place your WordPress files in the web root directory. On Ubuntu, that’s typically /var/www/html/.
- Create a new configuration file or modify the default to set up your site. For example, create a file called your-site.conf in /etc/apache2/sites-available/:
<VirtualHost :80> ServerName yourlocal.dev DocumentRoot /path/to/your/wordpress <Directory /path/to/your/wordpress> Options Indexes FollowSymLinks AllowOverride All Require all granted </Directory> ErrorLog ${APACHE_LOG_DIR}/your-site-error.log CustomLog ${APACHE_LOG_DIR}/your-site-access.log combined</VirtualHost>- Enable the site and rewrite module:
sudo a2ensite your-site.confsudo a2enmod rewritesudo systemctl restart apache2This setup allows you to access your WordPress site via http://yourlocal.dev (you’ll need to update your hosts file to point that to 127.0.0.1).
Note for Nginx Users
If you’re more comfortable with Nginx, the process is similar but uses server blocks. You define server configurations in /etc/nginx/sites-available/ and link them to /etc/nginx/sites-enabled/. The key is to set up the root directory and enable URL rewriting for permalinks.
Summary
In essence:
- Install your preferred web server (Apache or Nginx).
- Configure the server to point to your WordPress directory.
- Ensure URL rewriting is enabled for pretty permalinks.
- Test your setup by navigating to your local domain.
And voilà—your local web server is ready to serve your WordPress site! Now, onto the next crucial step: setting up the database.
6. Configuring Database for WordPress
Before you can start installing WordPress, you need a database where all your content, settings, and plugins will live. Setting up a database might sound intimidating, but it’s actually quite straightforward, especially if you’re using tools like MySQL or MariaDB.
Installing MySQL or MariaDB
If you haven’t installed a database server yet, here’s how to do it on Ubuntu:
sudo apt updatesudo apt install mysql-serverFor Windows, XAMPP or WAMP packages include MySQL/MariaDB, so you can install those and skip the command line steps.
Creating a New Database and User
Once your database server is running, you’ll want to create a dedicated database for your WordPress site, along with a user that has permissions to access it. Here’s a quick example:
sudo mysql -u root -pEnter your MySQL root password, then run these commands:
CREATE DATABASE wordpress_db DEFAULT CHARACTER SET utf8mb4 COLLATE utf8mb4_unicode_ci;CREATE USER 'wp_user'@'localhost' IDENTIFIED BY 'your_password';GRANT ALL PRIVILEGES ON wordpress_db. TO 'wp_user'@'localhost';FLUSH PRIVILEGES;EXIT;Replace wordpress_db, wp_user, and your_password with your preferred database name, username, and password.
Configuring wp-config.php
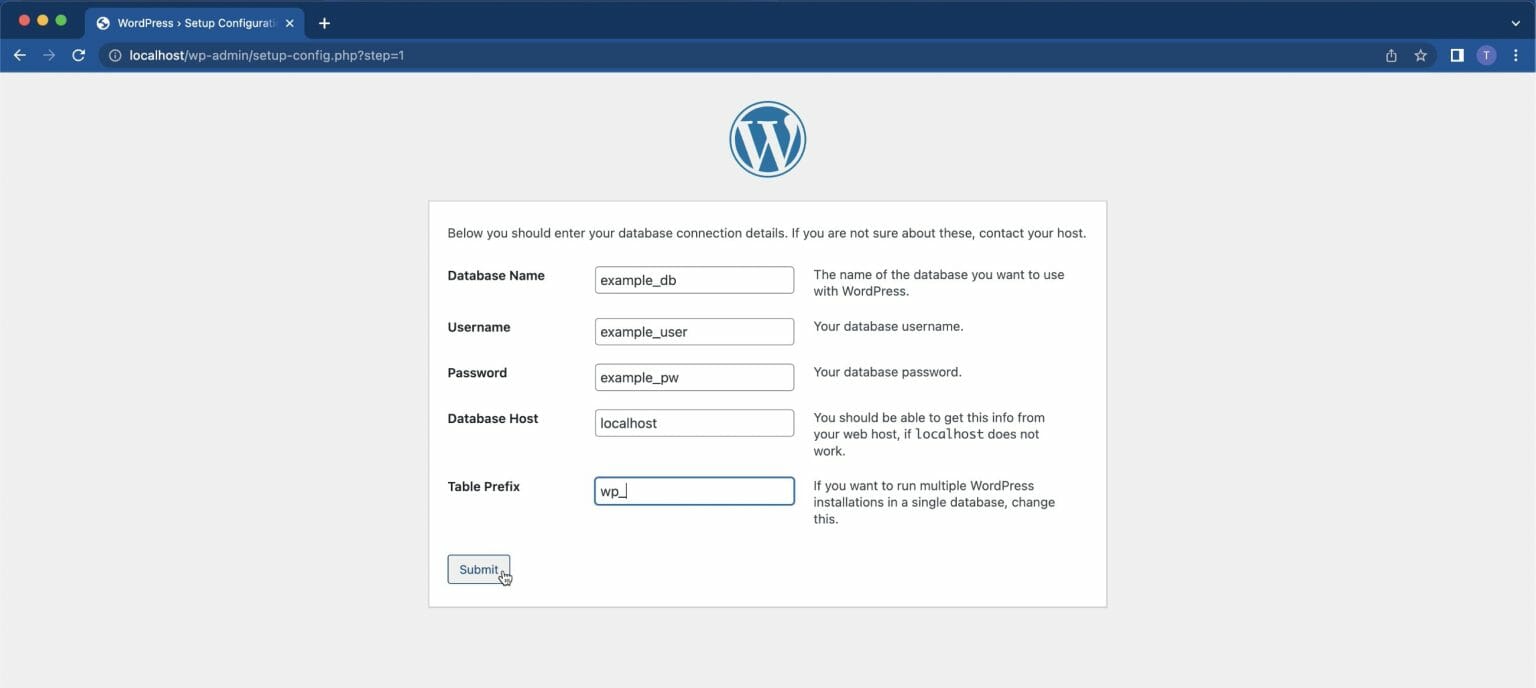
When you run the WordPress installer, you’ll be prompted to input your database details. Alternatively, you can configure wp-config.php manually:
define('DB_NAME', 'wordpress_db');define('DB_USER', 'wp_user');define('DB_PASSWORD', 'your_password');define('DB_HOST', 'localhost');Place this in your wp-config.php file located in your WordPress directory. This step is essential because it links your WordPress files to the database you just set up.
Testing the Connection
Once everything is set, visit your local site (e.g., http://yourlocal.dev) and run the WordPress installation process. If your database connection is successful, you’ll be guided through the rest of the setup. If not, double-check your database credentials and ensure your database server is running.
Wrapping Up
Setting up the database might seem like a small step, but it’s the backbone of your WordPress site. With your database configured and your web server running, you’re all set to install WordPress and start building your site! Next up, I’ll walk you through the WordPress installation process and customizing your fresh local environment.
7. Installing WordPress on the Virtual Environment
Now that your virtual environment is up and running, it’s time to get WordPress installed so you can start building your site. Don’t worry—it’s a straightforward process, and I’ll walk you through each step to make it as smooth as possible.
Step 1: Download WordPress
First things first, head over to the official WordPress.org website and download the latest version of WordPress. You’ll get a ZIP file — simply save it somewhere easy to find, like your desktop or a dedicated folder inside your virtual environment directory.
Step 2: Create a Database
WordPress needs a database to store all your content, settings, and plugins. If you’re using a typical setup like XAMPP, MAMP, or a custom PHP environment, you’ll want to create a new database. Here’s a quick rundown:
- Access your database management tool — often phpMyAdmin or MySQL command line.
- Click on “Create Database” and give it a name (e.g., wp_db).
- Set the collation to utf8mb4_unicode_ci for best compatibility.
Step 3: Configure WordPress
Extract the WordPress ZIP file you downloaded. Inside, you’ll find a file named wp-config-sample.php. Make a copy of it and rename it to wp-config.php. Now, open this file in your favorite code editor and fill in your database details:
| Variable | Value |
|---|---|
| DB_NAME | Your database name (e.g., wp_db) |
| DB_USER | Your database username (often ‘root’) |
| DB_PASSWORD | Your database password (leave blank if none) |
| DB_HOST | Usually ‘localhost’ |
Save the file after updating the details.
Step 4: Place WordPress Files in Your Virtual Environment
Copy or move the extracted WordPress files into your virtual environment’s web root directory. For example, if you’re using a folder like /var/www/html/your-site, put everything there.
Step 5: Run the Installation
Open your web browser and navigate to your local site — for example, http://localhost/your-site. You should see the WordPress setup page. Follow the on-screen instructions:
- Choose your language.
- Enter your site title, admin username, password, and email.
- Click “Install WordPress.”
Once installation is complete, you can log in to your dashboard and start customizing your website!
8. Optimizing PHP 7 Performance for WordPress
Running WordPress smoothly on PHP 7 is all about optimization. PHP 7 brought significant improvements in speed and efficiency, but a few tweaks can push your setup to even better performance levels. Here are some practical tips to optimize PHP 7 for your WordPress environment:
1. Keep PHP 7 Up-to-Date
Always ensure you’re running the latest stable version of PHP 7.x. Updates often include security patches and performance enhancements that can make a noticeable difference in your site’s responsiveness.
2. Enable PHP OpCache
OpCache is a built-in bytecode cache that stores precompiled script bytecode in shared memory, reducing PHP execution times. To enable it:
- Edit your php.ini file.
- Find or add the line:
opcache.enable=1 - Set
opcache.memory_consumptionto at least 128MB for larger sites. - Restart your web server to apply changes.
This simple tweak can dramatically speed up PHP script execution.
3. Use PHP-FPM (FastCGI Process Manager)
If your environment supports it, switching to PHP-FPM can improve performance and resource management over traditional mod_php. It handles PHP processes more efficiently, especially under high traffic.
4. Optimize PHP Settings
Fine-tuning your php.ini settings can boost performance. Consider:
- memory_limit: Increase to at least 256MB if you’re running many plugins or large media files.
- max_execution_time: Set to 30 seconds or less, to prevent scripts from hanging.
- upload_max_filesize and post_max_size: Adjust according to your media upload needs.
5. Disable Unnecessary PHP Modules
Review your PHP modules and disable any that your site doesn’t need. Fewer modules mean less overhead.
6. Use Caching Plugins and Server-side Caching
While not strictly PHP settings, leveraging caching plugins like W3 Total Cache or WP Super Cache, combined with server-side caching, reduces PHP execution frequency and speeds up page loads.
7. Monitor and Profile Performance
Tools like New Relic or Xdebug can help identify bottlenecks in your PHP scripts. Regular monitoring allows you to fine-tune configurations as your site grows.
By combining these PHP optimizations with good hosting practices and efficient theme/plugin choices, you’ll ensure your WordPress site runs swiftly and reliably on PHP 7. Keep an eye on updates and regularly review your setup to maintain top performance!
9. Testing Your Virtual WordPress Setup
Congratulations! You’ve gone through the process of setting up your virtual environment for WordPress with PHP 7. Now, the big question is: is everything working smoothly? Testing your setup is a crucial step to ensure your site runs properly and is ready for development or deployment.
First things first, open your web browser and navigate to the URL or localhost address you’ve configured for your virtual environment. If everything is set up correctly, you should see the WordPress installation page or your existing site’s homepage. If you reach this point, it’s a good sign that your web server and PHP are functioning properly.
Steps to Test Your Setup:
- Check the Home Page: Visit your site URL. You should see the default WordPress page or your custom theme if already installed.
- Verify PHP Info: Create a simple PHP info file to confirm PHP 7 is active. For example, create a file named
phpinfo.phpwith the following content:
<?phpphpinfo();?>
Then, navigate to http://your-localhost/phpinfo.php. Look for PHP version 7.x in the output. If it displays correctly, PHP is working as expected.
Additional Tips:
- Use Browser Developer Tools: Inspect network activity and console logs for any failed requests or JavaScript errors.
- Test on Multiple Browsers: Sometimes, issues are browser-specific. Check your site on Chrome, Firefox, and Edge.
- Check Responsiveness: Resize your browser window or use device emulation to ensure your site displays well across devices.
Performing these checks gives you confidence that your virtual environment is correctly configured. Once everything is confirmed working, you can start customizing your WordPress site, installing themes and plugins, or developing your project further!
10. Troubleshooting Common Issues
Even with careful setup, you might encounter hiccups along the way. Don’t worry — many common issues have straightforward solutions. Here’s a rundown of typical problems and how to fix them so you can get back on track quickly.
1. White Screen of Death or Server Errors
This can happen if PHP errors occur or there’s a misconfiguration. To troubleshoot:
- Check your error logs for specific messages.
- Ensure PHP 7 is properly installed and enabled in your server.
- Temporarily enable debugging in WordPress by editing
wp-config.phpand settingdefine('WP_DEBUG', true);. This reveals error details on the screen. - Deactivate plugins or switch themes if a particular plugin/theme causes issues.
2. Database Connection Problems
If WordPress can’t connect to the database:
- Verify your database credentials in
wp-config.php— username, password, database name, and host. - Ensure your database server is running and accessible.
- Check if the user has the necessary permissions.
- Restart your database server if needed.
3. PHP Version Issues
Make sure PHP 7 is correctly installed:
- Run
php -vin your terminal to confirm the version. - If the version is incorrect, review your server configuration to ensure PHP 7 is active.
4. Missing Dependencies or Modules
WordPress or plugins might require certain PHP modules:
- Check your PHP info output (from
phpinfo.php) for required modules likemysqli,curl, orgd. - Install missing modules via your package manager. For example, on Ubuntu:
sudo apt-get install php7.0-mysqli php7.0-curl php7.0-gd
5. Permission Issues
If you see errors related to file permissions:
- Ensure your WordPress files have the correct permissions, typically 755 for directories and 644 for files.
- Adjust ownership if necessary, especially if working with Docker or Vagrant.
Remember, patience is key. Most issues have clear solutions, and troubleshooting is part of the journey of mastering your local development environment. If you get stuck, consult community forums, official documentation, or reach out for help. Happy developing!
Conclusion and Next Steps for Your Virtual WordPress Development
Setting up a virtual WordPress environment with PHP 7 is a crucial step toward efficient and flexible website development. By creating an isolated and configurable workspace, you can streamline testing, debugging, and deploying updates without affecting your live site. Remember, leveraging tools like VirtualBox, Docker, or Local by Flywheel can significantly simplify this process and enhance your workflow.
As you move forward, consider the following next steps:
- Optimize Your Environment: Ensure PHP 7 is properly configured with necessary extensions such as curl, mbstring, and gd to support your development needs.
- Implement Version Control: Use Git to manage your codebase effectively, facilitating collaboration and tracking changes over time.
- Set Up Testing Frameworks: Integrate tools like PHPUnit or WP Test to automate testing and maintain high code quality.
- Backup and Security: Regularly back up your virtual environment and implement security best practices to protect your development data.
- Explore Deployment Options: Familiarize yourself with deployment strategies such as continuous integration and automated deployment pipelines.
By following these steps, you’ll establish a robust foundation for your WordPress projects, making future development smoother and more reliable. Keep experimenting with different configurations and tools to discover what best fits your workflow, and stay updated with the latest WordPress and PHP advancements to maintain a cutting-edge development environment.