Hey there! If you’re diving into WordPress and want to customize your site a bit more, getting familiar with page templates is a great place to start. Page templates are essentially blueprints that dictate how certain pages on your WordPress site are displayed. Using them, you can create unique layouts and designs that reflect your brand or personal style. Buckle up because this journey will not only boost your site’s visual appeal but also give you greater flexibility in showcasing your content!
Understanding the Structure of a WordPress Theme

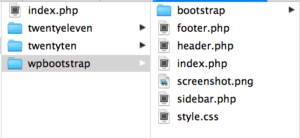
Alright, let’s break down what makes a WordPress theme tick. Understanding the structure of a theme is crucial for creating effective page templates. At its core, a WordPress theme consists of a collection of files that work together to display your site. Here’s a quick rundown:
- style.css: The main stylesheet where all the CSS lives; it controls the visual style and layout of your theme.
- index.php: The fallback file that displays your WordPress site’s content. If no other template file is specified, this one takes over.
- header.php: This file usually contains the header section of your site, including logo, navigation menus, etc.
- footer.php: Here’s where you’ll find the footer content, including copyright information and links.
- functions.php: A powerful file that enables you to add custom functions, features, and functionality to your theme.
- single.php: Used for displaying individual blog posts. This template shows how a single post looks.
- page.php: This is the default template for your pages. If you haven’t specified a custom template, this is the one that will be used.
In addition to these core files, themes can also include:
- archive.php: For archive pages, like categories or tags.
- 404.php: This template appears when a page isn’t found.
- custom-template.php: Custom templates that you create for specific needs.
Understanding these components is the key to crafting your own page templates. With this knowledge in hand, you’ll be well-equipped to get creative with your WordPress site!
3. Setting Up Your Development Environment

Before diving into the intricacies of creating a basic WordPress page template, it’s essential to set up your development environment. This ensures that you have a safe space to test your code without worrying about affecting your live site.
Here are some steps to help you establish your development environment:
- Install WordPress Locally: Use software like XAMPP, MAMP, or Local by Flywheel to create a local server on your computer. These tools make it easy to run a WordPress site in your development environment.
- Choose a Code Editor: Select a user-friendly code editor. Popular choices include Visual Studio Code, Sublime Text, and Atom. A good code editor can make coding much simpler with features like syntax highlighting and code suggestions.
- Create a Child Theme: It’s a best practice to create a child theme instead of editing the core theme directly. This way, you preserve your changes even when the main theme gets updated. To create a child theme, make a new folder in the wp-content/themes directory and add a style.css and functions.php file.
- Install Essential Tools: Consider using plugins like Debug Bar and Query Monitor. These tools help you troubleshoot any issues that arise as you develop your page template.
By following these steps, you’ll have a solid foundation for building your WordPress page template safely and effectively. A well-set development environment not only streamlines your workflow but also boosts productivity!
4. Creating a New Page Template File
Now that your development environment is set up, it’s time to create your new page template file. This process is relatively straightforward and can yield powerful results for your WordPress site. Let’s guide you through the steps!
Follow these steps to create your new page template:
- Access Your Theme Folder: Navigate to the directory of your child theme within wp-content/themes. This is where you’ll create your new template file.
- Create the Template File: Use your code editor to create a new PHP file. A common naming convention is to prepend “page-” to the name of your template, like
page-custom.php. - Add Template Header: At the top of your new file, include a comment block that defines the template. For instance:
<?php /* Template Name: Custom Page Template */ ?>
This header tells WordPress that it’s a custom template.
- Start Coding: Begin coding your HTML and PHP for the template. You can include elements like header, footer, and content dynamically from WordPress using functions like
get_header();andget_footer();.
Once you’ve finished your code, save the file! By following these steps, you’ve successfully created a new page template that you can use in your WordPress site. Don’t forget to test it out to ensure everything works as expected!
5. Adding Template Header Comment
When you’re creating a custom page template in WordPress, one of the first steps is to add a template header comment. This tells WordPress that your file is a template and provides essential details about it. Think of it as an introduction to your template, allowing WordPress to recognize and display it properly in the admin interface.
To add a template header comment, you need to start with a simple PHP comment block at the top of your template file. Here’s an example of what this comment might look like:
Breaking it down:
- Template Name: This is required and will be the name you see in the WordPress page editor when selecting your template.
- Description: It’s a good idea to add a description so that you and others can quickly grasp the purpose of the template at a glance.
By using clear, descriptive titles and notes, you’ll enhance both the usability of your template and the ease with which you (or others) can understand its function later. Remember, clarity is key!
6. Structuring the HTML for Your Page Template
Once you’ve added your header comment, it’s time to dive into structuring the HTML for your page template. Just like building a house, a solid structure is paramount for creating an effective and functional WordPress page.
Your page template will typically start with the basic HTML structure combined with WordPress functions to display dynamic content. Here’s a basic outline:
<?php get_header(); ?><div class="content"> <h1><?php the_title(); ?></h1> <div class="post-content"> <?php the_content(); ?> </div></div><?php get_footer(); ?>Let’s break it down:
- get_header(); – This function pulls in your theme’s header, which generally contains your site’s metadata and navigation menu.
- the_title(); – Displays the title of your page, making it easily recognizable for visitors.
- the_content(); – This function is key as it outputs the main content of your page, allowing for flexibility in what is displayed.
- get_footer(); – Just like the header, this function will include your site’s footer, maintaining a consistent look across your site.
Structuring your HTML this way ensures that your custom page template aligns well with WordPress standards and functionalities. Plus, it makes your template more maintainable and easier to update, should your theme evolve over time. Happy coding!
Incorporating WordPress Loop
The WordPress Loop is the backbone of dynamic content display in your templates. Understanding how to incorporate it effectively is crucial for creating engaging pages. The Loop retrieves and displays posts and pages based on specific criteria, making your site dynamic and user-friendly.
To get started, you first need to establish the basic structure of the Loop. Here’s a quick breakdown of the syntax:
This structure consists of the following components:
- have_posts(): Checks if there are any posts available.
- the_post(): Sets up the post data for each iteration.
- template tags: You can display various post information using tags like
the_title(),the_content(), andthe_excerpt(). - Fallback content: Always a good idea to include a message for when there are no posts like “No content found”.
By employing the Loop, you create a seamless way to display your content, ensuring users can easily interact with your site. Remember, it’s all about making it functional and appealing!
Adding Custom Styles and Scripts
Custom styles and scripts are essential for giving your WordPress page template a unique flair. They enhance user experience and elevate the overall aesthetic of your site. Luckily, WordPress makes it super easy to add your own CSS and JavaScript.
The best practice is to register and enqueue your styles and scripts in your theme’s functions.php file. This prevents potential conflicts and organizes your code efficiently. Here’s a quick guideline on how to do this:
Let’s break this down:
- wp_enqueue_style: This function loads your custom CSS file. Make sure you specify the correct path.
- wp_enqueue_script: This is for your JavaScript file. You can add dependencies (like jQuery) and ensure it loads in the footer with the
trueparameter. - get_template_directory_uri(): This function helps fetch the correct URL to your theme directory.
With your custom styles and scripts added, your WordPress page will not only look stunning but also provide an interactive experience for your visitors. Happy coding!
9. Saving and Uploading Your Template
Once you’ve crafted your basic WordPress page template, the next step is saving and uploading it to your website. Don’t worry, it’s simpler than it sounds! First, let’s cover how to save your template correctly.
Here’s a quick step-by-step guide:
- Open Your Text Editor: Use a code editor like Notepad++, Sublime Text, or Visual Studio Code to create your template file.
- Save the File: When you’re done coding your template, save it with a .php extension. For instance, you might name it
my-custom-template.php. - Upload Your Template: You’ll need an FTP client like FileZilla or use the built-in file manager in your hosting control panel. Connect to your server and navigate to the
/wp-content/themes/your-theme-name/directory. Here, upload your newly created PHP template file.
Once uploaded, ensure your file is in the correct theme folder that is currently active on your WordPress site. You may also want to check the permissions, though most FTP clients handle this automatically.
After all is said and done, you should see your new template listed within the WordPress admin, ready to be set up and used on your pages. And just like that, you’ve successfully saved and uploaded your template!
10. Setting Your Template in the WordPress Admin
Now that your page template is saved and uploaded, it’s time to set it in the WordPress admin area. This is where the real magic happens, as you’ll be able to apply your custom template to any page you desire. Here’s how to do it:
Follow these steps:
- Log into Your WordPress Admin Panel: Go to
yourwebsite.com/wp-adminand log in with your credentials. - Create a New Page: Navigate to
Pages > Add Newto create a new page where you want to apply your template. - Locate the Template Options: On the right-hand side of the page editor, you’ll see a Page Attributes box. Underneath it, you can choose your custom template from a dropdown menu.
- Select Your Template: Click on the dropdown and select the template you uploaded, like
My Custom Template. - Publish Your Page: Once you have selected your template, go ahead and publish the page. Ta-da! Your custom template is now live!
And that’s it! You’re all set to enjoy the benefits of your personalized WordPress page. Feel free to repeat this process for any other pages you want to customize. Happy designing!
Testing Your New Page Template
Once you’ve created your new WordPress page template, the fun begins! Testing is a crucial phase that helps ensure everything works as intended. You want to make sure that your template looks good, functions properly, and is user-friendly. Here’s a simple guide to follow:
- Preview the Template: Before publishing, use the “Preview” option in WordPress. This allows you to view how your page will appear without making it live. Look for any discrepancies in layout, colors, and fonts.
- Check Different Devices: With more users accessing the web on mobile devices, it’s essential to see how your template behaves on various screens. Use tools like Google’s Mobile-Friendly Test or simply resize your browser window to check responsiveness.
- Test Functionality: If your template includes forms, buttons, or other interactive elements, click through them to ensure that they work as expected. For example, if you included a contact form, submit some test data to verify the process goes smoothly.
- Page Load Speed: A slow-loading page can frustrate users. Use services like GTmetrix or PageSpeed Insights to evaluate how quickly your page loads and get suggestions for improvements.
- Cross-Browser Compatibility: Ensure your page template looks good on various browsers such as Chrome, Firefox, Safari, and Edge. Sometimes a layout looks great in one browser but can break in another.
After you’ve gone through these testing steps, and if all looks good, you’re ready to publish! It helps to keep revisiting your template in the future to ensure that it continues to perform as expected.
Conclusion and Further Resources
Congratulations! You’ve taken the steps to create a basic WordPress page template. This entire process, while it might seem daunting initially, is a gateway to customizing your website and making it truly yours. Keep in mind that mastery comes with practice, and your skills will undoubtedly improve as you continue to work with page templates.
If you’re eager to expand your skills even further, consider looking into these resources:
- WordPress Theme Developer Handbook – An extensive resource for deeper insights into WordPress themes.
- WPBeginner – Great tutorials and guides which are very beginner-friendly.
- Udemy WordPress Courses – A variety of courses ranging from beginner to advanced levels.
- Creating Page Templates – A more advanced look at handling page templates and utilizing advanced techniques.
Keep exploring, experimenting, and enhancing your WordPress skills. The world of website development is vast and filled with opportunities for creativity. Happy coding!


