Creating a custom header in WordPress can greatly enhance the aesthetic and functional appeal of your website. Think of the header as the first handshake visitors get with your site—it sets the tone and gives a snapshot of what to expect. In this guide, we’ll walk you through the steps to design a header that not only looks good but also complements your branding and user experience.
Understanding the Role of Headers in WordPress Themes
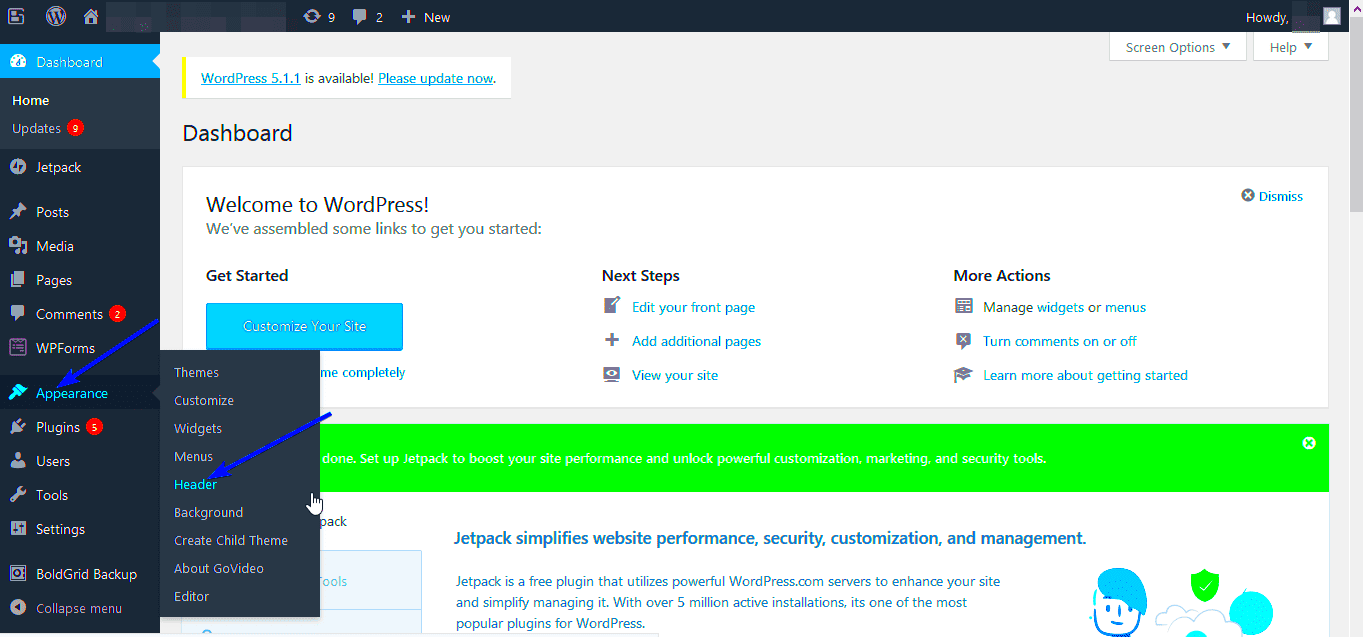
The header is a crucial element in any WordPress theme. It’s the area at the top of your site, often containing your logo, navigation menus, and other key features. Let’s dive deeper into its significance and functionalities:
- Brand Identity: Your header is often the first impression visitors get. A well-designed header reflects your brand, helping build trust and recognition.
- Navigation: Headers typically include navigation menus that guide users through your site. A clear, well-structured header helps visitors find what they’re looking for effortlessly.
- Call to Action: Many sites utilize headers to highlight specific actions, such as signing up for a newsletter or accessing special offers. This can significantly impact user engagement.
- Responsiveness: As users access websites from various devices, a custom header can enhance user experience by ensuring that it looks good on both desktop and mobile screens.
In terms of layout, here’s a simple comparison of various header components:
| Component | Description |
|---|---|
| Logo | Your brand’s visual identity that often links back to the homepage. |
| Navigation Menu | Links to different sections of your site, essential for user navigation. |
| Search Bar | A tool for users to quickly find specific content on your site. |
| CTAs | Buttons or links directing users to important actions or promotions. |
Understanding these elements will help you create a header that not only looks great but serves its intended purpose. So let’s roll up our sleeves and get started on crafting your custom header!
3. Preparing Your WordPress Site for Customization
Before you dive into the exciting world of customizing your WordPress theme, it’s crucial to make sure that your site is ready for these changes. Preparing your WordPress site not only helps to avoid potential mishaps but also streamlines the process so you can focus on creating the perfect header.
Here’s a handy checklist to guide you through the preparation phase:
- Backup Your Site: Always start with a backup! Use plugins like UpdraftPlus or BackWPup to save a copy of your files and database. This way, if something goes wrong, you can always revert to a previous version.
- Update WordPress & Plugins: Ensure your WordPress installation, themes, and plugins are up-to-date to avoid compatibility issues.
- Choose a Child Theme: If you haven’t done this yet, consider creating a child theme. This allows you to customize your site without affecting the parent theme’s code. It’s a safe way to play around without fear of losing functionality if the parent theme is updated.
- Check Theme Options: Navigate to your current theme’s settings in the WordPress dashboard. Some themes offer built-in customization options that might save you time.
- Set Up Custom CSS (if needed): If you’re comfortable with CSS, you might want to prepare a placeholder for custom styles you plan to add later.
By following these pre-customization steps, you’ll ensure that your WordPress site is not only functional but also ready for a fresh, personalized touch that reflects your brand or personal style!
4. Step-by-Step Guide to Creating a Custom Header
Now that your WordPress site is prepped and primed, let’s dive into creating that eye-catching custom header! This section will provide you with a straightforward, step-by-step guide to help you craft a unique header that sings your brand’s tune.
Here we go:
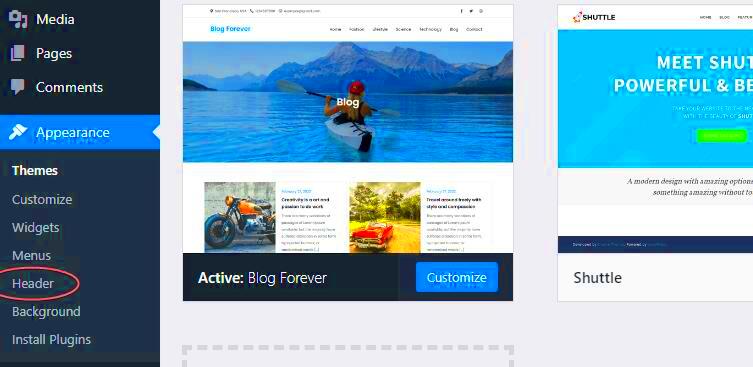
- Access the Theme Customizer: Head to your WordPress dashboard. Go to Appearance > Customize. This will open the Theme Customizer where you can make changes in real-time.
- Locate the Header Section: Within the customizer, look for the section labeled Header. Depending on your theme, it may also be labeled as Site Identity or Header Image.
- Upload a Custom Logo: If you wish to have your logo on the header, click on Site Identity and upload your logo. It’s advisable to use a high-resolution image for clarity.
- Add a Header Image: If you want to include a header image, check for an option that allows you to set this. Some themes allow you to choose an image that rotates, adding visual dynamism to your site.
- Customize Your Menu: Go back to the main customizer menu, select Menus, and set up a custom navigation menu. You can create, modify, and arrange menu items that will sit proudly in your header.
- Add Widgets (if supported): Some themes allow widgets in the header area. If yours does, navigate to the Widgets section and drag desired widgets into the header area.
- Preview and Publish: Before going live, take advantage of the preview feature in the customizer. Once you’re satisfied with how it looks, hit Publish to make your changes live!
Creating a custom header in WordPress is not just about aesthetics; it’s about building a cohesive representation of your brand. So have fun, experiment, and let your creativity flow!
Utilizing WordPress Customizer for Header Design
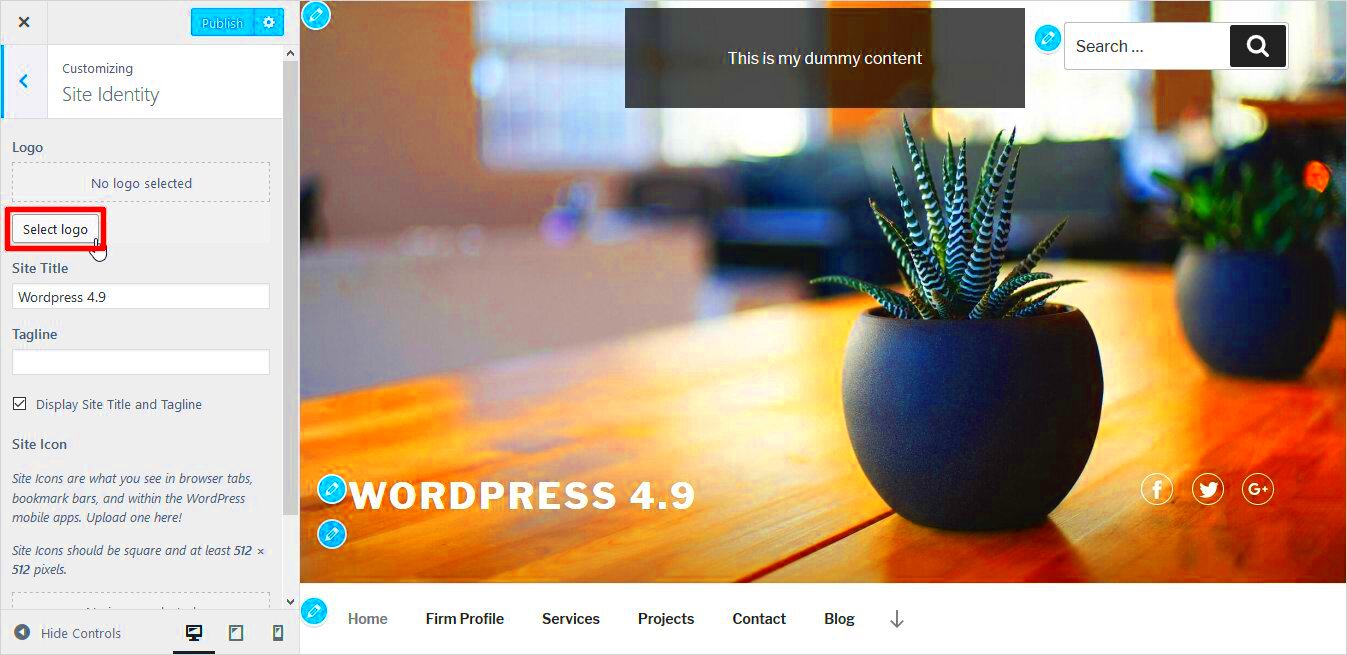
If you’re looking to create a custom header in your WordPress theme, the WordPress Customizer offers an intuitive way to do just that. It’s a built-in feature that allows you not only to tweak your header but also to preview your changes in real time. Isn’t that handy?
To get started, follow these steps:
- Access the Customizer: From your WordPress dashboard, navigate to Appearance > Customize. You’ll enter the Customizer interface where all theme customization options are presented.
- Select Header Options: Look for a section labeled “Header,” “Header Image,” or something similar. This section may vary depending on your active theme.
- Upload Your Logo: If you want to add a logo, you’ll typically find an option to upload one here. Ensure your logo is of high quality but not too large to affect site loading. A good rule of thumb is to keep it below 500 KB.
- Adjust Header Image: Many themes allow you to set a header image. Find the option labeled “Add New Image.” You can either select from your media library or upload a new one.
- Change Colors and Fonts: Explore other sections in the Customizer for options to change colors and font styles for your header elements. Consistency is key!
- Preview and Save: Once you’re satisfied with your adjustments, don’t forget to click “Publish” to save your changes. You can go back anytime to make more tweaks.
Remember, while the Customizer is user-friendly, it’s also limited based on your theme. So, don’t hesitate to reach out to your theme’s documentation for more specific header options.
Implementing Custom CSS for Header Styling
If you’re looking to take your header design to the next level, implementing custom CSS can really help you fine-tune the aesthetics and functionality of your header. While the WordPress Customizer provides a lot of options, sometimes you need that extra flair that only custom CSS can offer.
Here’s how you can get started:
- Identify the Element: First, determine which specific elements of your header you want to style. This could be the logo, navigation menu, or any other component. Use your browser’s Developer Tools (right-click and select “Inspect”) to find the class or ID names for these elements.
- Add Custom CSS via Customizer: Go to Appearance > Customize > Additional CSS in your WordPress dashboard. Here, you’ll see a text area where you can add your custom styles.
- Write Your CSS: Write your CSS rules. For instance:
| CSS Property | Example Code |
|---|---|
| Change Font Size | header h1 { font-size: 24px; } |
| Add Background Color | header { background-color: #333; } |
| Adjust Padding | nav { padding: 10px; } |
| Change Link Color | header a { color: #fff; } |
Keep your CSS clean and organized. Once you’ve entered your code, hit the “Publish” button to save your changes. It’s also good practice to test your website across different devices afterward to ensure everything appears as you intended.
Custom CSS can be a game-changer, allowing you to create a unique header that reflects your personal style or brand. So get creative and see what amazing transformations you can make!
7. Adding Functionality with Custom Header Tags
When it comes to creating a stunning custom header in WordPress, it’s not just about the visuals; it’s also about the functionality that custom header tags can bring to your website. Custom header tags allow you to add unique features to your header that can enhance user experience and improve site navigation.
Here’s how you can leverage custom header tags effectively:
- Header Image: You can add unique header images that can change based on posts or pages. Using the
add_theme_support('custom-header')function in your theme’s functions.php file allows you to manage header images easily. - Social Media Links: Including social media icons can increase engagement. You can use
tags within your header to link to your profiles, making it easy for visitors to follow you. - Search Bar: Adding a search feature directly in your header can enhance usability. Implementing a search form helps users find content quickly, improving overall site navigation.
- Custom Menus: Use
wp_nav_menu()to create custom menus that provide easy access to key areas of your site. You can design dropdown menus to categorize links, which keeps your header organized.
Don’t forget to test the functionality across different browsers and devices to ensure it works seamlessly for everyone. By adding such features, your custom header can become not just a visual element but a pivotal part of your site’s functionality.
8. Mobile Responsiveness and Header Design
In today’s mobile-first world, ensuring your custom header is mobile-responsive is paramount. With a significant percentage of web traffic coming from mobile devices, a header that looks good on all screen sizes is non-negotiable. Let’s dive into some tips for achieving a mobile-friendly header design.
Consider the following best practices to ensure your header stands out on mobile:
- Simplified Design: Keep it clean and uncluttered. Reduce the number of elements in the header, so it doesn’t become crowded on smaller screens.
- Responsive Layout: Use CSS media queries to adjust header styles based on screen size. For example, stack menu items vertically on mobile and display them horizontally on desktop.
- Hamburger Menu: This popular icon can help minimize space while allowing users to access your navigation. Implementing a hamburger menu can save valuable real estate in a mobile layout.
- Touch-Friendly Buttons: Ensure that any buttons in your header are large enough to be tapped easily. A good rule of thumb is to make touch targets at least 44px by 44px.
Moreover, remember to test your design across various devices, because what works on one screen might not work on another. Utilizing tools such as Google’s Mobile-Friendly Test can help you ensure that your header design is not only visually appealing but also functional and user-friendly on mobile.
Common Issues and Troubleshooting Tips
Creating a custom header in WordPress themes can be a fun and rewarding project, but sometimes things don’t go as planned. Let’s explore some common issues that you might encounter and how to troubleshoot them effectively. Here are a few problems and their solutions:
- Header Not Appearing: If your custom header isn’t showing up, double-check if you have selected the correct header in your theme settings. Also, ensure that there’s no code error in your custom header files.
- Responsive Issues: If your header looks great on desktop but not on mobile, consider using CSS media queries. They allow you to adjust your layout based on screen size, ensuring a seamless experience across devices.
- Image Display Problems: Sometimes images in your header might not load or appear distorted. Verify that the image is the correct size and formats are supported. Make sure it’s uploaded correctly in the WordPress Media Library.
- CSS Conflicts: Conflicts in your CSS can cause your header to appear incorrectly. Use the browser’s inspect tool to identify any conflicting styles and adjust your custom CSS accordingly.
- Plugin Compatibility: Some plugins may conflict with your header settings. Temporarily deactivate plugins one by one to find any that might be causing the issue.
Remember, troubleshooting takes patience. If you’re still stuck, consider reaching out to the WordPress community or forums for help. Don’t forget to back up your site before making major changes!
Conclusion and Additional Resources
Creating a custom header in WordPress is an exciting way to personalize your website and reflect your brand identity. By following the steps outlined in our previous sections, you can design a functional and aesthetically pleasing header that enhances user experience.
In conclusion:
- Choose a theme that supports custom headers.
- Use the WordPress Customizer for modifications.
- Consider coding for advanced headers if you’re comfortable.
For those looking to delve deeper into WordPress customizations, there are plenty of resources available:
| Resource | Link |
|---|---|
| WordPress Codex | https://codex.wordpress.org/ |
| WordPress Developer Resources | https://developer.wordpress.org/ |
| WPBeginner Tutorials | https://www.wpbeginner.com/ |
Embrace your creativity, keep experimenting, and soon you’ll have a header that showcases your unique style and professionalism. Happy customizing!

