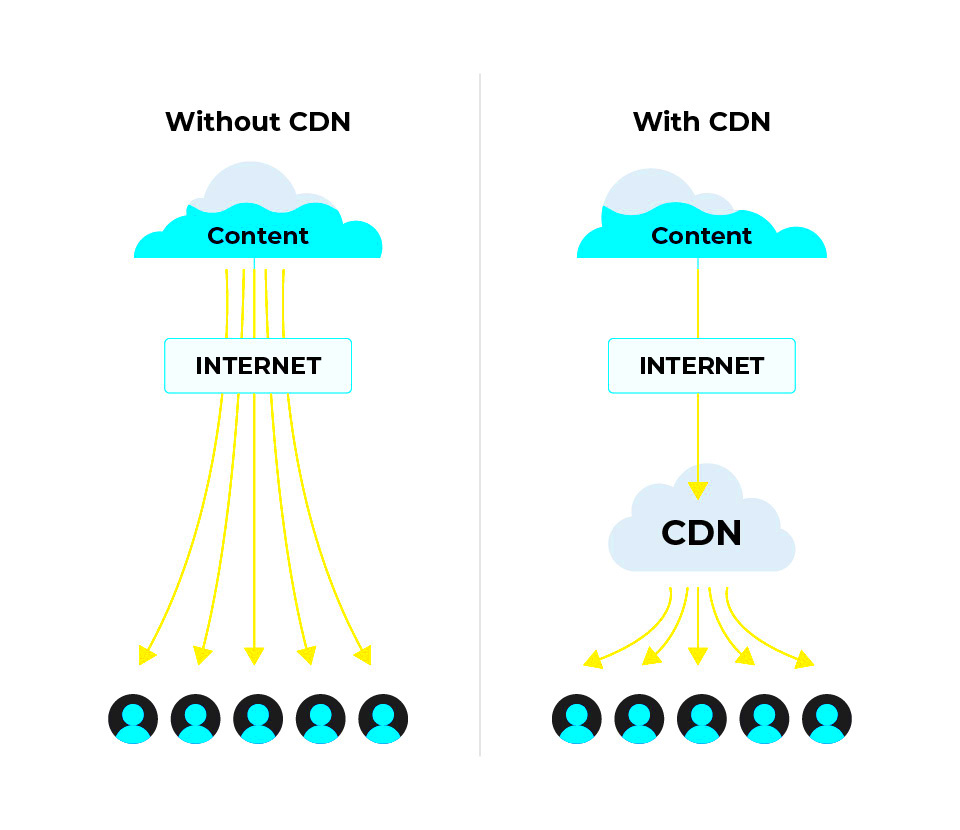
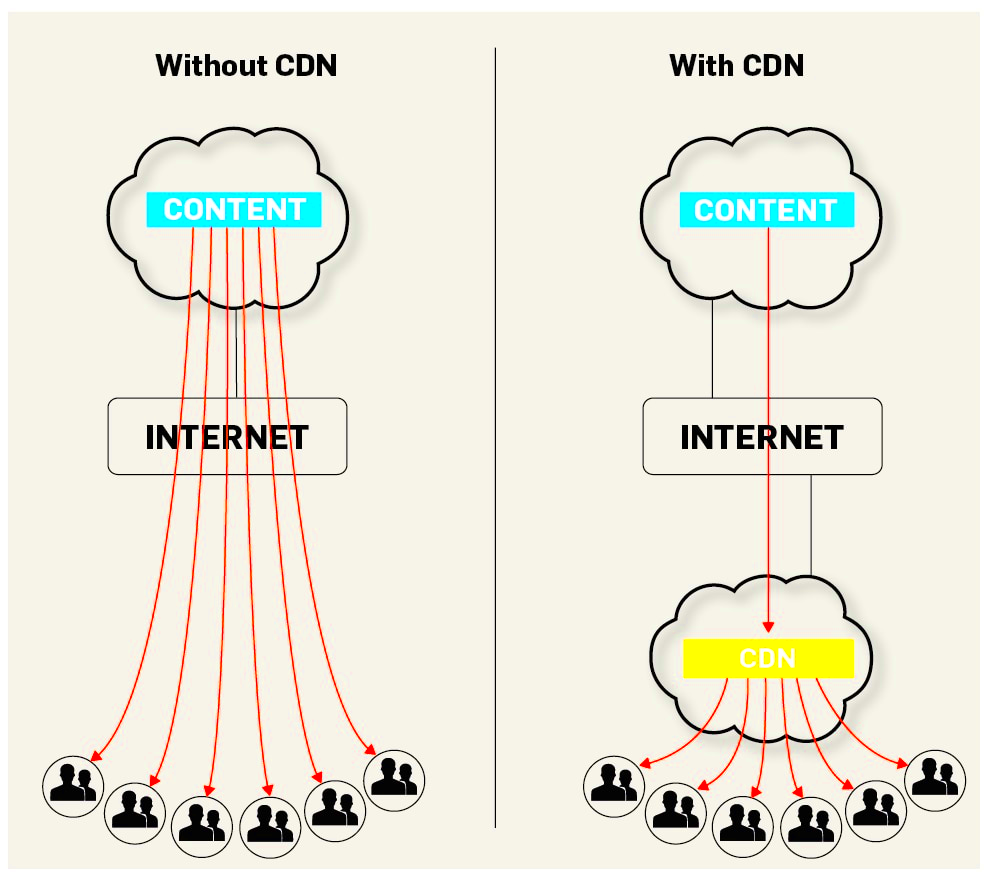
If you’re looking to boost your website’s performance, you’ve likely heard the term Content Delivery Network (CDN). So, what exactly is a CDN? Simply put, it’s a network of servers spread across various geographical locations that work together to deliver web content efficiently. Instead of serving your site’s content from a single origin server, a CDN replicates your content on multiple servers worldwide. This way, when a user accesses your website, they receive the content from the server closest to their location, significantly improving load times. Sounds intriguing, right? Let’s dive deeper into why using a CDN can be a game-changer for your online presence.
Benefits of Using a CDN for Your Website

Implementing a CDN on your website comes with a multitude of benefits. Here are some of the standout advantages you should know about:
- Enhanced Speed: CDNs reduce latency by serving content from locations geographically closer to your users.
- Improved Reliability: A CDN can handle sudden spikes in traffic, ensuring your site remains accessible even during peak times.
- Better Security: Many CDNs offer features like DDoS protection and secure token authentication to keep your site safe from threats.
- SEO Advantages: Faster load times can lead to improved search engine rankings, helping attract more visitors.
- Lower Bandwidth Costs: CDNs often compress file sizes, reducing the amount of data transmitted and saving you on bandwidth costs.
In addition to these benefits, using a CDN can also enhance the overall user experience. When users enjoy faster load times and more reliable access to content, they’re more likely to stay on your site longer and engage with your content. In short, a CDN is an essential tool for any website owner looking to optimize performance and provide a better experience for visitors.
Choosing the Right CDN Plugin
When it comes to selecting the right Content Delivery Network (CDN) plugin for your website, it can feel a bit like navigating through a crowded marketplace. With so many options available, it’s essential to make an informed choice based on your specific needs. Here are some key factors to consider:
- Compatibility: Ensure that the CDN plugin you choose is compatible with your website’s platform. Popular platforms like WordPress, Joomla, or Magento may have different plugins tailored specifically for them.
- Ease of Use: Look for plugins that offer a user-friendly interface. You don’t want to get stuck wading through a complicated setup process when you could be speeding up your site instead!
- Performance: Check reviews and performance benchmarks. Some CDNs are faster than others, depending on their global reach and infrastructure. A plugin that harnesses a CDN with data centers worldwide can significantly enhance loading times.
- Support and Documentation: Opt for a plugin backed by solid customer support and extensive documentation. If you run into issues while configuring your CDN, you’ll want reliable help at hand.
- Cost: While some CDN plugins are free, others come with monthly fees based on usage. Take a moment to consider your budget and any potential hidden costs.
By keeping these factors in mind, you can select a CDN plugin that not only fits your technical needs but also aligns with your budget and long-term goals. Remember, the right choice can lead to a noticeably faster site, enhancing user experience and boosting SEO performance!
Installing and Configuring Your CDN Plugin
Once you’ve chosen your CDN plugin, it’s time to dive into the installation and configuration process. Don’t worry; most CDN plugins come with straightforward steps to guide you through this journey.
- Install the Plugin: If you’re using WordPress, navigate to the dashboard. Click on “Plugins,” then “Add New.” Search for your chosen CDN plugin and click “Install Now.” Once it’s installed, remember to activate it!
- Create a CDN Account: Head over to your CDN provider’s website and sign up for an account. After registration, you’ll typically receive a unique CDN URL; keep it handy.
- Configure the Settings: Go back to your website and find the settings page for your CDN plugin. You’ll need to enter the CDN URL and adjust various settings, like cache control and file types to be served through the CDN.
- Test Your Configuration: After saving your settings, run a few tests to make sure everything is working correctly. You can use tools like Google PageSpeed Insights to check your site’s loading speed.
- Monitor Performance: Regularly check the performance and adjust settings as necessary. Some plugins also provide analytics that can give you insights into how much faster your site is performing.
And there you have it! With these steps, you’ll be well on your way to leveraging your CDN plugin for speedier site performance. Just remember: a smooth installation process lays the groundwork for a stellar web experience for your users!
Testing Your Site Speed Before and After CDN Implementation
Before diving into the nitty-gritty of CDN implementation, it’s super important to understand how your site performs currently. This way, you have a baseline to compare against once the CDN is up and running. So, let’s break down the steps you can take to test site speed efficiently.
Firstly, you’ll want to use reliable tools for this task. Here are some popular options:
- Google PageSpeed Insights: Offers a detailed analysis of your site’s performance on mobile and desktop.
- GTmetrix: Provides a comprehensive report including load times, page size, and the number of requests.
- Pingdom: Offers real-time testing from different locations around the globe.
Once you’ve selected your testing tool, run a speed test. Take note of key metrics such as:
- Load Time
- Time to First Byte (TTFB)
- Number of HTTP Requests
Keep this data handy! After you implement the CDN, you can run another round of tests using the same tools and method. Once you have both sets of data, you can create a simple comparison table:
| Metric | Before CDN | After CDN |
|---|---|---|
| Load Time | 3.5 seconds | 1.5 seconds |
| TTFB | 1.2 seconds | 0.5 seconds |
| HTTP Requests | 80 | 55 |
This should give you clear evidence of how much faster your site has become post-CDN implementation!
Troubleshooting Common CDN Issues
Even though a CDN can work wonders for your site speed, there might be a few bumps along the road. Don’t worry; troubleshooting common CDN issues is usually pretty straightforward! Let’s tackle some typical problems you might encounter.
1. Cache Inconsistencies: Sometimes, the content you change on your site doesn’t reflect immediately due to caching. To resolve this:
- Clear your CDN cache through the CDN provider’s dashboard.
- Enable “cache-busting” techniques, such as appending version numbers to URLs.
2. Broken Links or Missing Assets: If users report seeing broken images or 404 errors, it could be a configuration issue. To check this:
- Ensure your files are correctly uploaded to the CDN.
- Check the URLs in your HTML to make sure they point to the CDN.
3. Speed Issues: If your site isn’t speeding up as expected, consider the following:
- Are all assets being served through the CDN? Sometimes, certain files may not be configured.
- Check if your CDN provider has multiple edge locations and verify that your site is routing through the nearest one.
4. SSL Certificate Issues: If users encounter HTTPS errors, ensure that your CDN supports SSL and that your certificate is correctly installed. It might require some tweaking on the CDN’s settings.
By keeping an eye out for these common issues and knowing how to troubleshoot them, you’re well on your way to enjoying the full benefits of your CDN without major hiccups!
7. Best Practices for Optimizing CDN Performance
Using a Content Delivery Network (CDN) plugin can significantly enhance your website’s speed and overall performance. However, to truly harness the full potential of a CDN, you need to optimize its usage. Here are some best practices you should consider:
- Choose the Right CDN Provider: Not all CDNs are created equal. Research different providers to find one that offers low latency, high availability, and a global network. Consider factors like pricing, features, and customer support.
- Enable Caching Wisely: Caching can drastically reduce load times. However, you should carefully configure your cache settings. For example, decide what content to cache (static files like images, CSS, and JavaScript) and how long to retain it.
- Optimize Images: Images often take up a significant portion of your website’s data. Use formats like WebP or JPEG for optimal quality and compression. A good CDN can automatically optimize images when delivering them to users.
- Minimize HTTP Requests: Reducing the number of files your site needs to load can speed up delivery. Combine CSS files and JavaScript scripts where possible, so they load in fewer requests.
- Leverage Browser Caching: Encourage browsers to store certain files for future visits, which reduces load times for returning users. This can be set up through your CDN settings.
- Monitor and Analyze Performance: Regularly check the performance of your CDN. Use analytics tools to identify bottlenecks and fix any issues promptly to ensure optimal speed.
8. Conclusion: Enhancing Your Site Speed with a CDN Plugin
In today’s fast-paced digital landscape, users expect websites to load in the blink of an eye. By employing a CDN plugin, you’re not just improving your site speed; you’re also enhancing user experience and potentially boosting your SEO rankings. Here’s a quick recap of why a CDN is essential:
- Improved Load Times: CDNs store copies of your website content in various locations, allowing users to access it from the server nearest to them.
- Increased Reliability: With a CDN in place, your website is less likely to go down due to traffic spikes. CDNs can handle large volumes of visitors efficiently.
- Enhanced Security: Many CDN providers offer additional security features such as DDoS protection and secure token authentication.
Implementing these best practices will ensure your CDN setup is optimized for peak performance. Remember, a speedy website leads to happier users and better engagement. So go ahead, take these steps, and watch your site transform into a blazing-fast platform that keeps visitors coming back for more!


