Hey there, fellow WordPress enthusiast! If you’ve ever wanted to make your posts stand out and include specific information that isn’t available by default, you’re in the right place. In this guide, we’ll dive into adding custom fields to WordPress post types without relying on plugins. It’s easier than you might think, and it opens up a world of possibilities for your content. Ready to get started? Let’s go!
Understanding Custom Fields in WordPress

Custom fields are a fantastic way to add extra metadata to your posts, pages, or custom post types. They allow you to store additional information that might not fit into the standard WordPress fields. Think of them like extra boxes for your content—perfect for unique needs or specialized data.
Here’s why you should care about custom fields:
- Personalization: Tailor your posts with additional data that enhances user experience.
- Flexibility: Create a wide variety of content types without needing multiple plugins.
- Organization: Keep your data organized and accessible for future reference or modifications.
When you work with custom fields, there are two primary components you should be aware of:
- Custom Field Name: This is the identifier for your custom field. It can be anything you choose but should be descriptive.
- Custom Field Value: This is the actual data that you want to associate with the custom field name.
To visualize how custom fields work, let’s take a quick look at a simple table:
| Custom Field Name | Custom Field Value |
|---|---|
| Author Bio | John Doe is a freelance writer… |
| ISBN Number | 978-3-16-148410-0 |
By using custom fields, you’re not just adding data; you’re enhancing the storytelling capabilities of your WordPress site. So, let’s roll up our sleeves and discover how to implement these powerful features without any plugins!
Why Use Custom Fields?

Custom fields, also known as post metadata, offer a powerful way to enhance the capabilities of your WordPress site. By allowing you to add specific data to your posts and pages, they can help tailor your content to meet your unique needs. Here are some compelling reasons why you might want to use custom fields:
- Enhanced Content Management: Custom fields provide a structured way to manage metadata, which can help organize information more effectively.
- Increased Flexibility: They allow you to add various types of information, such as ratings, prices, and additional descriptions. This flexibility can help make your content more engaging.
- Better SEO: Custom fields can improve your site’s search engine optimization by giving you more control over how information is presented, potentially making your content more attractive to search engines.
- Custom User Experience: By utilizing custom fields, you can create tailored user experiences—like displaying specific data based on user preferences or interactions.
- Easy Integration: Custom fields integrate seamlessly with WordPress themes and templates, making it easy to customize layout and design based on the additional data.
Whether you’re adding a unique feature to your blog or managing a more complex content type, custom fields provide the tools necessary for innovation. They can make your site stand out and cater specifically to your audience’s needs. So, if you want to take your WordPress site to the next level, using custom fields is a fantastic option!
Preparing Your WordPress Environment
Before diving into adding custom fields to your WordPress post types, it’s crucial to ensure your environment is ready. A well-prepared WordPress setup can save you time and headaches later on. Here are some steps to help you get your environment ready:
- Update WordPress: Ensure you’re using the latest version of WordPress. New updates not only provide new features but also enhance security and performance.
- Backup Your Site: Always create a backup before making significant changes to your site. This includes files and database backups so you can easily restore your site if something goes wrong.
- Select a Compatible Theme: Choose a theme that supports custom fields or is easy to customize. A theme that works well with your plans will streamline the process.
- Familiarize Yourself with PHP: Since you’ll be coding a bit, brush up on your PHP skills. Custom fields require some snippets of code to be added to your theme’s template files.
- Set Up a Child Theme: If you’re modifying an existing theme, it’s wise to create a child theme. This way, your changes won’t be lost when the parent theme updates.
Once you’ve ticked off these essentials, you’ll be well-positioned to start adding custom fields. Taking these preparatory steps will help ensure a smoother experience as you customize your WordPress site!
Creating a Custom Field
Addition of custom fields can seem daunting at first, but once you dive in, you’ll see that it’s a straightforward process! Custom fields provide a way to add additional metadata to your WordPress posts, pages, or custom post types. Let’s break this down into bite-sized steps to make it easier for you.
To create a custom field, you’ll follow these simple steps:
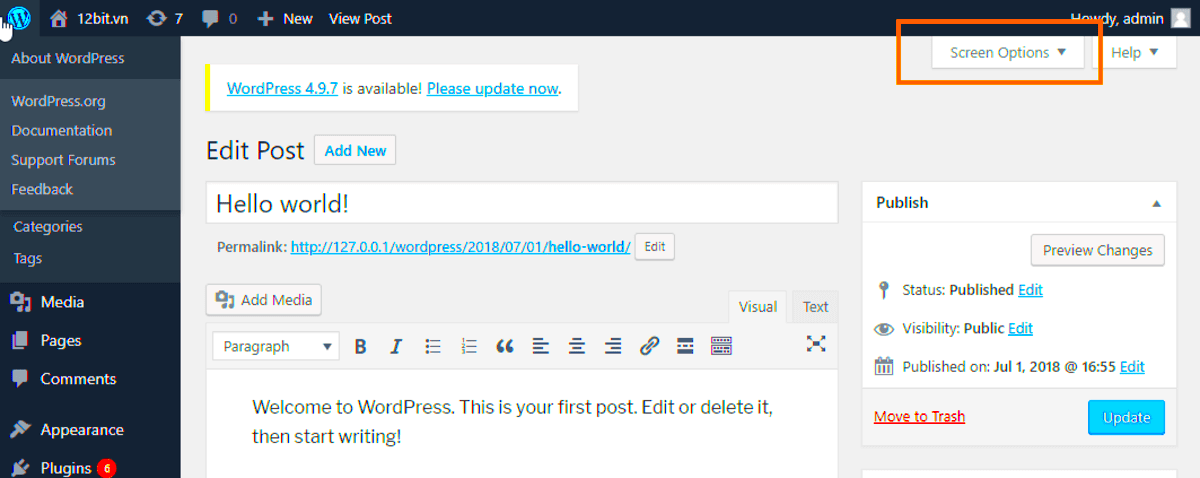
- Enable Custom Fields: First, make sure that custom fields are enabled in your post editor. You can do this by clicking on the “Screen Options” tab at the top of the edit screen and checking the “Custom Fields” option.
- Locate Custom Fields Box: Once enabled, scroll down to find the “Custom Fields” box in your post editor. If you don’t see it, you may need to refresh your page.
- Add a New Custom Field: In the Custom Fields section, you’ll see fields to add a new one. Enter a name for your field in the “Name” column (like ‘Author Note’ or ‘Book Genre’) and then fill in the appropriate value in the “Value” column.
- Save and Update: After adding your custom field, don’t forget to click the “Add Custom Field” button to save it. Once you’re done editing your post, hit the “Update” button on the post editor to ensure all your changes are saved.
And voila! You just created a custom field in WordPress. You’re now one step closer to customizing your posts exactly how you want them!
Displaying Custom Fields in Your Theme
Now that you have created a custom field, the next logical step is to display it on your website. Displaying custom fields in your theme allows you to share that additional information with your visitors, enhancing their experience significantly.
Here’s how you can display custom fields in WordPress:
- Locate the Theme File: Start by finding the relevant template file in your theme where you want the custom field to appear. Often, this will be in the
single.phporpage.phpfile, depending on your setup. - Use the get_post_meta Function: To retrieve the custom field value, use the
get_post_meta()function. Here’s a basic example of how you can implement this:<?php $custom_field_name = 'your_custom_field_name'; $custom_value = get_post_meta(get_the_ID(), $custom_field_name, true); echo '<p>' . esc_html($custom_value) . '</p>'; ?> - Style Your Output: Feel free to add some additional HTML or CSS to style your custom field output as desired. You might want to wrap it in a
<div>or use custom classes for more refined styling. - Test Your Changes: After adding the code, save the file and refresh your site to see if the custom field appears as expected. Make sure that it’s displaying the right information and looking good!
And there you go! You have successfully added and displayed custom fields in your WordPress theme without using any plugins. This hands-on approach not only enriches your content but also retains the flexibility of your site. Happy customizing!
Updating and Managing Custom Fields
Managing and updating custom fields in WordPress can be quite straightforward once you get the hang of it. After you’ve successfully added custom fields to your post types, you’ll likely want to maintain and modify them over time. Thankfully, WordPress allows you to make these adjustments with ease!
To update a custom field, follow these steps:
- Navigate to the post where you’ve added the custom fields.
- In the post editor, scroll down to find the custom fields section.
- Locate the field you wish to update.
- Modify the value as needed and click the “Update” button to save your changes.
Managing these custom fields is also crucial. You may want to:
- Delete Fields: If a custom field is no longer necessary, simply find it in the custom fields section and remove it.
- Rename Fields: Change the key name of a custom field if your needs shift.
- Batch Updates: If you have multiple posts using the same custom field, you might want to update them in bulk. You can use WordPress functions or WP-CLI for more advanced management.
It’s worth noting that when you change or delete a custom field, the associated data will also disappear, so always ensure you back up important information before making alterations. Managing custom fields effectively can lead to a more organized content structure, making your site easier to maintain over time!
Best Practices for Using Custom Fields
When it comes to adding custom fields to your WordPress post types, having a set of best practices can make your life a lot easier. Following these tips will help you keep your content organized, improve performance, and provide a better user experience.
- Keep It Simple: Only add custom fields that will significantly enhance your content. Avoid cluttering your post types with too many fields that may confuse both you and your readers.
- Standardize Field Names: Use consistent naming conventions for your custom fields. This practice not only prevents confusion but also makes it easier to manage your fields, especially if you are working in a team.
- Document Your Fields: Create a simple guide outlining what each custom field is intended for. This documentation can prove invaluable later on, especially when returning to a project after a long period.
- Test Regularly: Ensure you’re testing to see how your custom fields are functioning. Check compatibility with themes and plugins, as well as the impact on performance.
- Consider Future Needs: Think ahead regarding how your site may evolve. Will you need to add more custom fields later on? Make room for scalability.
By adhering to these best practices, you can maximize the potential of custom fields while minimizing headaches down the line. A well-structured system can radically transform your workflow and enhance the quality of content you produce!
Conclusion
Adding custom fields to WordPress post types without using plugins can empower you to create a more tailored and versatile content management experience. By harnessing the capabilities of WordPress’ built-in functions and custom code, you gain the flexibility to extend the functionality of your website significantly. Here’s a quick recap of the process:
- Understanding Custom Fields: Custom fields, also known as post meta, allow you to store additional information with your posts that can be displayed on the front end of your site.
- Utilizing Functions.php: By adding custom code in the
functions.phpfile of your theme, you can register custom fields for any post type. - Creating Meta Boxes: Use the
add_meta_box()function to create a user-friendly interface for entering custom field data. - Saving Data: Implement saving functionality using the
save_post()action hook to ensure that your custom field data is stored correctly in the database. - Displaying Custom Fields: Utilize
get_post_meta()to retrieve and display your custom fields on the front end wherever required.
This approach not only saves you the hassle of relying on third-party plugins but also provides a clean and efficient method to expand the capabilities of your WordPress website. By employing the methods outlined above, you can seamlessly integrate custom fields into your WordPress environment, thus enhancing user experience and the overall functionality of your site.


