If you’ve ever felt overwhelmed by the cluttered WordPress admin dashboard or wished you could prioritize the tools you use most, you’re not alone. Customizing your WordPress admin menus allows you to tailor the backend to better fit your workflow, making management smoother and more efficient. Whether you’re a developer, a site owner, or a client managing multiple sites, understanding how to reorder and organize admin menus can save you time and frustration. In this guide, we’ll explore how to customize those menus easily, so your dashboard works exactly how you need it to.
Understanding the Importance of Custom Admin Menus

Why bother customizing your WordPress admin menus? Well, think about your daily tasks. If every time you log in, you’re hunting through a long list of menu items to find the one you need, it slows down your productivity. Custom admin menus help you:
- Prioritize important tools: Keep frequently used sections like Posts or WooCommerce at the top.
- Reduce clutter: Hide or remove menu items that aren’t relevant to your role or workflow.
- Improve user experience: For clients or team members, a simplified dashboard makes managing the site less intimidating.
- Boost efficiency: Save time by navigating directly to the sections you use most, without sifting through irrelevant options.
Custom menus are especially valuable on multisite setups or when managing multiple users with different roles. By tailoring the admin interface, you ensure that everyone has quick access to the tools they need, without distraction. Plus, a well-organized dashboard looks more professional and can even help prevent accidental changes to less relevant settings. Overall, investing a little time in customizing your admin menus leads to a more streamlined, user-friendly experience that benefits everyone involved.
3. Step-by-Step Guide to Using the Custom_Menu_Order Feature
If you’re looking to streamline your WordPress admin dashboard and make it more tailored to your workflow, customizing the admin menu order is a fantastic way to do it. Here’s a simple, step-by-step guide to help you get started with the Custom_Menu_Order feature, whether you’re using a plugin or adding some custom code.
Step 1: Access Your WordPress Dashboard
Log into your WordPress admin area. From there, you’ll be working either through a plugin interface or directly editing your theme’s functions.php file. Make sure you have backups before making any changes, just in case something doesn’t go as planned.
Step 2: Understand the Menu Structure
Before reordering, it’s helpful to see the current menu structure. The main admin menu in WordPress includes items like Dashboard, Posts, Media, Pages, Comments, and more. Some plugins and themes add their own menu items. Knowing what’s what will make your customization smoother.
Step 3: Use the Custom_Menu_Order Hook or Plugin
Depending on your approach, you’ll either:
- Use a plugin that provides an intuitive interface for reordering menus
- Add custom code to your functions.php file to specify the desired order
Step 4: Define Your Custom Order
You’ll need to decide the sequence of menu items. For example, you might want to move Posts to appear after Pages or bring WooCommerce to the top if you manage an eCommerce store.
Step 5: Save and Refresh
Once you’ve set your preferences, save your changes. Refresh your admin dashboard to see the new menu order in action. If something looks off, double-check your settings or code and tweak as needed.
Tip:
If you’re not comfortable editing code, plugins are a safer and more user-friendly way to customize menu order. But if you’re a developer or comfortable with PHP, custom code gives you more flexibility.
4. Installing and Setting Up the Required Plugins or Code
Now that you know what you want to achieve, it’s time to set up the tools that will help you customize your admin menu. There are two main routes: using a plugin or adding custom code. Let’s walk through both options so you can choose what fits best for you.
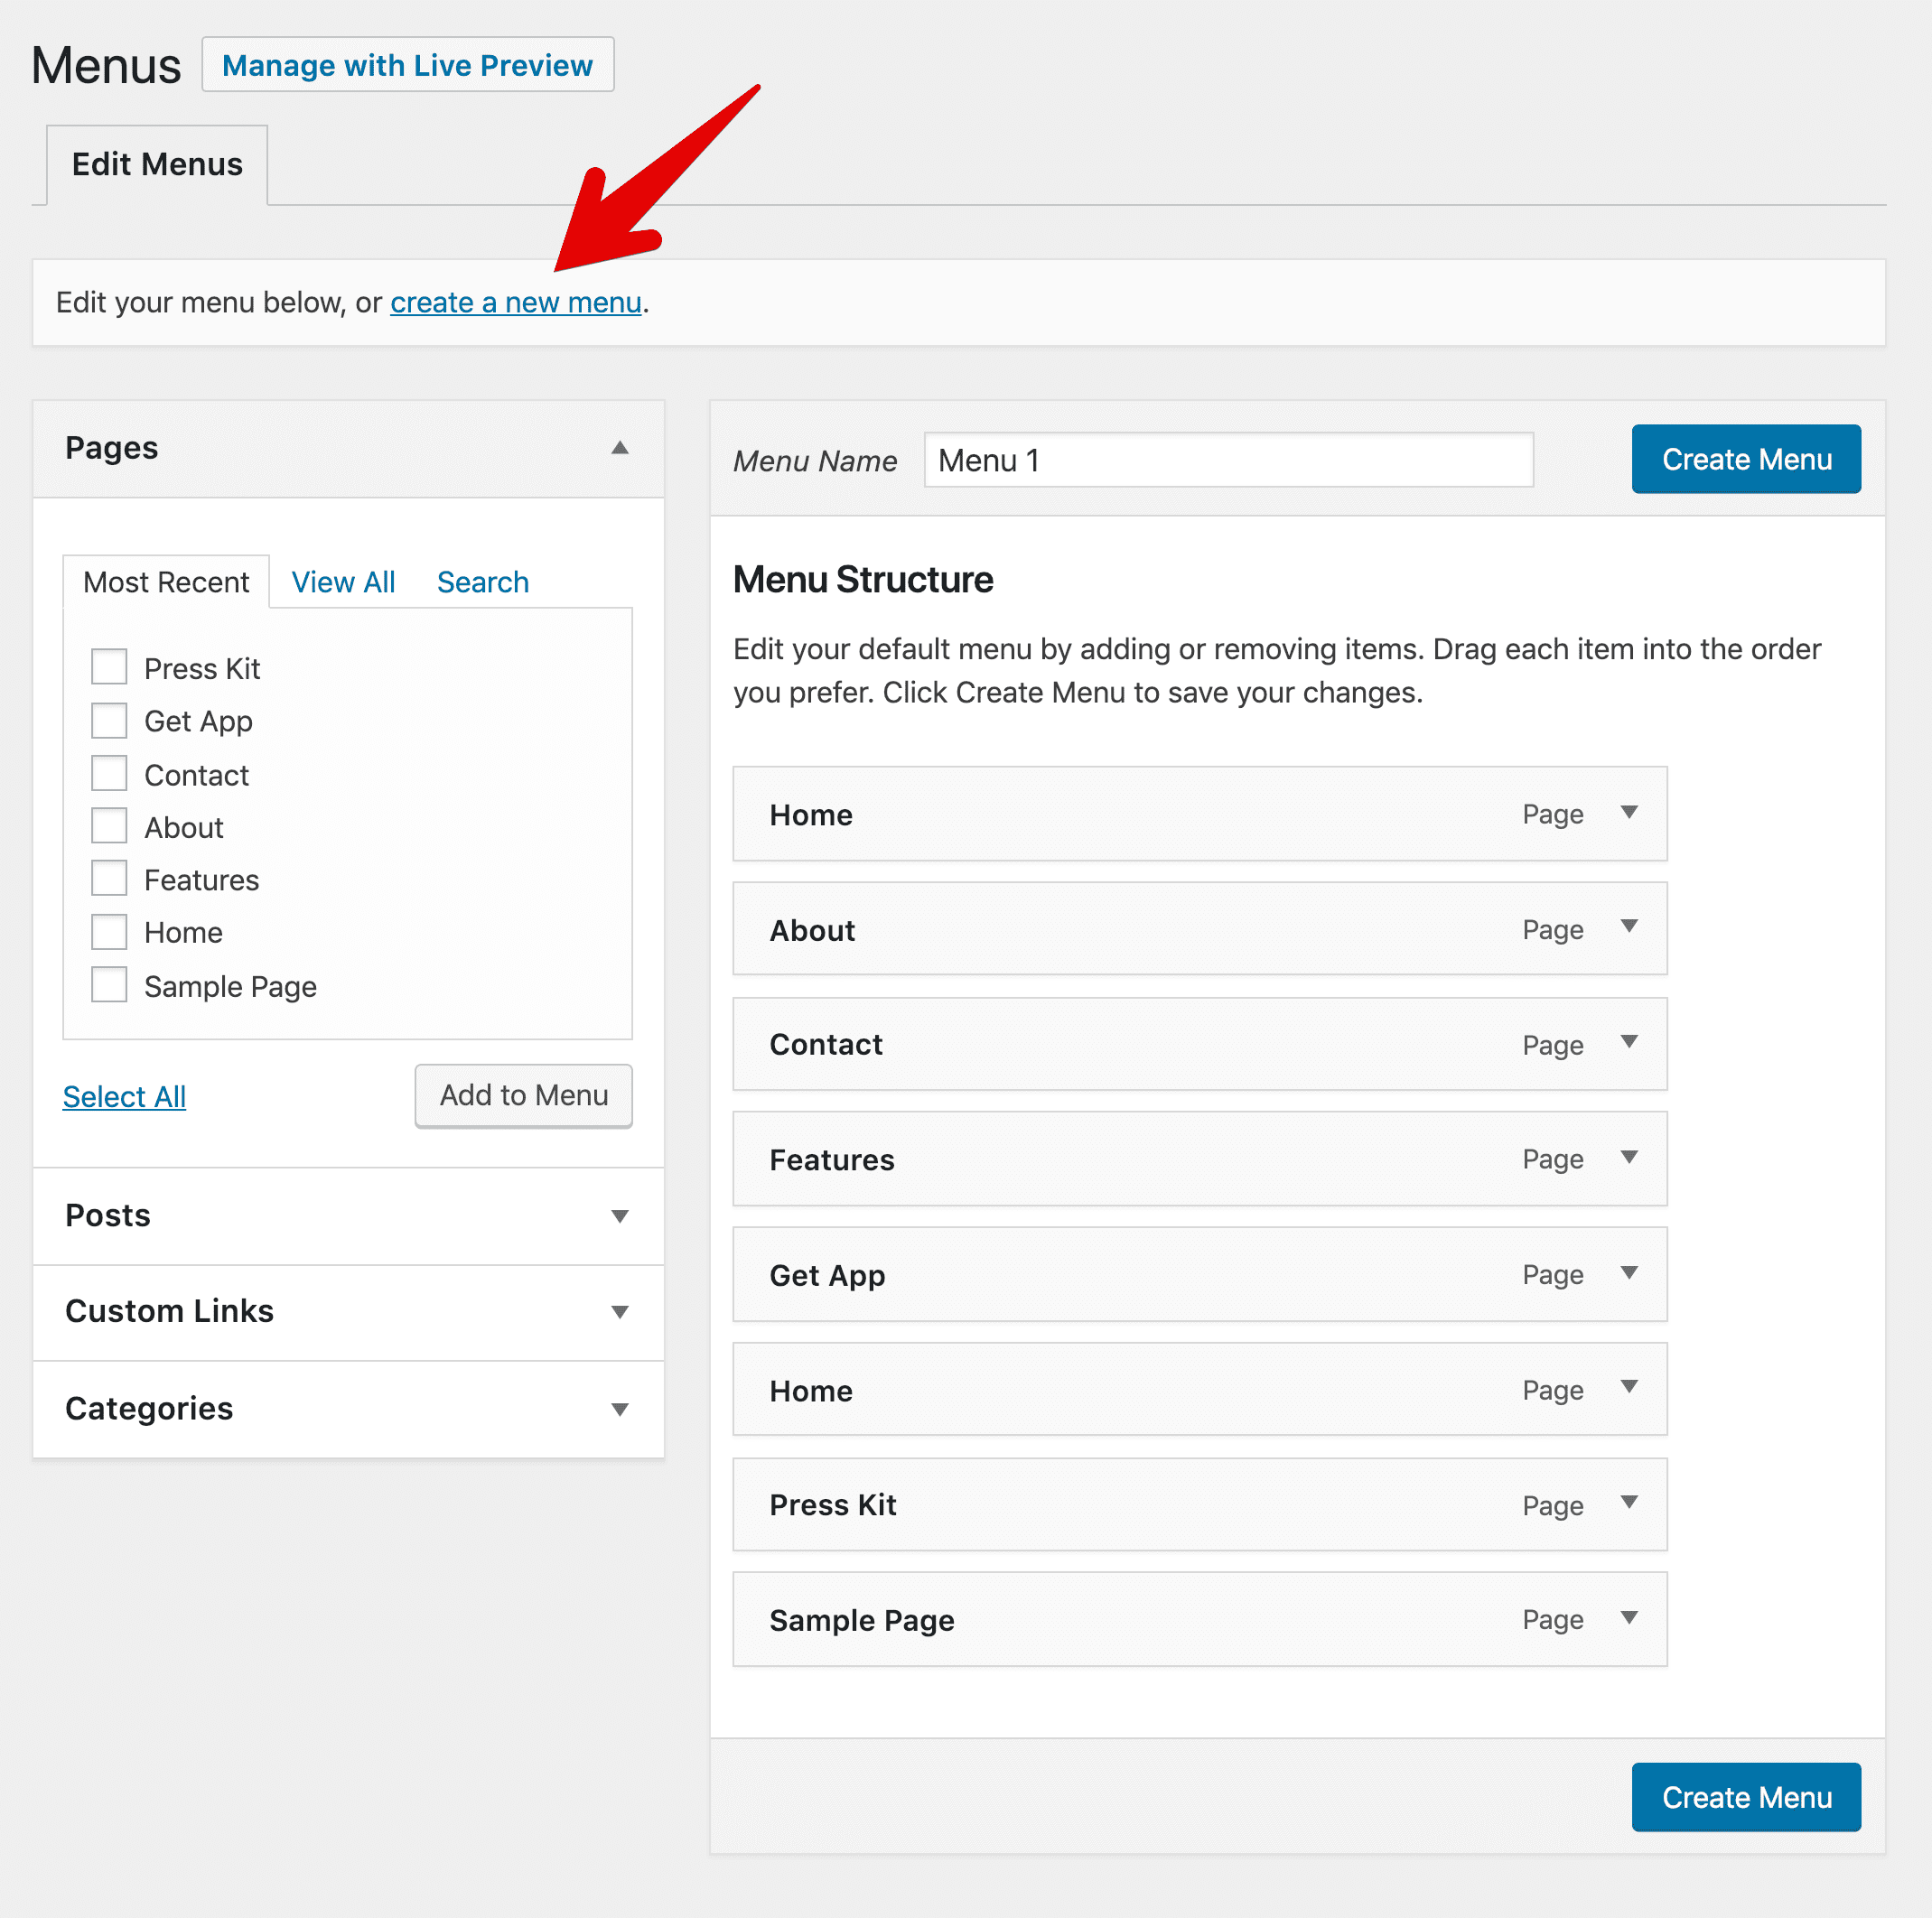
Option 1: Using a Plugin
Plugins are the easiest way to customize your admin menu without touching code. One popular plugin for this purpose is Admin Menu Editor. Here’s how to install and set it up:
- Go to Plugins > Add New in your WordPress dashboard.
- Search for Admin Menu Editor.
- Click Install Now and then Activate.
- Once activated, navigate to Settings > Menu Editor.
- You’ll see a drag-and-drop interface where you can reorder, hide, or rename menu items.
- Drag items to your preferred order and click Save.
This plugin also allows you to:
- Change menu labels
- Disable menu items for specific user roles
- Export and import menu configurations
Option 2: Adding Custom PHP Code
If you prefer a more hands-on approach or want to automate certain changes, you can add custom code to your theme’s functions.php file or a site-specific plugin. Here’s a simple example:
function custom_menu_order($menu_ord) { if (!$menu_ord) return true; // Define your custom menu order $new_order = array( 'index.php', // Dashboard 'edit.php', // Posts 'upload.php', // Media 'edit.php?post_type=page', // Pages 'edit-comments.php', // Comments 'plugins.php', // Plugins 'users.php', // Users 'tools.php', // Tools 'options-general.php' // Settings ); // Reorder menu based on your array return $new_order;}add_filter('custom_menu_order', '__return_true');add_filter('menu_order', 'custom_menu_order');Replace the array values with the menu slugs that match your desired order. You can find these slugs by inspecting the menu items or referring to WordPress documentation.
Important Tips:
- Always back up your site before editing code.
- If you’re not comfortable with PHP, stick with plugins.
- Test changes on a staging environment if possible.
Whichever method you choose, customizing your WordPress admin menu can significantly improve your workflow and make managing your site more efficient. Happy customizing!
5. Configuring the Custom Menu Order in WordPress
Now that you’ve set up a way to customize your WordPress admin menu, it’s time to get into the nitty-gritty of configuring the actual menu order. This step is all about fine-tuning your dashboard so that the most important or frequently used items are right at your fingertips. Trust me, a well-organized admin menu can save you tons of time and frustration in the long run.
First things first, if you’re using a plugin like Admin Menu Editor, it provides a very intuitive drag-and-drop interface. Here’s a quick rundown of how you can configure your menu order:
- Access the plugin settings: Usually, you’ll find this under Settings > Menu Editor or a similar menu item added to your dashboard.
- Drag and drop items: Simply click on an admin menu item and drag it to your preferred position. Think about what tasks you perform daily—if editing posts is your bread and butter, put it near the top.
- Rearrange submenus: You can also reorder submenus by expanding the parent menu and dragging the nested items around.
- Rename menu items: Need to make labels clearer? Many plugins allow you to edit the menu labels directly to better match your workflow.
- Save your changes: Once you’re happy with your new arrangement, hit the save button. Your admin menu will refresh to reflect your custom order.
If you prefer to do things programmatically, you can use the filter hook called custom_menu_order. Here’s a quick example:
function my_custom_menu_order($menu_order) { if (!$menu_order) return true; // Define your desired order of menu slugs $new_order = array( 'index.php', // Dashboard 'edit.php', // Posts 'upload.php', // Media 'edit.php?post_type=page', // Pages 'plugins.php', // Plugins 'users.php', // Users 'settings.php', // Settings ); // Reorder the menu items return $new_order;}add_filter('custom_menu_order', '__return_true');add_filter('menu_order', 'my_custom_menu_order');This snippet tells WordPress explicitly how to order your menus. Just customize the array to match your preferred order, and voila—you’re all set!
6. Best Practices for Managing Admin Menu Customizations
Customizing your WordPress admin menu is fantastic, but with great power comes great responsibility. To keep your dashboard efficient, secure, and user-friendly, here are some best practices to follow:
1. Keep the User Experience Simple
Remember, not everyone who logs into your site will be a developer or tech-savvy. If you’re managing a team or clients, aim for a clean and straightforward menu structure. Hide or remove unnecessary items to prevent clutter and confusion.
2. Use Roles and Capabilities Wisely
WordPress has a robust role and capability system. When customizing menus, consider leveraging plugins that allow role-based menu visibility. This way, admins see everything, while contributors only see what they need. It enhances security and usability.
3. Document Your Customizations
Whenever you tweak the admin menu—especially if you do it programmatically—make sure to document what you’ve changed. This helps you or your team troubleshoot later and prevents accidentally overwriting your customizations during updates.
4. Test Changes Thoroughly
Before rolling out menu customizations on a live site, test them on a staging environment. Check how the menus look across different user roles and devices. This ensures a seamless experience for everyone involved.
5. Backup Before Major Changes
Always back up your site before making significant modifications to your admin menu, especially if you’re editing code. This way, if something goes wrong, you can quickly revert to a previous state.
6. Keep Plugins and Themes Updated
Some menu customization plugins depend on specific WordPress versions. Make sure your plugins, themes, and WordPress core are up to date to avoid compatibility issues that could disrupt your admin interface.
7. Limit Customizations to What’s Necessary
While it’s tempting to customize everything, avoid overdoing it. Focus on the most impactful changes that genuinely improve your workflow. Over-customization can make future updates more complicated and harder to troubleshoot.
By following these best practices, you’ll ensure your WordPress admin dashboard remains a powerful yet manageable tool tailored perfectly to your needs. Happy customizing!
7. Common Issues and Troubleshooting Tips
While customizing your WordPress admin menus can be a game-changer for streamlining your workflow, sometimes you might run into a few hiccups along the way. Don’t worry—most issues are pretty straightforward to fix once you know what to look for.
Problem: Custom Menu Order Not Saving
If your menu order resets after refreshing or logging out, it’s likely a permission or plugin conflict. First, double-check that your user role has the necessary capabilities. For example, only administrators can typically make these changes.
- Try disabling other plugins temporarily to see if there’s a conflict.
- Clear your browser cache and cookies—sometimes the display doesn’t update immediately.
- If you’re using a caching plugin, clear its cache as well.
Problem: Changes Not Visible to Other Users
If you’ve customized the menu for your account but others don’t see the updates, ensure that:
- You’re logged in with the correct user role (admin privileges).
- The customizations are made in a way that affects all users—using a plugin or code that targets only your user ID can limit visibility.
- You clear caches so the changes are reflected on the frontend.
Problem: Conflicting Plugins or Themes
Sometimes, other plugins or themes may override your menu customizations. To troubleshoot:
- Deactivate plugins one by one to identify conflicts.
- Switch to a default theme like Twenty Twenty-Three temporarily to see if your theme is causing issues.
- Check error logs for conflicts or PHP errors that might hint at the problem.
Remember, always back up your site before making major changes. If you encounter persistent issues, consulting the plugin documentation or reaching out to support forums can also be helpful.
8. Additional Tips for Enhancing Your WordPress Admin Experience
Customizing your admin menu is just the start—there are plenty of additional ways to make your WordPress backend more efficient and tailored to your needs.
1. Use Custom Dashboard Widgets
Adding personalized dashboard widgets can give you quick access to important stats, recent posts, or custom reports. Plugins like WP Dashboard Notes or Admin Custom Dashboard allow you to create and manage these with ease.
2. Leverage User Role Management
Control who sees what by customizing user roles and permissions. This way, you can hide unnecessary menu items from contributors or subscribers, reducing clutter and potential confusion.
- Use plugins like User Role Editor for fine-tuned permission control.
- Assign roles based on responsibilities to keep the admin interface relevant for each user.
3. Incorporate Keyboard Shortcuts
Speed up your workflow by learning and customizing keyboard shortcuts in WordPress. For example, pressing Alt + Shift + M takes you to the Media Library, saving clicks.
4. Use Admin Themes and Custom CSS
Change the look and feel of your admin area with themes or custom CSS. This not only makes the interface more visually appealing but can also help differentiate environments (staging vs. production).
- Plugins like WP Admin UI Customize or Admin Customization make styling straightforward.
- Add custom CSS snippets to tweak fonts, colors, or layout elements for a better user experience.
5. Keep Your Admin Area Organized
Regularly review and prune your menu items, delete unused plugins, and organize your content structure. A clean, organized admin interface minimizes confusion and boosts productivity.
By implementing these tips, you can transform your WordPress admin area into a sleek, efficient workspace tailored exactly to your needs. Remember, the key is to make your environment work for you—so don’t hesitate to experiment and find what best enhances your workflow!
Conclusion and Final Thoughts on Customizing WordPress Admin Menus
Customizing the WordPress admin menus enhances your workflow by making frequently used features easily accessible and decluttering the interface. By reorganizing menu items, hiding unnecessary options, or adding custom links, you can tailor the admin area to better suit your specific needs.
Remember, the key benefits of customizing your admin menus include:
- Improved Efficiency: Save time by accessing important features quickly.
- Enhanced User Experience: Create a streamlined interface for clients or team members.
- Personalization: Make the admin area reflect your workflow and preferences.
Tools like Admin Menu Editor or custom code snippets provide flexible options for customization. Always back up your site before making significant changes, and test modifications on a staging environment when possible.
In conclusion, mastering the art of customizing WordPress admin menus empowers you to create a more efficient and user-friendly backend environment. Whether you’re a developer or a site owner, investing time in menu customization can significantly improve your overall WordPress experience.