If you’re diving into the world of WordPress development, you’ve probably heard about the REST API—it’s like a bridge that lets your website communicate smoothly with other applications, mobile apps, or even custom front-end interfaces. One of the key features of WordPress REST API is its ability to expose your site’s data, including posts, pages, and yes, categories! Categories are essential for organizing your content and making it easier for visitors to find what they’re looking for. But what if you want to access category data directly through the REST API? That’s exactly what we’re going to explore today—how to enable and work with category viewing in the REST API so you can enhance your site’s functionality.
Understanding the Default Limitations of Category Data in the REST API
By default, WordPress’s REST API doesn’t provide full access to all category-related data out of the box. You might notice that when you try to fetch categories via the API, the response is limited—sometimes only basic information like the category ID and name appears, but other details such as descriptions, slug, or custom fields are missing. This can be frustrating if you’re trying to build a custom frontend or integrate your site with other applications that need comprehensive category data.
The main reasons behind these limitations are:
- Default Endpoints Are Minimal: WordPress provides basic endpoints, but they’re primarily designed for core functionalities. Extended data might not be included unless explicitly added.
- Permissions and Capabilities: Some category data may be restricted based on user permissions, especially if you’re working with authenticated endpoints.
- Performance Considerations: Fetching all category details can be resource-intensive, so the API is optimized for quick, lightweight requests by default.
So, if you’re trying to display a detailed list of categories or include category data within your custom API endpoints, you’ll need to extend the default REST API responses. This involves registering custom fields, creating custom endpoints, or modifying existing ones. Don’t worry—it’s easier than it sounds, and in the next sections, we’ll walk through how to unlock and enable full category viewing in your WordPress REST API.
3. Step-by-Step Guide to Enable Category Viewing in the REST API
If you’ve ever tried to fetch categories through the WordPress REST API and found that they’re not showing up as expected, don’t worry — it’s a common scenario. By default, WordPress restricts some data for security reasons, but enabling category viewing is straightforward once you know the steps. Here’s a simple, step-by-step guide to get you up and running:
Step 1: Check Your Current REST API Endpoints
First, it’s good to see what endpoints are available. You can do this by visiting https://yourwebsite.com/wp-json/ in your browser. Look for the /wp/v2/categories endpoint. If it’s not there, you might need to enable it manually.
Step 2: Register the Categories Endpoint (if needed)
If categories aren’t showing up, you can add a code snippet to your theme’s functions.php file or a site-specific plugin. Here’s a simple example:
function register_custom_endpoints() { register_rest_route( 'wp/v2', '/categories/', array( 'methods' => 'GET', 'callback' => 'get_categories_for_rest', ));}function get_categories_for_rest( $request ) { $categories = get_terms( array( 'taxonomy' => 'category', 'hide_empty' => false, )); if ( is_wp_error( $categories ) ) { return new WP_Error( 'rest_category_error', 'Unable to get categories', array( 'status' => 500 ) ); } return rest_ensure_response( $categories );}add_action( 'rest_api_init', 'register_custom_endpoints' );This code explicitly registers the categories endpoint, making sure they’re accessible via REST API calls.
Step 3: Make Sure Categories Are Public
Sometimes, categories might be set to private or have limited visibility. Check your category settings in the WordPress admin panel:
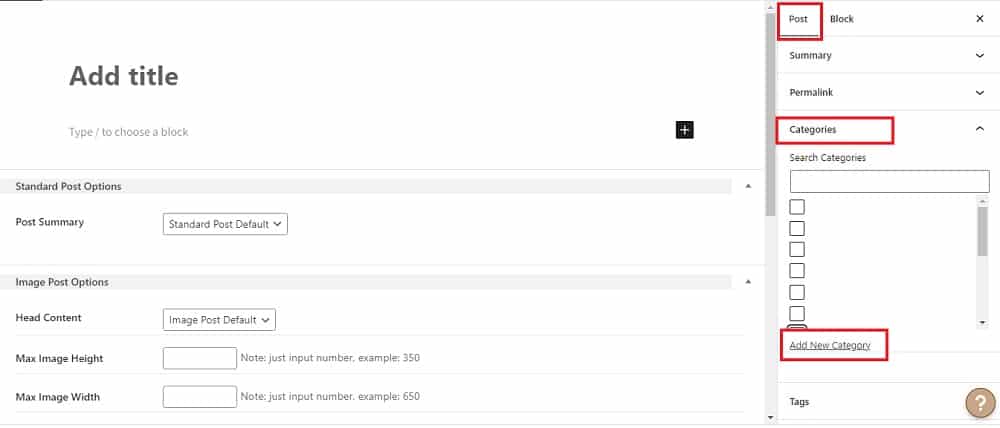
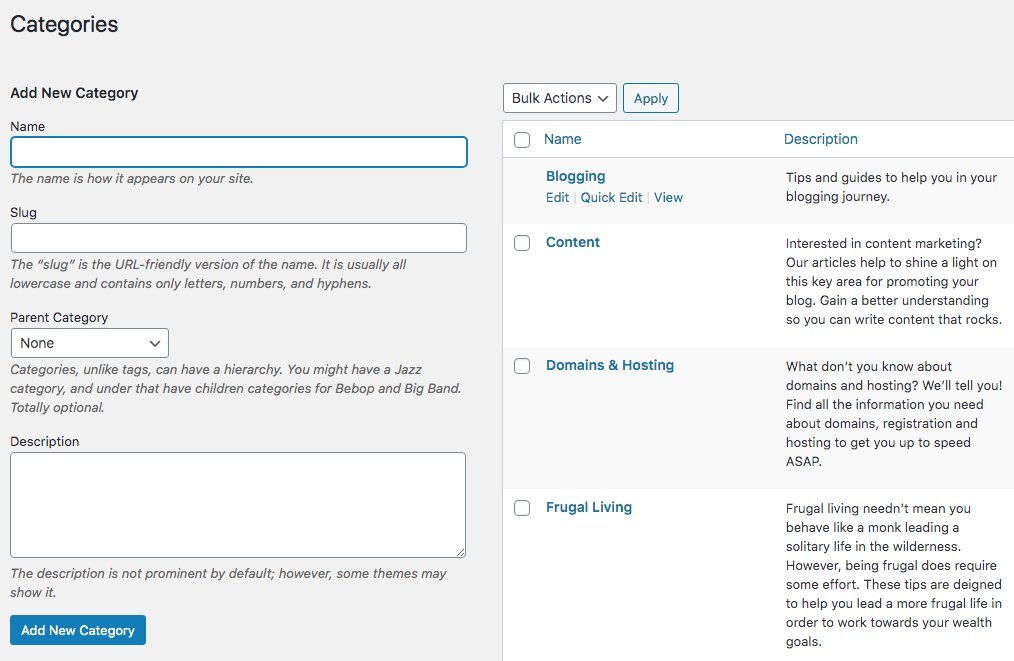
- Go to Posts > Categories
- Edit each category to ensure it’s public and visible.
Also, verify your user permissions. The REST API respects user roles, so ensure that the user or API token you’re using has the right capabilities.
Step 4: Test Your Endpoint
Finally, test your setup by visiting https://yourwebsite.com/wp-json/wp/v2/categories. You should see a JSON response with all your categories listed. If not, revisit the previous steps or check for plugin conflicts that may block REST API access.
4. Using Plugins to Extend REST API Functionality for Categories
If editing code isn’t your thing or you want a more user-friendly approach, plugins can make this process much easier. There are several great options to extend the REST API and ensure your categories are accessible and customizable. Let’s explore some of the most popular ones:
1. WP REST API Controller
This plugin provides an intuitive interface to control what data is exposed via the REST API. You can enable or disable endpoints, customize what fields are visible, and even add custom data without touching code. It’s perfect for non-developers who want granular control.
2. REST API Toolbox
REST API Toolbox enhances the default REST API by adding endpoints and improving existing ones. It allows you to:
- Expose additional taxonomy data, including categories
- Control access permissions
- Add custom fields to existing endpoints
It’s a lightweight plugin that’s easy to configure and very flexible.
3. Custom REST API Endpoints
If you need even more control, some plugins like WP REST API Controller or Advanced Custom Fields (ACF) combined with REST API extensions can help you create custom endpoints for categories and other taxonomies. This approach is ideal if you want to:
- Display specific category data on your site
- Integrate categories into custom applications or dashboards
- Filter categories based on custom criteria
4. How to Install and Use a Plugin
Getting started is simple:
- Navigate to Plugins > Add New in your WordPress dashboard.
- Search for your chosen plugin, like WP REST API Controller.
- Click Install Now and then Activate.
- Follow the plugin’s documentation to configure category endpoints and permissions.
Many plugins provide a settings page where you can toggle endpoint visibility or customize data exposure without any coding experience.
Final Tip
Always remember to back up your site before installing new plugins or making significant changes. And once you’ve enabled category viewing, test your API endpoints thoroughly to ensure everything works smoothly. Whether you choose to do it manually or with a plugin, making your categories accessible via the REST API opens up a lot of possibilities for custom integrations, mobile apps, or headless WordPress setups. Happy API-ing!
5. Custom Coding Solutions for Displaying Categories in REST API Responses
So, you’ve been exploring the WordPress REST API and noticed that categories aren’t showing up by default in your JSON responses. Don’t worry—this is a common scenario, and with some custom coding, you can tailor the API to include category data exactly how you want it.
One of the most straightforward ways to add categories to your REST API responses is by using WordPress hooks, specifically register_rest_field(). This function allows you to add custom fields to existing REST API endpoints, making it a powerful tool for extending the default behavior.
Here’s a simple example:
// Add categories to the REST API response for postsfunction add_categories_to_rest_response() { register_rest_field( 'post', 'categories_info', array( 'get_callback' => function( $post ) { // Fetch categories associated with the post $categories = get_the_category( $post['id'] ); if ( ! empty( $categories ) ) { // Return an array of category names and slugs return array_map( function( $category ) { return array( 'name' => $category->name, 'slug' => $category->slug, ); }, $categories ); } return array(); }, 'schema' => array( 'type' => 'array', 'items' => array( 'type' => 'object', 'properties' => array( 'name' => array( 'type' => 'string' ), 'slug' => array( 'type' => 'string' ), ), ), ), ) );}add_action( 'rest_api_init', 'add_categories_to_rest_response' );This code snippet hooks into the REST API initialization process and adds a new field called categories_info to each post response. Inside the callback, it fetches the categories linked to the post and returns an array of category names and slugs.
If you’re dealing with custom post types or want to include categories in other endpoints, you can adapt this approach accordingly. For example, replace 'post' with your custom post type slug or add similar code for pages or custom endpoints.
Remember, customizing REST API responses with code gives you full control, but it requires some familiarity with PHP and WordPress hooks. Also, make sure to test your changes thoroughly to ensure they work as intended without affecting other parts of your site.
6. Best Practices for Managing and Securing REST API Category Data
Now that you’ve enabled category data in your REST API responses, it’s crucial to think about how to manage this information responsibly. After all, exposing too much data or mishandling permissions can lead to security concerns or data leaks.
Here are some best practices to keep in mind:
- Limit data exposure: Only include the category information necessary for your application. For instance, if the category slug is enough, avoid sending additional details like category descriptions unless needed.
- Authenticate and authorize: Use proper permissions to control who can access or modify category data via the API. You can customize REST API permission callbacks to restrict access to authenticated users or specific roles.
- Use nonce verification: For operations that change data, implement nonce checks to prevent CSRF attacks and unauthorized modifications.
- Implement rate limiting: Protect your API endpoints from abuse by setting limits on how often they can be called, especially if they expose sensitive information.
- Keep your WordPress and plugins updated: Regular updates help patch security vulnerabilities that could be exploited via the REST API.
- Monitor API usage: Use logging and monitoring tools to track who is accessing your API and what data they’re requesting. This can help you spot suspicious activity early.
- Consider hiding categories from public API responses if sensitive: If certain categories contain sensitive or private data, you might choose to exclude them altogether or restrict access via custom permission checks.
By following these best practices, you ensure that your REST API remains a powerful tool for your site’s functionality while minimizing potential security risks. Always think about the principle of least privilege—only expose what’s necessary and keep sensitive data protected.
In summary, enabling category viewing via the REST API is a combination of customizing your code thoughtfully and managing access wisely. With proper setup and ongoing management, you can leverage categories effectively without compromising your site’s security or performance.
7. Testing Your REST API for Category Visibility
Now that you’ve set up your custom endpoint and made sure your categories are visible through the REST API, it’s time to test and confirm everything’s working smoothly. Testing is a crucial step because it helps you catch any issues early and ensures your site visitors or applications can access the data they need.
Here’s a simple way to test your REST API:
- Use a Web Browser: Open your browser and enter your API endpoint URL, something like:
https://yourwebsite.com/wp-json/custom/v1/categories. If everything’s set up correctly, you should see a JSON response listing your categories with their details. - Use API Testing Tools: Tools like Postman or Insomnia make testing APIs easier. – Create a new GET request to your endpoint URL. – Hit “Send” and examine the response. – Check if the categories appear as expected, with correct IDs, names, and links.
- Check for Errors: If you get an error message or an empty array, double-check your custom code. Make sure your `register_rest_route()` function is correctly defined, and your callback retrieves categories properly.
- Verify User Permissions: Remember, REST API responses can be restricted by user capabilities. If you’re testing as a logged-in user, ensure your user role has the right permissions. For public access, your code must allow unauthenticated requests to see categories.
It’s also good practice to test edge cases:
- What happens if there are no categories? Does your API handle that gracefully?
- Are the category details accurate and complete?
- Does pagination work if you have many categories?
By thoroughly testing, you ensure that your custom category visibility feature is reliable and ready for prime time. Remember, consistent testing helps you catch issues early and keeps your site running smoothly for all users.
8. Conclusion and Additional Resources for WordPress REST API Customization
Congratulations! You’ve successfully learned how to enable category viewing in the WordPress REST API. By creating custom endpoints and adjusting permissions, you can tailor the API to fit your site’s specific needs. This unlocks a lot of potential — from building custom frontend apps to integrating with third-party services.
Just to recap, here are the key steps you took:
- Created a custom REST API endpoint using `register_rest_route()`
- Ensured your categories are accessible by modifying permissions and callbacks
- Tested your endpoint to confirm categories appear as expected
- Refined your code to handle different scenarios and ensure security
But don’t stop here! The WordPress REST API is incredibly flexible, and you can extend it further. Here are some additional resources to help you deepen your understanding and continue customizing:
- Official WordPress REST API Developer Handbook — The ultimate resource for all things REST API in WordPress.
- Extending the REST API — Learn how to add custom endpoints, fields, and more.
- Using the REST API — Practical guides and best practices for working with the API.
- Creating Custom REST API Endpoints in WordPress — Step-by-step tutorials with examples.
Remember, customizing the REST API can seem daunting at first, but with patience and practice, you can unlock powerful capabilities for your WordPress site. Keep experimenting, stay curious, and don’t hesitate to reach out to the community for support. Happy coding!