Looking for ways to make your WordPress site more lively and engaging? Slideshows and GIFs are fantastic tools to catch visitors’ attention and communicate your message more effectively. They add movement and visual interest that static images just can’t match. Whether you’re showcasing your latest products, sharing a story, or simply want to make your content pop, integrating slideshows and GIFs can elevate your website’s appeal. Don’t worry if you’re new to this—adding these dynamic elements is easier than you think, and I’ll guide you through the process step by step.
Benefits of Using Slideshows and GIFs on Your Website

Incorporating slideshows and GIFs into your website isn’t just about making things look pretty—it offers several real benefits that can help your site thrive:
- Increased Engagement: Moving visuals attract attention and encourage visitors to stay longer. People are naturally drawn to animations and slideshows, making your content more memorable.
- Better Storytelling: They help you tell stories more effectively by showcasing multiple images or concepts in one space. For example, a slideshow can display different angles of a product, while GIFs can illustrate a process or action quickly.
- Enhanced User Experience: Interactive and visually appealing elements make your site more enjoyable to browse. When visitors find your site interesting, they’re more likely to explore further or return later.
- Highlighting Key Messages: Use GIFs or slideshows to emphasize important points, promotions, or features without overwhelming your visitors with text.
- SEO Benefits: Engaging content can reduce bounce rates and increase time spent on your site, which are positive signals for search engines.
Plus, with the right tools and a little creativity, adding slideshows and GIFs can be straightforward—no advanced coding needed! So, why not give your WordPress site a fresh, dynamic look that keeps visitors engaged and eager to see more?
3. Step-by-Step Guide to Adding Slideshows to Your WordPress Site

Adding a slideshow to your WordPress site is a fantastic way to showcase images, promotions, or important content in an engaging way. Don’t worry if you’re new to this — it’s pretty straightforward, especially with the right plugins. Let’s walk through the steps together!
Step 1: Choose a Slideshow Plugin
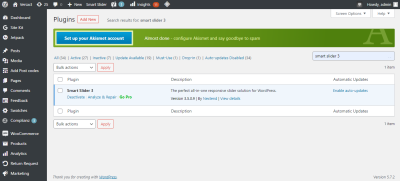
There are several popular slideshow plugins out there, such as MetaSlider, Smart Slider 3, and Slider Revolution. For beginners, MetaSlider is a solid choice because it’s user-friendly and free. Just head to your WordPress dashboard, click on Plugins > Add New, then search for your preferred plugin. Once you find it, click Install Now and then Activate.
Step 2: Create Your Slideshow
- Navigate to the plugin’s menu (e.g., MetaSlider) in your dashboard.
- Click on Add New or Create Slider.
- Upload your images or select media from your library.
- Adjust settings like transition effects, slide duration, and navigation controls.
Step 3: Insert the Slideshow into Your Content
Once your slideshow looks perfect, the plugin will generate a shortcode — a small snippet of code like [metaslider id="123"]. Copy this shortcode.
Next, go to the page or post where you want the slideshow to appear. Paste the shortcode directly into the editor where you’d like the slideshow to show up. If you’re using the block editor (Gutenberg), you can add a Shortcode block and paste it there. If you’re using the classic editor, just paste it into the content area.
Step 4: Preview and Publish
Preview your page to see the slideshow in action. Make any tweaks if needed, then hit Publish or Update. And voilà! Your engaging slideshow is now live.
Remember, the key is to keep your slides visually appealing and not overcrowded — a few high-quality images are better than a cluttered slideshow. With just a few clicks, you can create a dynamic experience that keeps visitors hooked!
4. How to Insert GIFs into Your WordPress Pages and Posts
GIFs are a fun way to add humor, demonstrate a process, or grab attention on your site. Inserting them into your WordPress content is super simple once you know how. Let’s get into it!
Step 1: Find or Create Your GIF
You can source GIFs from popular sites like Giphy, Tenor, or create your own using tools like GIF Maker or Canva.
Download the GIF file to your computer or copy its URL if you prefer embedding directly from the web.
Step 2: Upload the GIF to Your Media Library
- In your WordPress dashboard, go to Media > Add New.
- Upload your GIF file just like you would upload an image.
- Once uploaded, click on the GIF to get its URL, or note the filename.
Step 3: Insert the GIF into Your Post or Page
There are two easy ways to do this:
- Using the Block Editor (Gutenberg):
- Edit the post or page where you want the GIF.
- Add a Image block.
- Click Upload to select your GIF from your media library, or click Media Library and choose your uploaded GIF.
- Click on the spot in your content where you’d like the GIF.
- Click the Add Media button above the editor.
- Select your GIF from the media library and click Insert into post.
Step 4: Adjust Size and Alignment
Once inserted, you can click on the GIF to resize it directly in the editor or set alignment options (left, center, right). For better responsiveness, it’s good practice to keep the size modest and let your site’s CSS handle scaling on different devices.
Extra Tips:
- Use GIFs sparingly to avoid slowing down your site — optimize them for web use.
- Add descriptive alt text to improve accessibility and SEO.
- Be mindful of copyright — use your own GIFs or ensure you have permission to use others’ creations.
And that’s it! With these simple steps, your pages and posts will be more lively and engaging, encouraging visitors to stay longer and interact more with your content. Whether it’s a fun GIF or a captivating slideshow, adding visual flair makes your website stand out!
5. Best Plugins for Creating Stunning Slideshows on WordPress
When it comes to jazzing up your WordPress site with eye-catching slideshows, choosing the right plugin can make all the difference. Luckily, there are some fantastic options out there that are user-friendly, feature-rich, and compatible with most themes. Let’s explore some of the top contenders:
- MetaSlider – This plugin is a favorite among beginners and pros alike. It offers a simple drag-and-drop interface, multiple slideshow types (Flex Slider, Nivo Slider, Responsive Slides, etc.), and easy integration. Plus, it supports SEO-friendly images and captions.
- Smart Slider 3 – Known for its stunning visual effects and advanced customization options, Smart Slider 3 lets you craft truly dynamic slideshows. It features a live slide editor, pre-made templates, and even the ability to add layers like buttons, text, and images for a more interactive experience.
- Slider Revolution – If you’re after premium, highly customizable slideshows with animations and multimedia support, Slider Revolution is a solid pick. Although it has a steeper learning curve, it’s incredibly powerful for creating professional, eye-popping slideshows that can include videos, parallax effects, and more.
- WP Slick Slider and Image Carousel – For those who want a straightforward, lightweight solution, this plugin offers sleek, responsive carousels with minimal fuss. It’s ideal for showcasing images or products without bogging down your site.
Most of these plugins come with free versions, so you can experiment without commitment. When choosing a plugin, consider your site’s design, the level of customization you need, and whether you want to incorporate multimedia elements. Also, make sure the plugin is regularly updated and compatible with your current WordPress version to avoid headaches down the road.
6. Tips for Selecting the Right GIFs and Slideshows for Your Audience
Now that you’re equipped with the best plugins, let’s talk about how to pick the right visuals—GIFs and slideshows—that truly resonate with your audience. It’s not just about making your site look pretty; it’s about engaging visitors and delivering your message effectively. Here are some practical tips:
Know Your Audience
Understanding who your visitors are is key. Are they professionals looking for serious content? Or are they casual browsers who enjoy fun, lighthearted visuals? For example, a tech blog might use sleek, modern slideshows to showcase new gadgets, while a travel site could incorporate vibrant GIFs of scenic destinations to inspire wanderlust.
Align Visuals with Your Brand
Your GIFs and slideshows should reflect your brand’s personality and tone. If your brand is playful and youthful, use lively, humorous GIFs. If you’re more formal or luxury-focused, opt for elegant, minimalist slideshows that emphasize quality and sophistication.
Keep It Relevant and Purposeful
Every visual should serve a purpose—whether it’s highlighting a product, explaining a feature, or entertaining your audience. Avoid cluttering your site with random GIFs or slideshows that don’t add value. Instead, focus on visuals that enhance your content and make your message clearer.
Balance Visuals and Content
While eye-catching visuals are great, they shouldn’t overshadow your main content. Use slideshows and GIFs to complement your text, not replace it. For example, a product page might feature a slideshow demonstrating the product in action, paired with detailed descriptions.
Optimize for Speed and Responsiveness
Heavy GIFs or overly complex slideshows can slow down your site, frustrating visitors. Use optimized images and consider lazy loading options. Also, test your visuals on different devices to ensure they look good and function smoothly across desktops, tablets, and smartphones.
Test and Iterate
Finally, don’t be afraid to experiment. Track how visitors interact with your slideshows and GIFs—are they engaging users? Do they lead to more conversions? Use tools like Google Analytics to gather insights and refine your visual strategy over time.
Remember, the goal is to create a visual experience that captivates your audience, supports your content, and boosts engagement—all while maintaining a seamless, enjoyable browsing experience. Keep these tips in mind, and you’ll be well on your way to creating a more dynamic and engaging WordPress site!
7. Optimizing Media for Fast Loading and Better User Experience
Let’s face it — nobody likes a slow website. When your slideshows and GIFs take ages to load, visitors tend to get frustrated and bounce away. That’s why optimizing your media is so crucial. Luckily, there are simple steps you can take to ensure your visual content loads quickly without sacrificing quality.
First off, always choose the right file formats. For images and GIFs, formats like JPEG and PNG are common, but for animations, GIFs are the go-to. However, newer formats like WebP offer high quality at smaller sizes, which can significantly boost load times. Many WordPress plugins automatically convert your images to WebP, so it’s worth exploring those options.
Next, compress your media files before uploading. There are plenty of free and paid tools like TinyPNG, ImageOptim, or online compressors that reduce file sizes without noticeable loss of quality. Smaller files mean faster loading and less strain on your server.
Another tip is to implement lazy loading. This technique delays loading images, GIFs, or slides until they are about to come into the visitor’s viewport. WordPress now has native lazy loading support, but if you want more control, plugins like Lazy Load by WP Rocket or a3 Lazy Load can do wonders. Lazy loading improves page speed and enhances user experience, especially on mobile devices or long pages.
Using a Content Delivery Network (CDN) is another game-changer. CDNs distribute your media across servers worldwide, so when someone visits your site, the media is delivered from the closest server, reducing latency. Popular options include Cloudflare, StackPath, and BunnyCDN. Many CDN providers integrate seamlessly with WordPress and can be configured with just a few clicks.
Lastly, consider the placement and number of slideshows and GIFs on your pages. Overloading a page with too many large media elements can slow things down. Use slideshows sparingly and optimize their size and transition effects. When it comes to GIFs, opt for shorter animations and keep file sizes minimal. Remember, balance is key — you want your visuals to engage, not hinder your site’s performance.
8. Conclusion: Enhancing Engagement with Visual Content on WordPress
By now, it’s clear that incorporating slideshows and GIFs can make your WordPress site more lively, interactive, and engaging. Visual content captures attention, conveys messages quickly, and keeps visitors interested. But just as important as adding media is ensuring it loads fast and provides a smooth experience.
Optimizing your media files—through proper formats, compression, lazy loading, and leveraging CDNs—ensures your site remains swift and user-friendly. Remember, a fast-loading site not only improves user satisfaction but also benefits your SEO rankings. It’s all about providing a seamless experience that encourages visitors to stay longer and explore more.
So, whether you’re showcasing your latest products with dynamic slideshows or adding fun GIFs to inject personality into your content, keep these best practices in mind. The right visual content, presented efficiently, can significantly boost your site’s engagement and help you connect better with your audience.
Ready to take your WordPress site to the next level? Start experimenting with different media, optimize diligently, and watch your engagement soar!


