When it comes to creating a stunning website, typography plays a crucial role in capturing your visitors’ attention and communicating your message effectively. WordPress makes it easy to customize your site’s appearance, but sometimes, standard text styles aren’t enough to make your content stand out. That’s where adding text borders comes into play. By incorporating borders around your text, you can add a touch of elegance, improve readability, and make key messages pop. Whether you’re a blogger, small business owner, or designer, understanding how to enhance your typography can take your website to the next level.
Why Adding Text Borders Improves Your Website’s Design
Adding borders to your text isn’t just a decorative choice; it’s a smart design technique that offers several benefits. First, it creates a visual emphasis on important content, drawing visitors’ eyes exactly where you want them. Imagine highlighting a quote, a call-to-action, or a special announcement with a simple border—you instantly make it more noticeable.
Moreover, text borders can help improve overall readability, especially against busy backgrounds or colorful images. They act like a frame, separating the text from the rest of the page and making it easier for visitors to focus. This is particularly useful for headers, banners, or promotional sections where clarity is key.
From a design perspective, borders add structure and balance to your layout. They can complement your website’s color scheme and style, creating a cohesive look. Whether you prefer a subtle outline or a bold box around your text, borders give you creative flexibility to match your branding.
In short, incorporating text borders is a simple yet effective way to boost your website’s aesthetic appeal, improve user experience, and make your content more engaging. It’s a small change that can make a big difference—so let’s dive into how you can easily add borders to your WordPress text!
3. Methods to Add Text Borders in WordPress

Adding borders around your text can really make your content stand out and improve readability. Luckily, there are several ways to do this in WordPress, whether you’re a beginner or a bit more tech-savvy. Let’s explore the most popular methods to add those stylish borders to your text.
Method 1: Using Built-in Block Editor Options
Many modern WordPress themes and block editors like Gutenberg come with advanced typography options. Some blocks offer border settings directly within their style options. For example, you might find border controls in paragraph blocks, headings, or custom blocks provided by page builders.
- Look for border or box-shadow options within the block settings.
- Adjust the border width, color, and style to your liking.
This method is straightforward but may depend on your theme or page builder’s capabilities.
Method 2: Using Page Builder Plugins
Plugins like Elementor, Beaver Builder, or Divi give you extensive control over your content’s appearance. They usually include options to add borders around text modules or sections.
- Drag a text widget or module onto your page.
- Navigate to style settings.
- Look for border options and customize as needed.
This approach offers more flexibility and visual controls without touching any code.
Method 3: Applying Custom CSS
If you’re comfortable with a bit of code, custom CSS is a powerful way to add unique borders. It allows for precise styling tailored to your website’s look and feel. This method works well if you want consistent borders around specific text elements.
- Create a CSS class or ID.
- Assign it to your text element.
- Add custom CSS to style the border.
We’ll go in-depth into this method in the next section, providing a step-by-step guide to help you achieve perfect borders.
4. Step-by-Step Guide to Adding Text Borders with Custom CSS
Ready to get your hands dirty with CSS? Don’t worry — I’ll walk you through each step to add beautiful borders around your text in WordPress. This approach gives you the most control and can be reused across your site for a consistent look.
Step 1: Identify the Text Element You Want to Style
First, decide which text you want to add a border around. It could be a heading, a paragraph, or a special call-out. To keep things simple, let’s say you want to style a specific paragraph.
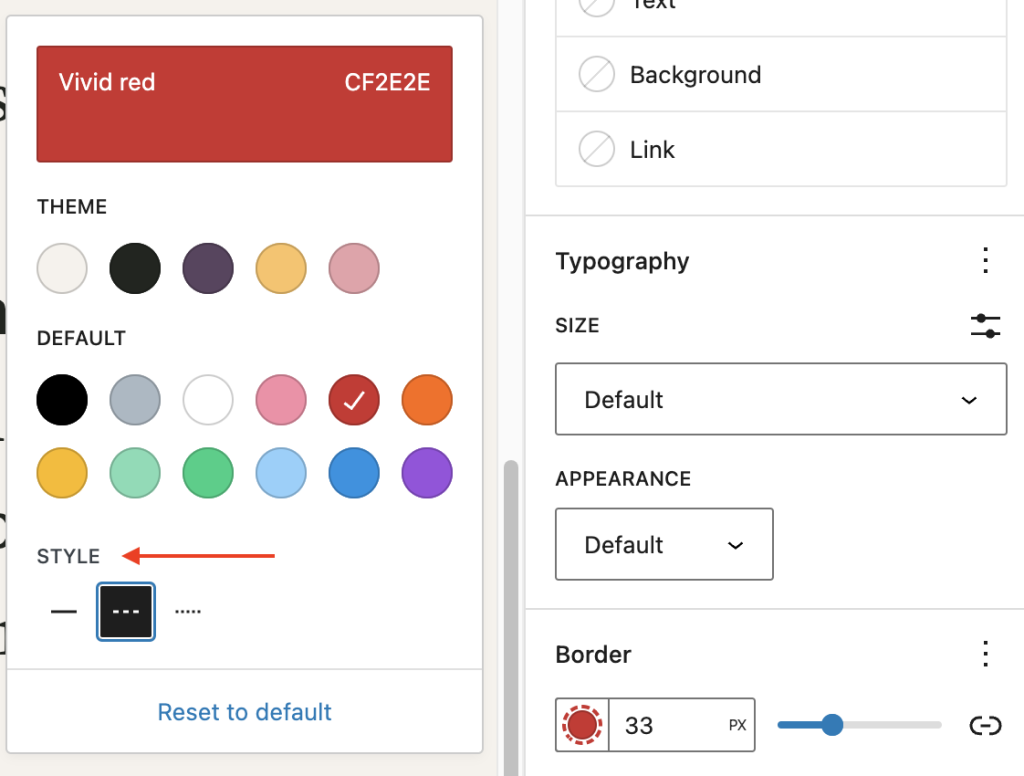
Step 2: Assign a Custom Class to Your Text
Using the WordPress block editor:
- Select the paragraph block.
- In the block settings sidebar, find the “Advanced” section.
- In the “Additional CSS Class(es)” field, enter a unique class name, like
bordered-text.
This class will be used to target your specific text with CSS.
Step 3: Add Custom CSS to Your Site
Next, you need to add the CSS code to your website. You can do this in several ways:
- Go to Appearance > Customize > Additional CSS in your WordPress dashboard.
- Paste the CSS code below:
.bordered-text { border: 2px solid 3498db; / Change color and thickness as desired / padding: 10px; / Adds space between text and border / display: inline-block; / Ensures border wraps around the text properly / border-radius: 5px; / Optional: rounded corners for a softer look /}
Adjust the border, padding, and border-radius values to match your design preferences.
Step 4: Save and Preview
Once you’ve added your CSS, save your changes and preview your page. The selected text should now be enclosed within a stylish border. If it doesn’t appear right away, double-check your class name and CSS syntax.
Extra Tips:
- To style different types of text differently, create multiple CSS classes.
- Use developer tools in your browser to inspect elements and confirm class names.
- Experiment with border styles like dashed, dotted, or double for different effects.
With this simple method, you can create eye-catching text borders that enhance your typography and make key messages stand out. Feel free to get creative with colors, thicknesses, and border shapes to match your website’s style!
5. Best Practices for Using Text Borders Effectively
Now that you know how to add text borders to your WordPress content, it’s important to use them wisely to truly enhance your typography rather than distract from it. Here are some best practices to keep in mind:
Keep it Simple
While it might be tempting to go all out with bold, colorful borders, simplicity often works best. Use borders sparingly — maybe highlight headings or key phrases — so they stand out without overwhelming your readers.
Choose Subtle Colors
Contrasting colors can make borders pop, but they can also be harsh on the eyes if overdone. Opt for subtle shades that complement your overall color scheme. For example, a soft gray or muted pastel can add just enough emphasis without clashing.
Maintain Consistency
Consistency is key to a polished look. Stick to a set style — same border thickness, color, and style — throughout your site. This helps create a cohesive visual experience and makes your content look professional.
Use Borders to Highlight Key Content
Text borders are great for drawing attention to important information, like calls-to-action, quotes, or special announcements. Use them strategically to guide your readers’ focus where you want it most.
Balance with White Space
Don’t overcrowd your page with borders. Leave enough white space around your bordered text to ensure it’s readable and visually appealing. This balance helps prevent your content from feeling cluttered.
Test on Different Devices
What looks good on your desktop might not translate well on mobile or tablet screens. Always preview your bordered text on various devices to ensure it enhances readability and aesthetics across the board.
Use Borders to Enhance Readability
Sometimes, borders can help separate sections, making your content easier to scan. For example, adding a border around a blockquote or a highlighted section can improve overall readability without overwhelming your design.
6. Common Issues and Troubleshooting Tips
Even with the best intentions, you might encounter some hiccups when adding text borders in WordPress. Here are common issues and how to troubleshoot them:
Borders Not Showing Up
- Check your CSS or plugin settings: Ensure that your border styles are correctly applied and that no conflicting styles override them.
- Clear cache: Sometimes, your browser or caching plugin might be showing an older version of your page. Clear cache and refresh to see changes.
- Verify theme compatibility: Some themes have restrictive styles that might suppress custom borders. Try switching to a default theme temporarily to test.
Borders Look Unprofessional or Off-Style
- Adjust border thickness and color: Use subtle, consistent styles to avoid a cluttered look.
- Check for conflicting CSS: Custom styles or other plugins might conflict with your borders. Use browser developer tools to inspect and troubleshoot.
Border Overlaps or Clipping
- Padding and Margin: Ensure you have enough padding inside your bordered element so the text doesn’t touch the border. Adjust padding via CSS if needed.
- Border Length: Make sure borders are not extending beyond their container. Use CSS to set max widths or overflow properties.
Fonts or Text Disappearing or Overlapping
- Check font size and line height: Large fonts or tight line spacing can cause overlaps. Adjust these settings for better spacing.
- Use compatible font styles: Some custom fonts might not display well with borders. Stick to web-safe fonts if issues persist.
Responsive Design Problems
- Test on multiple devices: Use Chrome DevTools or real devices to ensure borders look good everywhere.
- Use media queries: Adjust border styles for different screen sizes to maintain aesthetic appeal and readability.
Remember, troubleshooting is part of the process. If something doesn’t work as expected, take a step back, inspect your styles, and make incremental adjustments. With patience, you’ll master the art of adding stylish, functional text borders that truly enhance your WordPress site’s typography.
Conclusion and Final Tips for Better Typography in WordPress
Enhancing your WordPress website’s typography is essential for creating a professional and engaging user experience. Well-chosen fonts, appropriate text borders, and thoughtful styling can significantly improve readability and visual appeal. Remember, the key is to strike a balance between aesthetics and functionality, ensuring your content remains accessible across devices.
Here are some final tips to elevate your typography:
- Use Consistent Fonts: Stick to a limited set of fonts to maintain a cohesive look throughout your site.
- Leverage Text Borders: Adding subtle borders around headings or quotes can emphasize important content.
- Adjust Line Spacing and Margins: Proper spacing improves readability and prevents clutter.
- Utilize Custom CSS: For advanced styling like text borders, custom CSS provides greater control and flexibility.
- Preview on Multiple Devices: Always check how your typography appears on desktops, tablets, and smartphones to ensure consistency.
Incorporating these tips will help you craft visually appealing and highly readable content in WordPress. With thoughtful attention to typography details like borders, fonts, and spacing, your website will stand out with a polished and professional look.