If you’re thinking about building a website or a blog, you’ve probably heard of WordPress. It’s one of the most popular content management systems (CMS) out there, powering over 40% of all websites on the internet! WordPress is loved for its user-friendly interface, flexibility, and a massive library of themes and plugins. Whether you’re a beginner or a seasoned developer,
Prerequisites for Installing WordPress
Before you dive into downloading and installing WordPress, there are a few important prerequisites you need to have in place. First, you’ll need a domain name — that’s your website’s address (like www.yourwebsite.com). If you haven’t purchased one yet, you can grab one from domain registrars like GoDaddy, Namecheap, or Google Domains. Second, you’ll need a hosting provider — this is where your website lives on the internet. Popular hosts like Bluehost, SiteGround, and HostGator offer one-click WordPress installations and excellent support. Third, ensure your hosting account supports PHP and MySQL/MariaDB, which are essential technologies
3. Step 1: Downloading the Latest Version of WordPress
Alright, let’s get started with the first step—downloading WordPress itself. It’s super straightforward, and the best part is that WordPress is completely free and open-source. So, no need to worry about licensing or fees.
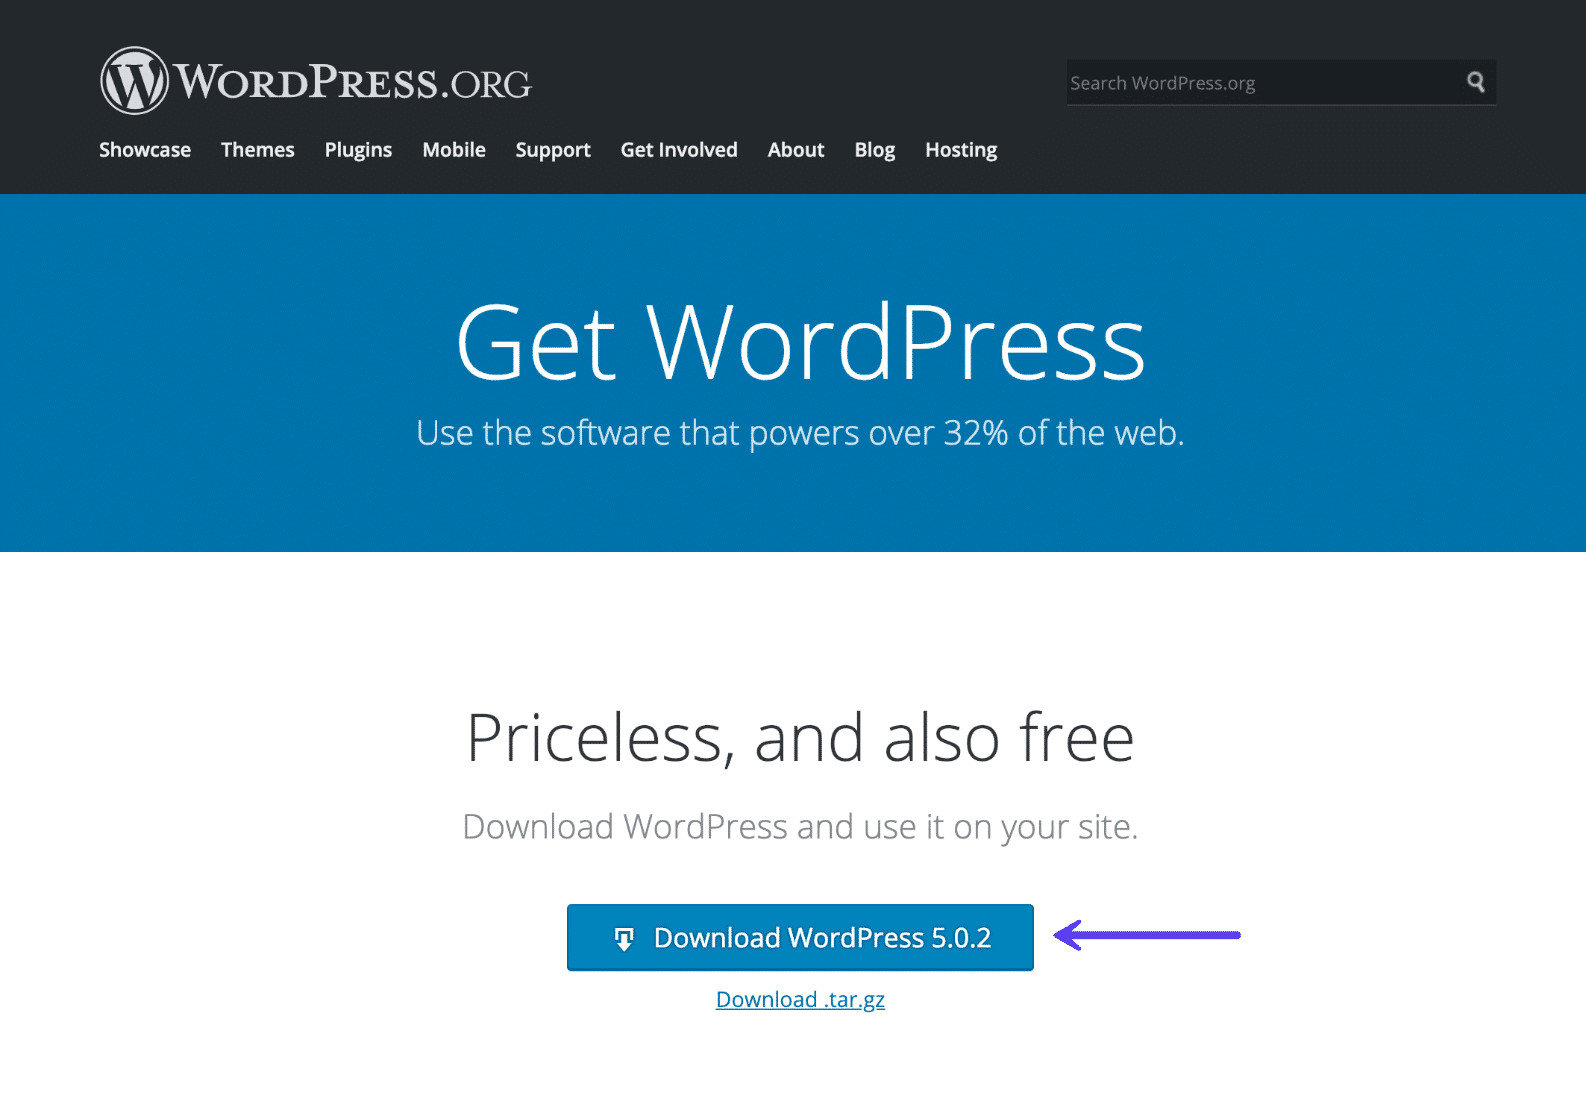
First things first, head over to the official WordPress website at wordpress.org. This is the safest and most reliable place to grab the latest version of WordPress. You want to make sure you’re downloading from the official source to keep your website secure.
Once you’re on the site, look for the big green button that says Download WordPress. Click on it, and your browser will start downloading a zip file, usually named something like latest.zip. This zip file contains all the core WordPress files you need to install on your server.
Here’s a quick checklist for this step:
- Visit wordpress.org
- Click on the Download WordPress button
- Save the zip file to your computer (preferably in a dedicated folder for easy access)
Once downloaded, it’s a good idea to keep this zip file safe—you might want to keep a backup copy in case you need to reinstall or move the site later. The next step involves preparing your hosting environment, so stay tuned!
4. Step 2: Preparing Your Web Hosting Environment
Now that you have the latest WordPress files downloaded, it’s time to get your web hosting environment ready. Think of your hosting environment as the home for your website—it needs to be set up properly to ensure everything runs smoothly.
Most hosting providers today make this process pretty simple, but there are a few key things you need to verify before uploading WordPress:
- Web Hosting Plan: Make sure your hosting plan supports PHP (version 7.4 or higher) and MySQL (version 5.6 or higher) or MariaDB. These are essential for running WordPress.
- Domain Name: You’ll need a domain name pointing to your hosting server. If you don’t have one yet, most hosts offer domain registration options.
- FTP Access or File Manager: You need a way to upload files to your server. This can be done via an FTP client like FileZilla or through your hosting provider’s file manager in the control panel.
- Database Setup: WordPress uses a database to store all your content, settings, and more. Usually, your hosting provider offers a database management tool like cPanel’s MySQL Database Wizard or phpMyAdmin.
Here’s a quick step-by-step checklist to prepare your environment:
| Step | Action | Details |
|---|---|---|
| 1 | Log into your hosting control panel | Most hosts use cPanel, Plesk, or a custom dashboard |
| 2 | Create a new database | Use the database wizard or MySQL management tools |
| 3 | Create a database user | Assign proper permissions and note down username/password |
| 4 | Get FTP credentials | Usually provided in your hosting account details |
| 5 | Prepare to upload files | Have your FTP client ready or access your file manager |
Once these steps are completed, you’re all set to upload the WordPress files and start the installation process. Remember, most hosting providers also offer one-click WordPress installers, which can significantly simplify this process if you prefer a more automated route. But understanding these foundational steps helps you better manage your website down the line.
Step 3: Uploading WordPress Files to Your Server
Great, you’ve downloaded the WordPress files and are ready to get them onto your web server. Think of this step as moving into your new digital home. The process might seem a bit technical at first, but don’t worry — I’ll walk you through it smoothly.
First things first, you’ll need an FTP client. Think of FTP (File Transfer Protocol) as the bridge that connects your computer to your web server. Popular options include FileZilla, Cyberduck, or WinSCP — all user-friendly and free.
Steps to Upload Files:
- Install and open your FTP client. Once set up, you’ll need your FTP credentials. These are usually provided by your hosting provider. They include:
- FTP Host (often your domain name or IP address)
- Username
- Password
- Port (usually 21)
- Connect to your server. Enter your credentials and click connect.
- Navigate to the correct directory. This is typically the ‘public_html’ folder or a folder designated for your website.
- Upload the WordPress files. Locate the folder where you downloaded WordPress. Select all the files and folders inside (like wp-admin, wp-includes, wp-content, and various PHP files). Drag and drop them into your server directory.
While the upload is happening, take a moment to relax. Depending on your internet speed and the size of the files, this might take a few minutes. Once completed, your WordPress files are now on your server, ready to be configured.
Tip: Ensure that your files are uploaded to the root directory or the specific folder where you want your website to appear. If you upload to a subfolder, you’ll need to navigate to that URL.
Step 4: Creating a Database for WordPress
Now that your files are uploaded, the next step is setting up a database — think of it like a big digital filing cabinet where all your website’s content, settings, and user data will be stored. Without this database, WordPress can’t function properly.
Most hosting providers offer a control panel — cPanel, Plesk, or similar — that makes creating databases pretty straightforward. Here’s a simple walk-through:
How to Create Your WordPress Database:
- Log into your hosting control panel. Look for the section labeled ‘Databases’ or similar.
- Click on ‘MySQL Databases’ or ‘Database Wizard.’ The wizard makes it even easier if you’re new to this.
- Create a new database. Give it a name that you can easily recognize, like wp_db or similar.
- Create a database user. Assign a username and password. Keep this information safe — you’ll need it shortly.
- Assign the user to the database. Make sure this user has all privileges (select, insert, update, delete, etc.).
Once done, you should have:
| Item | Details |
|---|---|
| Database Name | Your chosen database name (e.g., wp_db) |
| Database User | The username you created |
| Password | The password for the user |
Keep this information handy — you’ll need to enter it during the WordPress installation process. With your database ready and files uploaded, you’re well on your way to launching your website. Next step? Running the WordPress installer to connect everything together!
7. Step 5: Running the WordPress Installation Script
Alright, you’re almost there! Once you’ve uploaded the WordPress files to your server, the next step is to run the installation script. This process is pretty straightforward, but it’s important to follow each step carefully to ensure everything sets up correctly.
First, open your web browser and navigate to your website’s URL. For example, if your domain is www.yourwebsite.com, just type that into your address bar. If you uploaded WordPress to a subfolder, like www.yourwebsite.com/blog, go there instead.
You should see the WordPress language selection screen. Pick your preferred language and click Continue. The installer will then check your server environment to make sure everything’s compatible. If all checks pass, you’ll see the main setup page.
Fill in Your Site Details
- Site Title: This is the name of your website. You can change it later, so don’t worry if you’re unsure.
- Username: Choose a username for logging into your admin dashboard. For security, avoid common names like “admin.”
- Password: Pick a strong password. WordPress will suggest one, but you can create your own. Remember, a strong password helps keep your site safe.
- Admin Email: Enter your email address. This is important for password resets and notifications.
- Search Engine Visibility: You can check or uncheck this box depending on whether you want search engines to index your site right away.
Run the Installation
Once all fields are filled out, click the Install WordPress button. The script will do its magic — creating the necessary database tables and configuring your site. In just a few seconds, you should see a success message.
Congratulations! Your WordPress installation is now complete. You’ll be prompted to log in with your username and password. Keep these credentials safe—they’re your gateway to managing your website.
8. Post-Installation Tips and Next Steps
You’ve successfully installed WordPress — great job! But before you start customizing your site, there are a few essential steps to take to ensure everything runs smoothly and securely.
Secure Your Login
First, change your default login URL if possible, especially if you chose a common username like “admin.” This simple tweak can help protect your site from brute-force attacks. Consider installing security plugins like Wordfence or iThemes Security to add extra layers of protection.
Configure Basic Settings
Navigate to your dashboard (usually yoursite.com/wp-admin) and review your settings:
- Site Title & Tagline: Update these to reflect your brand or personal style.
- Permalinks: Set your URL structure to be SEO-friendly. Go to Settings > Permalinks and choose “Post name” for clean URLs.
- Timezone & Language: Make sure these match your location and preferences.
Install Essential Plugins
Plugins extend your website’s functionality. Here are some must-haves:
- Security: Wordfence or Sucuri Security
- SEO: Yoast SEO or All in One SEO Pack
- Backup: UpdraftPlus or BackupBuddy
- Performance: W3 Total Cache or WP Super Cache
Choose a Theme
Your website’s look and feel come from your theme. Browse the WordPress Theme Directory or consider premium themes from marketplaces like ThemeForest. Install and activate a theme that matches your style and goals.
Start Creating Content
Now that your basic setup is done, start adding pages and posts. Think about your website’s purpose—whether it’s a blog, portfolio, or business site—and plan your content accordingly.
Regular Maintenance
- Keep WordPress, themes, and plugins updated for security.
- Monitor site performance and fix issues promptly.
- Regularly back up your website to prevent data loss.
By following these tips, you’ll set a strong foundation for your website. Remember, building a great site is an ongoing process—keep learning, experimenting, and refining as you grow!