Looking to enrich your WordPress site by importing blog posts from external sources? Maybe you’ve found some great content elsewhere and want to add it seamlessly to your site, complete with images and formatting. Importing posts with external images can seem tricky at first, but with the right approach, it becomes straightforward. In this guide, I’ll walk you through a step-by-step process to import blog posts along with their images from external URLs into WordPress. Whether you’re a beginner or looking for a quick refresher, this guide has got you covered!
Understanding the Challenges of Importing External Blog Posts
Importing blog posts from external sources might sound simple at first, but there are several challenges you need to be aware of to ensure a smooth process. Let’s go over some of the common hurdles:
- Broken Image Links: When you import posts with images hosted outside your site, those images might not display correctly after import. The links could break if the images are moved or deleted from their original source.
- Image Downloading and Hosting: To have full control over your images and ensure they display reliably, it’s often better to download external images and host them locally on your WordPress site. This involves extra steps and can be time-consuming if done manually, especially for many posts.
- Formatting Compatibility: External posts may use different HTML structures or formatting styles, which can cause inconsistencies once imported. You’ll need to clean up or adjust the formatting to match your site’s style.
- Duplicate Content and SEO: Importing content without proper attribution or duplicate content considerations could harm your SEO rankings. Make sure you have permission to republish and consider canonical URLs if necessary.
- Automation and Scalability: Manually importing posts one-by-one is manageable for a few articles, but if you’re dealing with hundreds, automation becomes essential. Finding the right tools and understanding their limitations can be a challenge.
Understanding these challenges upfront helps you plan your import process better. It also prepares you to choose the right tools and techniques for handling images, formatting, and large-scale imports. With the right strategy, you can turn what seems like a complicated task into a manageable, even enjoyable, project!
3. Preparing Your External Content for Import
Before jumping into the importing process, it’s essential to get your external content ready. This step makes the entire process smoother and helps prevent issues like broken images or formatting errors. Think of it as tidying up your workspace before starting a big project — it saves you headaches later on!
First, review your external blog posts and ensure that all images are properly embedded using absolute URLs. Absolute URLs are complete links like https://example.com/images/photo.jpg, which are crucial because they tell WordPress exactly where to find each image during import. If images are embedded with relative URLs like /images/photo.jpg, you’ll want to convert them to absolute URLs.
Next, check the formatting of your posts. Make sure your content is clean and consistent. Remove any unnecessary code, scripts, or styles that might interfere with the import process. If you’re exporting posts from a platform like Blogger or another WordPress site, consider exporting a sample post first to see how it appears and to identify any quirks you might need to fix.
Another helpful tip is to ensure your images are optimized for web. Large images can slow down your website and impact user experience. Resize or compress images if necessary before importing. Tools like TinyPNG or ImageOptim can help reduce file sizes without sacrificing quality.
If you’re working with a large batch of posts, consider creating a backup of your current site just in case anything goes wrong. It’s always better to be safe than sorry!
Lastly, if your external content is stored in a format like CSV, XML, or JSON, double-check that the data is correctly structured. For example, ensure that each post has a title, content, and image URL properly mapped. This prep work makes the import process much smoother and reduces the chances of errors.
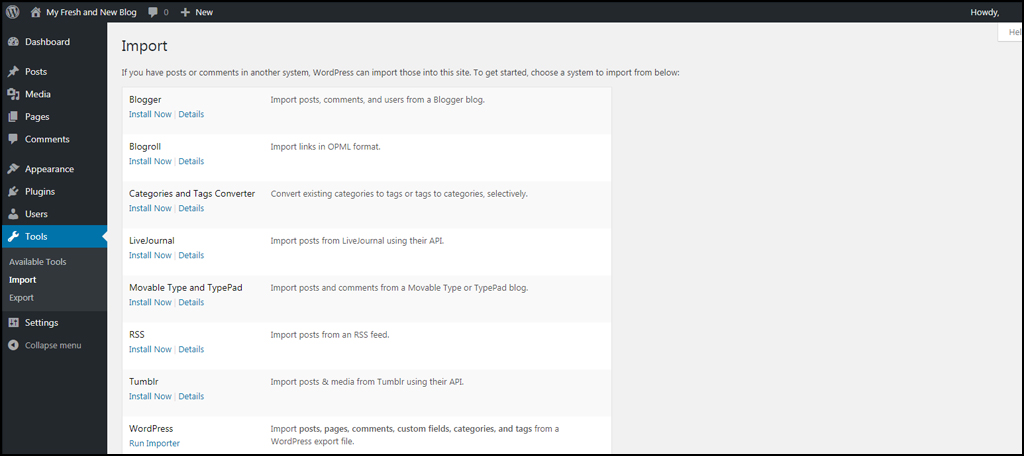
4. Choosing the Right Plugin or Tool for Importing Blog Posts
Now that your content is prepped and ready, it’s time to choose the right tool to import your blog posts with images. There are several plugins and tools out there, each with its own strengths. Picking the right one depends on your specific needs, the format of your external content, and your comfort level with WordPress.
Here are some popular options to consider:
- WP All Import: This is a powerful and flexible plugin that supports importing posts, pages, custom post types, and images from various formats like CSV, XML, and JSON. It offers a drag-and-drop interface and allows you to map your data fields easily. Plus, it can fetch images from external URLs automatically.
- Import External Posts: A straightforward plugin designed specifically for importing content from external RSS feeds or URLs. It’s simple to set up but may have limitations if you need complex mappings or large batch imports.
- RSS Feed Importers: If your external content is available via RSS feeds, plugins like WP RSS Aggregator can help you import and display that content on your site. They may have add-ons to handle images and custom fields.
- Custom Scripts or APIs: For advanced users, creating custom PHP scripts or using REST API endpoints can give you full control over the import process. This approach is more complex but offers maximum flexibility, especially if your data is in a unique format.
When choosing a plugin, consider these factors:
- Compatibility: Make sure the plugin supports your WordPress version and hosting environment.
- Ease of Use: If you’re not familiar with coding, opt for user-friendly, drag-and-drop interfaces.
- Support for Images: Ensure the plugin can handle importing images from external URLs seamlessly.
- Batch Import Capabilities: For large datasets, check if the plugin supports importing multiple posts at once without crashing.
- Custom Fields and Taxonomies: If your posts have custom metadata, verify that the plugin can import those as well.
In summary, choosing the right tool is crucial for a successful import. Take the time to research and test a few options — many plugins offer free versions or demos. Once you’ve selected the best fit, you’ll be ready to move your external blog posts and images into your WordPress site with confidence!
5. Step-by-Step Instructions for Importing Posts with Images
Alright, now that we’ve covered the basics, let’s get into the nitty-gritty of actually importing your blog posts along with their images from external URLs into WordPress. I’ll walk you through each step to make this process as smooth as possible.
Step 1: Prepare Your Data
Before jumping into the import process, ensure your blog posts are organized properly. Typically, you’ll want a CSV or XML file containing your post titles, content, and image URLs. If you’re working with a single post or a small batch, you might prepare a spreadsheet with columns like:
- Post Title
- Post Content (HTML format is preferable)
- Image URL
This structured approach makes the import easier and minimizes errors.
Step 2: Use a Suitable Import Plugin
For importing posts with images from external URLs, plugins like WP All Import or Really Simple CSV Importer are great options. These plugins allow you to map CSV columns to WordPress fields and handle media files efficiently.
Install and activate your chosen plugin through the WordPress admin dashboard. Once activated, look for the plugin’s import menu to begin setting up your import.
Step 3: Configure Import Settings
Upload your CSV or XML file and start configuring the import. Map the columns to the appropriate WordPress fields:
- Map “Post Title” to the Title field
- Map “Post Content” to the Content editor
- Map “Image URL” to a custom field or media handling option
Most plugins allow you to specify how images are imported—whether to download and attach them to the post or just embed the URLs. Choose the option to download images for a more integrated appearance.
Step 4: Set Up Image Handling
In the plugin settings, look for options like “Download images” or “Fetch remote images.” Enable this feature so the plugin will fetch images from the external URLs and add them to your WordPress media library. This step ensures images display correctly and are stored locally, preventing broken links later.
Step 5: Run the Import
Double-check your mappings and settings, then hit the “Run Import” button. The plugin will process your data, create posts, and import images accordingly. Depending on the number of posts, this might take a few moments.
Step 6: Review and Edit
After the import completes, review some of the imported posts. Check if images display correctly and content formatting is intact. If needed, do some manual adjustments or rerun the import with tweaks to your settings.
6. Handling Image URLs and Ensuring Proper Display
One common challenge when importing posts with images from external sources is ensuring that images display properly on your WordPress site. External URLs can sometimes break due to permission issues, hotlinking restrictions, or simply because the images aren’t stored locally. Let’s talk about how to handle this effectively.
1. Download and Attach Images Locally
The best way to prevent broken images is to download all images during the import process and store them in your media library. Plugins like WP All Import have options to automatically fetch and attach images. When images are stored locally:
- They load faster
- They are less likely to break if external URLs change or become unavailable
- You have more control over image optimization and SEO
2. Check Image URLs in Your Imported Content
After import, inspect some posts to verify that images are displaying correctly. You can do this by viewing the front end and inspecting the image element’s URL. Ideally, the URL should point to your local media library, like https://yourdomain.com/wp-content/uploads/2024/04/image-name.jpg.
If images still point to external URLs, revisit your import settings to ensure the “download images” option was enabled. Sometimes, you might need to rerun the import or manually edit posts to update image URLs.
3. Use Relative Paths or Rewrite URLs if Necessary
In some cases, especially if you’re migrating content from another platform, you might need to update image URLs within the post content. You can do this with plugins like Better Search Replace to batch update URLs from external links to your local media URLs.
4. Optimize Images for Performance
Once images are stored locally, consider optimizing them for faster load times. Use plugins like Smush or ShortPixel to compress images without losing quality. This improves user experience and SEO rankings.
5. Prevent Hotlinking and Protect Your Media
To avoid other sites hotlinking your images, which can drain your bandwidth, set up hotlink protection via your hosting or CDN settings. Also, consider adding watermarks or licensing info if you’re concerned about content theft.
In summary, the key to ensuring proper display of images after import is to download and host them locally, verify URLs, and optimize images for performance. Taking these steps will give your imported posts a professional look and keep your site running smoothly.
7. Verifying and Troubleshooting the Imported Content
Once you’ve completed the import process, it’s time to take a thorough look at your newly imported blog posts. This step is crucial to ensure everything looks good, functions properly, and that no issues slipped through the cracks. Think of it as giving your website a quick health check-up.
Start by browsing through a few of your imported posts. Check that:
- Images appear correctly: Make sure all images are displaying properly and are not broken links. Sometimes, images may appear missing if the URLs are incorrect or if they weren’t imported properly.
- Text formatting is intact: Confirm that your headings, paragraphs, bullet points, and other formatting elements look consistent with your original posts.
- Links are functional: Test any internal or external links to ensure they direct to the right pages.
- Media elements: If your posts include videos or other media, verify they display and work as intended.
If you encounter issues, don’t panic! Here are some common troubleshooting tips:
- Broken image links: Check if the image URLs are correct. If they are pointing to external sources, verify that those URLs are still active. If images were stored locally, you might need to re-upload them or update the URLs.
- Formatting errors: Sometimes, imported content can have inconsistent formatting. Use the WordPress editor to make quick adjustments or switch to the Text tab for more control.
- Missing images after import: If images aren’t showing up, consider regenerating thumbnails with a plugin like Regenerate Thumbnails. Also, check your server permissions to ensure images are accessible.
- Broken links: Use plugins or online tools to scan your site for broken links and fix them accordingly.
Remember, the goal is to ensure your site functions seamlessly and looks professional. Taking a little extra time now saves you from headaches later. If you notice recurring issues, revisit your import settings or consider re-importing specific posts with adjustments to the process.
8. Best Practices for Maintaining SEO and Image Optimization
Now that your content is imported and verified, it’s time to focus on SEO and image optimization. These elements are vital for making sure your site is discoverable, loads quickly, and provides a great user experience.
Here are some best practices to keep in mind:
Optimizing Images
- Use descriptive filenames: Before uploading images, give them clear, descriptive names (e.g., solar-panels-installation.jpg) instead of generic names like IMG1234.jpg.
- Compress images: Use tools like TinyPNG, ImageOptim, or plugins like Smush to reduce file sizes without sacrificing quality. Smaller images load faster, improving your site performance.
- Use appropriate formats: JPEGs are great for photos, PNGs are ideal for graphics with transparency, and WebP offers good compression with quality.
- Implement lazy loading: Enable lazy loading to defer off-screen images from loading until they’re needed, speeding up initial page loads.
Maintaining SEO
- Use meaningful alt text: Add descriptive alt tags to all images. This not only improves accessibility but also helps search engines understand your content.
- Optimize your content: Ensure your posts include relevant keywords naturally, with proper use of headings (H2, H3, etc.) and clear structure.
- Set permalink structures: Use SEO-friendly URLs that include keywords and are easy to read.
- Meta descriptions and titles: Customize your meta titles and descriptions for each post to improve click-through rates from search engines.
- Internal linking: Link related posts to keep visitors engaged and help search engines crawl your site effectively.
Additional Tips
- Use SEO plugins: Plugins like Yoast SEO or Rank Math can guide you through optimizing your content and ensure you’re following best practices.
- Monitor your site’s performance: Keep an eye on Google Analytics and Search Console to track traffic, identify issues, and refine your SEO strategies.
- Regularly update your content: Keep your blog fresh with new content and updates to existing posts to maintain and improve your SEO rankings.
By paying attention to these aspects, you’ll help your website load faster, rank higher in search results, and provide a better experience for your visitors. Remember, SEO isn’t a one-time task—it’s an ongoing process that evolves with your content and audience.
Conclusion and Additional Resources
Successfully importing blog posts with images from external URLs into WordPress can significantly streamline your content management process. By following the step-by-step approach outlined above, you ensure that your content remains organized, visually appealing, and efficiently integrated into your website. Remember, maintaining proper image attribution and optimizing image sizes can enhance both user experience and site performance. Utilizing plugins like Import External Images or WP All Import can further simplify complex imports, especially when dealing with large datasets.
For those looking to deepen their understanding or troubleshoot specific issues, here are some valuable resources:
- WordPress Support Forums
- Developers’ Guide to Plugins
- WPBeginner – WordPress Tutorials & Tips
- Smashing Magazine – Web Development & Design
- Official Documentation for Import Plugins
By leveraging these resources and best practices, you can confidently manage your content imports and ensure your WordPress site remains fresh, engaging, and well-structured.