If you’ve ever faced frustrating slowdowns or error messages like “Allowed memory size exhausted” on your WordPress site, you’re not alone. These issues often stem from your website hitting its memory limit. Think of your WordPress site’s memory as its short-term brainpower—it’s what allows plugins, themes, and core functions to run smoothly. When this limit is too low, your site struggles to handle the workload, leading to performance hiccups or even crashes. Increasing your
Signs That Your WordPress Site Needs a Higher Memory Limit
Not sure if your WordPress site needs a boost in memory? Here are some common signs to watch out for:
- Frequent Error Messages: If you see errors like “Allowed memory size exhausted” or “Memory limit exceeded,” it’s a clear sign you need more memory.
- Slow Loading Times: When pages take ages to load, especially after installing new plugins or themes, your site might be running out of available memory to process everything efficiently.
- Plugin or Theme Failures: Some plugins or themes require a certain amount of memory to function properly. If they crash or don’t work as expected, insufficient memory could be the culprit.
- Backend Timeouts: If your WordPress admin dashboard becomes unresponsive or times out during updates or plugin installations, it might be due to memory constraints.
- Frequent Server Errors: Hosting server logs showing errors related to memory limits indicate you need to allocate more resources.
In many cases, these issues are solvable by increasing your site’s memory limit. It’s a straightforward fix that can significantly boost your website’s performance and stability. If you notice any of these signs, it might be time to consider bumping up your WordPress memory limit to keep your website running smoothly and provide visitors with a better experience.
3. Methods to Increase WordPress Memory Limit

So, you’re looking to boost your WordPress memory limit to make your website run smoother and faster? Great idea! Increasing your memory limit can help prevent errors like the dreaded “White Screen of Death” and improve overall performance, especially if you’re running a resource-heavy site. There are several straightforward ways to do this, and I’ll walk you through the most common methods.
1. Edit wp-config.php File
This is one of the simplest and most effective methods. You just need to access your website files via an FTP client or your hosting file manager. Once you locate your wp-config.php file — usually in the root folder of your WordPress installation — add this line before the line that says / That's all, stop editing! /:
define('WP_MEMORY_LIMIT', '256M');You can replace 256M with any amount you prefer, like 128M or 512M. Save your changes, and you’re all set. This method works well for most hosting environments, especially if your host allows modifications to this file.
2. Modify .htaccess File
If your server uses Apache, you might be able to increase the memory limit by editing the .htaccess file located in your website’s root directory. Simply add this line at the top of the file:
php_value memory_limit 256MBe cautious with this approach: if your server doesn’t support overriding PHP settings via .htaccess, you could run into server errors. Always back up your .htaccess file before making changes.
3. Use a Plugin
If you’re not comfortable editing files manually, a plugin can do the heavy lifting for you. Plugins like WP-Optimize or WP Memory Limit allow you to increase your memory limit with just a few clicks from the WordPress admin dashboard. Simply install, activate, and set your desired limit in the plugin’s settings.
4. Contact Your Hosting Provider
If none of the above methods work, or if you’re on a managed hosting plan with restrictions, the best route might be to reach out to your host’s support team. They can often increase the limit for you or guide you on how to do it within their environment.
4. Checking Your New Memory Limit and Ensuring Changes Take Effect
After you’ve increased your WordPress memory limit, it’s crucial to verify that the change actually took effect. Here’s how you can do that easily:
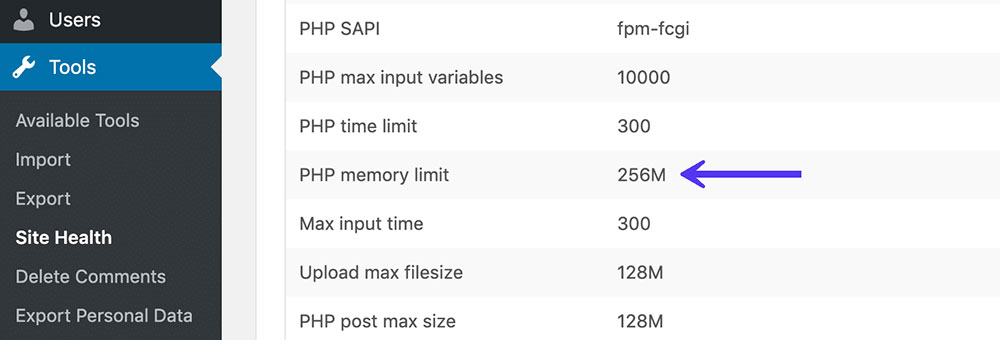
Method 1: Using a Plugin
- Install and activate a plugin like WP Server Info or Health Check & Troubleshooting.
- Navigate to the plugin’s info page or health status section.
- Look for the Memory Limit value. It should reflect the new limit you set, such as 256M or higher.
Method 2: Using a phpinfo.php File
If you prefer a more manual approach, you can create a simple PHP info file:
<?phpphpinfo();?>Upload this file to your website’s root directory via FTP, then visit http://yourdomain.com/phpinfo.php. Search for memory_limit on the page. The value displayed should match the limit you set. Remember to delete this file afterward for security reasons.
Method 3: Checking WordPress Dashboard
Some plugins or themes display the current memory limit within the WordPress admin area. Also, you can create a small custom plugin or add a snippet to your functions.php file that outputs the current memory limit, like so:
echo 'Current Memory Limit: ' . ini_get('memory_limit');Place this in your theme’s functions.php file temporarily, visit your site, and see the output.
Ensuring Changes Take Effect
If your new memory limit isn’t showing up, double-check the following:
- You edited the correct file in the correct directory.
- You saved and uploaded the file properly.
- Your hosting environment allows the method you used to change the limit.
- Clear any server caches or CDN caches that might be serving old configurations.
Once everything is set, your website should be leveraging the increased memory, leading to a more robust and responsive experience for your visitors. If you still encounter issues, don’t hesitate to contact your hosting provider for support—they can often assist in making these changes seamlessly.
5. Tips for Maintaining Optimal WordPress Performance
Keeping your WordPress site running smoothly isn’t just about bumping up the memory limit once and forgetting about it. It’s an ongoing process that involves regular maintenance and smart practices. Here are some tried-and-true tips to help you maintain optimal performance and ensure your website stays fast, responsive, and reliable.
1. Keep Your Plugins and Themes Updated
Outdated plugins and themes can cause compatibility issues, slow down your site, or even introduce security vulnerabilities. Make it a habit to regularly check for updates and install them promptly. Developers often release updates that optimize code, fix bugs, and improve performance. Remember, a well-maintained plugin is less likely to eat up unnecessary memory.
2. Optimize Your Database
Over time, your WordPress database can become cluttered with unnecessary data like post revisions, spam comments, or transient options. Use plugins like WP-Optimize or WP-Sweep to clean up your database periodically. An optimized database loads faster and reduces server load, which directly impacts your website’s performance.
3. Use Caching Effectively
Caching stores static versions of your pages, reducing the need for PHP processing and database queries each time someone visits. Implement caching plugins like W3 Total Cache or WP Super Cache. Proper caching can drastically decrease load times and lessen the memory demands on your server.
4. Minimize and Optimize Images
Large images are often the biggest culprits behind slow websites. Use image optimization tools or plugins like Smush or ShortPixel to compress images without losing quality. Additionally, serve images in modern formats like WebP when possible. Faster-loading images mean less memory usage and a better user experience.
5. Limit the Use of Resource-Heavy Plugins
Not all plugins are created equal. Some can be quite resource-intensive, especially those that add complex features or real-time functionalities. Regularly review your active plugins and deactivate or replace those that aren’t essential. The fewer the plugins, the less memory your site consumes.
6. Monitor Your Site’s Performance
Use tools like Google PageSpeed Insights, GTmetrix, or Pingdom to keep an eye on your site’s performance metrics. Monitoring helps you spot bottlenecks early and identify which changes yield the best improvements. It’s a proactive way to maintain optimal performance over time.
6. Conclusion and Best Practices for Managing WordPress Memory Limit
Managing your WordPress memory limit is a vital part of ensuring your website runs smoothly and efficiently. By increasing the memory limit thoughtfully and following best practices, you can prevent common performance issues and provide a better experience for your visitors.
Remember these key takeaways:
- Assess your needs: Determine how much memory your site requires based on its size and complexity.
- Adjust thoughtfully: Increase the memory limit gradually, monitoring the impact after each change.
- Optimize regularly: Keep plugins, themes, and your database in check to prevent unnecessary memory use.
- Leverage caching and image optimization: These simple steps can significantly improve performance without requiring more memory.
- Stay updated and monitor: Regular updates and performance checks help you catch issues early and maintain a healthy website.
Ultimately, managing your WordPress memory limit isn’t just a one-time task; it’s an ongoing process that aligns with the overall health and speed of your website. By applying these best practices, you’ll be well on your way to a faster, more reliable WordPress site that can handle growth and deliver a top-notch user experience.