Thinking about launching your own website or blog? WordPress is a fantastic choice — flexible, user-friendly, and widely supported. If you’re familiar with Linux and looking for a lightweight, isolated environment to run WordPress, setting it up inside a Debian 12 LXC (Linux Container) is a smart move. Containers offer a clean, efficient way to host your site without the overhead of full virtual machines. In this guide, we’ll walk through the simple steps to get
Prerequisites for Setting Up WordPress in an LXC Container
Before we get our hands dirty, there are a few important things you’ll need to prepare. Having these in place will make the installation process smooth and hassle-free:
- Proxmox or a similar virtualization platform: While you can run LXC containers on other systems, Proxmox VE is popular and user-friendly for managing containers.
- Root or sudo access to your host server: You’ll need administrative privileges to create and configure containers.
- Basic Linux knowledge: Familiarity with command-line operations will be very helpful, though we’ll keep instructions straightforward.
- Container setup: You should have a Debian 12 LXC container installed and running. If not, you’ll need to create one first.
- Network configuration: Ensure your container has a static IP address or a reliably assigned DHCP IP, so you can access your WordPress site later.
- Updated system packages: It’s a good idea to update your container’s package list and upgrade installed packages before starting:
apt update && apt upgrade -y
Additionally, you’ll want to have some essential tools installed, like curl, wget, and nano or your preferred text editor. Once you’ve confirmed these prerequisites, you’re all set to proceed with installing WordPress inside your Debian 12 LXC container!
3. Creating and Configuring the Debian 12 LXC Container
Alright, let’s get started with creating your Debian 12 LXC container. If you’re new to LXC (Linux Containers), think of it as a lightweight, virtualized environment that runs like a separate mini-server on your host system. It’s perfect for testing, development, or even hosting small websites like your upcoming WordPress site.
First things first, you’ll want to ensure your host system has LXC installed. On most Linux distributions, this can be done via your package manager. For example, on Ubuntu or Debian, run:
sudo apt updatesudo apt install lxcOnce installed, you can create a new container with a simple command. Here’s a step-by-step:
- Create the container: Use the following command, replacing mydebian with your preferred container name:
lxc launch images:debian/12 mydebian- Check that your container is running: You can list all containers with:
lxc listThis will show you the status of your container. It should say RUNNING. If it’s not, start it with:
lxc start mydebianNow, you’ll want to enter your container to configure it further:
lxc exec mydebian -- /bin/bashInside, you’re now working within your Debian 12 environment. From here, it’s all about setting up the network, updating the system, and preparing it for WordPress. Remember, you can always exit the container by typing exit.
4. Installing Necessary Dependencies and Web Server

Great! Your container is running, and now it’s time to install the essential dependencies needed for WordPress. Think of these as the foundation and tools that make everything work smoothly.
First, update your package list to ensure you have the latest info:
apt update && apt upgrade -yNext, install the web server. For simplicity and popularity, we’ll go with Apache. You can also choose Nginx if you prefer, but here, we’ll stick with Apache for clarity:
apt install apache2 -yOnce installed, start and enable Apache to run on boot:
systemctl start apache2systemctl enable apache2Now, let’s install PHP, since WordPress relies heavily on PHP. Debian 12 comes with PHP 8.1 by default, which is perfect:
apt install php php-mysql libapache2-mod-php php-xml php-mbstring php-curl php-zip php-gd -yThis command installs PHP along with some commonly needed modules for WordPress. After installation, restart Apache to load the new PHP modules:
systemctl restart apache2Finally, install MySQL (or MariaDB, a popular drop-in replacement). Here, we’ll go with MySQL:
apt install mysql-server -yOnce installed, run the security script to set your root password and secure your database:
mysql_secure_installationFollow the prompts to set a strong root password and secure your database. Now, your container has all the basic dependencies needed for WordPress: a web server, PHP, and a database.
With these pieces in place, you’re well on your way to installing WordPress. Next steps will involve configuring your database, downloading WordPress, and getting it all set up inside your Debian 12 LXC container. But for now, you’re all set with the essentials!
5. Setting Up a Database for WordPress
Before we can get WordPress up and running, it definitely needs a place to store all its content, settings, and users. That’s where a database comes into play. For Debian 12, the most common choice is MySQL or MariaDB—both are excellent options and quite similar. Let’s walk through setting up a database so that WordPress has a cozy home to store everything.
First, ensure your server is up to date. Run these commands in your terminal:
sudo apt updatesudo apt upgrade -yNext, install MariaDB (or MySQL if you prefer). For MariaDB, just type:
sudo apt install mariadb-server -yOnce installed, it’s best to run the security script to tighten things up:
sudo mysql_secure_installationThis script will ask you a few questions like setting a root password, removing anonymous users, and disabling remote root login. Follow the prompts and choose options that make sense for your setup. For a basic setup, just secure your database as recommended.
Create a Database and User for WordPress
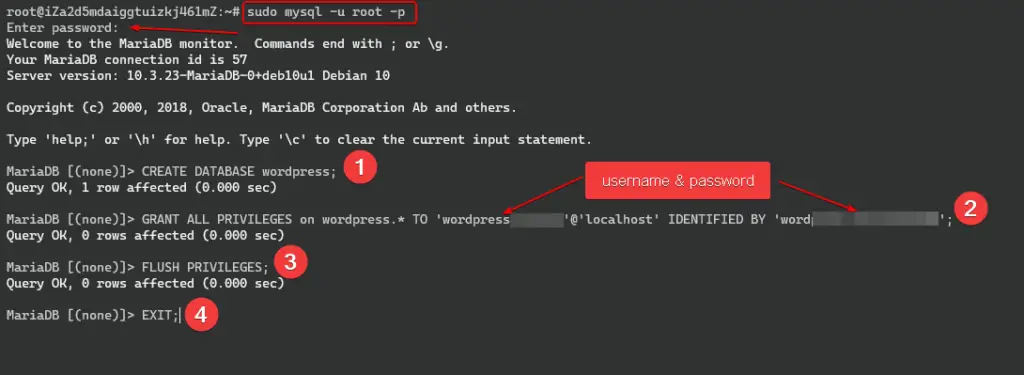
Now, let’s log into the database server:
sudo mysql -u root -pOnce inside, you can create a dedicated database for WordPress. Replace wordpress_db with your preferred database name, and wp_user / your_password with your chosen username and password:
CREATE DATABASE wordpress_db DEFAULT CHARACTER SET utf8mb4 COLLATE utf8mb4_unicode_ci;CREATE USER 'wp_user'@'localhost' IDENTIFIED BY 'your_password';GRANT ALL PRIVILEGES ON wordpress_db. TO 'wp_user'@'localhost';FLUSH PRIVILEGES;EXIT;This creates a database, sets up a user with full privileges on that database, and then exits. Keep this information handy—you’ll need it during WordPress installation!
Summary
At this point, you’ve got a dedicated database and user ready for WordPress. Your database server is secured, and you’re all set to connect WordPress to this database during its setup process. Easy, right? Now let’s move on to downloading and installing WordPress itself!
6. Downloading and Installing WordPress
Time to bring in the main event—WordPress! The process is pretty straightforward, but there are a few steps to ensure everything goes smoothly. First, make sure you’re logged into your Debian 12 server, and you’ve navigated to the directory where you want to install WordPress. Usually, this is somewhere in your web root, like /var/www/html or a dedicated directory.
Download WordPress
Start by downloading the latest WordPress package from the official site. Use wget for this:
cd /var/www/htmlsudo wget https://wordpress.org/latest.tar.gzOnce downloaded, extract the archive:
sudo tar -xzf latest.tar.gzThis will create a wordpress directory with all the files inside. To keep things tidy, you might want to move these files into your web directory or set up a dedicated folder:
sudo mv wordpress /var/www/html/yourdomain.comSet Permissions
WordPress needs proper permissions to function correctly. Set ownership to your web server user—usually www-data:
sudo chown -R www-data:www-data /var/www/html/yourdomain.comsudo chmod -R 755 /var/www/html/yourdomain.comCreate the wp-config.php File
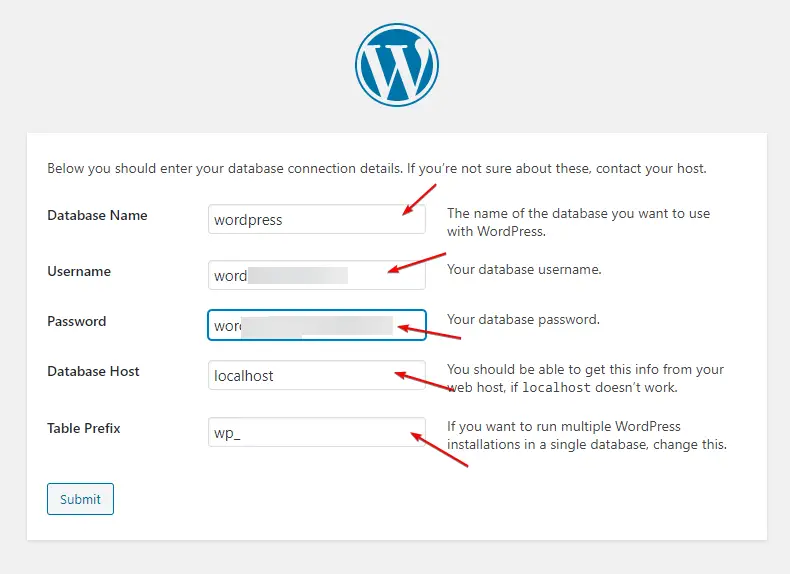
Next, you’ll need to configure WordPress to connect to your database. Copy the sample configuration file:
cd /var/www/html/yourdomain.comsudo cp wp-config-sample.php wp-config.phpOpen it with your favorite editor, like nano:
sudo nano wp-config.phpFind the following lines and update them with your database info:
| Variable | Value |
|---|---|
| DB_NAME | ‘wordpress_db’ |
| DB_USER | ‘wp_user’ |
| DB_PASSWORD | ‘your_password’ |
| DB_HOST | ‘localhost’ |
Save and close the file. This links WordPress to your database, making it ready to install!
Complete the Installation
Now, open your web browser and navigate to your server’s IP address or domain, like http://your-server-ip/yourdomain.com. You should see the WordPress setup page. Follow the on-screen instructions to set your site title, admin username, password, and email.
And just like that, you’ve installed WordPress on your Debian 12 LXC container! Next, you can log into your dashboard, customize your site, install plugins, and start creating content. Happy blogging!
7. Configuring WordPress for First Use
Congratulations! You’ve successfully installed WordPress and are now ready to get your site up and running. The first step is to configure your WordPress installation so it’s tailored to your needs. When you visit your site for the first time, you’ll see the default setup screen prompting you to get started.
Here’s a quick rundown of what you should do next:
- Choose a Site Title: Think of this as your website’s name. It appears in the header and browser tab.
- Set Up Your Admin Account: Create a username, password, and email address for your administrator account. Make sure to choose a strong password to keep your site secure.
- Configure Site Settings: Under the “Settings” menu, you can adjust your site’s language, timezone, date format, and other preferences to match your locale and style.
Once you’ve completed the initial setup, WordPress will take you to the main dashboard. Now, you can begin customizing your site by installing themes and plugins, creating posts and pages, and adjusting settings to match your vision.
Here are some tips for first-time configuration:
- Install a Theme: Choose a theme that fits your niche. You can start with a free one from the WordPress repository or purchase a premium theme for more features.
- Install Essential Plugins: Plugins extend your site’s functionality. Consider installing plugins like Yoast SEO for search engine optimization, Akismet for spam protection, and Jetpack for security and performance enhancements.
- Set Permalinks: Navigate to Settings > Permalinks and choose a URL structure that’s SEO-friendly, such as “Post name.”
Remember, the key to a successful WordPress site is ongoing customization and content creation. Don’t be afraid to explore different themes and plugins, and keep your site updated for security and performance.
8. Accessing the WordPress Dashboard
Now that your site is configured, it’s time to start managing your content and settings through the WordPress Dashboard. The dashboard is your control center, packed with options to customize your site, monitor performance, and create new content.
Accessing the dashboard is straightforward:
- Open your web browser and navigate to your domain or IP address followed by “/wp-admin”. For example:
http://your-server-ip/wp-admin - You’ll see the WordPress login screen. Enter the admin username and password you created during setup.
- Click “Log In” to enter the dashboard.
Once logged in, you’ll see the admin menu on the left side, which includes options like Posts, Pages, Appearance, Plugins, Users, Tools, and Settings. Here’s a quick overview of what you can do from the dashboard:
- Create and manage content: Use the Posts and Pages sections to add new articles or pages.
- Customize your site’s look: Under Appearance, you can change themes, customize your site’s layout, and manage widgets.
- Enhance functionality: Install, activate, or configure plugins to add features like contact forms, analytics, or e-commerce capabilities.
- Manage users: Add or edit user roles and permissions under Users.
- Adjust settings: Fine-tune your site’s general, writing, reading, discussion, and permalinks settings under Settings.
Remember to keep your WordPress core, themes, and plugins updated regularly to ensure security and compatibility. The dashboard also provides notifications if updates are available—don’t ignore them!
Getting comfortable navigating the WordPress dashboard might take a little time, but once you do, managing your site becomes much more straightforward. Dive in, explore the features, and start customizing your website to make it uniquely yours!
9. Troubleshooting Common Issues During Installation
Installing WordPress in a Debian 12 LXC container can sometimes come with its fair share of hiccups. Don’t worry—most issues are straightforward to resolve once you know what to look for. Let’s go over some of the most common problems and how to troubleshoot them.
Problem: Unable to Access the WordPress Dashboard
If you can’t reach your WordPress admin area, first double-check that your web server (like Apache or Nginx) is running smoothly. You can do this with commands like:
systemctl status apache2or
systemctl status nginxIf the service isn’t active, start it with:
systemctl start apache2or
systemctl start nginxNext, verify that your container’s firewall isn’t blocking HTTP (port 80) or HTTPS (port 443). Use:
ufw statusIf needed, allow web traffic:
ufw allow 80/tcpufw allow 443/tcpFinally, ensure your domain or IP points correctly to your container and that your WordPress URL settings are correct in the database or wp-config.php file.
Problem: Database Connection Errors
If WordPress can’t connect to the database, check that your MySQL/MariaDB service is running:
systemctl status mysqlIf it’s not, start it:
systemctl start mysqlAlso, confirm your database credentials in wp-config.php match the database user and password. Sometimes, a typo or permissions issue causes trouble. You can test this by trying to log into MySQL manually:
mysql -u your_db_user -p -h localhostIf you can’t connect, reset the password or check user privileges.
Problem: Permissions and File Ownership Issues
WordPress needs proper permissions to work correctly. If you see errors related to file access, make sure the web server owns the WordPress files:
chown -R www-data:www-data /var/www/html/wordpressReplace `/var/www/html/wordpress` with your actual directory. Also, ensure directories have 755 permissions and files have 644.
Additional Tips
- Check the error logs for Apache or Nginx, usually in `/var/log/apache2/error.log` or `/var/log/nginx/error.log`.
- Verify PHP modules are installed and enabled, especially `php-mysql`.
- Clear your browser cache or try accessing from a different browser or incognito mode.
Remember, patience is key. Most issues have a simple fix once you identify the root cause. Don’t hesitate to consult the official WordPress or Debian documentation if you get stuck!
10. Conclusion and Tips for Maintaining Your WordPress Site in an LXC Container
Congratulations! You’ve successfully installed WordPress inside a Debian 12 LXC container and accessed your dashboard. But the journey doesn’t end here. Maintaining your site properly ensures it stays secure, fast, and reliable. Let’s go over some essential tips to keep your WordPress environment in tip-top shape.
Regular Updates Are a Must
Always keep WordPress core, themes, and plugins updated to their latest versions. Developers regularly release updates that patch security vulnerabilities and improve performance. You can update via the WordPress dashboard or set up automatic updates for security releases.
Back Up Frequently
Before making major changes or updates, take backups of your entire site, including the database and files. Use plugins like UpdraftPlus or Easypie to automate this process. Store backups off-site if possible, so you can restore quickly if something goes wrong.
Monitor Security
Security should be a top priority. Consider installing security plugins like Wordfence or Sucuri Security. Also, use strong passwords, enable two-factor authentication, and restrict access to your admin area. Regularly review logs for suspicious activity.
Optimize Performance
To keep your site fast, implement caching (with plugins like W3 Total Cache or WP Super Cache), optimize images, and use a Content Delivery Network (CDN) if possible. Also, consider using a lightweight theme and removing unnecessary plugins.
Manage Resources in Your LXC Container
Since your WordPress site runs inside an LXC container, monitor resource usage—CPU, RAM, disk space—to prevent slowdowns. Use commands like `htop` or `top` inside your container to keep an eye on performance. Adjust container limits if needed.
Stay Informed and Keep Learning
WordPress and Debian are constantly evolving. Subscribe to relevant blogs, forums, or newsletters to stay updated on best practices, security alerts, and new features. Being proactive helps you avoid issues before they become serious problems.
By following these tips, you’ll maintain a healthy, secure, and high-performing WordPress site in your Debian 12 LXC container. Enjoy your blogging journey, and don’t forget to regularly review and update your setup!