WordPress Multisite is a fantastic feature that allows you to manage multiple websites from a single dashboard. Whether you’re running a network of blogs, a university portal, or a franchise, Multisite makes it easy to oversee everything in one place. But as your network grows, so do the challenges—especially when it comes to search. Finding specific content across multiple sites can become frustrating, leading to a subpar user experience. In this post, we’ll explore how to enhance your Multisite’s search capabilities, making it more powerful, relevant, and user-friendly.
What is Relevanssi and How Does It Improve Search Functionality?
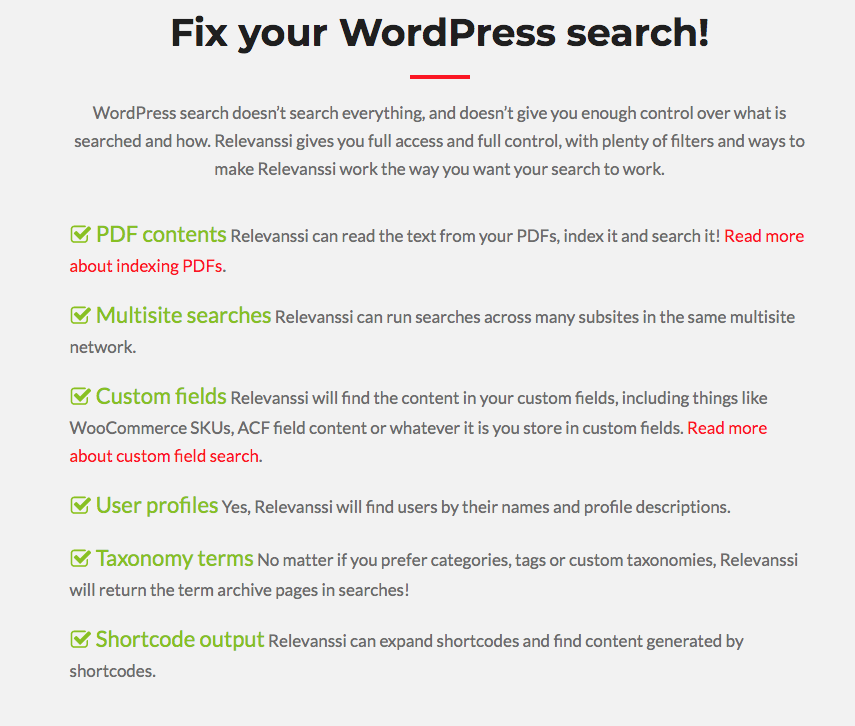
Relevanssi is a popular WordPress plugin designed to revolutionize your site’s search experience. Unlike the default WordPress search, which often feels limited and sometimes random, Relevanssi gives you more accurate and meaningful search results. It indexes your content more thoroughly—think of it as giving your search engine a supercharged brain.
So, how does it work? Relevanssi replaces the standard search with a fuzzy, full-text search engine that considers relevance, not just keyword matches. This means it ranks results based on how closely they match the search query, making the most relevant content appear first. For Multisite networks, Relevanssi offers specific features that enable searching across multiple sites seamlessly, giving your users a unified, efficient search experience.
Some key benefits include:
- Improved relevance: Search results are ranked based on relevance, not just date or alphabetically.
- Customizable weightings: You can assign importance to different content types, such as posts, pages, or custom fields.
- Multisite support: Search across all your sites from a single interface, making navigation easier for users.
- Advanced filtering: Narrow down results by categories, tags, authors, or date ranges.
In essence, Relevanssi transforms your search from a basic tool into a powerful, intuitive feature that helps visitors find exactly what they’re looking for—fast. If your Multisite network feels sluggish or cluttered when users search, Relevanssi might just be the upgrade you need to make your websites more user-friendly and efficient.
3. Step-by-Step Guide to Installing Relevanssi on WordPress Multisite
Getting Relevanssi up and running on your WordPress Multisite network might seem daunting at first, but it’s actually pretty straightforward. Let’s walk through the process together so you can start enhancing your search experience quickly.
Step 1: Ensure Compatibility
Before jumping into installation, double-check that your WordPress version is compatible with Relevanssi. Most recent versions are supported, but it’s always good to verify on the plugin’s official page or documentation. Also, make sure you have network admin access to your Multisite dashboard.
Step 2: Download Relevanssi
- Visit the Relevanssi plugin page.
- Click the “Download” button to get the latest ZIP file of the plugin.
Step 3: Network Activate the Plugin
In your WordPress Multisite dashboard, navigate to My Sites > Network Admin > Plugins.
- Click Add New.
- Upload the ZIP file you downloaded by clicking Upload Plugin.
- Once uploaded, click Network Activate to enable the plugin across all sites.
This makes Relevanssi available on your entire network, ready to be configured on each site individually.
Step 4: Activate on Individual Sites
After network activation, go to each site’s dashboard:
- Navigate to Dashboard > Plugins.
- Find Relevanssi in the list and activate it for that specific site.
Alternatively, you can activate it for all sites at once from the network admin, but managing it site-by-site gives you flexibility if some sites don’t need advanced search features.
Step 5: Rebuild the Index
Once activated, you need to build or rebuild the search index. To do this:
- Go to Settings > Relevanssi in your site’s dashboard.
- Click on the Rebuild Index button. This process might take a few moments depending on your content volume.
Rebuilding ensures that Relevanssi has all your latest content and is ready to deliver accurate, relevant search results.
4. Configuring Relevanssi for Optimal Search Performance
Now that Relevanssi is installed and indexing your content, it’s time to fine-tune its settings for the best search experience. Proper configuration makes all the difference in delivering relevant results quickly and efficiently.
Start with Basic Settings
Navigate to Settings > Relevanssi on your site’s dashboard. Here are some key options to consider:
- Indexing: Choose whether to index posts, pages, custom post types, comments, or taxonomies.
- Logging: Enable debugging and logging if you want to troubleshoot or analyze search queries later.
- Stop Words: Define words to exclude from indexing to improve performance (e.g., “the”, “and”).
Adjust Search Relevance Settings
Relevanssi allows you to customize how results are ranked:
- Boosting: Assign higher relevance to certain post types, taxonomies, or specific fields like titles or custom fields.
- Weighting Fields: Increase the importance of titles over content or vice versa, depending on your needs.
Use Keywords and Custom Fields
If your site uses custom fields or taxonomies, consider including them in the index:
- Go to the Indexing tab and select custom fields you want to include.
- This helps Relevanssi prioritize content based on specific metadata, making searches more precise.
Optimize Search Performance
For large sites, performance can be a concern. Here are some tips:
- Limit Index Size: Exclude unnecessary content to keep the index lightweight.
- Schedule Index Rebuilds: Instead of rebuilding manually, set up scheduled rebuilds during low-traffic hours.
- Adjust Search Limits: Limit the number of search results or reduce the number of search queries processed simultaneously.
Test and Tweak
Finally, always test your search after making adjustments. Try searching for common terms, and see if the results feel relevant. Don’t hesitate to tweak boosting settings or custom fields until you get the desired outcome.
Remember, the goal is to strike a balance between comprehensive indexing and fast, relevant results. With a little patience and experimentation, Relevanssi can transform your WordPress Multisite search into a powerful tool that users will love.
5. Customizing Search Results with Relevanssi Filters and Settings
One of the coolest things about Relevanssi is how flexible it is when it comes to tweaking search results. Whether you want certain content to rank higher or exclude some pages altogether, Relevanssi gives you the tools to make that happen. Let’s dive into some of the ways you can customize your search experience to better serve your site visitors and meet your specific needs.
First off, Relevanssi offers a bunch of built-in settings that you can adjust from the plugin’s options page. Here are some of the key ones:
- Relevance ranking: You can control what factors influence the order of search results. For example, you might want to prioritize recent posts, or posts with certain keywords.
- Stopwords: Words like “the,” “and,” or “but” are ignored by default. You can customize this list to include words relevant to your niche.
- Excerpt length: Adjust how much content snippet appears in search results, making them more informative or concise.
Using Filters to Fine-Tune Search Results
Beyond the default settings, Relevanssi allows you to add custom filters through code snippets, giving you even more control. For example, if you want to exclude certain post types or categories from search results, you can do so with some simple PHP tweaks:
add_filter( 'relevanssi_modify_wp_query', function( $query ) { // Exclude 'product' post type if ( ! is_admin() && $query->is_search() ) { $query->set( 'post_type', array( 'post', 'page' ) ); // only include posts and pages } // Exclude a specific category $query->set( 'category__not_in', array( 5 ) ); // exclude category ID 5 return $query;});This kind of customization is super helpful if you want your search to prioritize certain content or hide irrelevant results. You can also modify relevance scoring by adjusting how certain fields are weighted, like giving more importance to titles over content.
Highlighting Results and Adding Custom Labels
Another way to improve user experience is by highlighting matched keywords in search snippets or customizing the labels that appear in results. Relevanssi supports highlighting keywords within snippets, making it easier for visitors to see why a result is relevant. To enable this feature, simply turn on the highlighting option in the settings.
For more advanced customization, you might want to display custom labels or icons next to certain results, indicating categories, tags, or special statuses. This can be done by editing your theme’s search results template and adding logic to check for specific post meta or taxonomy terms.
All in all, Relevanssi’s filters and settings give you the power to craft a search experience that feels intuitive, relevant, and tailored to your audience. Don’t be afraid to experiment and see what works best for your multisite network!
6. Best Practices for Using Relevanssi Across Multiple Sites in Your Network
Managing multiple sites within a WordPress multisite network can seem daunting, especially when it comes to search. But with Relevanssi, you can create a seamless, cohesive search experience across all your sites—if you follow a few best practices.
1. Centralize Your Relevanssi Indexing
Instead of installing Relevanssi on each site individually, consider setting it up centrally. This way, you can index content from all sites into a single database, making cross-site search possible without duplicating effort. Plugins like the Multisite Global Search or custom configurations can help with this setup.
2. Optimize Indexing Frequency
Since indexing content across multiple sites can be resource-intensive, find a balance. Schedule regular re-indexing—say, once a day or once a week—so that search results stay fresh without overloading your server. Use WP-Cron or a real cron job for better control.
3. Use Consistent Taxonomies and Metadata
To make cross-site filtering easier, standardize your categories, tags, and custom fields across all sites. This consistency lets you create filters and relevance rules that work network-wide, providing users with a unified search experience.
4. Customize Search Results to Reflect Site Context
Sometimes, it’s helpful to show visitors which site a result comes from. You can tweak your search templates to display the site name, especially if your network hosts distinctly different content types or brands. This helps users understand the source of each result and navigate accordingly.
5. Consider User Permissions and Privacy
When indexing across multiple sites, remember that some content might be private or restricted. Make sure your search respects user roles and privacy settings—Relevanssi can be configured to exclude private content from public searches.
6. Test and Refine Your Search Experience
Finally, always test your multisite search thoroughly. Gather feedback from users, monitor search analytics, and make adjustments to settings or filters as needed. Over time, you’ll learn what works best to deliver relevant results quickly and effortlessly.
By following these best practices, you’ll turn your multisite network into a well-oiled search machine—helping visitors find what they’re looking for across all your sites with ease.
7. Troubleshooting Common Issues with Relevanssi on Multisite
Getting Relevanssi to work smoothly across your WordPress Multisite network can sometimes be a bit tricky. No worries—many issues are straightforward to fix once you know what to look for. Here are some of the most common problems users encounter and how to troubleshoot them:
1. Search Not Returning Expected Results
If your search results seem off or incomplete, the first step is to check if Relevanssi is indexing all your sites correctly. Sometimes, the plugin might not be indexing content from sub-sites, especially if you’ve recently added new content or made changes.
- Solution: Go to Relevanssi > Indexing in your WordPress dashboard and rebuild the index. Make sure all sub-sites are selected for indexing.
- Ensure that the plugin is configured to index all content types you want searchable, such as pages, posts, custom post types, etc.
2. Search Results Include Unwanted or Old Content
This can happen if the index hasn’t been refreshed after content updates or deletions.
- Solution: Rebuild the index manually via the plugin settings. Set up a scheduled reindexing if your site updates frequently.
- Check if there are any conflicting plugins or custom code snippets that might interfere with Relevanssi’s indexing process.
3. Performance Issues with Large Multisite Networks
Indexing and searching across multiple sites can sometimes slow down your server, especially if your network has a ton of content.
- Solution: Limit indexing to only the necessary content types or specific sites.
- Optimize your database and consider increasing server resources if needed.
- Schedule reindexing during off-peak hours to reduce load.
4. Relevanssi Not Working with Custom Post Types or Taxonomies
If you have custom content types or taxonomies, ensure Relevanssi is configured to index them.
- Solution: In the plugin settings, enable indexing for your custom post types and taxonomies.
- Verify your custom code isn’t accidentally excluding these types from search.
5. Compatibility Issues with Other Plugins
Sometimes, other plugins—especially caching or security plugins—can interfere with Relevanssi’s operation.
- Solution: Clear cache after indexing, disable other plugins temporarily to identify conflicts, and consult plugin documentation for known issues.
Remember, patience is key! Regularly updating and maintaining your index ensures your multisite network delivers relevant, fast search results. If problems persist, reaching out to Relevanssi support or checking their community forums can be a great way to find tailored solutions.
8. Conclusion: Enhancing User Experience Through Advanced Search Features
In today’s digital landscape, a powerful search experience isn’t just a luxury—it’s a necessity. For WordPress Multisite networks, where content is spread across multiple sites and types, providing users with quick, relevant search results can significantly boost engagement and satisfaction. That’s where Relevanssi comes into play.
By integrating Relevanssi, you’re not just replacing the default search; you’re upgrading to an advanced tool that understands your content better, ranks results more intelligently, and offers features like fuzzy matching, custom weighting, and partial matches. These enhancements help your visitors find what they’re looking for faster and more accurately, reducing frustration and increasing the likelihood they’ll stay longer on your site.
Some of the key benefits you gain include:
- More Relevant Results: Relevanssi’s ranking algorithms ensure the most pertinent content appears first.
- Flexible Customization: Adjust weights, exclude certain content, or tweak search behavior to suit your site’s needs.
- Improved User Engagement: Better search results lead to higher page views and lower bounce rates.
- Multi-site Compatibility: Seamlessly search across your entire network, providing a unified search experience for users.
Implementing advanced search features like Relevanssi might require some initial setup and occasional troubleshooting, but the payoff is well worth it. Your visitors will appreciate being able to find exactly what they need quickly, and you’ll enjoy the benefits of a more user-friendly, professional website.
So, take the time to configure Relevanssi properly, keep your index updated, and don’t hesitate to explore its powerful options. With these tools at your fingertips, your WordPress Multisite network will deliver a superior search experience that sets you apart from the competition.