If you’ve been working on your WordPress site and suddenly see a blank white screen with a message like “There has been a critical error on this website,” you’re not alone. This frustrating issue, known as the WordPress Critical Error, can stop your website in its tracks, leaving you wondering what went wrong. It’s a serious problem because it prevents visitors from accessing your content, and it can also cause stress for site owners trying to fix it. But don’t worry—this guide will help you understand what causes this error and how to fix it so you can get your site back online quickly and smoothly.
Common Causes of the WordPress Critical Error
The WordPress Critical Error can pop up for various reasons, many of which are related to recent changes or updates you might have made. Here are some of the most common causes:
- Plugin Conflicts: When you install or update a plugin, sometimes it clashes with your theme or other plugins, leading to a critical error. Plugins are powerful tools, but they can cause issues if not coded properly.
- Theme Issues: Switching themes or updating your current theme can introduce errors, especially if the theme isn’t compatible with your WordPress version or has bugs.
- PHP Version Compatibility: WordPress and its plugins require specific PHP versions. Running an outdated or incompatible PHP version can trigger critical errors.
- Corrupted Core Files: Sometimes, core WordPress files can become corrupted during updates or manual modifications, leading to errors.
- Exceeded PHP Memory Limit: If your site exceeds the allocated PHP memory, it might crash with a critical error. This often happens after installing resource-heavy plugins or themes.
- Failed Updates: Incomplete or failed updates to WordPress core, themes, or plugins can leave your site in an unstable state, causing errors.
Understanding these common causes helps you troubleshoot more effectively. Often, the problem is related to recent changes you’ve made, so retracing your steps can lead you to the culprit. Next, we’ll explore practical ways to diagnose and fix these issues so you can get your WordPress site back up and running without too much hassle.
3. Step-by-Step Guide to Troubleshooting and Fixing the Error
If you’ve encountered the dreaded WordPress critical error, don’t worry—you’re not alone, and there are effective ways to fix it. Let’s walk through a straightforward, step-by-step process to troubleshoot and resolve this issue so you can get your website back up and running smoothly.
Step 1: Check for Recent Changes
Start by asking yourself, “What did I do just before the error appeared?” Did you update a plugin, theme, or WordPress core? Recent changes are often the culprit. If possible, revert those updates temporarily to see if that resolves the problem.
Step 2: Enable Debug Mode
Turning on debug mode can give you more details about what’s causing the error. We’ll cover how to do this in the next section, but if you’re comfortable, you can proceed now to the next step.
Step 3: Deactivate Plugins
Plugins are common sources of conflicts. To test if a plugin is the issue:
- Access your website’s files via FTP or your hosting control panel’s file manager.
- Navigate to the wp-content folder.
- Rename the plugins folder to something like plugins_backup.
If the site loads after doing this, then a plugin was likely causing the problem. You can then rename the folder back to plugins and deactivate plugins one by one via the admin dashboard to identify the culprit.
Step 4: Switch to a Default Theme
If plugins aren’t the issue, try switching your theme to a default WordPress theme like Twenty Twenty-Three:
- Via FTP or file manager, navigate to wp-content/themes.
- Rename your current theme folder to something like my-theme_backup.
- WordPress will automatically fall back to a default theme if it’s available. If not, upload one like Twenty Twenty-Three.
This step helps determine if your theme is causing the error.
Step 5: Increase PHP Memory Limit
Sometimes, a critical error is due to insufficient PHP memory. To increase it:
- Edit your wp-config.php file.
- Add the following line before “That’s all, stop editing! Happy publishing”:
<?phpdefine( 'WP_MEMORY_LIMIT', '256M' );
This allocates more memory to WordPress and can resolve memory-related errors.
Step 6: Check Error Logs
If you still don’t see the root cause, check your server error logs. Your hosting provider’s control panel usually provides access. These logs can reveal specific plugin, theme, or PHP errors that led to the critical error.
Step 7: Reinstall WordPress Core Files
If all else fails, try re-uploading the core WordPress files. Download the latest version from WordPress.org, extract it, and upload the wp-admin and wp-includes folders via FTP, overwriting existing files. This can fix corrupt core files causing the error.
Final Tip: Seek Professional Help
If you’re uncomfortable performing these steps or still can’t resolve the issue, don’t hesitate to reach out to a developer or your hosting support. They can often diagnose and fix server-side issues quickly.
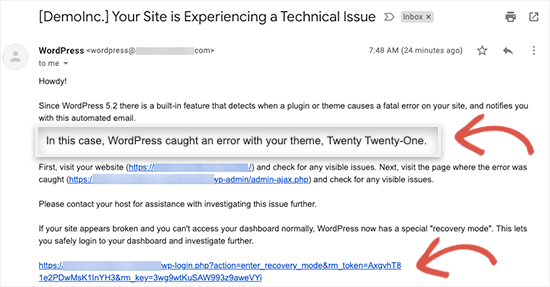
4. How to Enable WordPress Debug Mode for Detailed Error Insights
One of the most powerful tools in troubleshooting WordPress critical errors is enabling debug mode. It provides detailed error messages that clarify what’s going wrong behind the scenes. Here’s how to turn it on safely and effectively.
Step 1: Access Your Site’s Files
To modify debug settings, you need access to your website’s files. You can do this via:
- FTP client (like FileZilla)
- Hosting control panel’s file manager
Step 2: Locate and Edit wp-config.php
Navigate to your WordPress root directory, where you’ll find the wp-config.php file. Download it or open it directly in the editor provided by your host.
Step 3: Enable Debug Mode
Find the line that says / That’s all, stop editing! /. Just before this line, add the following code:
define( 'WP_DEBUG', true );define( 'WP_DEBUG_LOG', true );define( 'WP_DEBUG_DISPLAY', false );
Here’s what each line does:
- WP_DEBUG: Turns on debugging mode.
- WP_DEBUG_LOG: Saves all error messages to a debug.log file in the wp-content folder.
- WP_DEBUG_DISPLAY: Prevents error messages from showing publicly on your website, which is important for security.
Step 4: Save and Upload Changes
After adding the lines, save the file and upload it back to your server if you edited it locally. If you used the file manager, simply save your changes.
Step 5: Check the Error Log
Visit your website to reproduce the error. Then, navigate to the wp-content folder and open debug.log. You’ll find detailed error messages that pinpoint the plugin, theme, or PHP issue causing the critical error.
Important Note:
Once you’ve identified and fixed the problem, remember to disable debug mode for security reasons. To do this, simply change WP_DEBUG to false or remove the debug lines from your wp-config.php file.
In Summary
Enabling debug mode is like turning on the flashlights in a dark room—it illuminates the problem and makes troubleshooting much easier. With detailed error messages at hand, you’re better equipped to fix your WordPress site’s critical error efficiently and confidently.
5. Repairing or Replacing Corrupted Files and Plugins
If your WordPress site is throwing a critical error, one common culprit is corrupted files or plugins. Sometimes, during updates or installations, files can get corrupted or incomplete, leading to those frustrating error messages. The good news is that fixing this is often straightforward, and you don’t need to be a coding expert to do it.
First, it’s important to identify which files or plugins might be causing the issue. Usually, the error message will give you some clues, but if not, you can use a process of elimination. Here’s what you can do:
- Access Your Website Files: Use an FTP client like FileZilla or your hosting file manager to connect to your website’s server.
- Navigate to the Plugins Folder: Go to /wp-content/plugins/ and look for the plugin you suspect might be causing the problem.
- Rename the Plugin Folder: To disable a plugin, right-click and rename its folder (e.g., add “_old” at the end). This will deactivate it without deleting it. Refresh your site to see if the error clears.
- Replace Corrupted Files: If you suspect core files are corrupted, re-upload fresh copies of WordPress files from a clean download from WordPress.org. Be sure to only overwrite files if you’re comfortable doing so, and always back up first.
Another handy tip is to check the error logs if your hosting provider offers access. These logs can give you specific details about which files or plugins are causing trouble. Once identified, replacing or repairing these files often involves re-uploading clean copies or removing problematic plugins altogether.
Remember, always back up your website before making any file changes. That way, if something goes wrong, you can restore your site to its previous state without losing any data. Regular backups are your safety net in these situations.
6. How to Deactivate Plugins and Themes Safely
Plugins and themes are essential for customizing your WordPress site, but they can sometimes be the root of critical errors. Deactivating them safely is the first step toward troubleshooting and fixing these issues. The key is to do it without causing further problems or data loss.
Here’s the most straightforward way to deactivate plugins and themes:
- Access Your Site Files: Use an FTP client or your hosting provider’s file manager to connect to your server.
- Navigate to the Relevant Folder: For plugins, go to /wp-content/plugins/. For themes, go to /wp-content/themes/.
- Rename the Folder: To deactivate a plugin, right-click its folder and add a suffix like “_deactivated” or similar. For themes, do the same. This prevents WordPress from loading them.
After renaming, visit your website. If the critical error is gone, you’ve identified the problematic plugin or theme. Now, you can troubleshoot further by re-enabling plugins one by one or switching to a default theme (like Twenty Twenty-Three) to see if the issue resolves.
Alternatively, if you can access your WordPress admin dashboard:
- Navigate to Plugins > Installed Plugins, then deactivate each plugin individually.
- Go to Appearance > Themes and activate a default theme like Twenty Twenty-Three.
This method is safer and easier, especially if you can log into your dashboard. However, if you’re locked out due to the critical error, renaming via FTP or file manager remains the most reliable way.
Remember, after deactivating problematic plugins or themes, always look for updates or alternatives. Sometimes, outdated or incompatible plugins/themes cause these errors, and updating them can prevent future issues.
In summary, deactivating plugins and themes safely involves careful file management, backups, and sometimes a bit of trial and error. Patience is key, and once you identify the culprit, fixing your site becomes much easier. Happy troubleshooting!
7. Restoring a Backup to Fix Critical Errors
If you’ve ever encountered a critical error on your WordPress site, one of the most straightforward solutions is restoring a recent backup. Think of your backup as a safety net — it’s your way of reverting your site to a healthy state before the error occurred. Restoring a backup can resolve issues caused by plugin conflicts, faulty updates, or accidental changes.
Here’s a simple step-by-step guide to restoring your backup:
- Identify Your Backup Method: Did you use a plugin like UpdraftPlus, BackupBuddy, or Jetpack? Or perhaps your hosting provider offers automatic backups? Knowing how your backup is stored will determine your restoration process.
- Access Your Backup Files: Log into your backup plugin dashboard or hosting control panel to locate the backup files. Ensure you select the most recent backup taken before the critical error appeared.
- Put Your Site in Maintenance Mode: To prevent visitors from experiencing errors during the restore, consider enabling maintenance mode. Many backup plugins have this feature, or you can use a simple plugin like WP Maintenance Mode.
- Restore the Backup: Follow your backup plugin’s instructions to restore. Typically, this involves selecting the backup file and clicking ‘Restore’ or ‘Import.’ For hosting backups, you might need to upload files via cPanel or a file manager.
- Verify Your Site: After the restoration completes, visit your website to ensure the critical error is gone. Clear your browser cache and WordPress cache if you use caching plugins.
A few tips to keep in mind:
- Always back up your site before making significant changes or updates.
- Test your backup files periodically to confirm they work correctly.
- If restoring doesn’t fix the issue, or if you encounter problems during restore, contact your hosting support for assistance.
Restoring from a backup is a powerful way to undo problematic changes quickly. While it might feel daunting at first, once you get familiar with the process, it becomes a reliable tool in your troubleshooting toolkit.
8. Preventing Future Critical Errors on Your WordPress Site
The best way to deal with critical errors is to prevent them from happening in the first place. Prevention involves a combination of best practices, regular maintenance, and being cautious with updates and customizations. Here’s how you can keep your WordPress site running smoothly:
Regular Backups
As we mentioned earlier, backups are your safety net. Schedule automatic backups (daily or weekly) using reliable plugins or your hosting provider. Store backups in multiple locations, like cloud storage, to avoid data loss.
Keep Everything Updated
- WordPress Core: Always run the latest version of WordPress to benefit from security patches and improvements.
- Plugins and Themes: Regularly update plugins and themes, but do so cautiously. Test updates on a staging site first if possible.
- PHP Version: Ensure your hosting environment uses a supported PHP version. Newer PHP versions are faster and more secure.
Use Reliable Plugins and Themes
Only install plugins and themes from trusted sources like the WordPress repository or reputable developers. Avoid using poorly coded or outdated plugins, as they can introduce vulnerabilities or conflicts.
Employ a Staging Environment
A staging site is a clone of your live website where you can test updates, new plugins, or custom code safely. Many hosting providers offer one-click staging setups. This way, you can catch potential errors before they affect your visitors.
Implement Security Measures
Strengthen your site’s security to prevent hacks and malware, which are common causes of critical errors. Use security plugins like Wordfence or Sucuri, enable two-factor authentication, and monitor your site regularly.
Monitor Your Site
Keep an eye on your site’s health with uptime monitoring tools and error logs. Quick detection of issues allows you to address problems early before they escalate into critical errors.
Limit Plugin Usage
Only install essential plugins. Too many plugins can increase the risk of conflicts and errors. Regularly review and deactivate or delete plugins you no longer need.
Practice Caution with Custom Code
If you code your own functions or customize themes, test your code thoroughly. Use a child theme for modifications and avoid editing core files directly.
By following these proactive steps, you can significantly reduce the chances of encountering critical errors. Remember, a well-maintained website not only prevents errors but also provides a better experience for your visitors and peace of mind for you as a site owner.
When to Seek Professional Help for WordPress Critical Errors
While many WordPress issues can be resolved by following troubleshooting steps, there are situations where professional assistance becomes essential. Recognizing these scenarios can save you time and prevent further damage to your website.
You should consider seeking help from a WordPress expert in the following cases:
- Persistent Errors: If you’ve tried standard solutions like disabling plugins or switching themes, but the critical error persists, a professional can diagnose underlying issues more efficiently.
- Data Loss or Corruption: When errors lead to database corruption or loss of content, specialists can help recover your data safely.
- Security Concerns: If your site shows signs of hacking or malware infection, professional security services are crucial to remove malicious code and strengthen defenses.
- Custom Development Needs: For complex fixes involving custom code, plugin development, or server configurations, experts ensure proper implementation without risking site stability.
- Limited Technical Knowledge: If you’re unfamiliar with server management, PHP errors, or debugging tools, a professional can handle these technical aspects effectively.
In addition, consulting a professional is advisable if your website’s downtime impacts your business or brand reputation. They can quickly identify root causes and implement comprehensive solutions, minimizing disruption and ensuring your site operates smoothly.
Ultimately, knowing when to seek expert help can prevent prolonged outages and safeguard your website’s integrity, allowing you to focus on your content and audience.