Hey there! If you’re running a WordPress site on Debian 12, you know how essential it is to keep everything running smoothly. Managing multiple aspects like updates, security, backups, and performance can become overwhelming. That’s where a Linux Dashboard comes into play. Think of it as your centralized control panel — a friendly, powerful interface that simplifies server management. Setting up a Linux Dashboard tailored for WordPress not only saves you time but also makes monitoring and maintaining your site a breeze. Ready to dive into how you can set this up and make your life easier? Let’s get started!
Prerequisites for Installing the Linux Dashboard on Debian 12
Before you jump into installing your Linux Dashboard, there are a few important prerequisites to consider. Making sure your environment is ready will help ensure a smooth setup process and optimal performance. Here’s what you’ll need:
- Debian 12 Server: Ensure you have a fresh or existing Debian 12 installation. It should be updated to the latest version to avoid compatibility issues.
- Root or Sudo Privileges: You’ll need administrative rights to install packages and configure the server. If you’re not logged in as root, make sure your user has sudo privileges.
- Web Server: A web server like Apache or Nginx installed and running. Most dashboards are web-based, so this is essential.
- PHP and Database Support: Since WordPress depends on PHP and a database (usually MySQL or MariaDB), ensure these are installed and properly configured.
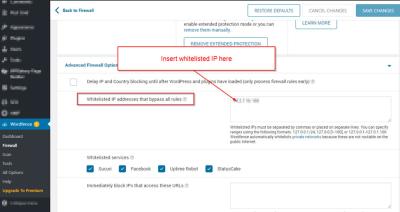
- Firewall Settings: Configure your firewall to allow HTTP (port 80) and HTTPS (port 443) traffic, plus any other necessary ports for your dashboard.
- SSL Certificate (Optional but Recommended): For security, it’s highly recommended to set up SSL/TLS, so your dashboard and WordPress data stay encrypted.
Once these prerequisites are in place, you’ll be well on your way to installing and configuring your Linux Dashboard for managing WordPress seamlessly. It’s always a good idea to back up your server before making major changes, just to keep everything safe!
Step 1: Updating Your Debian 12 System
Before diving into installing the Linux Dashboard for WordPress, it’s essential to make sure your Debian 12 system is fully up-to-date. Think of it like cleaning your workspace before starting a new project — it makes everything run smoother and avoids headaches later on.
Updating your system is straightforward, and you just need to run a couple of simple commands in your terminal. Here’s what you should do:
- Open your terminal. You can do this by searching for “Terminal” in your applications menu or pressing Ctrl + Alt + T.
- First, update your package list to make sure you have the latest information about available packages:
sudo apt update - Next, upgrade all your installed packages to their latest versions:
sudo apt upgrade -y - If prompted to restart services or the system, go ahead and follow the prompts. Sometimes, a full upgrade might require a reboot to complete the process:
sudo reboot
By doing this, you ensure your Debian 12 system is current and secure, which is especially important when installing new software components like the Linux Dashboard. It minimizes compatibility issues and keeps everything running smoothly.
Once your system is up-to-date, you’re ready to move on to installing the dependencies and tools needed for the dashboard setup. Let’s get those installed next!
Step 2: Installing Necessary Dependencies and Tools
Now that your Debian 12 system is fresh and updated, it’s time to gather the tools and dependencies that will make setting up your Linux Dashboard for WordPress a breeze. Think of this step as gathering all your ingredients before cooking a delicious meal — you want everything ready so the process goes smoothly.
For the dashboard setup, you’ll typically need:
- Apache or Nginx as your web server
- PHP along with relevant modules
- MySQL or MariaDB for database management
- Git for version control and fetching dashboards/templates
- Tools like unzip or wget for downloading files
Let’s install these step-by-step:
sudo apt install apache2 php php-mysql libapache2-mod-php mysql-server git unzip wget -yThis command installs:
- Apache2: The web server that will host your dashboard
- PHP and the php-mysql module: To run PHP scripts and connect to your database
- MySQL server: Your database backend for WordPress and dashboard data
- Git: Useful if you want to clone repositories or dashboards directly from GitHub
- Unzip and wget: For downloading and extracting files easily
After installing these, it’s a good idea to enable some Apache modules and restart the services:
sudo a2enmod rewritesudo systemctl restart apache2This ensures URL rewriting works properly, which is often necessary for WordPress and dashboards to operate correctly.
Once all dependencies are in place, you’re set to proceed with configuring your web server, setting up databases, and installing the dashboard itself. Remember, having these tools ready makes the rest of the setup process much smoother and less frustrating.
5. Step 3: Downloading and Installing the Linux Dashboard for WordPress
Alright, now that you’ve prepared your environment, it’s time to get the Linux Dashboard for WordPress installed. Think of this step as setting up the control panel that’ll let you easily manage your WordPress site directly from your Linux server. The good news? It’s pretty straightforward.
First things first, you need to download the Linux Dashboard package. Typically, this comes from the official repository or a trusted source. If you’re following a specific dashboard like WP Server Manager or WP CLI Dashboard, make sure to grab the latest version. For this example, let’s assume you’re using WP Server Manager.
To download, open your terminal and run a command similar to this:
wget https://example.com/path-to-wp-server-manager-latest.tar.gzThis command fetches the package directly into your current directory. Once downloaded, you should extract it like so:
tar -xzvf wp-server-manager-latest.tar.gzAfter extracting, navigate into the folder:
cd wp-server-managerNext, you’ll want to run the installer script or copy files into your web server directory. For example, if you’re using Apache, you might copy the folder to:
/var/www/html/wp-dashboardEnsure the folder has the proper permissions:
sudo chown -R www-data:www-data /var/www/html/wp-dashboardFinally, if the dashboard requires a database setup, create a new database and user, then import any necessary SQL files included in the package. Follow the specific instructions provided with your dashboard package for configuration details.
And that’s it! Once installed, you should be able to access your dashboard by navigating to http://your-server-ip/wp-dashboard in your web browser. Next, let’s look at how to fine-tune your setup for the best performance possible.
6. Step 4: Configuring the Linux Dashboard for Optimal Performance
Great! You’ve installed your Linux Dashboard for WordPress. Now, the key to making it really useful is proper configuration. A well-tuned dashboard not only runs smoothly but also helps you keep your WordPress site secure and efficient.
Here are some essential tips to optimize your dashboard:
- Update Settings and Plugins: Always ensure your dashboard software, plugins, and themes are up to date. Developers regularly release updates that fix bugs and improve performance.
- Configure Caching: Implement caching mechanisms like Redis or Memcached to speed up data retrieval. Check if your dashboard supports cache configuration and enable it accordingly.
- Set Proper Permissions: Make sure your dashboard files and directories have the correct permissions. Typically, directories should be 755 and files 644, with ownership assigned to www-data or your web server user.
- Optimize Database Connections: If your dashboard interacts with your database, configure connection pooling or persistent connections to reduce overhead. Also, regularly optimize your WordPress database via WP-CLI or phpMyAdmin.
- Enable SSL: For security, set up SSL/TLS so that all dashboard traffic is encrypted. This can be done easily with Let’s Encrypt on Debian 12.
- Monitor Resource Usage: Use tools like htop or top to keep an eye on CPU, memory, and disk I/O. Adjust your server resources or optimize your site if you notice bottlenecks.
Additionally, check if your dashboard offers built-in performance settings. Adjust logging levels to avoid unnecessary disk usage, and disable any features you don’t need.
Finally, consider setting up regular backups of your dashboard configuration and database. In case something goes wrong, you’ll be able to restore quickly without losing your hard-earned settings.
By tweaking these settings, your Linux Dashboard for WordPress will be a powerful, reliable tool that helps you manage your site effortlessly and efficiently. Now, you’re well on your way to a streamlined WordPress management experience on Debian 12!
7. Step 5: Connecting Your WordPress Site to the Linux Dashboard
Now that you’ve set up your Linux dashboard and have your WordPress site ready, it’s time to connect the two. This step is crucial because it allows you to manage your WordPress installation directly from your dashboard, streamlining your workflow and giving you quick access to important site metrics and controls.
First things first, ensure your WordPress site is accessible and running smoothly. You’ll need the site’s URL, admin credentials, and, optionally, SSH access if you want more advanced management features.
Here’s a simple step-by-step guide to connect your WordPress site to your Linux dashboard:
- Install Necessary Plugins or Tools: Depending on your dashboard setup, you might need plugins like WP CLI or specific management tools that integrate with your dashboard. If your dashboard supports direct integration, follow its documentation to install and configure these plugins.
- Configure API or SSH Access: To enable seamless management, set up secure SSH keys or REST API credentials. This might involve generating SSH keys with
ssh-keygenand adding the public key to your server, or creating an API key within WordPress for API-based management. - Connect via Dashboard Interface: Within your Linux dashboard, locate the section for site management or integrations. Enter your WordPress site URL, and if required, input your API keys or SSH details.
- Test the Connection: Once everything is configured, perform a test to ensure the dashboard can communicate with your WordPress site. You should see your site’s details, latest posts, or stats reflected within the dashboard interface.
It’s worth noting that some dashboards come with pre-built integrations for WordPress, making this process smoother. If you’re using custom tools or plugins, consult their documentation for specific instructions. The key point here is ensuring a secure and reliable connection so you can manage your site effortlessly from your Linux dashboard.
Once connected, you’ll gain a powerful overview of your WordPress site right within your dashboard, including performance metrics, updates, and even direct access to manage plugins and themes. This setup not only saves time but also helps you catch issues early before they impact your visitors.
8. Best Practices for Managing WordPress with the Linux Dashboard
Managing your WordPress site through a Linux dashboard can be a game-changer, but like any powerful tool, it’s essential to follow some best practices to keep everything running smoothly and securely.
Here are some tips to make the most out of your setup:
- Keep Everything Updated: Regularly update your WordPress core, plugins, themes, and your Linux system. Automate updates where possible, but always test updates on a staging environment first to prevent unexpected downtime.
- Secure Your Connection: Use SSH keys instead of passwords for connecting your dashboard to the server. Enable firewalls, and consider setting up a VPN if you access your dashboard remotely.
- Set Permissions Carefully: Limit access to your dashboard and server to only trusted users. Use the principle of least privilege—give users only the permissions they need to do their jobs.
- Regular Backups: Schedule regular backups of your WordPress database and files. Store backups securely off-site or in cloud storage, and verify your restore process periodically.
- Monitor Site Performance and Security: Use monitoring tools integrated into your dashboard or external services. Keep an eye on uptime, load times, and security alerts. Consider installing security plugins like Wordfence or Sucuri for added protection.
- Automate Routine Tasks: Leverage your dashboard’s automation features for tasks like plugin updates, backups, and security scans. This reduces manual work and minimizes human error.
- Document Your Configuration: Keep a record of your setup process, credentials, and configurations. This documentation will save you time if you need to troubleshoot or migrate your site later.
Finally, stay engaged with the WordPress community and your hosting provider’s support channels. They can offer invaluable advice, security updates, and troubleshooting tips that keep your site healthy and responsive.
By following these best practices, you’ll ensure your WordPress site remains secure, fast, and easy to manage—all from the convenience of your Linux dashboard. Happy managing!
9. Troubleshooting Common Issues During Setup
Setting up the Linux dashboard for WordPress on Debian 12 can sometimes come with a few bumps along the way. Don’t worry—many of these issues are quite common and have straightforward solutions. Let’s go through some of the most frequent problems you might encounter and how to fix them.
1. Cannot Access the Dashboard
If you’re unable to reach your WordPress admin panel after setup, double-check these:
- URL correctness: Ensure you’re entering the right URL, typically
http://your-server-ip/wp-adminorhttp://your-domain.com/wp-admin. - Firewall settings: Make sure your server’s firewall isn’t blocking HTTP (port 80) or HTTPS (port 443). You can use
ufwcommands likesudo ufw allow 'Apache Full'. - Web server status: Confirm your web server (Apache or Nginx) is running with
systemctl status apache2orsystemctl status nginx. - Database connection issues: Check your
wp-config.phpfile to ensure database credentials are correct.
2. WordPress Not Loading Properly
If your WordPress site loads but displays errors or incomplete pages:
- Clear cache: Browser cache or caching plugins can cause display issues. Clear your browser cache and disable caching temporarily to test.
- Permalinks problem: Try resetting permalinks via Settings > Permalinks in the dashboard.
- Plugin conflicts: Disable all plugins and re-enable them one by one to identify problematic ones.
3. Database Connection Errors
If you see errors like “Error establishing a database connection,” check:
- Database credentials: Verify your database name, username, password, and host in
wp-config.php. - MySQL service: Ensure MySQL/MariaDB is running with
systemctl status mysqlorsystemctl status mariadb. - Database user permissions: Confirm the user has necessary permissions.
4. SSL/TLS Issues
If your site shows security warnings or HTTPS isn’t working:
- Certificate installation: Ensure your SSL certificate is correctly installed via Certbot or your preferred method.
- Redirects: Check your web server configuration to properly redirect HTTP to HTTPS.
- Mixed content: Update your site URLs to HTTPS in WordPress settings and ensure assets load over HTTPS.
5. Log Files Are Your Friend
When things go wrong, always check your logs:
- Apache logs:
/var/log/apache2/error.log - Nginx logs:
/var/log/nginx/error.log - MySQL logs: Typically in
/var/log/mysql/error.log
Reviewing these logs can give you clues about what’s causing the issue and how to fix it.
10. Conclusion and Additional Resources for WordPress and Debian 12 Users
Congratulations! You’ve now got a solid grasp on setting up and managing your Linux dashboard for WordPress on Debian 12. Remember, while the setup process might seem daunting at first, tackling common issues as they come is part of the journey. With patience and a few troubleshooting tricks, you’ll be running a smooth WordPress site in no time.
To keep improving your skills and troubleshooting toolkit, here are some additional resources you might find helpful:
- Official WordPress Documentation: https://wordpress.org/support/
- Debian Documentation: https://www.debian.org/doc/
- Certbot for SSL/TLS: https://certbot.eff.org/
- Web Server Tutorials: For Apache (https://httpd.apache.org/docs/) and Nginx (https://nginx.org/en/docs/)
- Community Forums: Join communities like Stack Overflow, Reddit, or Debian forums for support and tips.
Happy hosting! With your new setup, you’re well on your way to managing a powerful, secure, and efficient WordPress site on Debian 12. Keep exploring, stay curious, and don’t hesitate to seek help when needed. Your website success story is just beginning!