Starting your own website might seem daunting at first, but with WordPress, it’s more accessible than ever. Whether you’re building a personal blog, a business site, or an online store, WordPress offers a flexible platform that’s easy to use—even if you’re a complete beginner. In this guide, we’ll walk you through each step of the process, from picking the perfect domain name to launching your site to the world. So, grab a cup of coffee, and let’s dive into the exciting world of website creation!
Choosing the Right Domain Name and Hosting Provider
Before you start designing your website, the first big step is choosing a domain name and a hosting provider. Think of your domain as your website’s address—something visitors will type into their browser to find you. A good domain should be memorable, easy to spell, and relevant to your content or brand. For example, if you’re creating a site about baking, something like SweetTreats.com would work well.
When selecting a domain, consider these tips:
- Keep it short and simple
- Avoid hyphens and numbers that can cause confusion
- Use keywords related to your niche
- Choose a popular extension like .com, .net, or .org
Next up is choosing a hosting provider. Think of hosting as renting space on the internet for your website. There are many options out there, but for beginners, it’s best to pick a provider known for good support and easy WordPress integration. Popular choices include Bluehost, SiteGround, and DreamHost. These hosts often offer one-click WordPress installation, which makes getting started super simple.
When picking a hosting plan, consider:
- Reliability and uptime guarantees
- Customer support quality
- Pricing and renewal rates
- Features like SSL certificates (important for security)
- Scalability options for future growth
Investing in a trustworthy domain and hosting setup now can save you headaches later. Once you’ve secured your domain and hosting, you’re ready to move on to installing WordPress and customizing your site. Remember, the foundation you set today lays the groundwork for a successful online presence!
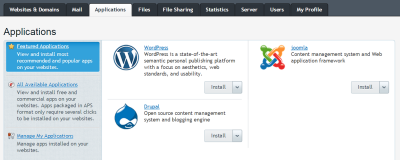
3. Installing WordPress on Your Hosting Server
Alright, now that you’ve got your domain and hosting set up, it’s time to get WordPress installed. Don’t worry—it’s easier than you might think! Most hosting providers offer simple, one-click WordPress installations, which make the process smooth and straightforward.
Step 1: Log into Your Hosting Account
Start by logging into your hosting control panel (often cPanel or a custom dashboard). Look for an icon or section labeled WordPress Installer, Softaculous, or something similar. This is where the magic begins.
Step 2: Use the One-Click Installer
Click on the WordPress installer. You’ll typically see a button to Install Now. Click it, and you’ll be prompted to fill in some basic details:
- Choose the domain where you want WordPress installed.
- Set your site name and admin username.
- Create a strong password for security.
- Enter your email address for notifications.
Step 3: Configure Advanced Options (Optional)
If you’re a beginner, you can usually leave the advanced options as default. But if you want to customize:
- Set a different directory if you want WordPress installed in a specific folder.
- Choose the database name or create a new one if prompted.
- Enable automatic backups if available.
Step 4: Install and Wait
Click the Install button and wait a few moments. Once completed, you’ll see a confirmation message with your admin URL, username, and password. Keep these details safe!
And voilà! Your WordPress site is now installed and ready for customization. If your host doesn’t offer one-click installs, don’t worry—there are manual methods involving uploading files via FTP and creating databases. But for most beginners, the automated install is the way to go.
4. Configuring Basic Settings and Preferences
Congratulations on installing WordPress! Now, let’s make your site feel more like your own by tweaking some essential settings. This step is crucial because it sets the foundation for your website’s appearance, functionality, and security.
Accessing the Settings Menu
Log into your WordPress admin dashboard by going to yourdomain.com/wp-admin. Use the admin credentials you set during installation. Once inside, navigate to Settings in the sidebar. Here, you’ll find several key options:
General Settings
- Site Title & Tagline: Make this catchy and descriptive. It appears in search engines and browser tabs.
- WordPress Address (URL) & Site Address (URL): Usually the same unless you’re using a different directory or subdomain.
- Timezone & Date Format: Set your local timezone so your posts display correctly.
- Site Language: Choose your preferred language for the admin interface.
Writing Settings
Here, you can customize how your posts behave:
- Default Post Category and Format
- Enable or disable emoticons and other writing features
Reading Settings
This controls what visitors see when they land on your homepage:
- Your Homepage Displays:
- Your latest posts: Great for blogs.
- A static page: Perfect for business sites or portfolios.
- Blog pages show at most: Limit the number of posts on your blog page.
- Enable or disable search engine indexing to control whether your site appears in Google during development.
Discussion Settings
Manage how comments work. You can turn comments on or off, require approval, and set notification preferences.
Permalinks
This is super important for SEO and user experience. Instead of URLs like yourdomain.com/?p=123, you can choose cleaner options like yourdomain.com/blog/my-article. The Post name setting is popular and effective.
Final Tips
- Update your site title and tagline to reflect your brand.
- Set your permalink structure early to avoid SEO issues later.
- Configure your privacy settings under Settings > Privacy to control search engine visibility.
By taking a few minutes to set up these basics, you’ll ensure your website runs smoothly, looks professional, and is optimized for visitors and search engines alike. Now, you’re all set to start customizing your site further with themes, plugins, and content!
5. Selecting and Customizing a WordPress Theme
So, you’ve got your WordPress site set up and you’re feeling excited about the next step — choosing the perfect theme! Your theme is like the wardrobe for your website. It defines the look, feel, and overall vibe, so picking the right one is super important.
First things first, think about the purpose of your website. Are you creating a blog, an online store, a portfolio, or a business website? Different themes cater to different needs, so keep your goals in mind.
How to Choose the Right Theme
- Responsiveness: Make sure the theme looks great on all devices — desktops, tablets, smartphones.
- Customization Options: Check if you can easily change colors, fonts, layouts without needing coding skills.
- Speed: A lightweight theme will load faster, improving user experience and SEO.
- Support and Updates: Pick a theme from reputable developers who provide regular updates and support.
- Reviews and Ratings: Read what other users say — high ratings and positive reviews are a good sign.
Popular Free and Premium Themes
Some themes are free in the WordPress repository, like Astra or OceanWP. These are versatile and easy to customize. Premium themes, like Divi or Avada, often come with more features, dedicated support, and pre-built layouts.
Customizing Your Theme
Once you’ve installed your chosen theme, head over to the WordPress Customizer (found under Appearance > Customize). Here, you can tweak various settings like colors, fonts, header styles, and layout options. Many themes also come with their own options panel for more advanced customization.
If you want to go beyond the basics, consider using a page builder plugin like Elementor or Beaver Builder. These tools let you create custom page layouts visually — no coding required!
Tip:
Always preview your changes before publishing. And if you’re experimenting, it’s a good idea to use a staging site or backup your site first, so you don’t lose any work if something doesn’t look right.
6. Installing Essential Plugins for Functionality and Security
Plugins are like apps for your WordPress website—they add all sorts of features and functionalities to make your site more powerful, user-friendly, and secure. With thousands of plugins available, it can be tempting to install everything. But remember, less is more. Focus on the essentials first!
Must-Have Plugins for Every WordPress Site
| Plugin | Purpose |
|---|---|
| Yoast SEO | Optimize your website for search engines, improve readability, and manage meta tags easily. |
| Wordfence Security | Protect your site from malware, hacks, and malicious attacks with firewall and malware scan features. |
| UpdraftPlus | Backup your website automatically and restore easily if needed. |
| WPForms | Create contact forms, surveys, and other interactive forms effortlessly. |
| Smush | Optimize images to improve load times without losing quality. |
Additional Useful Plugins
- Cache Plugin: Such as W3 Total Cache or WP Super Cache for faster performance.
- Analytics: Use MonsterInsights to connect your site with Google Analytics and track visitors.
- Security: Besides Wordfence, consider Sucuri Security for comprehensive protection.
- Social Sharing: Plugins like Social Warfare help visitors share your content easily.
Installing Plugins
Installing plugins is straightforward:
- Navigate to Plugins > Add New in your WordPress dashboard.
- Search for the plugin you want by name.
- Click Install Now and then Activate.
- Configure the plugin settings as needed — most have an options panel or setup wizard.
Reminder:
Keep your plugins updated and delete any that you no longer use. Outdated or unnecessary plugins can slow down your site and pose security risks.
Building a solid foundation with the right theme and essential plugins will make managing your WordPress site much easier and more enjoyable. Ready to move on? Let’s dive into creating engaging content and making your website truly yours!
7. Creating and Organizing Website Content
Now that your website’s structure is in place, it’s time to focus on creating and organizing content that truly resonates with your visitors. Content is the heart of your website — it’s what keeps people engaged, encourages them to explore more, and ultimately helps you achieve your goals, whether that’s selling products, sharing information, or building a community.
Start with a clear content plan. Think about the main topics or services you want to showcase. Create a list of pages you’ll need, such as Home, About, Services, Blog, and Contact. For each page, outline the key points you want to cover. This planning step helps ensure your content is organized and consistent across your site.
When crafting your content, keep these tips in mind:
- Be clear and concise. Visitors want to find information quickly, so avoid lengthy paragraphs. Use short sentences and break up text with headings and bullet points.
- Use engaging visuals. Incorporate images, videos, or infographics that complement your text. Visuals make your pages more appealing and help explain complex ideas.
- Include calls to action (CTAs). Whether it’s “Contact Us,” “Subscribe,” or “Buy Now,” clear CTAs guide visitors to take the next step.
- Maintain a consistent tone and style. Use a voice that matches your brand — friendly, professional, fun, or serious — and stick with it throughout your site.
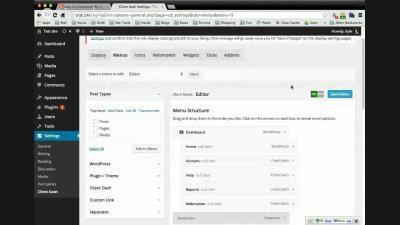
Organizing your content effectively is just as important as creating it. Use WordPress categories and tags to classify blog posts, making it easier for visitors to find related topics. For static pages, ensure your navigation menu is logical and easy to use so users can quickly locate what they’re looking for.
Don’t forget about readability. Use headings (like this one), subheadings, and plenty of white space to make your content easy on the eyes. Consider adding a search bar so visitors can quickly find specific information.
Finally, regularly update your content to keep your website fresh and relevant. Fresh content not only keeps visitors coming back but also signals to search engines that your site is active and trustworthy.
8. Optimizing Your Website for Search Engines
Once your content is in place, it’s time to make sure people can actually find your website. Search engine optimization (SEO) might sound complicated, but at its core, it’s about making your site appealing to search engines like Google so they rank your pages higher in search results.
Start with keyword research. Think about what terms your target audience might use when searching for your products or services. Use tools like Google Keyword Planner or Ubersuggest to find relevant keywords with good search volume and manageable competition.
Incorporate these keywords naturally into your content. Here’s how:
- Page titles: Include primary keywords in your page titles.
- Headings and subheadings: Use keywords where appropriate to emphasize important sections.
- Meta descriptions: Write compelling summaries that include keywords — these appear in search results and can influence click-through rates.
- Image alt text: Describe your images with relevant keywords to improve visibility in image searches.
WordPress plugins like Yoast SEO or All in One SEO Pack can help you optimize each page and post. They provide real-time feedback and suggestions, making SEO accessible even if you’re new to it.
Other important SEO practices include:
- Creating high-quality, original content. Search engines prioritize valuable content that answers users’ questions.
- Building backlinks. Getting other reputable sites to link to your content improves your authority in search rankings.
- Ensuring your website loads quickly. Use optimized images and consider caching plugins to improve speed.
- Making your website mobile-friendly. A responsive design ensures your site looks great on all devices, which is a ranking factor.
- Using clean, SEO-friendly URLs. Instead of long strings of numbers or confusing characters, use descriptive, keyword-rich URLs like www.yourwebsite.com/seo-tips.
Remember, SEO is an ongoing process. Regularly monitor your website’s performance with tools like Google Analytics and Search Console. Keep refining your strategy based on what’s working and stay updated on the latest SEO best practices to maintain and improve your rankings over time.
9. Testing Your Website for Performance and Compatibility
Before you hit the big “Go Live” button, it’s super important to make sure your website is performing well and works seamlessly across all devices and browsers. Think of it like giving your website a thorough check-up to catch any bugs or issues that might annoy your visitors.
First up, testing performance is key. Nobody likes waiting around for a slow website, right? Use tools like Google PageSpeed Insights, GTmetrix, or Pingdom to analyze your site’s speed. These tools will give you insights into what’s dragging your site down — like unoptimized images or too many scripts.
Here’s a quick checklist for performance testing:
- Optimize Images: Make sure images are compressed without losing quality. Plugins like Smush or EWWW Image Optimizer can help automate this.
- Caching: Enable caching to speed up page load times. Popular plugins include W3 Total Cache or WP Super Cache.
- Minify Files: Minify CSS, JavaScript, and HTML files to reduce load times. Plugins like Autoptimize make this easy.
- Hosting Quality: Ensure your hosting provider is reliable and offers good uptime and speed. Sometimes, upgrading to a better plan makes a huge difference.
Next, compatibility testing is just as vital. You want your website to look and work perfectly whether someone is browsing on Chrome, Firefox, Safari, or Edge. Plus, it should be mobile-friendly because a huge chunk of users will visit from their phones.
To test compatibility:
- Use BrowserStack or CrossBrowserTesting to simulate your site on various browsers and devices.
- Check your site on different smartphones and tablets to make sure the layout is responsive and easy to navigate.
- Test your forms, buttons, and interactive elements to ensure they work smoothly across browsers.
Lastly, don’t forget to check for broken links, missing images, and typos. Tools like Broken Link Checker can help identify issues that might hurt your user experience or SEO.
Taking the time to thoroughly test your website pays off. It not only improves user satisfaction but also helps you avoid surprises once your site is live. Remember, a well-performing, compatible website sets the stage for a successful online presence!
10. Launching Your WordPress Website and Promoting It
Congratulations! Your website is polished, tested, and ready to be shared with the world. Launching your WordPress site is an exciting milestone, but it’s just the beginning. To make sure people find and love your site, you need a solid promotion plan.
First, it’s time to officially make your website live. If you’re using a hosting provider, this usually involves pointing your domain to your hosting server and ensuring all settings are correct. Double-check everything—your URLs, SSL certificate (for HTTPS), and that your site loads without errors.
Once your site is live, consider these essential promotion strategies:
- Announce Your Launch: Share the news on your social media channels, email newsletters, or any other platforms where your audience hangs out. A simple post or email saying “We’re live!” can generate initial traffic.
- Optimize for Search Engines (SEO): Use your SEO plugin (like Yoast SEO) to optimize your content with relevant keywords, meta descriptions, and titles. Submit your site to Google Search Console to get indexed faster.
- Leverage Social Media: Create profiles around your niche and start sharing your content regularly. Engage with your followers, join relevant groups, and participate in conversations.
- Content Marketing: Keep adding valuable blog posts, videos, or resources. Consistent, helpful content attracts visitors and encourages sharing.
- Build an Email List: Offer freebies or updates to encourage visitors to subscribe. Use email marketing to nurture your audience and drive repeat visits.
- Partner and Collaborate: Reach out to influencers, other websites, or communities in your niche for collaborations or guest posting opportunities.
Remember, building traffic and engagement takes time. Be patient, stay consistent, and keep improving your site based on feedback and analytics.
Finally, monitor your website’s performance using tools like Google Analytics. Track what’s working and tweak your strategies accordingly. Over time, your efforts will help you grow a loyal audience and turn your website into a thriving online hub.
Maintaining and Updating Your Website Regularly
Once your WordPress website is live, the journey doesn’t end there. Regular maintenance and updates are crucial to ensure your site remains secure, performs optimally, and continues to meet your visitors’ needs. Keeping your website current not only enhances user experience but also boosts your search engine rankings.
Here are some essential practices for effective website maintenance:
- Update WordPress Core, Themes,, and Plugins: Regularly check for updates to the WordPress core, themes, and plugins. Developers release updates to fix security vulnerabilities and improve functionality. Keeping everything up-to-date prevents potential security breaches.
- Backup Your Website: Schedule routine backups to safeguard your content and settings. Use reliable backup plugins or hosting services to create both on-site and off-site backups.
- Monitor Website Performance: Use tools like Google PageSpeed Insights or GTmetrix to analyze load times and optimize images, scripts, and caching settings accordingly.
- Review and Remove Unnecessary Plugins or Themes: Deactivate and delete unused plugins or themes to reduce security risks and improve site speed.
- Check for Broken Links and Update Content: Regularly scan your website for broken links and outdated information to maintain credibility and enhance user experience.
To streamline your maintenance routine, consider creating a checklist and setting reminders. Staying proactive with updates and health checks ensures your website remains secure, fast, and engaging for your visitors.
In conclusion, consistent maintenance and timely updates are the backbone of a successful WordPress site. Dedicate a little time regularly to these tasks, and your website will continue to grow and thrive effectively.