Hey there! If you’re like most WordPress users, you probably spend a good chunk of your time on your dashboard. It’s your control center, after all. But did you know you can make it truly your own? Customizing your WordPress dashboard isn’t just about making things look pretty — it’s about tailoring it to fit your workflow, making your life easier, and even boosting your productivity. Whether you’re a blogger, an e-commerce store owner, or a developer, a personalized dashboard can save you time and help you stay organized. Let’s dive into how you can start customizing today!
Why Customizing Your WordPress Dashboard is Important
So, you might be wondering, “Why bother customizing my dashboard?” Well, there are actually several great reasons to do it. First off, a customized dashboard can significantly improve your efficiency. When everything is arranged the way you like it, you spend less time hunting for tools and more time focusing on your content or business. Imagine having your most-used plugins, recent posts, or analytics front and center, ready to go.
Another reason is personalization. Your dashboard is your workspace, so why not make it reflect your style or preferences? It’s like decorating your office — it makes you feel more comfortable and motivated. Plus, if you work with a team, customizing the dashboard can ensure everyone has quick access to their most needed tools, streamlining collaboration.
Additionally, a well-organized dashboard can help you avoid clutter and distraction. By hiding unnecessary widgets and highlighting what matters most, you create a clean, focused environment that keeps you on track.
And let’s not forget, customizing your dashboard can also be a fun project! It’s a chance to learn a bit about WordPress’s flexibility and maybe even pick up some coding skills if you’re into that. Overall, taking the time to tweak your dashboard means you’re making your WordPress experience more enjoyable and efficient. Who wouldn’t want that?
3. Step-by-Step Guide to Personalizing Your WordPress Dashboard

Ready to give your WordPress dashboard a fresh new look and feel? Personalizing your dashboard isn’t just about aesthetics; it’s about making it work better for you. Let’s walk through a simple step-by-step process to tailor your dashboard to your needs.
Step 1: Access Your Dashboard Settings
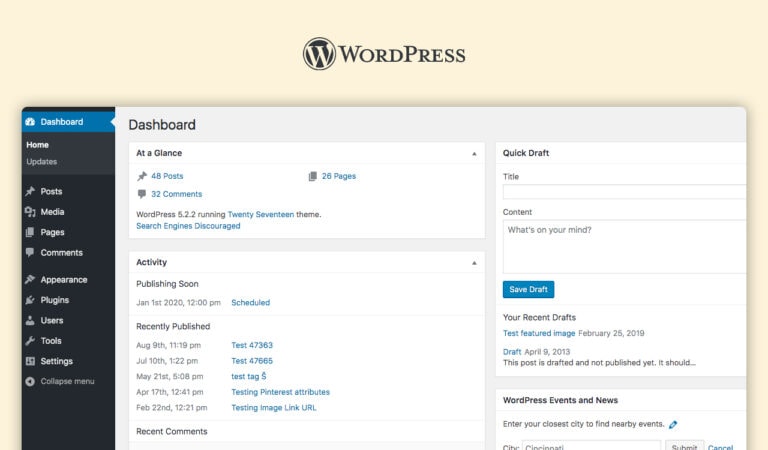
First things first, log into your WordPress admin area. Once there, navigate to Dashboard. From the top menu, click on Screen Options — it’s usually at the top right corner. This panel allows you to control what modules and widgets appear on your dashboard.
Step 2: Customize the Visible Widgets
In the Screen Options tab, you’ll see checkboxes for various widgets like Welcome Panel, Quick Draft, Activity, WordPress News, and more. Simply check or uncheck the boxes to show or hide these sections according to what’s relevant to you.
- Hide clutter: Remove widgets you don’t use often to declutter your workspace.
- Add useful widgets: Keep or add those that help you monitor your site, like stats or recent comments.
Step 3: Rearrange Widgets for Better Workflow
Once your widgets are visible, you can drag and drop them to rearrange their order. Think about what you need to see immediately upon logging in. For example, if site stats are crucial, place that widget at the top.
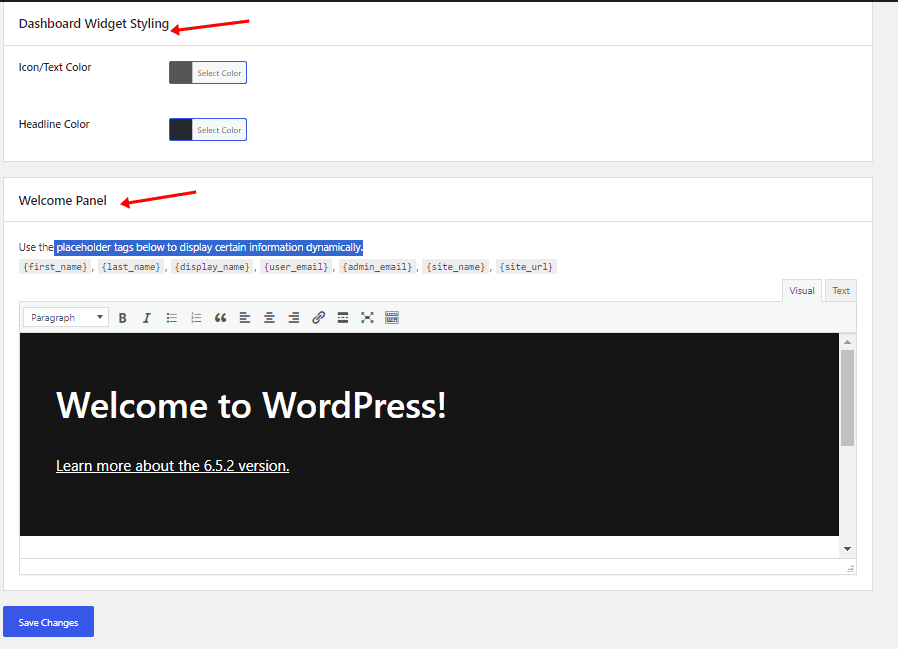
Step 4: Customize the Welcome Panel
The Welcome Panel can be customized to include useful links or tips. To do this, you might need a plugin, but for quick edits, you can simply click on the panel header and look for customization options or dismiss it if it’s not helpful.
Step 5: Use Custom Dashboard Widgets
If you want even more personalization, consider adding your own custom widgets. This involves some coding or plugins, which we’ll cover in the next section. But for now, focusing on the built-in options is a great start.
Step 6: Save Your Layout
Most of the changes happen instantly. Just make sure to review your layout. Your customized dashboard should now reflect your preferences, making your workflow more efficient and enjoyable.
4. Best Plugins for Enhancing Your WordPress Dashboard
If you want to take your dashboard customization to the next level, plugins are your best friends. They offer a variety of features that can add new widgets, improve usability, and even give your dashboard a professional look. Here are some of the top plugins to consider:
1. WP Dashboard Notes
This plugin allows you to add sticky notes directly to your dashboard. Perfect for reminders, to-do lists, or quick tips. It keeps your notes visible right where you work, helping you stay organized.
2. Ultimate Dashboard
An all-in-one plugin that lets you customize your dashboard extensively. You can add custom widgets, hide unnecessary items, and even create personalized dashboard pages for different user roles. It’s highly flexible and user-friendly.
3. Adminimize
If your goal is to streamline the admin area, Adminimize is fantastic. It lets you hide menu items, widgets, and even entire sections based on user roles. This is especially useful for clients or team members who only need access to specific parts of the dashboard.
4. WP Admin UI Customize
This plugin gives you the ability to change the colors, logos, and overall look of your admin interface. Want a branded dashboard that matches your company’s colors? This plugin makes it easy.
5. Dashboard Widgets Suite
Offers a collection of additional widgets that you can add to your dashboard, such as site health, analytics, or custom feeds. It’s a quick way to enhance the functionality without much fuss.
Summary Table of Top Plugins
| Plugin Name | Best For | Key Features |
|---|---|---|
| WP Dashboard Notes | Adding reminders and notes | Sticky notes, quick access, customizable |
| Ultimate Dashboard | Full dashboard customization | Custom widgets, role-based layouts |
| Adminimize | Hiding unnecessary items | Role-based menu/widget hiding |
| WP Admin UI Customize | Design and branding | Colors, logos, styling options |
| Dashboard Widgets Suite | Adding extra widgets | Site health, analytics, feeds |
Whether you’re a developer wanting full control or a beginner looking for simple enhancements, these plugins can help you craft a dashboard that’s not just functional but also visually appealing and tailored to your workflow. Experiment with a few, and see how your WordPress admin area transforms into a workspace you actually enjoy visiting!
5. Tips for Creating a User-Friendly and Efficient Dashboard
Designing a WordPress dashboard that’s both user-friendly and efficient can make a huge difference in how smoothly your website runs. Whether you’re managing your own site or building for clients, a well-thought-out dashboard helps save time and reduces frustration. Here are some practical tips to keep in mind:
Prioritize Key Features
Start by identifying what you or your users need most. Are you focusing on content creation, e-commerce management, or analytics? Highlight these essentials on the dashboard and keep secondary features a click away. This way, users can jump straight to what matters without wading through clutter.
Keep It Minimal and Clean
Less is more! Use a clean layout with plenty of white space. Avoid overloading the dashboard with too many widgets or options. A cluttered interface can be overwhelming and lead to mistakes or wasted time. Focus on clarity and simplicity.
Use Clear Labels and Icons
Make sure all menu items, buttons, and widgets are labeled clearly. Pair labels with intuitive icons to improve recognition and speed up navigation. For example, a gear icon for settings or a pencil for editing can quickly convey their purpose.
Organize with Custom Menus and Sections
Group related features together using custom menus or sections. For instance, keep all your SEO tools in one area and your design options in another. This logical organization makes it easier for users to find what they need without hunting around.
Implement Role-Based Access
If your website has multiple users, set up role-based access controls. Limit dashboard features based on user roles—admins see everything, while contributors only see what they need. This improves security and prevents accidental changes.
Test and Gather Feedback
Finally, regularly test your dashboard’s usability. Ask for feedback from actual users and make adjustments accordingly. Small tweaks based on real-world use can significantly boost efficiency and satisfaction.
6. Examples of Creative and Functional WordPress Dashboard Customizations
Looking for inspiration? There are tons of creative ways to customize your WordPress dashboard to make it more engaging and functional. Here are some standout examples:
Custom Welcome Widgets
Instead of the default dashboard, replace the welcome panel with a personalized message, quick links to your most-used tools, or a motivational quote. For example, a friendly greeting like “Welcome back, John! Ready to create something amazing today?” can make your workspace feel more welcoming.
Branded Dashboard Themes
Incorporate your brand colors, logo, and style into the dashboard. This not only boosts brand consistency but also makes the interface feel more professional and personalized. Use custom CSS or plugins like Admin Theme to achieve this.
Drag-and-Drop Widget Areas
Make customization easy by enabling drag-and-drop functionality for dashboard widgets. Users can arrange their workspace to suit their workflow, moving important tools to the top or grouping related items together.
Quick Action Buttons
Add prominent buttons for common tasks, like creating a new post, viewing analytics, or managing products. These shortcuts save time and streamline workflow, especially if you frequently perform certain actions.
Interactive Data Visualizations
Embed charts and graphs directly into the dashboard to provide real-time insights. Use plugins like WP Charts or Google Charts to make data more digestible and engaging. Visual data helps you make informed decisions faster.
Customized User Profiles
Allow users to personalize their dashboard experience further. They can select which widgets to display, choose themes, or set preferences for notifications. A tailored experience increases comfort and productivity.
Use of Creative Icons and Graphics
Incorporate fun and relevant icons or custom graphics to make the dashboard more visually appealing. Well-designed visuals can guide users intuitively and add personality to your site’s backend.
By mixing creativity with functionality, you can create a WordPress dashboard that not only looks great but also helps you work smarter. Experiment with different customizations to find what best boosts your productivity and makes managing your website a more enjoyable experience.
Conclusion and Final Tips for Dashboard Customization
Customizing your WordPress dashboard is a powerful way to enhance your workflow, improve efficiency, and create a personalized workspace that suits your unique needs. By tailoring the layout, widgets, and plugins, you can streamline your administrative tasks and make managing your site more enjoyable. Remember, the key is to keep your dashboard organized and clutter-free, focusing on the tools and information most relevant to your goals.
Here are some final tips to optimize your dashboard customization:
- Regularly review and update your dashboard layout to adapt to new needs or workflows.
- Utilize plugins that enhance functionality, such as custom widgets or quick access tools.
- Prioritize important information by placing critical widgets at the top or in prominent positions.
- Limit clutter by removing unnecessary widgets and only displaying what you need daily.
- Back up your customizations to easily restore your setup if needed after updates or issues.
By applying these tips, you can create a more efficient and personalized WordPress dashboard that accelerates your workflow and enhances your overall site management experience. Remember, a well-organized dashboard is not just about aesthetics; it’s about boosting productivity and making your daily tasks smoother.