Ever felt like your website’s footer could use a little extra flair or better information? Editing your WordPress footer might sound daunting, but with tools like Elementor, it’s surprisingly straightforward—and fun! Elementor’s drag-and-drop interface makes customizing your footer a breeze, whether you want to add contact info, social links, or a simple copyright notice. In this guide, we’ll walk you through everything step-by-step so you can create a footer that truly reflects your brand and personal style. Ready to give your website a professional finishing touch? Let’s dive in!
Prerequisites for Editing Your Footer in WordPress
Before you start customizing your footer, there are a few things you’ll need to have in place. No worries—most of these are quick to set up!
- WordPress Website: Of course, you need a WordPress site up and running. If you haven’t set one up yet, you’ll want to do that first.
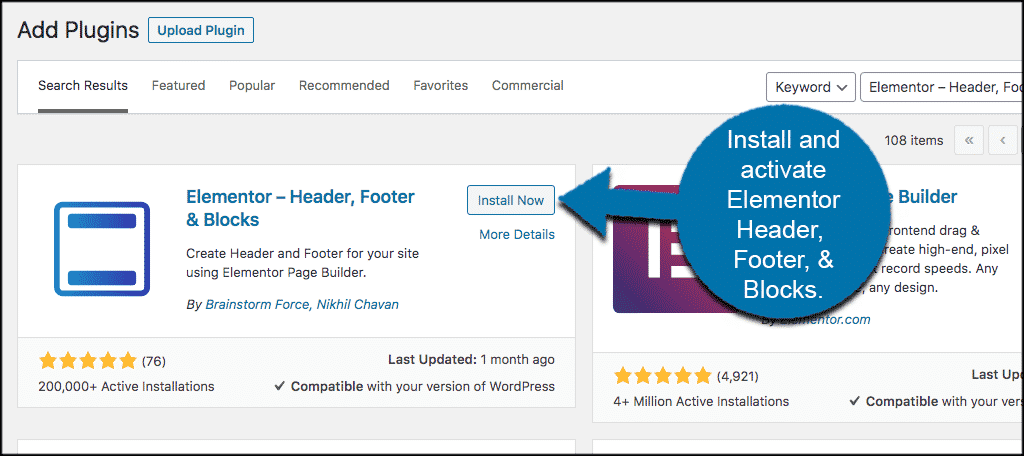
- Installed and Activated Elementor: Make sure you have the free Elementor plugin installed from the WordPress plugin repository. For more advanced features, you might consider Elementor Pro, but the free version works well for basic footer editing.
- Compatible Theme: Use a theme that is compatible with Elementor, like Hello Elementor, Astra, or OceanWP, to ensure smooth editing.
- Understanding of WordPress Widgets and Menus: Some familiarity with how WordPress handles menus and widgets will come in handy, especially if you want to add specific elements to your footer.
- Backup Your Website: As a best practice, always back up your site before making significant changes. This way, if anything goes wrong, you can restore your site easily.
Once you’ve got these essentials in place, you’re all set to start customizing your footer and making your website look polished and professional. Ready for the next step? Let’s move on to how you can actually edit your footer with Elementor!
3. Accessing the Footer Template in Elementor
Alright, now that you’re all set up with Elementor, the next step is to access the footer template. Think of the footer as the finishing touch on your website — it’s where visitors find important info like contact details, social links, or quick navigation. So, getting to it in Elementor is pretty straightforward once you know where to look.
First, head over to your WordPress dashboard. On the left sidebar, hover over Templates and then click on Theme Builder. This is where Elementor organizes all the templates for your site, including headers, footers, archives, and single posts.
In the Theme Builder, look for the section labeled Footer. If you’ve already created a footer, it will appear here. If not, you’ll see an option to Add New. Click that button to create a new footer template. You’ll be prompted to give it a name — something like Website Footer works well.
Once you’ve named your footer and clicked Create Template, Elementor will open the editor with a blank canvas or some pre-made templates you can choose from. If you see a template you like, you can insert it right away, or start from scratch and design your footer exactly how you want.
Remember, after designing your footer, don’t forget to click the Publish button. Elementor will then ask you to set display conditions — basically, telling WordPress where to show this footer. For most cases, you’ll select Entire Site so that your footer appears across all pages.
And that’s it! You’re now ready to dive into customizing your footer content with Elementor’s tools.
4. Customizing Footer Content with Elementor Widgets
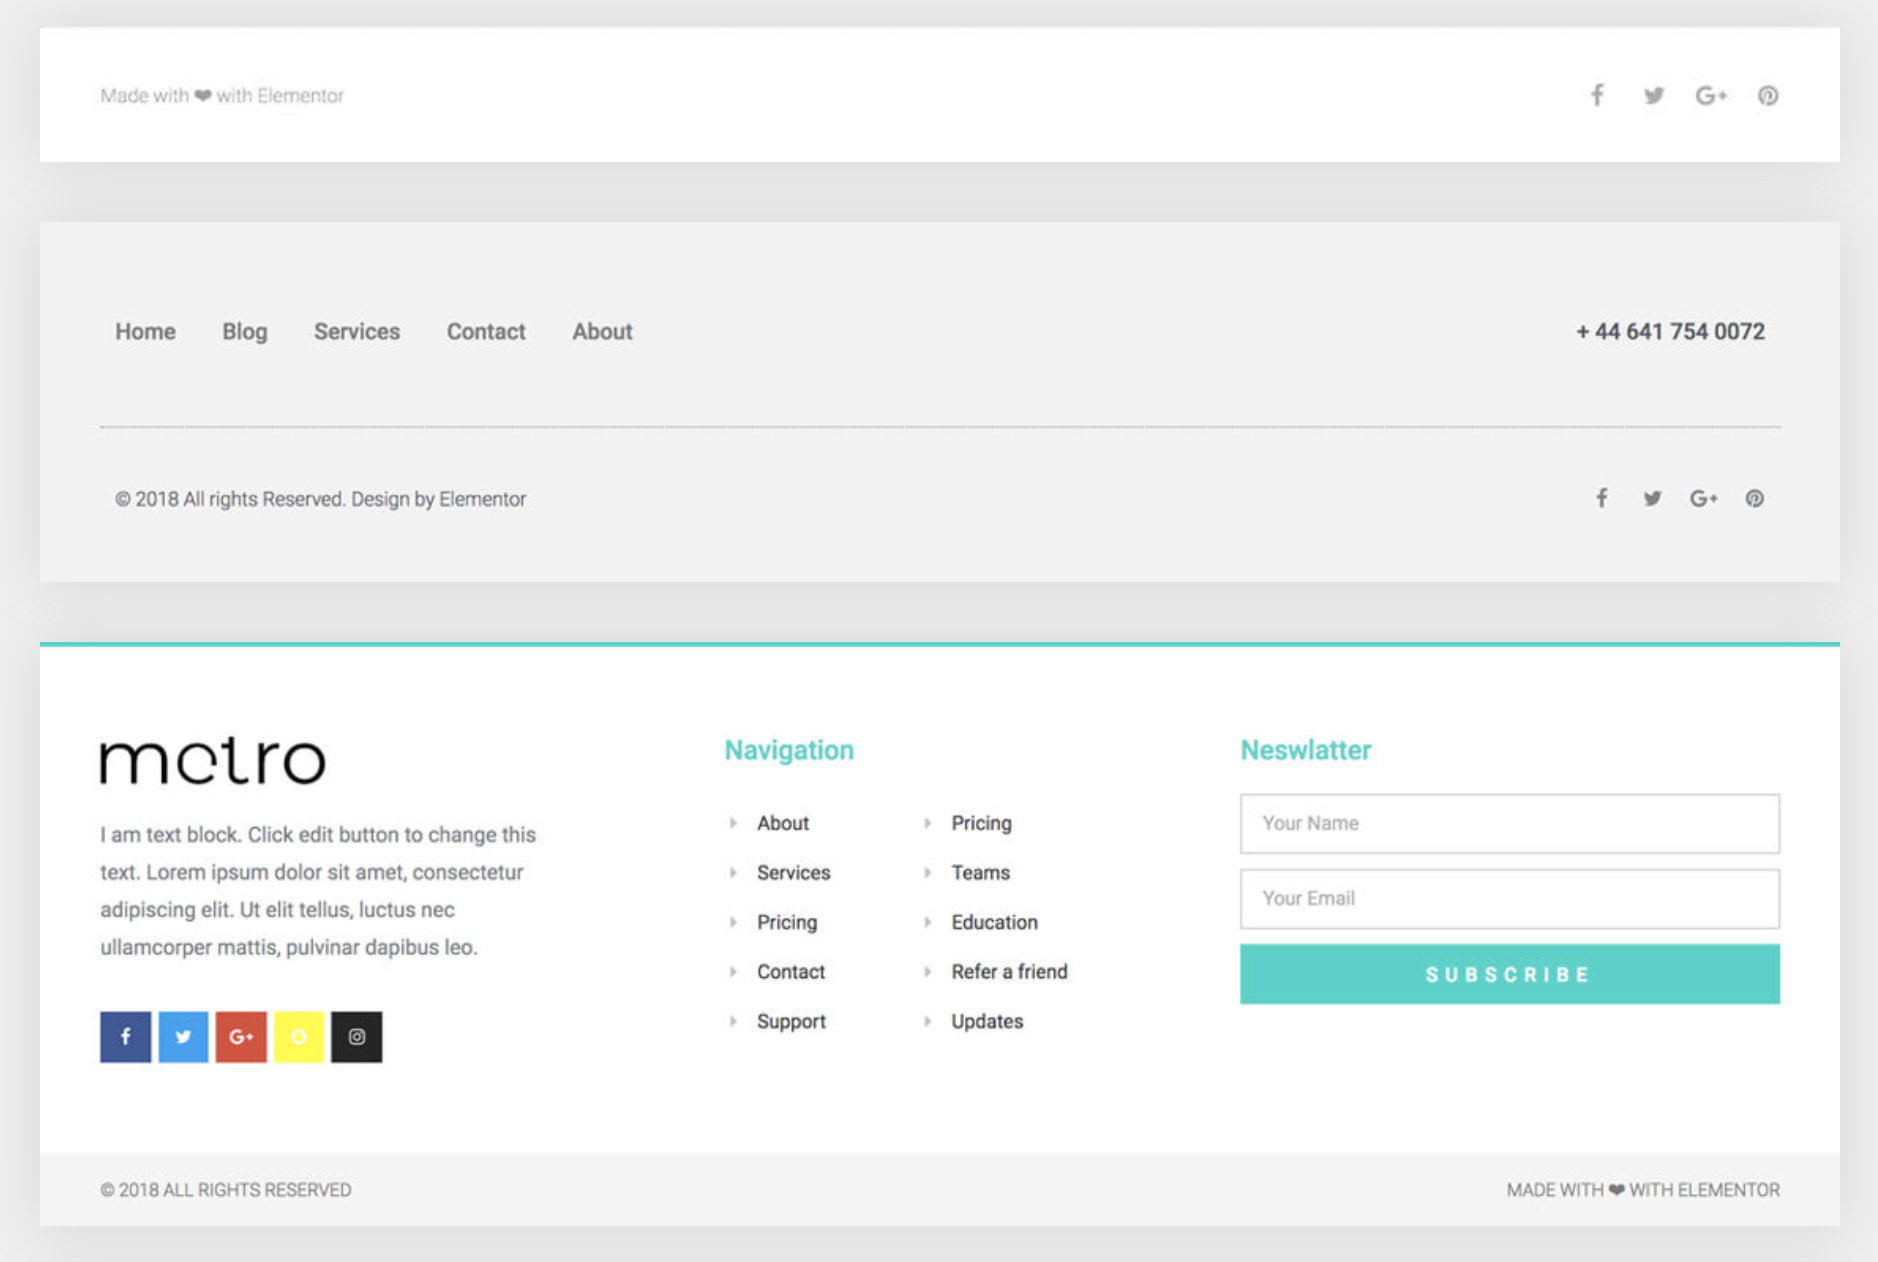
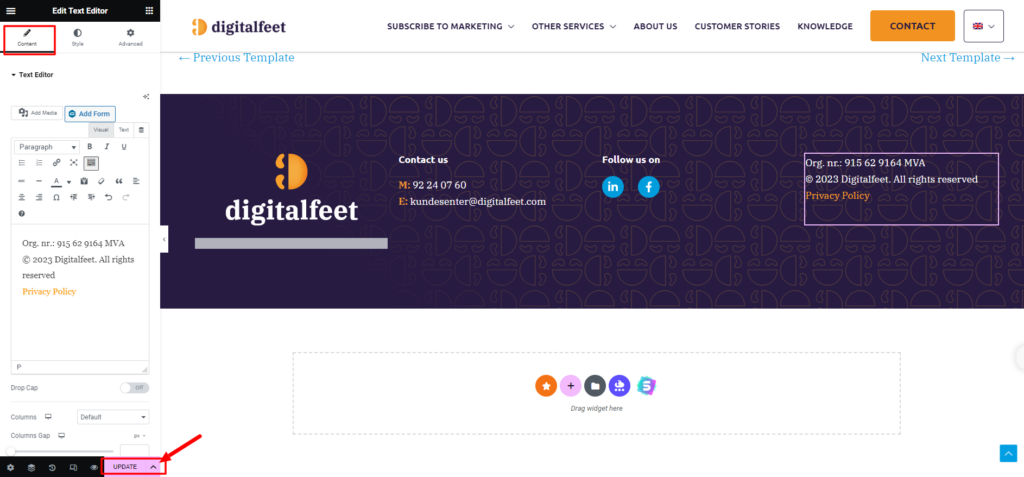
This is where the magic happens! Customizing your footer content with Elementor is super flexible thanks to its drag-and-drop widgets. Whether you want to add a simple copyright notice, social icons, contact info, or even a newsletter signup, Elementor has you covered.
Once you’re inside the footer editor, you’ll see a panel on the left with all the widgets you can add. To start customizing, simply drag a widget from the panel onto your footer canvas. Let’s go through some common widgets you might want to use:
- Text Editor: Perfect for adding custom text, like copyright info or a brief company description.
- Icon List: Great for listing contact details such as phone number, email, or address, with icons for visual appeal.
- Social Icons: Easily add your social media profiles so visitors can connect with you on platforms like Facebook, Twitter, or Instagram.
- Image: Use this to add a logo or other relevant images.
- Menu: Insert a menu for quick navigation, like links to important pages or legal info.
- Newsletter Signup: With Elementor Pro, you can add forms directly or embed third-party form widgets to grow your mailing list.
For example, if you want to add social icons, drag the Social Icons widget into your footer area. You can then customize which social networks to display, their icons, sizes, and colors under the widget’s settings. It’s as simple as selecting the icons you want and tweaking the style to match your site’s look.
Similarly, for contact info, use the Icon List widget. Fill in your phone number, email, and address, then style the icons and text to make sure they’re easily readable and match your branding.
Don’t forget to play around with spacing, colors, and fonts. Elementor’s style tab lets you fine-tune every element so your footer looks cohesive and professional. And if you want to add multiple sections, you can use columns or inner sections to organize your content neatly.
Once you’re happy with your footer, preview it to see how it looks on different devices. Elementor allows you to switch between desktop, tablet, and mobile views to ensure your footer is responsive and looks great everywhere.
And that’s the core of customizing your footer! With these simple steps, you can create a footer that not only looks good but also provides valuable information to your visitors. Happy designing!
5. Design Tips for Creating an Engaging Footer
Designing a footer that’s both functional and visually appealing can really boost your website’s overall impression. Think of your footer as the last thing visitors see before leaving your site—so, why not make it memorable? Here are some handy tips to craft an engaging footer using Elementor:
- Keep It Simple: Avoid clutter. Focus on essential information like contact details, social media links, and quick navigation. A clean layout feels inviting and easy to scan.
- Use Consistent Branding: Incorporate your brand colors, fonts, and logo. Consistency helps reinforce your brand identity and makes your site look professional.
- Add Visual Elements: Icons for social media, subtle background textures, or decorative dividers can add visual interest without overwhelming the design.
- Prioritize Readability: Make sure text is legible with sufficient contrast. Use a font size that’s easy to read, especially on mobile devices.
- Include Calls-to-Action (CTAs): Whether it’s subscribing to a newsletter, following on social media, or exploring your services, clear CTAs can guide visitors towards your goals.
- Make It Responsive: Test how your footer looks on different devices. Elementor makes it easy to adjust settings specifically for mobile, tablet, and desktop views.
Remember, your footer is a reflection of your website’s overall style and purpose. Take your time experimenting with different layouts, colors, and elements until you find a design that feels just right. Don’t forget to keep it aligned with your website’s tone and audience expectations. After all, a well-designed footer can encourage visitors to stay longer and engage more with your content!
6. Saving and Publishing Your Footer Changes
Once you’ve put together a footer you love, it’s time to save your work and make it live on your website. Elementor makes this process straightforward, but a few tips can help you avoid common pitfalls:
- Preview Your Design: Before publishing, always preview your footer on different devices using Elementor’s responsive mode. This ensures everything looks great on desktops, tablets, and smartphones.
- Save Your Draft: Click the “Save Draft” button regularly as you work. This way, you won’t lose progress if you accidentally close the editor or encounter a technical issue.
- Publish Your Footer: When satisfied, click the “Publish” button. If your footer is attached to a specific page or template, make sure it’s assigned correctly in the display conditions.
- Assigning the Footer: In Elementor, you might need to set your footer as a global widget or assign it to specific pages via display conditions. This ensures your footer appears where you want it to.
- Clear Cache: If you don’t see your changes immediately, clear your website’s cache and your browser cache. Sometimes, your visitors might see an older version until caches refresh.
- Test the Live Site: Visit your website on different devices or browsers to confirm your footer looks and functions as expected. Check links, buttons, and responsiveness.
And there you go! Saving and publishing your footer is the final step to showcase your design to the world. With Elementor’s intuitive interface, it’s easy to make adjustments later if needed. Just remember, a well-implemented footer can significantly enhance your site’s professionalism and user experience. Happy editing!
7. Common Issues and Troubleshooting Tips
Editing your WordPress footer with Elementor can sometimes come with a few hiccups, but don’t worry—most issues are pretty straightforward to resolve. Here are some common problems you might encounter and tips to troubleshoot them:
Problem: Footer Not Updating or Showing Old Content
If your changes aren’t appearing after you save, it might be a caching issue. Try clearing your website cache if you’re using a caching plugin, and also clear your browser cache. Sometimes, server-side caching can also cause delays in seeing updates.
- Clear cache from your caching plugin or service.
- Refresh your browser with a hard reload (Ctrl + Shift + R or Cmd + Shift + R).
- Check if your hosting provider has server caching and clear it if needed.
Problem: Footer Sections Are Disappearing or Overlapping
This can happen if there are conflicting styles or layout issues. First, check your section and column settings in Elementor:
- Ensure sections are not set to “Display: None”.
- Adjust z-index values to ensure the footer appears above other elements.
- Review margin and padding settings to prevent overlaps.
If conflicts persist, try disabling other plugins temporarily to see if they are causing conflicts with Elementor styling.
Problem: Unable to Edit Footer with Elementor
If clicking “Edit with Elementor” doesn’t open the editor, consider these steps:
- Make sure you’re editing the correct footer template (especially if using Elementor Pro’s Theme Builder).
- Check for plugin conflicts — disable other plugins one by one to identify the culprit.
- Update Elementor and Elementor Pro to the latest versions.
- Ensure your theme is compatible with Elementor. Switch to a default theme temporarily to test.
Problem: Responsive Issues on Mobile or Tablet
If your footer doesn’t look right on smaller screens, use Elementor’s responsive editing tools:
- Switch to mobile or tablet view within the Elementor editor.
- Adjust font sizes, padding, and margins specifically for each device.
- Hide or show certain footer elements based on device type if needed.
Always preview your footer on different devices before publishing to ensure a seamless experience for all visitors.
8. Final Thoughts on Customizing Your WordPress Footer with Elementor
Customizing your footer using Elementor is a powerful way to enhance your website’s look and functionality without diving into code. With the drag-and-drop interface, you can create a footer that truly reflects your brand, provides easy navigation, and adds value to your visitors.
Remember, while Elementor makes this process accessible, it’s important to keep things simple and user-friendly. Avoid cluttering your footer with too many elements—think about what your visitors actually need to see, like contact info, social links, or quick links to important pages.
If you run into issues, don’t get discouraged. Many common problems are fixable with a few troubleshooting steps. And always keep your plugins and themes updated to avoid compatibility issues.
Finally, don’t forget to test your footer across devices and browsers. A well-designed footer not only improves your site’s aesthetics but also boosts user experience and engagement. So, have fun experimenting with different layouts and styles—your perfect footer is just a few clicks away!