If you’re interested in customizing your WordPress site or adding new features, diving into plugin development is a fantastic way to do it. Think of plugins as the apps for your WordPress site—they extend functionality and make your website more engaging and useful. Whether you’re a beginner or have some coding experience, understanding the basics of plugin development can open up a world of possibilities. Plus, creating your own plugin allows you to tailor your website exactly how you want it, without relying solely on third-party solutions. Let’s explore what it takes to get started with
What Is a WordPress Boilerplate Plugin?
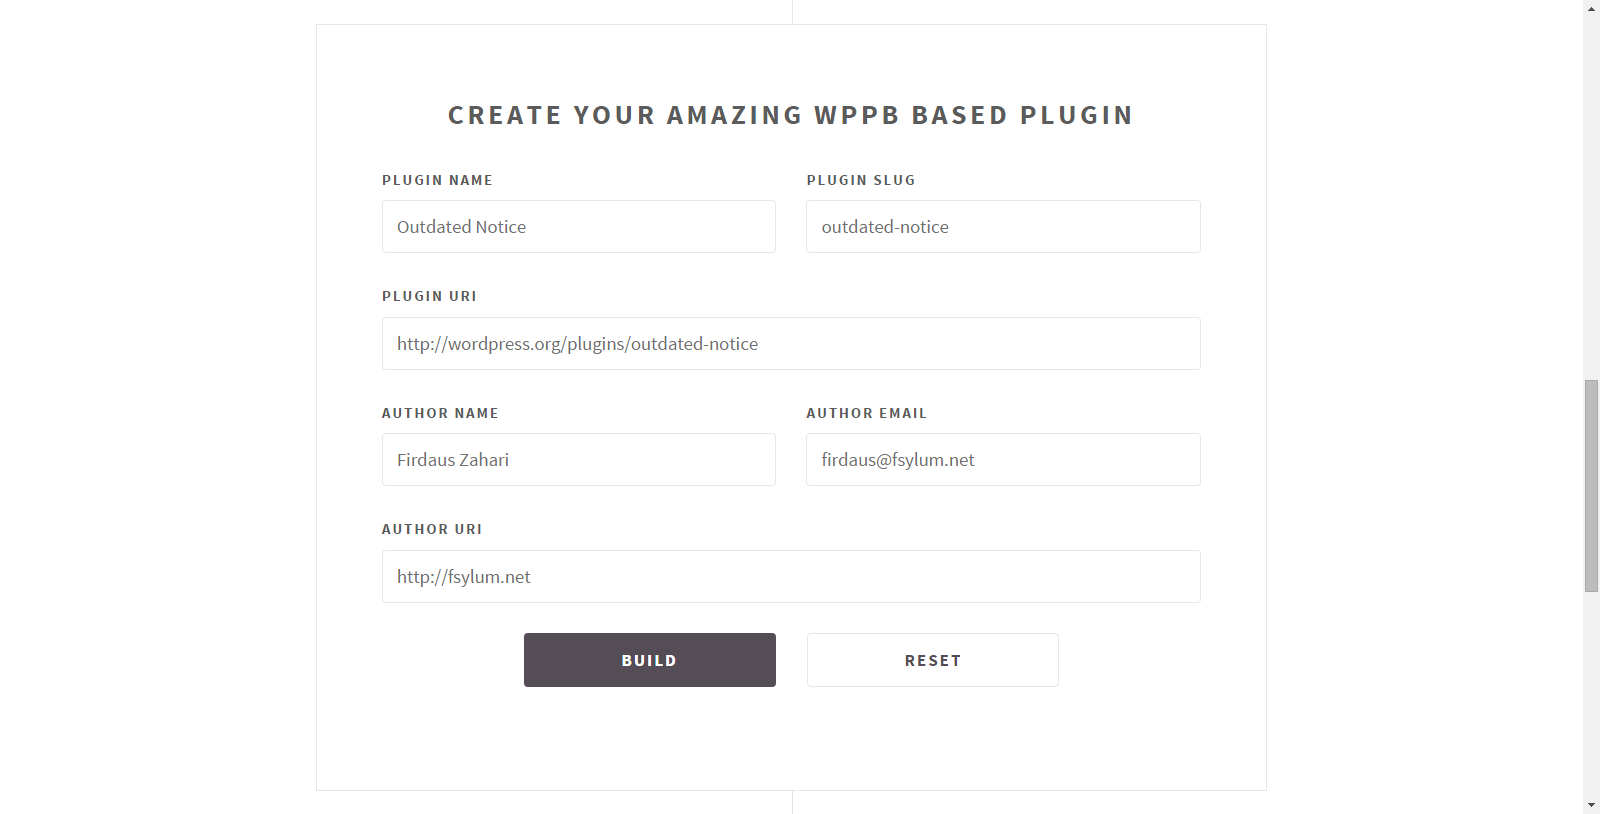
A WordPress boilerplate plugin is essentially a starter template—a ready-made, standardized code structure you can use as a foundation for building your own custom plugins. Imagine it as a blank canvas that includes all the essential files and code snippets you need to create a functional WordPress plugin, without having to start from scratch each time.
Using a boilerplate saves you time and helps ensure your plugin follows best practices, making it easier to maintain and extend later on. These boilerplates typically come with predefined folder structures, main plugin files, and sometimes even sample code for common tasks like adding admin menus, creating custom post types, or handling settings.
For beginners, boilerplate plugins are incredibly helpful because they provide a clear starting point and reduce the initial overwhelm of setting up the basic plugin architecture. Instead of worrying about the technical setup, you can focus more on the unique features and functionality you want to build.
There are many boilerplate options available, some designed specifically for beginners, others more advanced for seasoned developers. They often include comments and documentation to help you understand how each part works. Over time, as you become more comfortable, you can modify and expand these boilerplates to suit your project needs.
In summary, a boilerplate plugin is your handy toolkit that accelerates your development process, helps you learn best practices, and makes creating custom WordPress plugins more approachable and less intimidating. It’s a stepping stone towards becoming a confident WordPress plugin developer!
3. Benefits of Using a Boilerplate Plugin for Beginners
If you’re just starting out with WordPress plugin development, using a boilerplate plugin can be a total game-changer. Think of it as a solid foundation that saves you from reinventing the wheel every time you want to build a new plugin. Here are some of the main perks:
- Time-Saving: Instead of setting up all the basic files and structure from scratch, a boilerplate gives you a ready-made setup. This means you can jump straight into adding your unique features.
- Consistent Structure: Boilerplates follow best practices for organizing files and code. This consistency makes it easier for you and others to understand and maintain the plugin later on.
- Learning Tool: For beginners, exploring a boilerplate provides insight into how a well-structured plugin is built. It’s like having a template that teaches you the ropes.
- Reduced Errors: Boilerplates often include standardized code snippets, reducing the chances of common mistakes and bugs.
- Community & Support: Many boilerplates are open-source and have active communities. This means you can find support, updates, and new features as you grow your skills.
Overall, starting with a boilerplate helps you focus on what really matters — creating features that make your plugin unique — instead of getting bogged down in setup details. It’s like building a house on a sturdy foundation; everything else falls into place more smoothly.
4. Step-by-Step Guide to Creating a Basic WordPress Plugin
Ready to roll up your sleeves and create your very first plugin? Don’t worry, I’ll walk you through a simple step-by-step process. By the end, you’ll have a basic plugin up and running that you can expand upon later.
Step 1: Set Up Your Plugin Folder and Main File
Start by creating a new folder in your WordPress plugins directory (usually wp-content/plugins/). Name it something relevant, like my-first-plugin.
Inside this folder, create a PHP file with the same name, e.g., my-first-plugin.php. This will be your main plugin file.
Step 2: Add the Plugin Header Comment
Open the PHP file and add a special comment block at the top. This tells WordPress about your plugin. Here’s a simple example:
<?php/Plugin Name: My First PluginPlugin URI: https://yourwebsite.com/my-first-pluginDescription: A simple plugin for beginners.Version: 1.0Author: Your NameAuthor URI: https://yourwebsite.com/This information appears in the WordPress admin area when managing plugins.
Step 3: Write Your First Function
Let’s add a simple feature: display a message at the top of every page. You can do this by hooking into WordPress’s wp_head action:
function display_custom_message() { echo '<div style="background-color: yellow; padding: 10px; text-align: center;">Hello from my first plugin!</div>';}add_action('wp_head', 'display_custom_message');This code adds a yellow notification bar at the top of your site. Easy, right?
Step 4: Activate Your Plugin
Go to your WordPress admin dashboard, navigate to the Plugins section, find My First Plugin, and click Activate. Voila! Your message should now appear on your site.
Step 5: Expand and Experiment
From here, you can start adding more features, like custom shortcodes, admin pages, or other functionalities. Remember, keep experimenting and learning. That’s how you grow as a developer!
Summary
Creating a basic WordPress plugin isn’t complicated once you understand the steps. Starting with a boilerplate can make this process even smoother. Just remember to keep your code organized, test thoroughly, and most importantly — have fun building!
5. Sample Boilerplate Plugin Code Explained
Alright, let’s break down a simple boilerplate plugin code so you can see how it all fits together. If you’re new to WordPress plugin development, don’t worry — I’ll walk you through each part step by step.
Here’s a basic example of what a boilerplate plugin might look like:
'; echo '' . esc_html( 'Sample Boilerplate Plugin is active!', 'sample-boilerplate' ) . '
'; echo '';}Breaking it down:
- Header comment block: This section includes the plugin name, description, version, and author info. WordPress reads this to display your plugin details.
- Security check: `if ( ! defined( ‘ABSPATH’ ) ) { exit; }` prevents direct access to the plugin file, which is a good security practice.
- Hook into WP: Using `add_action()` ties your custom functions into WordPress’s execution flow. Here, we’re hooking into `init` to set up our plugin.
- Function `sbp_initialize_plugin()`: Sets up other hooks or functionalities. In this case, it adds an admin notice.
- Function `sbp_display_admin_notice()`: Outputs a message in the admin dashboard, confirming the plugin is active.
Notice how the code is clean and modular. You can add more functions and hooks as needed. This structure helps you keep your code organized as your plugin grows.
6. Best Practices for Developing WordPress Plugins
Building a WordPress plugin can be exciting, but following best practices ensures your plugin is secure, efficient, and easy to maintain. Here are some tips to keep in mind:
1. Follow WordPress Coding Standards
Always write your code following the official WordPress PHP coding standards. This makes your code consistent, readable, and easier for others (and your future self) to understand.
2. Use Unique Function Names and Prefixes
WordPress runs on a shared environment, so avoid function name conflicts by prefixing your functions, classes, and variables with a unique identifier, like your plugin name. For example, use `sbp_` as a prefix.
3. Keep Your Code Modular
Break your plugin into smaller, reusable functions or classes. This makes debugging easier and allows others to extend your plugin without modifying core code.
4. Sanitize, Validate, and Escape Data
Always sanitize user input, validate data, and escape output to prevent security vulnerabilities like SQL injection or cross-site scripting (XSS).
5. Use Hooks Properly
Leverage WordPress actions and filters to modify or extend core functionality. This keeps your plugin compatible with other plugins and themes.
6. Enqueue Scripts and Styles Correctly
Use `wp_enqueue_script()` and `wp_enqueue_style()` rather than hardcoding scripts or styles. This ensures dependencies are handled properly and your assets load only when needed.
7. Localize Your Plugin
If you plan to translate your plugin, use `load_plugin_textdomain()` and functions like `__()` or `_e()` for strings. This makes your plugin accessible to a broader audience.
8. Test Thoroughly
Test your plugin in different environments, with various themes and other plugins active. Watch out for conflicts or bugs that could affect user experience.
9. Document Your Code
Comment your code and include a README file. Clear documentation helps others understand how to install, configure, and extend your plugin.
10. Keep Security in Mind
Always think security first. Validate all inputs, use nonces for form submissions, and avoid exposing sensitive data.
By following these best practices, you’ll set a strong foundation for developing reliable, safe, and user-friendly WordPress plugins. Happy coding!
7. Resources and Tools for WordPress Plugin Development
Getting started with WordPress plugin development can feel overwhelming at first, but luckily, there are plenty of resources and tools out there to make your journey smoother. Whether you’re a complete beginner or looking to level up your skills, these essentials will help you write better, more efficient plugins.
Official Documentation
The WordPress Plugin Developer Handbook is your best friend. It’s comprehensive, up-to-date, and full of examples. Spend some time exploring it—it covers everything from plugin basics to advanced topics like security and performance optimization.
Development Environments
- Local Development Tools: Tools like Local by Flywheel, DesktopServer, or XAMPP make it easy to set up a local WordPress site. Developing locally means faster testing and fewer worries about messing up a live site.
- Code Editors: Use a good code editor such as Visual Studio Code, Sublime Text, or PhpStorm. They provide syntax highlighting, code completion, and debugging tools tailored for PHP and JavaScript.
Debugging and Testing Tools
- WP_DEBUG: Enable debugging in your wp-config.php to catch errors early.
- Query Monitor: A handy plugin for debugging database queries, hooks, and more.
- Unit Testing: Use PHPUnit alongside the WordPress testing suite to write automated tests for your plugin code.
Community and Support
Don’t forget about community! The WordPress Support Forums, Stack Overflow, and dedicated Facebook groups are great places to ask questions, share your progress, and learn from others. Plus, following blogs and tutorials on sites like WPBeginner, WPMU DEV, or Torque can provide inspiration and practical tips.
Plugins and Libraries
Leverage existing libraries and frameworks to streamline your development. For example, Composer helps manage dependencies, and libraries like jQuery or React can enhance your plugin’s interactivity. Also, explore GitHub repositories for open-source code you can learn from or adapt.
8. Conclusion and Next Steps in Your Plugin Development Journey
Congratulations! You’ve taken the first steps toward creating your own WordPress plugins with some easy-to-understand boilerplate examples. Remember, the key to becoming proficient is practice and continuous learning. Don’t be afraid to experiment with different features, test your code thoroughly, and seek feedback from the community.
Next, consider setting achievable goals:
- Build Small Plugins: Start with simple features like a custom shortcode or a widget. These projects will boost your confidence and help you understand the plugin architecture better.
- Learn Best Practices: Focus on security (escaping inputs, nonces), performance (caching, efficient queries), and user experience (easy settings, clear documentation).
- Share Your Plugins: Publish your plugins on the WordPress Plugin Repository or GitHub. Sharing your work not only helps others but also provides valuable feedback.
Remember, every expert was once a beginner. Keep experimenting, stay curious, and don’t get discouraged by setbacks. With time and persistence, you’ll be creating powerful, useful plugins that make WordPress even better for everyone.
Happy coding, and enjoy your journey into plugin development!