If you’re looking to add more interactivity and dynamic features to your WordPress site, then you’ve probably heard about Aploit.js. It’s a powerful JavaScript library designed to make your website smarter and more engaging without the hassle of heavy coding. Whether you’re a developer or a site owner with some basic tech skills, integrating Aploit.js can significantly enhance user experience, boost engagement, and even improve your site’s performance.
So, what makes Aploit.js stand out? For starters, it’s lightweight and easy to implement, meaning you don’t have to be a coding wizard to get started. It offers a variety of features like real-time updates, interactive forms, and seamless animations—all of which can make your website feel more modern and user-friendly. Plus, it’s flexible enough to work with other libraries and plugins, giving you the freedom to customize your site exactly the way you want.
Some key benefits include:
- Enhanced User Engagement: Create interactive elements that keep visitors hooked.
- Improved Performance: Light-weight scripts that load quickly and don’t bog down your site.
- Ease of Use: Simple integration process suitable for WordPress users at various skill levels.
- Extensibility: Compatible with other JavaScript libraries and WordPress plugins for more advanced features.
In short, adding Aploit.js to your WordPress site is a smart move if you want to stand out and offer a richer experience to your visitors without a steep learning curve. Now, let’s talk about what you need before you start installing it.
Prerequisites for Installing Aploit.js on Your WordPress Website
Before you dive into the exciting world of Aploit.js, there are a few basic prerequisites you should have in place. Think of these as your toolkit to ensure a smooth installation process and optimal performance of the library on your site.
First, make sure you have:
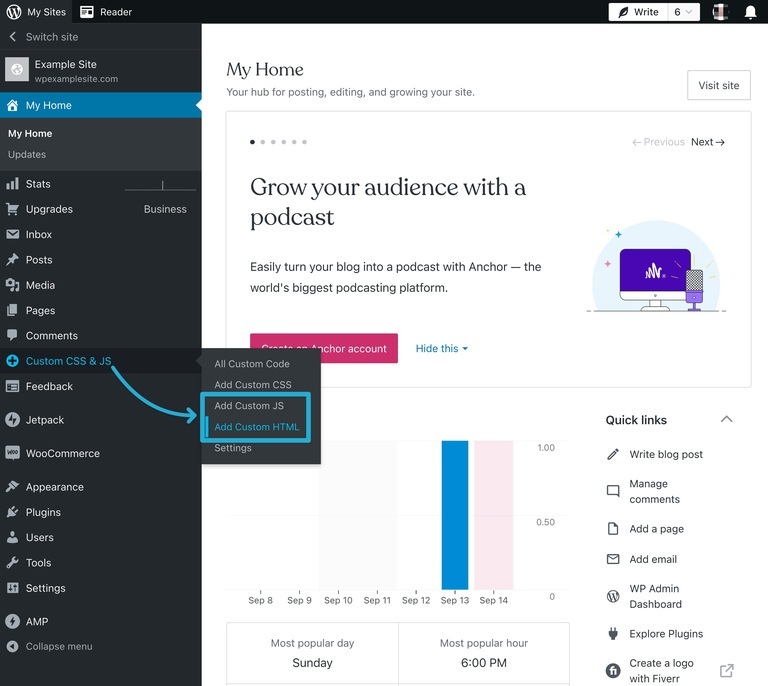
- Access to Your WordPress Dashboard: You need admin privileges to install plugins and add custom code.
- Basic Knowledge of JavaScript and HTML: While Aploit.js is beginner-friendly, understanding how scripts and tags work will help you troubleshoot and customize effectively.
- FTP or File Manager Access: Sometimes, direct file edits are necessary, so having access to your server files via FTP or your hosting control panel is helpful.
- A WordPress Child Theme or Custom Plugin: To keep your changes safe from theme updates, it’s best to add scripts via a child theme or custom plugin rather than editing core theme files directly.
- Compatibility Check: Ensure your WordPress version is up to date and compatible with the latest JavaScript practices. Also, check if your theme or other plugins might conflict with custom scripts.
Once you’ve confirmed these prerequisites, you’re good to move on to the actual installation process. Remember, the key is to back up your website before making any changes—better safe than sorry! Having a backup means you can easily restore your site if anything doesn’t go as planned.
With these basics covered, you’re set to start integrating Aploit.js and unlocking new levels of functionality on your WordPress site. Next up, we’ll walk through the actual installation steps, so stay tuned!
3. Step-by-Step Guide to Adding Aploit.js to Your WordPress Site
Alright, so you’re excited to get Aploit.js up and running on your WordPress site? No worries—it’s pretty straightforward, and I’ll walk you through each step. Just follow along, and you’ll have this powerful tool integrated in no time!
Step 1: Download Aploit.js
First things first, you need to get the Aploit.js library. Head over to the official website or GitHub repository where it’s hosted. Download the minified version, usually named something like apolit.js or apolit.min.js. Save it somewhere easy to find, like your desktop or a dedicated folder for scripts.
Step 2: Upload the Script to Your WordPress Site
Next, you want to upload this file to your WordPress server. You can do this via an FTP client or using the WordPress admin dashboard if your hosting provider offers file management tools. A common practice is to upload it into your theme’s js folder, like wp-content/themes/your-theme/js/.
- Connect to your site via FTP or File Manager.
- Navigate to your theme’s folder.
- Create a new folder named js if it doesn’t exist.
- Upload the apolit.min.js file into this folder.
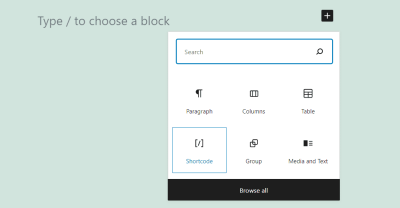
Step 3: Enqueue the Script in WordPress
This is the most important step. Instead of directly editing theme files, it’s best to enqueue scripts properly using WordPress functions. Open your theme’s functions.php file. You can do this via Appearance > Theme Editor or through FTP.
Insert the following code:
function enqueue_apolit_script() { wp_enqueue_script( 'apolit-js', // Handle get_template_directory_uri() . '/js/apolit.min.js', // Path to script array(), // Dependencies '1.0.0', // Version true // Load in footer );}add_action('wp_enqueue_scripts', 'enqueue_apolit_script');This code tells WordPress to load your Aploit.js script on the frontend. Save your changes, and you’re all set to test if the script loads correctly.
Step 4: Verify the Script is Loaded
Visit your website, right-click, and select “Inspect” (or press F12). Go to the Console tab and check if there are any errors related to Aploit.js. If everything is loaded without issues, you’re ready to start configuring it for your needs!
4. Configuring Aploit.js for Optimal Performance and Compatibility

Now that you’ve added Aploit.js to your site, it’s time to fine-tune its settings for peak performance and compatibility with your existing setup. Proper configuration ensures that it runs smoothly without causing conflicts or slowing down your site.
Understand Your Needs
Before diving into settings, clarify what you want Aploit.js to accomplish. Are you using it for advanced analytics, user engagement, or some custom functionality? Knowing your goals helps in configuring it effectively.
Set Appropriate Options
Most JavaScript libraries, including Aploit.js, come with configuration options. These might include:
- Enabling/disabling features
- Adjusting load timing (e.g., defer or async)
- Specifying target elements or pages
Check the official documentation for Aploit.js to see available options. Typically, you initialize the script with a configuration object like this:
This approach allows you to customize how the script behaves, ensuring it aligns with your site’s design and user experience.
Optimize Load Performance
To keep your site speedy, consider these tips:
- Use async or defer attributes when enqueuing scripts, if supported, to prevent blocking page rendering.
- Load scripts conditionally. Only load Aploit.js on pages where it’s needed. You can do this by wrapping your enqueue code in conditional tags in functions.php.
- Minimize conflicts by ensuring no other scripts override or interfere with Aploit.js. Use unique IDs or classes if customizing its behavior.
Test Compatibility
Finally, always test your site thoroughly after configuration. Use browser developer tools to monitor network activity and console logs. Make sure there are no errors or conflicts with other plugins or scripts.
Also, check your site’s responsiveness and overall performance, especially if you’re adding multiple scripts. Tools like Google PageSpeed Insights or GTmetrix can help identify bottlenecks and suggest improvements.
By carefully configuring Aploit.js, you’ll enhance your website’s functionality while keeping things smooth and efficient for your visitors. Happy customizing!
5. Testing and Troubleshooting Common Issues with Aploit.js Integration
Once you’ve integrated Aploit.js into your WordPress site, the next crucial step is to make sure everything is working smoothly. Testing helps catch any bugs or conflicts before they affect your visitors. Plus, troubleshooting guides you through common issues so you can quickly resolve them and keep your site running seamlessly.
How to Test Aploit.js Integration Effectively
- Check Console for Errors: Open your browser’s developer tools (usually F12 or right-click > Inspect) and go to the Console tab. Look for any JavaScript errors or warnings related to Aploit.js. Errors here can point you directly to problematic scripts or conflicts.
- Verify Functionality: Test the features you added with Aploit.js—like dynamic content, animations, or interactions. Make sure they appear and behave as expected across different pages.
- Use Multiple Browsers and Devices: Sometimes, issues are browser-specific. Test your site on Chrome, Firefox, Safari, and Edge, plus on mobile devices to ensure cross-browser compatibility.
- Disable Conflicting Plugins: Temporarily deactivate other JavaScript-heavy plugins to identify conflicts. If issues resolve, reactivate plugins one by one to pinpoint the culprit.
Common Troubleshooting Scenarios
| Issue | Possible Cause | Solution |
|---|---|---|
| Aploit.js not loading | Incorrect script enqueue or path error | Double-check your enqueue code in functions.php and ensure the script URL is correct. |
| JavaScript errors in console | Conflicts with other scripts or syntax errors | Review the console errors, disable conflicting scripts, or fix syntax issues in your code. |
| Features not working as expected | Incorrect initialization or missing dependencies | Ensure you initialize Aploit.js after the DOM is ready and include all necessary dependencies. |
| Performance issues | Heavy scripts or multiple instances | Optimize your code, lazy-load content, or limit the number of scripts running on each page. |
Pro Tips for Smooth Troubleshooting
Remember, patience is key. Always back up your site before making major changes. Use browser tools to help identify issues quickly, and don’t hesitate to consult the Aploit.js documentation or community forums if you get stuck. With some systematic testing and troubleshooting, you’ll ensure your integration is flawless and your site delivers a fantastic experience to visitors.
6. Best Practices for Maintaining and Updating Aploit.js on Your WordPress Site
Once your Aploit.js integration is up and running smoothly, the journey doesn’t end there. To keep your site secure, fast, and feature-rich, ongoing maintenance and updates are essential. Let’s explore some best practices to help you manage Aploit.js effectively over time.
Keep Aploit.js Up-to-Date
- Regularly Check for Updates: Follow the official Aploit.js repository or website for new releases. Updates often include security patches, new features, and performance improvements.
- Test Before Deploying: Always test updates on a staging environment before applying them to your live site. This prevents potential disruptions or conflicts.
- Use Version Control: Manage your scripts with version control systems like Git. This way, you can track changes, roll back if needed, and collaborate more effectively.
Optimize Performance
- Minify Scripts: Use tools or plugins to minify your Aploit.js files. Smaller files load faster, improving your site’s performance.
- Implement Lazy Loading: Load Aploit.js only on pages where it’s needed. This reduces unnecessary script loading on pages that don’t use it.
- Monitor Site Speed: Use tools like Google PageSpeed Insights or GTmetrix regularly to assess how your scripts impact loading times and optimize accordingly.
Maintain Compatibility
- Test with WordPress Updates: Major WordPress updates can sometimes affect plugin and script compatibility. Test your Aploit.js integration after each update.
- Check Plugin Conflicts: When installing new plugins, verify they don’t conflict with your Aploit.js scripts. Disable any problematic plugins promptly.
- Document Customizations: Keep detailed notes on how you’ve customized or integrated Aploit.js. This helps troubleshoot issues faster and simplifies future updates.
Security and Backup Practices
- Regular Backups: Always back up your WordPress site before making major updates to scripts or core files.
- Security Checks: Ensure your scripts and plugins are from trusted sources to prevent vulnerabilities.
By following these best practices, you ensure that your Aploit.js implementation remains robust, secure, and efficient. Continuous maintenance not only enhances user experience but also saves you headaches down the line. Remember, a well-maintained site is a happy site—both for you and your visitors!
Conclusion and Additional Resources for Enhancing Your WordPress Functionality
Implementing Aploit.js on your WordPress site is a powerful way to boost your website’s capabilities and provide a better user experience. By integrating this JavaScript library, you can add dynamic features, improve interactivity, and streamline complex functionalities without heavy coding. Remember, successful implementation hinges on understanding your specific site needs and customizing Aploit.js accordingly.
For further enhancement, consider exploring these additional resources:
- Official Aploit.js Documentation: Comprehensive guides and API references to help tailor features to your site.
- WordPress Plugin Repository: Find plugins that facilitate easy integration and management of custom scripts.
- Community Forums and Support: Engage with developer communities such as Stack Overflow or WordPress forums for troubleshooting and best practices.
- Tutorials and Courses: Online platforms like Udemy or YouTube offer tutorials on JavaScript integration and advanced WordPress customization.
- Security Best Practices: Always ensure your scripts are secure, using techniques like code sanitization and regular updates to prevent vulnerabilities.
By leveraging these resources, you can continue to refine and expand your site’s functionality, ensuring a seamless and engaging experience for your visitors. Remember, ongoing learning and experimentation are key to mastering WordPress enhancements with Aploit.js and beyond.