If you’ve ever felt a bit lost trying to customize your website’s navigation menu in WordPress, you’re not alone! The main navigation is like the roadmap for your visitors, helping them find what they need and making your site user-friendly. Whether you want to add new links, rearrange existing ones, or remove outdated items, editing your main menu is a straightforward process once you get the hang of it. Don’t worry if you’re new to WordPress—by the end of this guide, you’ll be able to confidently tweak your navigation to better suit your website’s needs and improve the overall user experience.
Accessing the WordPress Dashboard and Navigating to Menus
Getting started is easier than you might think. First, log in to your WordPress admin dashboard. You can do this by adding /wp-admin to the end of your website URL (for example, www.yoursite.com/wp-admin) and entering your login credentials. Once you’re in, you’ll see the dashboard, which is like your control panel for managing everything on your site.
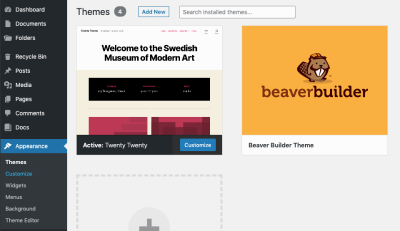
Now, to find the menu editing area, look at the left-hand sidebar and locate the Appearance section. Hover over it, and you’ll see a dropdown menu. Click on Menus. This will take you to the Menus page, where you can see your existing menus, create new ones, and make all sorts of adjustments. If you don’t see any menus listed yet, don’t worry—this is where you’ll create and customize your main navigation. Navigating to this section is the first step toward making your website more organized and user-friendly, so take your time exploring the options available on this page.
3. Understanding the Structure of WordPress Menus
Before you start tweaking your main navigation, it’s helpful to understand how WordPress manages menus behind the scenes. Think of menus as a collection of links that guide visitors around your site. These links can point to pages, posts, categories, custom URLs, or even external websites.
In WordPress, menus are made up of menu items. Each item is a link that you add to the menu, and these items can be arranged in a hierarchy—like parent and child items—to create dropdown menus or nested navigation structures.
Here are some key components of WordPress menus:
- Menu Items: Individual links such as pages, categories, or custom links.
- Hierarchy: The nesting of menu items to create submenus.
- Locations: The areas of your theme where menus can be displayed, like the main header or footer.
- Custom Links: URLs you add manually, which are great for linking to external sites or specific pages not automatically listed.
Knowing this helps you visualize how your navigation is built, making it easier to make the changes you want. When you access the menu editor, you’re essentially editing this collection of links and their arrangement. The goal? To create a user-friendly, intuitive menu that helps visitors find what they’re looking for without frustration.
Imagine your menu as a roadmap for your visitors. The better you understand its structure, the more effectively you can customize it to match your website’s needs and improve user experience.
4. Steps to Edit the Main Navigation Menu
Ready to make your main navigation look just how you want? Editing your menu in WordPress is pretty straightforward once you know where to go. Let’s walk through the step-by-step process:
- Log into your WordPress Dashboard: Head over to your website’s admin area by adding /wp-admin to your site’s URL.
- Navigate to the Menus Section: In the sidebar, hover over Appearance and click on Menus. This is where all the magic happens.
- Select the Main Menu: If you have multiple menus, use the dropdown to choose your primary or main menu. If you haven’t created one yet, you can create a new menu by clicking create a new menu.
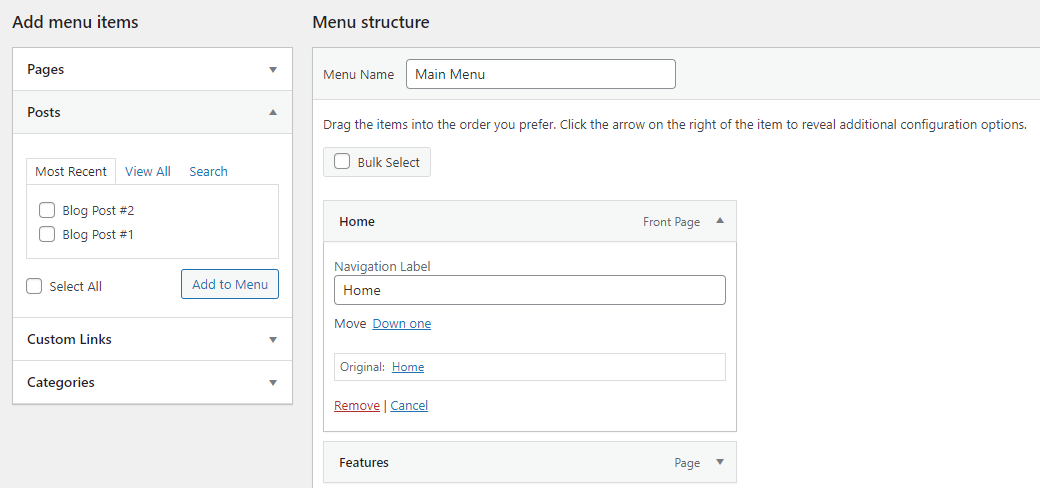
- Add Items to Your Menu: On the left side, you’ll see panels like Pages, Posts, Categories, and Custom Links. Select the items you want to add and click Add to Menu.
- Arrange Your Menu Items: Drag and drop the menu items to set their order. To create a dropdown or nested menu, drag an item slightly to the right under another item. This makes it a submenu.
- Configure Menu Item Settings: Click the arrow next to each menu item to reveal options like Navigation Label (what appears on the menu), Title Attribute, and whether it opens in a new tab.
- Assign the Menu to the Correct Location: Under Menu Settings, check the box for Main Menu (or the theme-specific primary menu location). This ensures your changes appear where visitors see them.
- Save Your Changes: Don’t forget to click Save Menu at the bottom to apply your updates!
And voilà! Your main navigation is now customized to better suit your site’s structure and your visitors’ needs. Remember, you can always go back, tweak the order, add new items, or remove outdated links. Making your menu user-friendly is an ongoing process, so don’t hesitate to experiment until it feels just right.
5. Adding New Pages or Links to the Main Navigation
Once you’ve got your main navigation set up, you might find yourself needing to add new pages or external links to keep your site fresh and user-friendly. Don’t worry—it’s a straightforward process that even beginners can master!
First, head over to your WordPress dashboard and look for the “Appearance” menu on the left sidebar. Hover over it, then click on “Menus.” This is where all the magic happens.
Now, to add a new page, you’ll want to make sure that your desired page is already created. If not, go to “Pages” > “Add New” and create your page first. Once done, come back to the Menus section.
On the left side, you’ll see a list of your pages, posts, custom links, and categories. Find the page or link you want to add, check the box next to it, and then click “Add to Menu.”
After it’s added, you’ll see it appear at the bottom of the menu structure on the right. From here, you can drag and drop to position it exactly where you want in the navigation. Want to add an external website? Use the “Custom Links” option:
- Enter the URL of the external site.
- Provide the link text that will appear in the menu.
- Click “Add to Menu.”
Once your new link or page is in place, don’t forget to click “Save Menu” to lock in your changes. Voilà! Your navigation now includes the new page or link, making it easier for visitors to find what they need.
6. Rearranging and Organizing Menu Items
Now that you’ve added new pages or links, you might want to organize your menu to keep things neat and intuitive. Rearranging menu items is super simple and a great way to improve your site’s navigation.
Stay in the “Menus” section of your WordPress dashboard. You’ll see your current menu structure displayed as a list of items. To change their order, just click and hold on a menu item, then drag it up or down to your preferred position.
Want to create dropdown menus (also called submenus)? It’s easy:
- Drag a menu item slightly to the right underneath another item.
- You’ll see it nest under the parent item, forming a dropdown.
- You can create multiple levels of nesting if needed!
This nesting helps organize related links, like grouping all your service pages under a “Services” menu item. It keeps your navigation clean and user-friendly.
Here are some quick tips for organizing your menu effectively:
- Prioritize important pages: Place them at the top or in prominent positions.
- Group related links: Use dropdowns to keep your menu tidy.
- Limit menu items: Too many options can overwhelm visitors—stick to the essentials.
- Test on different devices: Make sure your menu looks good on mobile and desktops.
Once you’re happy with the arrangement, click “Save Menu”. Now, your navigation is organized just the way you want, guiding visitors smoothly through your website!
7. Customizing Menu Appearance and Settings
Now that you’ve got your menu set up and your pages linked, it’s time to make sure it looks just right on your site. Customizing the appearance and settings of your menu can really improve the user experience and make your website feel more polished.
First, let’s talk about menu locations. Depending on your theme, you might have a few options for where your menu appears — like the header, footer, or even a sidebar. To adjust this, go to Appearance > Menus and look for the Manage Locations tab. Here, you can assign your menu to the desired spot. If your theme supports multiple menus, you’ll see options like “Primary Menu,” “Footer Menu,” etc. Just select the right one for your design and save your changes.
Next, customizing how your menu looks. WordPress themes often come with built-in options for styling menus, but you can also add custom styles if you’re comfortable with CSS. For simple tweaks, check your theme’s customizer by navigating to Appearance > Customize. Look for sections like Header or Menus—many themes let you change font sizes, colors, and hover effects directly here.
If you want more control, you might consider using a plugin like WP Menu Cart or Max Mega Menu. These tools allow you to add icons, dropdown styles, and even animated effects to make your menu more engaging.
Another tip is to organize your menu items with nested sub-menus. To do this, simply drag menu items slightly to the right under their parent item. This creates a dropdown menu that visitors can hover over or click to access more links. Keep it clean and straightforward — too many nested levels can make navigation confusing.
Finally, don’t forget about accessibility. Ensure your menu is easy to navigate with a keyboard and screen readers. Most modern themes do a good job, but if you’re customizing heavily, check that your menu’s HTML follows best practices for accessibility.
8. Previewing and Saving Your Menu Changes
Before you get excited and publish your new menu, it’s super important to preview how it looks on your site. This way, you can catch any issues with layout or links and make adjustments without affecting your live site.
To preview your changes, simply click the Save Menu button in the WordPress menu editor. Once saved, head over to your website and navigate to the page where your menu appears. Usually, your theme displays the menu in the header or designated area, so check if everything looks good.
Most themes also offer a live preview feature in the Customizer. To use this, go to Appearance > Customize and find the Menus section. Here, you can see a real-time preview of how your menu will look. This is especially helpful if you’re making styling adjustments or rearranging menu items.
If you notice something off — broken links, misaligned items, or styling issues — go back to the Appearance > Menus or the Customizer to make the necessary tweaks. Remember to clear your browser cache if you don’t see updates immediately.
Once you’re happy with how everything looks, click the Publish button in the Customizer or ensure you’ve saved the menu. It’s a good idea to check your site on different devices, like a smartphone or tablet, to see how the menu adapts to smaller screens. Responsive design is key to ensuring your visitors have a smooth experience no matter how they access your website.
And there you go! With these steps, you can confidently customize and preview your main navigation menu, making sure it’s both functional and visually appealing. Happy editing!
9. Common Issues When Editing Navigation and How to Fix Them
Editing the main navigation in WordPress can sometimes be straightforward, but it’s not uncommon to run into a few hiccups along the way. Don’t worry—most issues have simple fixes once you know what to look for. Let’s go over some of the common problems beginners face and how to resolve them.
1. Menu Items Not Saving Properly
If you notice that your changes aren’t sticking—like new menu items disappearing or edits not appearing—this could be due to a few reasons. First, make sure you’re clicking the “Save Menu” button after making your changes. Sometimes, it’s easy to forget this step!
Another common cause is plugin conflicts. Try temporarily disabling plugins to see if that resolves the issue. Also, clear your browser cache or try viewing your site in an incognito window to make sure you’re seeing the latest version.
2. Menu Items Not Showing Up on the Frontend
If your menu looks fine in the admin area but isn’t displaying on your site, double-check that you’ve assigned your menu to the correct location. Different themes have different menu locations, so go to Appearance > Menus and make sure you’ve checked the box for the right display location.
Additionally, verify that the theme you’re using supports the menu location you selected. Some themes have multiple menu areas, and you need to assign your menu to the one that appears on your homepage or other pages.
3. Broken Links or Missing Submenus
Sometimes, clicking on menu items leads nowhere, or submenus don’t expand as expected. This often occurs if the menu structure isn’t properly nested. To fix this, revisit the Menus screen and ensure that submenu items are indented under their parent items.
Also, check if your theme or a plugin is overriding default menu behavior. Disabling plugins one-by-one can help identify conflicts. If submenus are still not working, consider switching to a different theme temporarily to see if the issue persists.
4. Styling Issues or Inconsistent Appearance
If your menu looks out of place or inconsistent across pages, it might be due to custom CSS overrides or theme styles. Use your browser’s developer tools to inspect the menu and see which CSS rules are applying.
To fix styling issues, you can add custom CSS in Appearance > Customize > Additional CSS. For example, adjusting padding, font size, or colors can make your menu look cohesive. If you’re unsure, a quick consultation with a developer or support forum can be very helpful.
Summary
Most navigation editing issues boil down to simple checks—saving the menu, assigning it correctly, nesting items properly, and ensuring your theme supports your layout. When problems arise, stay patient, troubleshoot step-by-step, and don’t hesitate to seek help from the WordPress community or documentation. With a little patience, you’ll have your perfect menu in no time!
10. Additional Tips for Managing WordPress Menus Effectively
Managing menus might seem easy at first, but as your website grows, so does your menu structure. Here are some handy tips to help you keep things organized and effective:
1. Plan Your Menu Structure
- Map out your navigation: Before diving into WordPress, sketch a rough outline of your main pages and subpages.
- Keep it simple: Aim for clarity and ease of use. Too many menu items can overwhelm visitors.
- Use logical categories: Group related pages under submenus to keep your main menu clean.
2. Use Descriptive Labels
Your menu labels should clearly describe where they lead. Instead of vague names like “Page 1,” use labels like “About Us” or “Contact.” This helps visitors navigate intuitively and improves your site’s professionalism.
3. Regularly Review and Update Menus
As your site evolves, so should your menus. Regularly check that all links work, and remove outdated or irrelevant items. This keeps your navigation fresh and user-friendly.
4. Utilize Menu Locations Wisely
Most themes offer multiple menu locations—like header, footer, or mobile menus. Assign menus thoughtfully based on where users are likely to look for navigation, ensuring consistency across devices.
5. Take Advantage of Menu Plugins
If you need advanced features—like mega menus, icons, or animations—consider using menu plugins such as Max Mega Menu or WP Mega Menu. These tools give you more control and customization options.
6. Keep Accessibility in Mind
Make your menus accessible to all users by:
- Using clear, readable fonts
- Ensuring sufficient contrast
- Adding ARIA labels for screen readers
This not only improves user experience but also helps with SEO.
7. Backup Your Menus
Before making major changes, back up your website or export your menu structure. This way, you can easily restore if something doesn’t go as planned.
Final Thoughts
Managing WordPress menus doesn’t have to be complicated. With a little planning, regular updates, and some best practices, you can create a navigation system that’s both functional and user-friendly. Remember, a well-structured menu is key to providing visitors a great experience and guiding them effortlessly through your site!
Conclusion and Final Thoughts on Navigational Customization in WordPress
Customizing your main navigation in WordPress is a vital step in creating a user-friendly and professional website. Throughout this guide, we’ve explored various methods to edit, organize, and enhance your navigation menu, including using the built-in menu editor, customizing menu items, and adding useful widgets or icons. Remember, a well-structured menu not only improves user experience but also boosts your site’s SEO performance.
Key takeaways include:
- Plan your menu structure before making changes to ensure clarity and ease of navigation.
- Leverage WordPress’s native menu editor to add, remove, or rearrange menu items effortlessly.
- Utilize custom links and categories to create a comprehensive and intuitive menu that aligns with your content hierarchy.
- Consider responsive design to ensure your navigation works seamlessly across all devices.
- Use plugins or theme options for advanced customization, such as dropdowns, icons, or sticky menus.
Remember, your website’s navigation is often the first interaction visitors have with your content. Investing time in customizing it effectively will lead to a better user experience and encourage visitors to explore more of what your site offers. Keep experimenting with different styles and structures until you find the perfect fit for your website’s goals.