Hey there! If you’re running a WordPress website and want to make your tracking and marketing efforts more efficient, then Google Tag Manager (GTM) is a game-changer. It’s a free tool from Google that allows you to manage all your website tags—like Google Analytics, Facebook Pixels, and more—without digging into the code each time. Imagine making updates quickly, avoiding errors, and having better control over your site’s data. Whether you’re a beginner or a seasoned marketer, GTM simplifies how you implement and manage various tracking codes, saving you time and reducing headaches.
Preparing Your Google Tag Manager Account and Container
Before you can add GTM to your WordPress site, you’ll need to set up your account and create a container. Think of the account as your overall GTM workspace, and the container as the specific place where you’ll keep all your tags for your website. Here’s how to get started:
- Sign in or create a Google Account: If you don’t already have one, create a Google account. It’s free and easy.
- Go to the Google Tag Manager website: Visit https://tagmanager.google.com.
- Create a new account: Click on “Create Account,” give it a name (like “My Website GTM”), and set your country.
- Set up your container: Name your container (preferably your website’s name), select “Web” as the platform, and click “Create.”
- Accept the terms of service: Read through and agree to the terms to proceed.
Once your account and container are ready, GTM will generate a unique container code snippet. This code is what you’ll add to your WordPress site later so that GTM can start tracking your website data. Be sure to keep this code handy; you’ll need it in the next steps.
3. Installing Google Tag Manager on Your WordPress Website

Alright, so you’ve got your Google Tag Manager (GTM) account all set up and ready to go. Now, the next step is to get GTM onto your WordPress website. Don’t worry — it’s pretty straightforward, and I’ll walk you through the process.
First things first, you need to grab your GTM container code. Head over to your Google Tag Manager dashboard, click on your container, and then click on Admin in the sidebar. Under Install Google Tag Manager, you’ll see two snippets of code:
- The first code goes into the head section of your website.
- The second code goes immediately after the opening <body> tag.
Now, if you’re not familiar with editing your WordPress theme files directly, I recommend being cautious or using a child theme. Making direct edits can be risky if you’re not comfortable with code, so always back up your site beforehand.
Manual Method
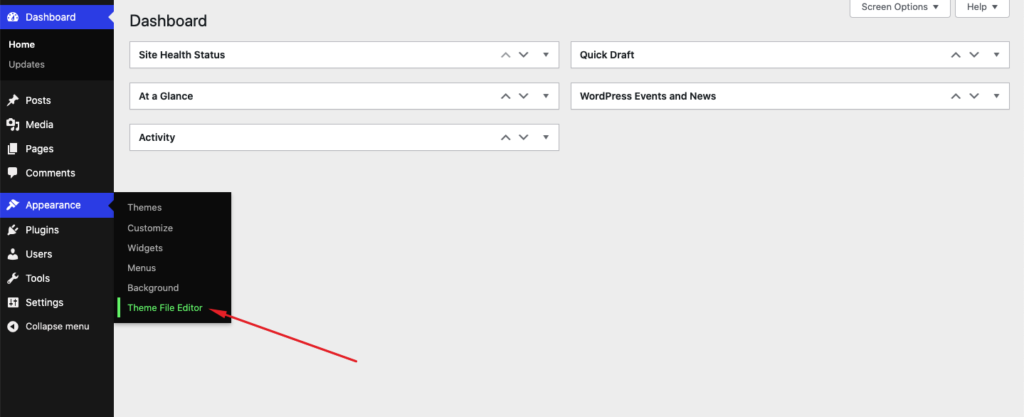
- Access your theme files: Go to your WordPress dashboard, navigate to Appearance > Theme Editor. Alternatively, you can use an FTP client or your hosting file manager for safer editing.
- Insert the code:
- Paste the first GTM code snippet into the <head> section of your header.php file.
- Paste the second GTM code snippet immediately after the opening <body> tag in your header.php file.
- Save your changes: After pasting the code snippets, save the file. Refresh your website, and check if GTM is firing correctly using tools like Tag Assistant.
Using a Plugin (Recommended for Beginners)
If editing theme files sounds intimidating, don’t worry — there’s an easier way! Plugins can handle the insertion of GTM code seamlessly. We’ll talk more about this in the next section, but for now, just know that using a plugin is a safe and simple method.
Important Tips
- Always double-check that the code snippets are correctly placed.
- Use your browser’s developer tools or Google Tag Assistant to verify GTM is working.
- Remember to clear caches if you’re using caching plugins or CDN services.
Once the code snippets are in place and verified, your Google Tag Manager is installed and ready to start managing your tags. Next up, let’s look at how plugins can make this process even easier and more error-proof!
4. Using Plugins to Simplify Google Tag Manager Integration

Let’s be honest — editing theme files directly can be a bit daunting, especially if you’re not super comfortable with code. Luckily, there are plenty of WordPress plugins designed specifically to simplify the process of integrating Google Tag Manager. These plugins not only make installation a breeze but also help you manage your GTM containers without touching any code.
Why Use a Plugin?
- Simplified setup: Just input your GTM ID or container ID, and the plugin takes care of the rest.
- Automatic code insertion: No need to manually edit theme files.
- Additional features: Some plugins offer options for event tracking, data layer management, or tag previewing.
- Less risk of errors: Reduces chances of breaking your site with incorrect code placement.
Popular Plugins for Google Tag Manager
| Plugin Name | Features | Ease of Use | Compatibility |
|---|---|---|---|
| DuracellTomi’s Google Tag Manager for WordPress | Easy setup, event tracking, data layer options | Very user-friendly | Works with latest WordPress versions |
| GA Google Tag Manager | Simple GTM integration, supports multiple containers | Basic, straightforward | Well-maintained and reliable |
| Insert Headers and Footers | Insert custom scripts in header/footer, manual control | Moderate; requires entering GTM ID | Highly compatible, lightweight |
How to Set Up Using a Plugin (Example with DuracellTomi’s Plugin)
- Install and activate the plugin: Go to Plugins > Add New, search for DuracellTomi’s Google Tag Manager for WordPress, then install and activate.
- Configure the plugin: Navigate to the plugin settings via Settings > Google Tag Manager.
- Enter your GTM Container ID: It looks like GTM-XXXXXX. Paste it into the provided field.
- Save your settings: Once saved, the plugin automatically inserts the GTM code snippets into your site.
- Verify: Use Google Tag Assistant or GTM’s Preview mode to ensure everything is working smoothly.
Additional Tips
- Keep your plugins updated to ensure compatibility and security.
- Check plugin settings periodically to manage tags and triggers more effectively.
- Combine plugin use with GTM’s preview mode for testing your tags before publishing.
Using a plugin is arguably the easiest way to get GTM up and running on your WordPress site, especially if you want to avoid messing with code. It’s a smart choice for beginners and those who prefer a more hands-off approach. Once installed, you can focus on creating and managing your tags within GTM without worrying about the technicalities of code insertion.
5. Manually Adding Google Tag Manager Code Snippets to Your WordPress Theme
If you prefer a hands-on approach or want more control over where your Google Tag Manager (GTM) code sits, manually adding the snippets to your WordPress theme can be a good option. This method involves editing your theme’s files directly, so make sure to back up your site before proceeding — a small safety net in case anything goes wrong.
Here’s a simple step-by-step guide to do it:
- Access Your Theme Files: You can do this via cPanel, an FTP client, or through the WordPress admin dashboard by navigating to Appearance > Theme Editor.
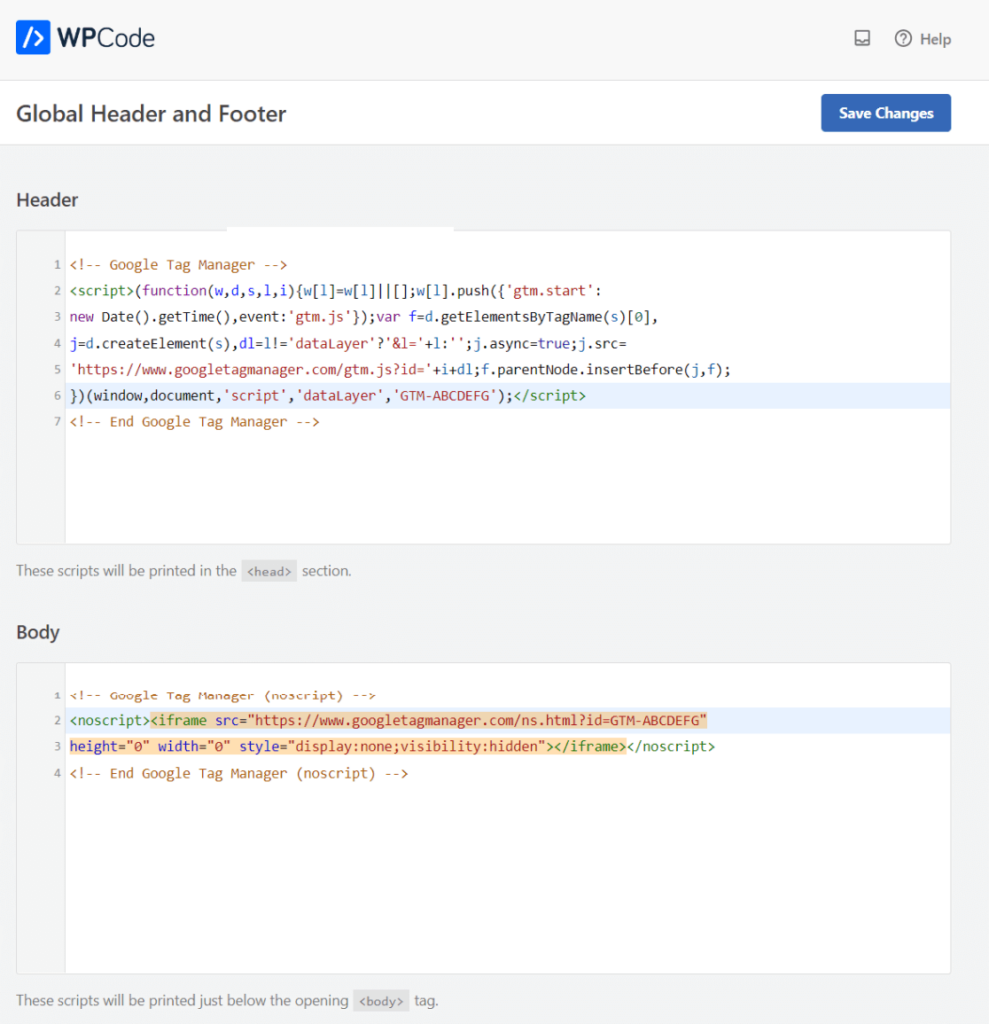
- Locate header.php: Find and open the header.php file. This is where you’ll add the first snippet that loads GTM.
- Insert the GTM Snippet: Just before the closing
</head>tag, paste the following code snippet provided by Google Tag Manager:<!-- Google Tag Manager --><script>(function(w,d,s,l,i){w[l]=w[l]||[];w[l].push({'gtm.start':new Date().getTime(),event:'gtm.js'});var f=d.getElementsByTagName(s)[0],j=d.createElement(s),dl=l!='dataLayer'?'&l='+l:'';j.async=true;j.src='https://www.googletagmanager.com/gtm.js?id='+i+dl;f.parentNode.insertBefore(j,f);})(window,document,'script','dataLayer','GTM-XXXX');</script><!-- End Google Tag Manager --> - Locate the noscript Tag: Next, find the body tag in your header.php or index.php file. Immediately after the opening
<body>tag, insert the following noscript snippet:<!-- Google Tag Manager (noscript) --><iframe src="https://www.googletagmanager.com/ns.html?id=GTM-XXXX"height="0" width="0" style="display:none;visibility:hidden"></iframe><!-- End Google Tag Manager (noscript) -->
- Save Your Changes: Once both snippets are in place, save the files and clear your cache to ensure the changes go live.
Tip: Keep your GTM ID (GTM-XXXX) handy. Never share your container ID publicly, but make sure it’s correctly pasted in both snippets.
Manual installation is effective but requires a bit of technical confidence. If you’re not comfortable editing theme files directly, consider using plugins or the theme’s customization options instead. But if you’re comfortable, this method gives you maximum control over your setup.
6. Verifying the Proper Installation of Google Tag Manager
After installing GTM, your next step is to make sure everything is working smoothly. No one wants to build a setup only to find that the tags aren’t firing correctly, right? Luckily, there are some easy ways to verify that GTM is installed properly and functioning as it should.
Here’s how you can check:
1. Use the Google Tag Manager Preview Mode
- Log into your Google Tag Manager account.
- Select your container.
- Click on Preview in the top right corner.
- Enter your website URL and hit Connect.
- This opens your website with the GTM preview console at the bottom of the page.
If GTM is correctly installed, you’ll see the preview and debug console showing which tags are firing and which aren’t. Click around your site to trigger different tags and verify they activate as expected.
2. Use Your Browser’s Developer Tools
Most modern browsers have developer tools that can help you see if GTM scripts are present:
- Open Chrome DevTools (press F12 or right-click and select Inspect).
- Go to the Console tab.
- Type
dataLayerand press Enter. - You should see an array of objects representing your GTM data layer. If it’s undefined or empty, GTM might not be installed correctly.
3. Use Tag Assistant by Google
This is a handy Chrome extension that scans your site for tags and reports any issues:
- Download and install Tag Assistant.
- Navigate to your website and click the extension icon.
- Follow the prompts to record a session. The tool will analyze your tags and tell you if GTM is firing correctly.
4. Check for the GTM Container in Source Code
Finally, you can verify manually by viewing your website’s source code:
- Right-click on your webpage and select View Page Source.
- Search for your GTM container ID (e.g., GTM-XXXX).
- If present in the code, it indicates the snippets are correctly embedded.
By following these steps, you can confidently confirm that your GTM setup is working properly. Remember, testing is a crucial part of the process — it saves you headaches down the line and ensures your tracking is accurate. If you find issues, double-check your snippets, clear caches, and revisit your installation steps. With a little patience, you’ll have your Google Tag Manager running smoothly on your WordPress site!
7. Best Practices for Managing Tags Within Google Tag Manager
Now that you’ve set up Google Tag Manager (GTM) on your WordPress website, it’s time to talk about how to keep everything organized and running smoothly. Managing tags effectively is key to ensuring accurate data collection and making your marketing efforts successful. Here are some best practices to keep in mind:
1. Use Descriptive Naming Conventions
When creating tags, triggers, and variables, always use clear and descriptive names. This helps you quickly identify what each item does, especially as your GTM container grows. For example, instead of naming a tag “Tag 1,” use “GA – All Pages” or “Facebook Pixel – Purchase Event.”
2. Organize with Folders
GTM allows you to create folders to group related tags, triggers, and variables. Use folders to categorize your assets—such as “Analytics,” “Advertising,” or “Conversions.” This keeps your workspace tidy and makes updates easier to manage.
3. Test Before Publishing
Always use the Preview mode to test your tags before publishing them live. This way, you can see exactly what tags fire on your site and catch any errors or misfires. It’s a simple step that can save you from data discrepancies or tracking issues later on.
4. Use Version Control
Every time you make significant changes, create a new version. GTM automatically saves versions, but it’s good practice to add notes describing what was changed. This helps you revert to a previous setup if something goes wrong.
5. Limit Tag Overlap
Be careful not to create duplicate tags that track the same data. Overlapping tags can cause inflated metrics or conflicting data. Regularly review your tags to ensure each has a clear purpose and is firing only when needed.
6. Keep Your Container Lean
Only add tags that are necessary. Too many unnecessary tags can slow down your site and complicate troubleshooting. Periodically audit your container to remove outdated or unused tags.
7. Document Your Setup
Maintain documentation of your GTM setup—what tags you have, their purpose, and any special configurations. This is especially helpful if multiple people manage your tags or when you revisit your setup after some time.
8. Conclusion and Additional Resources for Optimizing Your Tag Management
Managing tags efficiently with Google Tag Manager is a crucial part of understanding your website’s performance and user behavior. By following best practices like clear naming, organization, testing, and regular audits, you can ensure your data collection is accurate and your marketing efforts are well-informed.
Remember, GTM is a powerful tool, but it requires ongoing maintenance and attention. Don’t hesitate to revisit your setup periodically to refine your tags, add new tracking as your website evolves, or remove outdated ones. The effort you put in now will pay off in better insights and smarter marketing decisions.
For further learning and to get the most out of GTM, check out these helpful resources:
- Google Tag Manager Official Documentation
- Google Analytics Academy
- Comprehensive GTM Tutorials
- Search Engine Journal Guide to GTM
Happy tag managing! With a well-organized GTM setup, you’ll gain clearer insights and have the confidence that your tracking is accurate and reliable. Keep experimenting, learning, and optimizing—your data-driven success depends on it!