Creating a memorable logo is a crucial step in establishing your brand’s identity, but not everyone has the design skills or budget to hire a professional. That’s where the Logo Creator Plugin for WordPress comes in! This handy tool makes designing custom logos straightforward, even if you’re a complete beginner. With its user-friendly interface and a variety of templates, you can craft a unique logo that perfectly represents your website or business—all without leaving your WordPress dashboard. Ready to take your branding to the next level? Let’s explore how this plugin can make your logo design process smooth and fun!
Benefits of Using a Logo Creator Plugin for Your Website
Using a logo creator plugin on your WordPress site offers a ton of advantages, especially if you want to save time, money, and effort. Here are some of the biggest benefits:
- Ease of Use: Most logo creator plugins are designed with non-designers in mind. They feature drag-and-drop editors, pre-made templates, and intuitive controls that make creating a professional-looking logo as simple as clicking a few buttons.
- Cost-Effective: Hiring a designer or agency can get pretty pricey. With a plugin, you can design your logo yourself, saving hundreds or even thousands of dollars. Plus, many plugins offer free versions or affordable premium options.
- Quick Turnaround: No more waiting weeks for a designer to deliver your logo. You can create, tweak, and finalize your logo in a matter of minutes or hours, which is perfect if you’re on a tight schedule or launching a new website.
- Customization and Flexibility: Want a logo that’s uniquely yours? These plugins typically come with a wide array of fonts, colors, icons, and layout options. You can easily customize every element to match your brand’s style and personality.
- Consistency Across Branding: Many logo plugins allow you to save your designs and create a branding kit, ensuring your logo stays consistent across all your marketing materials, social media, and website pages.
- Integration with WordPress: Since these plugins are built for WordPress, they seamlessly integrate into your existing website. No need to juggle multiple platforms or upload files manually—everything is handled within your dashboard.
All in all, a logo creator plugin is a smart, efficient way to develop a professional logo that boosts your brand’s credibility and helps you stand out online. Whether you’re just starting out or revamping your existing brand, it’s a tool worth exploring!
3. Step-by-Step Guide to Installing and Setting Up the Logo Creator Plugin
Getting started with the Logo Creator Plugin on WordPress is easier than you might think. Whether you’re a newbie or a seasoned website owner, this step-by-step guide will walk you through the process seamlessly.
Step 1: Log into Your WordPress Dashboard
First things first, head over to your WordPress admin panel. Usually, that’s yourwebsite.com/wp-admin. Log in with your credentials, and you’re ready to go.
Step 2: Navigate to Plugins and Install New
On the left sidebar, hover over Plugins and click on Add New. In the search bar, type Logo Creator Plugin (or the specific name if you have one).
Step 3: Find and Install the Plugin
Look for the plugin in the search results. Make sure to check reviews and ratings to confirm it’s reliable. When you find it, click the Install Now button. Once installed, click Activate.
Step 4: Access the Plugin Settings
After activation, you’ll see a new menu item in your dashboard—often called Logo Creator or similar. Click on it to access the setup and configuration options.
Step 5: Configure Basic Settings
Most plugins will have a setup wizard or a settings page. Here, you can choose default options like logo size, color palette, and file formats. Take a moment to customize these to match your brand’s style.
Step 6: Save Your Settings
Once you’ve tailored the initial options, don’t forget to click the Save Changes button. Your plugin is now ready for creating stunning logos!
4. How to Design Custom Logos Using the Plugin
Designing your own logo with the Logo Creator Plugin is a fun and creative process. Here’s a simple breakdown to help you craft a professional-looking logo that truly represents your brand.
Step 1: Open the Logo Builder Tool
From the plugin menu, select Create New Logo. You’ll be taken to the logo editor, which usually features a drag-and-drop interface—making design accessible for everyone.
Step 2: Choose a Template or Start from Scratch
Most logo plugins offer a variety of pre-designed templates. If you find one that suits your style, select it to customize. Alternatively, you can start with a blank canvas for full creative control.
Step 3: Customize Your Logo Elements
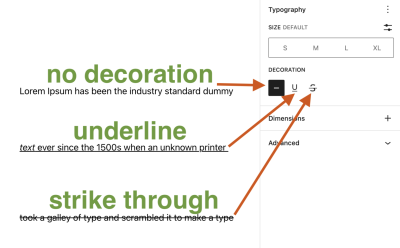
- Text: Add your brand name or tagline. Play with fonts, sizes, and colors to match your identity.
- Icons & Graphics: Insert icons or images relevant to your business. Many plugins come with a library of vectors or allow you to upload your own.
- Colors: Choose a color scheme that aligns with your branding. Use the color picker to adjust hues precisely.
- Shapes & Layout: Adjust the arrangement of elements, resize objects, or add shapes to give your logo a unique look.
Step 4: Preview and Make Adjustments
Use the preview feature to see how your logo looks on different backgrounds or sizes. Make any necessary tweaks to ensure it’s perfect.
Step 5: Save and Export Your Logo
Once satisfied, click the Save button. You can usually export your logo in multiple formats—PNG, JPEG, SVG—depending on your needs. Download the files and use them across your website, social media, and marketing materials.
Bonus Tips:
- Keep it simple: A clean, straightforward logo is often more memorable.
- Consistency is key: Match your logo style with your overall branding for a cohesive look.
- Test in different sizes: Make sure your logo looks great whether it’s small on a business card or large on a banner.
Designing a custom logo with the plugin is an empowering way to showcase your brand’s personality. Dive in, experiment with different styles, and create something uniquely yours!
5. Tips for Creating a Professional and Unique Logo
Designing a logo that stands out and truly represents your brand can feel like a daunting task, but with some helpful tips, you can create a logo that’s both professional and uniquely yours. Remember, your logo is often the first thing people see, so making a great impression is key!
Start with Your Brand Identity
Before diving into design, take a moment to define what your brand stands for. Think about your mission, values, and personality. Are you fun and playful, or serious and professional? Your logo should reflect this essence. Write down keywords that describe your brand — this will guide your design choices.
Keep It Simple
Less is often more when it comes to logos. A clean, simple design is more memorable and versatile. Think of iconic logos like Nike’s swoosh or Apple’s apple — they’re straightforward yet instantly recognizable. Avoid clutter, and focus on a clear visual that can be scaled easily.
Choose Colors Wisely
Colors evoke emotions and convey messages. Pick a color palette that aligns with your brand personality. For example, blue often communicates trust, while red can evoke excitement. Limiting your palette to 2-3 colors keeps your logo cohesive and adaptable across different platforms.
Select the Right Font
Your typography should complement your logo’s style. Whether it’s a sleek sans-serif or a classic serif, make sure the font is legible and aligns with your brand voice. Custom fonts can add a unique touch, but simplicity is key.
Make It Scalable and Versatile
Your logo will appear on everything from business cards to billboards. Design it to look good in different sizes and formats. Test your logo in black and white, as well as color, to ensure it remains effective across various backgrounds and mediums.
Get Feedback and Refine
Don’t be afraid to ask friends, colleagues, or even your target audience for feedback. Sometimes, fresh eyes can spot issues or suggest improvements you might have missed. Use their input to refine your design until it feels just right.
Remember, creating a professional and unique logo is a process. Take your time, experiment with ideas, and don’t settle for the first draft. With patience and creativity, you’ll end up with a logo that truly embodies your brand and leaves a lasting impression.
6. Integrating Your New Logo into Your WordPress Website
So, you’ve crafted a fantastic new logo — congratulations! Now, it’s time to showcase it on your website. Luckily, integrating your logo into your WordPress site is straightforward, even if you’re not a tech wizard. Here’s a simple step-by-step guide to help you seamlessly add your logo and give your site a polished, professional look.
Step 1: Prepare Your Logo Files
- Make sure your logo is saved in web-friendly formats like PNG, JPEG, or SVG for scalability and transparency.
- Resize your logo to fit your header area comfortably. Common dimensions are around 250px wide, but this can vary based on your theme.
- Keep a high-resolution version for retina displays to ensure your logo looks crisp on all devices.
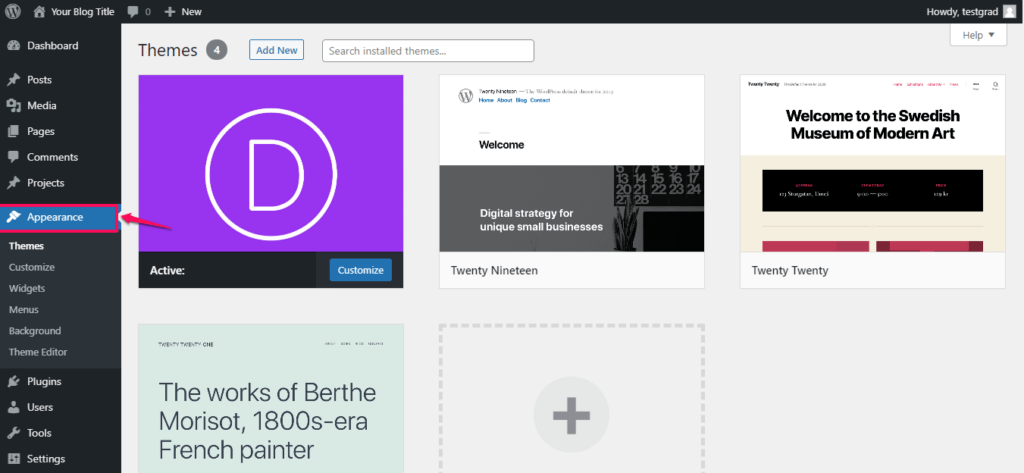
Step 2: Access Your WordPress Customizer
Login to your WordPress admin dashboard. Navigate to Appearance > Customize. This opens the theme customizer where you can modify various aspects of your site’s appearance.
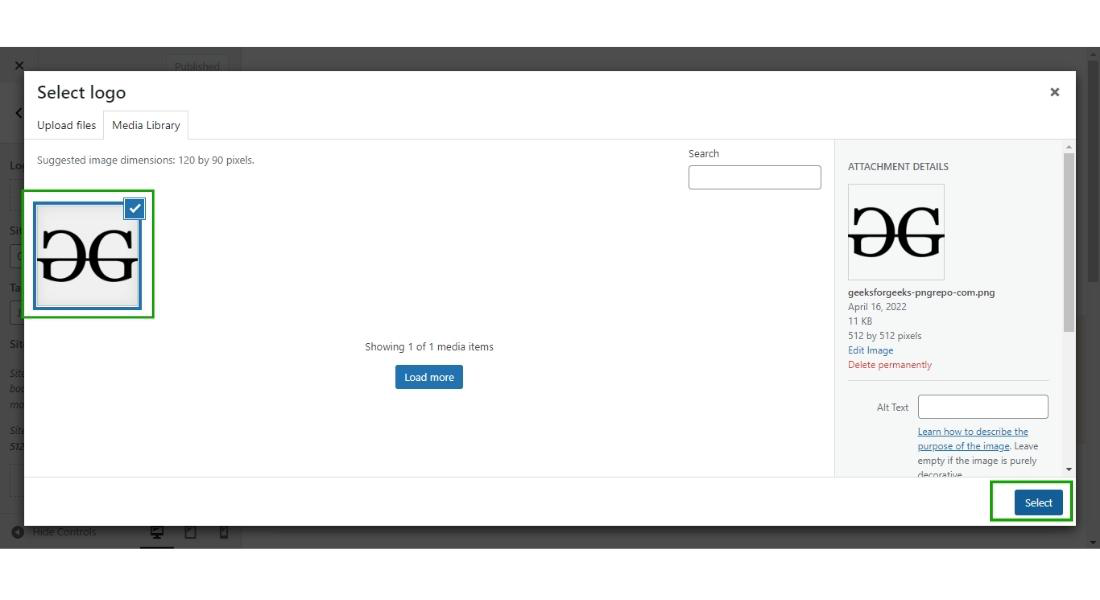
Step 3: Upload Your Logo
- Look for the Site Identity section (or similarly named, depending on your theme).
- Click on Upload Logo and select your prepared logo file from your computer.
- Preview how it looks. Adjust the size if your theme offers options, or consider resizing your image for a better fit.
Step 4: Save and Publish
Once satisfied, click Publish to apply the changes. Your new logo should now appear prominently on your website’s header.
Optional: Use a Logo Widget or Header Plugin
If your theme doesn’t support easy logo uploads, or if you want more customization, consider using a plugin like Header Footer Code Manager or a dedicated header plugin. These tools give you additional flexibility to place your logo exactly where you want.
Step 5: Check Responsiveness
Visit your website on different devices — desktop, tablet, and smartphone — to ensure your logo looks great everywhere. Make adjustments if needed, such as cropping or resizing your image.
And that’s it! With just a few simple steps, your brand-new logo will be proudly displayed on your WordPress site, helping you build a professional, cohesive online presence. Remember, branding is ongoing, so revisit your logo placement and size periodically to keep your website looking sharp and aligned with your evolving brand.
7. Common Troubleshooting Tips and Support Resources
Getting started with a new plugin like the Logo Creator Plugin for WordPress can sometimes come with a few hiccups. Don’t worry — many users face similar challenges, and there are straightforward ways to troubleshoot and find support. Let’s walk through some common issues and where you can turn for help.
Common Troubleshooting Tips
- Plugin Not Installing or Activating: Ensure your WordPress version is compatible with the plugin. Sometimes, outdated WordPress installs can cause issues. Also, check if your server meets the plugin’s hosting requirements. If installation fails, try deactivating other plugins temporarily to rule out conflicts.
- Logo Not Displaying Correctly: Double-check that you’ve set the logo as the primary logo in your theme settings. Clear your browser cache and any caching plugins you might be using. Sometimes, a simple refresh or cache clear resolves display issues.
- Design Tools Not Working as Expected: Make sure your browser is updated. The plugin’s design tools might not function smoothly on outdated browsers. Try disabling browser extensions that could interfere, or switch to a different browser for testing.
- Saving or Exporting Fails: Check your server’s PHP upload limits and permissions. Insufficient memory limits can prevent saving high-resolution logos. Increasing the PHP memory limit or checking file permissions often helps.
- Fonts or Images Not Loading: Confirm that all assets are correctly uploaded. Sometimes, issues arise if URLs are broken or files are missing. Re-upload any missing assets and verify their paths.
Support Resources
If troubleshooting doesn’t resolve your issue, there are plenty of resources to help you out:
- Official Documentation: The plugin’s official documentation is a treasure trove of step-by-step guides, FAQs, and troubleshooting tips. It’s often the fastest way to find a solution.
- Support Forums: Many WordPress plugins have dedicated forums or community groups where users and developers discuss common problems and solutions.
- Contact Support: If you purchased a premium version, you probably have access to dedicated support. Reach out with detailed descriptions of your issue, including screenshots if possible, to get personalized help.
- Online Communities: Platforms like Reddit, Stack Overflow, or specialized WordPress groups on Facebook can be great places to ask for advice and share experiences.
- Video Tutorials: Sometimes, visual guidance makes troubleshooting easier. YouTube channels dedicated to WordPress and design often feature tutorials on using logo plugins.
Remember, patience is key. Most issues are fixable with a bit of troubleshooting, and support resources are there to get you back on track quickly. Don’t hesitate to seek help — building your brand with a custom logo should be an exciting journey, not a frustrating one!
8. Conclusion and Final Thoughts on Enhancing Your Brand with Custom Logos
Creating a unique, memorable logo is one of the most impactful ways to boost your brand’s identity. With the Logo Creator Plugin for WordPress, you’ve got a powerful tool at your fingertips that makes designing custom logos accessible—even if you’re not a professional designer.
Throughout this guide, we’ve explored how to get started, choose the right design elements, and troubleshoot common issues. Remember, your logo isn’t just a pretty picture; it’s the visual cornerstone of your brand. It communicates your values, personality, and professionalism to your audience.
Here are a few final tips to keep in mind:
- Keep It Simple: A clean, straightforward logo is often more memorable and versatile across different platforms.
- Reflect Your Brand: Use colors, fonts, and symbols that embody your brand’s personality and message.
- Test Your Logo: View it on various devices and backgrounds to ensure it looks great everywhere.
- Be Consistent: Use your logo consistently across all marketing materials to build brand recognition.
Investing time in designing a custom logo pays off in the long run. It sets you apart from competitors and builds trust with your audience. With user-friendly tools like the Logo Creator Plugin, you don’t need to be a professional designer to create a compelling visual identity.
So, go ahead—dive into your logo design journey! Experiment, get feedback, and refine until it perfectly captures your brand essence. Your logo is the face of your business, and with a bit of creativity and the right tools, you’ll make a lasting impression in no time.