Ever wondered how to make your WordPress site more engaging? Embedding videos is a fantastic way to capture your visitors’ attention, showcase your products, or share your stories. Whether you’re a beginner or a seasoned user, adding video clips can seem tricky at first—but don’t worry! With the right tools and a little guidance, you’ll be able to seamlessly incorporate videos that look great and boost your site’s appeal. In this guide, we’ll walk through why videos matter and how you can effortlessly add and style them to create a dynamic online presence.
Step-by-Step Process to Insert Video Clips into Your WordPress Site
Getting your videos onto your WordPress site is easier than you might think. Here’s a straightforward, step-by-step approach to help you embed videos smoothly:
- Choose Your Video Source: Decide where your video will come from. You have a few options:
- YouTube or Vimeo: Popular video hosting platforms that make embedding simple.
- Self-hosted: Upload videos directly to your WordPress media library if you have enough hosting resources.
- Copy the Video URL or Embed Code:
- If using YouTube or Vimeo, copy the share URL or the embed code provided by the platform.
- If uploading yourself, you’ll upload the video file in the media library and note the URL.
- Insert the Video into a Post or Page:
Navigate to your WordPress dashboard, open the post or page where you want the video, and follow these options:
- Using the Block Editor (Gutenberg):
- Click the + icon to add a new block.
- Select the Video block for self-hosted videos, or Embed block for YouTube/Vimeo.
- Paste your URL or embed code in the block.
- Using the Classic Editor:
- Paste the URL directly into the editor, and WordPress will automatically convert it into an embedded video.
- Using the Block Editor (Gutenberg):
- Adjust Video Settings and Style: After inserting, you can resize or align your video using block options or custom CSS to match your site’s style.
- Preview and Publish: Always preview your post to ensure the video appears correctly, then hit publish or update.
- Optional: Enhance with Plugins: For more control over styling and responsiveness, consider plugins like WP Video Lightbox or Advanced Custom Fields that give you extra options.
And just like that, your video is live on your site! Remember, the key is choosing the right source and formatting your videos to look great across devices. With these steps, you’re well on your way to creating a more lively, interactive website that keeps visitors coming back for more.
3. Choosing the Right Video Formats for Compatibility and Quality
When it comes to adding videos to your WordPress site, selecting the right video format is a crucial step. Not all video formats are created equal—some work seamlessly across browsers and devices, while others might cause playback issues or result in poor quality. So, let’s break down what you need to know to choose the best formats for your site.
First, the main goal is to ensure your videos are compatible with as many browsers and devices as possible. The most widely supported formats are:
- MP4 (MPEG-4 Part 14): The most popular and versatile video format. Almost all browsers support MP4, making it the safe choice for embedding videos that need to work everywhere.
- WebM: An open-source format supported by most modern browsers like Chrome, Firefox, and Edge. It’s great for newer browsers and offers good compression and quality.
- Ogg/Theora: Another open-source format, but it’s less common today. It can be used as a fallback for older browsers.
To maximize compatibility, it’s recommended to upload your video in at least two formats—typically MP4 and WebM. This way, your browser can choose the best supported format to play, ensuring your viewers get a smooth experience.
Besides compatibility, consider the following tips:
- Compression and quality: Use a good video encoder to compress your videos without losing too much quality. This helps your videos load faster, especially for visitors with slower internet connections.
- File size: Keep your videos under a few hundred megabytes if possible. Smaller files mean quicker load times and less bandwidth usage.
- Hosting options: For very large or high-traffic sites, consider hosting videos on a dedicated platform like YouTube or Vimeo and embedding them. This takes the load off your server and provides built-in playback features.
In summary, choose MP4 as your primary format, add WebM as a fallback, and ensure your videos are optimized for both quality and performance. That way, your visitors will enjoy a smooth viewing experience, no matter what device they’re using.
4. Using the WordPress Block Editor to Embed Videos
Now that you’ve got your videos ready in the right formats, it’s time to embed them into your WordPress posts or pages. The good news is, the WordPress Block Editor (Gutenberg) makes this process super straightforward and user-friendly.
Here’s a step-by-step guide to embedding videos using the Block Editor:
- Open your post or page: Log in to your WordPress dashboard and navigate to the post or page where you want to add the video.
- Add a Video Block: Click the + (Add Block) button in the editor toolbar. From the list of blocks, select Video. You can also type “video” in the search bar to find it quickly.
- Upload or Insert Your Video: You’ll see several options:
- Upload: Upload a video file directly from your computer.
- Media Library: Select an existing video from your media library.
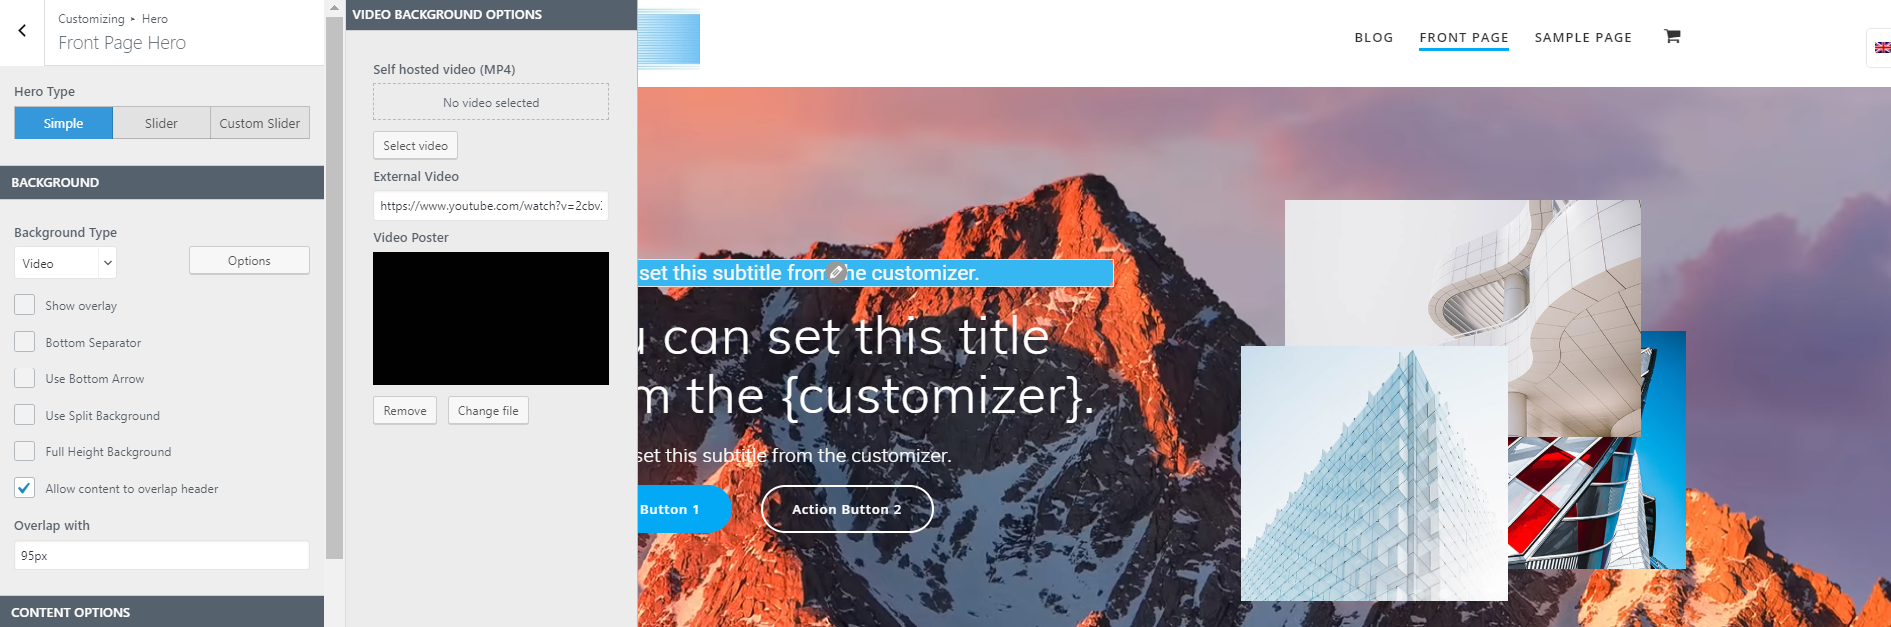
- Insert from URL: Paste the URL of a video hosted on YouTube, Vimeo, or other platforms.
- Adjust Settings: Once your video is embedded, you can customize its appearance:
- Align the video (left, center, right)
- Enable or disable autoplay, loop, or mute options (if supported)
- Add captions or descriptions below the video
- Preview and Publish: Always preview your post or page to see how the video looks and plays. Make any necessary adjustments, then click Publish or Update.
Embedding videos via the Block Editor is not only simple but also flexible. Want to embed a YouTube or Vimeo video instead of uploading your own? Just use the Embed block, paste the video URL, and WordPress will handle the rest.
By mastering these steps, you can enrich your content with engaging videos that enhance user experience and boost your site’s appeal. Whether you’re showcasing a product demo, a tutorial, or just sharing a fun clip, the Block Editor makes it easy to bring videos into your WordPress site seamlessly.
5. Styling and Customizing Video Clips for Better Visual Appeal
Once you’ve added your video clips to your WordPress site, the next step is to make sure they look great and match your overall site design. Customizing the appearance of your videos can make a huge difference in how engaging and professional your content feels. Luckily, WordPress offers several ways to style and tweak your videos to better suit your aesthetic.
Using Built-in Block Settings
If you’re using the Gutenberg editor, each video block comes with handy settings. You can adjust alignment (left, center, right), add captions, or change the width and height. These options help you position your videos precisely where you want and control their size without needing any extra code.
Adding Custom CSS
If you want more control, custom CSS is your friend. For example, you can add borders, shadows, rounded corners, or even overlays to your videos. Here’s a quick example of how to add a border and a subtle shadow:
/ Custom styling for embedded videos /.video-custom { border: 3px solid 333; box-shadow: 2px 2px 12px rgba(0,0,0,0.2); border-radius: 8px;}
Then, in your post or page, you can wrap your video in a <div> with this class:
<div class="video-custom"> <!-- Your video embed code --></div>
Using Plugins for Styling
There are also plugins that can help you style videos more creatively—adding overlays, play buttons, or animated effects. Plugins like Elementor or WPBakery give drag-and-drop options to create visually appealing video sections without touching a line of code.
Creative Ideas to Enhance Visual Appeal
- Adding a semi-transparent overlay with text for promotional videos
- Using animated borders or hover effects to draw attention
- Implementing custom play buttons that match your branding
Remember, the goal is to make your videos blend seamlessly with your site’s style while still standing out enough to catch visitors’ eyes. Play around with different styles, and don’t be afraid to experiment until you find a look that feels just right!
6. Enhancing User Experience with Responsive Video Styling
Nothing kills user engagement faster than videos that don’t display properly on different devices. That’s why making your videos responsive—that is, adaptable to various screen sizes—is essential. A responsive video ensures your visitors get a great viewing experience whether they’re on a desktop, tablet, or smartphone.
Why Responsiveness Matters
Imagine a video that’s too wide for a mobile screen or gets cut off because it doesn’t scale correctly. Visitors might leave your site frustrated or miss out on important content. Responsive videos prevent this by automatically adjusting their size to fit the viewer’s device, keeping everything neat and accessible.
Simple Techniques for Responsive Video Styling
One of the easiest ways to achieve responsiveness is by using the iframe embed method with CSS. Here’s a popular technique:
| CSS for Responsive Videos | Description |
|---|---|
/ Container for responsive videos /.video-container { position: relative; padding-bottom: 56.25%; / 16:9 aspect ratio / height: 0; overflow: hidden; max-width: 100%;}/ Styling the iframe/video element /.video-container iframe,.video-container video { position: absolute; top: 0; left: 0; width: 100%; height: 100%;}
|
This CSS creates a container that maintains the aspect ratio, and the video inside scales accordingly. |
To implement this:
- Wrap your embed code in a
<div class="video-container"> - Add the CSS to your stylesheet or custom CSS area (many themes have this option).
- Embed your video inside the container, like so:
<div class="video-container"> <iframe src="YOUR_VIDEO_URL" frameborder="0" allowfullscreen></iframe></div>
Using Plugins for Responsive Videos
Alternatively, some plugins automatically handle responsiveness. For example, plugins like Jetpack or WP YouTube Lyte optimize videos for mobile and various screen sizes without manual CSS tweaking.
Best Practices for Responsive Video Styling
- Always test your videos on multiple devices and screen sizes.
- Use aspect ratios that match your content style; 16:9 is common, but 4:3 or square can work too.
- Combine responsiveness with your custom styling for a cohesive look.
By making your videos responsive, you’re ensuring that every visitor, no matter their device, can enjoy your content comfortably. It’s a small change that has a big impact on your site’s professionalism and user satisfaction!
7. Tips for Optimizing Video Performance and Load Times
When it comes to embedding videos on your WordPress site, performance matters. Nobody likes a slow-loading page, especially when they’re eager to watch your awesome content. So, let’s go over some practical tips to keep your videos snappy and your visitors happy.
1. Use a Reliable Hosting Service or CDN
If you’re hosting videos directly on your server, make sure your hosting plan can handle the bandwidth. For larger sites, consider using a Content Delivery Network (CDN) like Cloudflare or StackPath. CDNs distribute your video content across multiple servers worldwide, reducing load times for visitors no matter where they are.
2. Compress Your Videos
Large video files can bog down your site. Use tools like HandBrake or Adobe Media Encoder to compress your videos without sacrificing too much quality. Aim for a balance — smaller files, faster load times, and still decent viewing experience.
3. Choose the Right Format
MP4 (H.264 codec) is widely supported and offers a good mix of quality and compression. Using the right format ensures your videos load quickly and play smoothly across different browsers and devices.
4. Enable Lazy Loading for Videos
Lazy loading delays loading videos until they are about to enter the viewport. This reduces initial page load time. WordPress plugins like Lazy Loader or native lazy loading attributes (loading=”lazy”) can help you implement this easily.
5. Optimize Your Video Player Settings
If you’re using third-party video players like YouTube or Vimeo, customize their settings for better performance. Disable auto-play, reduce buffering, and set appropriate resolution options. Sometimes, embedding a smaller thumbnail with a click-to-play feature can improve perceived performance.
6. Limit Autoplay and Looping
Autoplay videos can cause your site to load larger files upfront, which isn’t ideal. Instead, let visitors choose when to watch. This keeps your page lean and speeds up the initial load.
7. Regularly Monitor and Test
Use tools like Google PageSpeed Insights or GTmetrix to check your pages’ load times and see how videos impact performance. Regular testing helps you spot issues early and adjust your strategies accordingly.
8. Troubleshooting Common Issues When Adding Video Clips
Sometimes, despite your best efforts, things don’t work as planned. Don’t worry — most issues are fixable with a little troubleshooting. Here are some common problems and how to resolve them:
1. Video Not Playing or Showing a Blank Screen
- Check the video URL or embed code: Make sure it’s correct and accessible.
- Verify the video format: Ensure it’s supported by your browser and hosting setup.
- Inspect browser console: Look for errors related to media or security restrictions.
- Test on different browsers and devices: Sometimes, compatibility issues cause playback problems.
2. Slow Loading or Buffering
- Optimize your videos: Compress and use the right format.
- Implement lazy loading: Delay loading until needed.
- Use a CDN: Distribute your videos closer to your visitors.
- Check your hosting plan: Ensure it’s capable of handling video traffic.
3. Video Not Resizing Correctly
- Inspect your embed code or shortcode: Ensure width and height are set appropriately.
- Use responsive video containers: Wrap your video in a div with CSS styles like max-width: 100%; height: auto; to make it adapt to different screen sizes.
- Clear cache: Sometimes, styling changes don’t appear immediately due to caching plugins or browser cache.
4. Audio Not Working
- Check the volume settings: Make sure the volume isn’t muted or set too low.
- Test on different devices: The problem might be device-specific.
- Verify your embed code: Ensure it includes audio support.
5. Compatibility Issues with Plugins or Themes
- Disable conflicting plugins: Temporarily deactivate plugins to identify conflicts.
- Update your plugins and themes: Compatibility issues often stem from outdated software.
- Use default themes: Switch to a default WordPress theme to test if your theme is causing conflicts.
By keeping these tips in mind and knowing how to troubleshoot, you’ll be well on your way to creating a smooth, engaging video experience on your WordPress site. Remember, patience and a little experimentation go a long way in resolving most issues!
Conclusion and Best Practices for Managing Video Content in WordPress
Effectively managing video content in WordPress enhances user engagement, improves site performance, and ensures a seamless viewing experience. To achieve these goals, it’s important to follow some key best practices. First, always optimize your videos for web use by compressing files without sacrificing quality. This reduces load times and prevents slow page performance.
Next, consider the hosting method: self-hosted videos can slow down your site, so using reliable third-party platforms like YouTube or Vimeo can be beneficial. Embed videos using the provided embed codes or plugins to streamline management. When styling your videos, use CSS to create consistent appearance and responsiveness across devices, such as setting max-width and height properties for mobile compatibility.
It’s also crucial to implement accessibility features like captions and transcripts, making your content inclusive. Additionally, utilize SEO best practices by adding descriptive titles, alt text, and relevant tags to your videos. Regularly update your video content to keep it fresh and relevant, and monitor analytics to understand viewer engagement and preferences.
Finally, always back up your media library and keep your plugins and themes up to date to ensure security and compatibility. By adhering to these best practices, you can create a dynamic, engaging, and well-managed video experience for your WordPress audience.
In summary, thoughtful planning, optimization, and ongoing management are key to successfully integrating videos into your WordPress site, ultimately boosting your website’s effectiveness and user satisfaction.