If you’ve ever visited your WordPress site only to be greeted with a blank page and a message saying “There has been a critical error on this website,” you’re not alone. It’s a frustrating experience, especially when your site suddenly becomes inaccessible. But don’t worry—this error is a common issue that many WordPress users face at some point. The good news is that with a little patience and some troubleshooting, you can usually fix it yourself. In this post, we’ll explore what causes these critical errors and how you can resolve them to get your website back up and running smoothly.
Common Causes of Critical Errors in WordPress
Critical errors on WordPress sites can pop up for various reasons, often related to issues with themes, plugins, or server configurations. Here are some of the most common culprits:
- Plugin Conflicts: Sometimes, a plugin may not be compatible with your current WordPress version or conflict with another plugin, triggering a critical error.
- Theme Issues: An outdated or poorly coded theme can cause errors, especially after updates or changes.
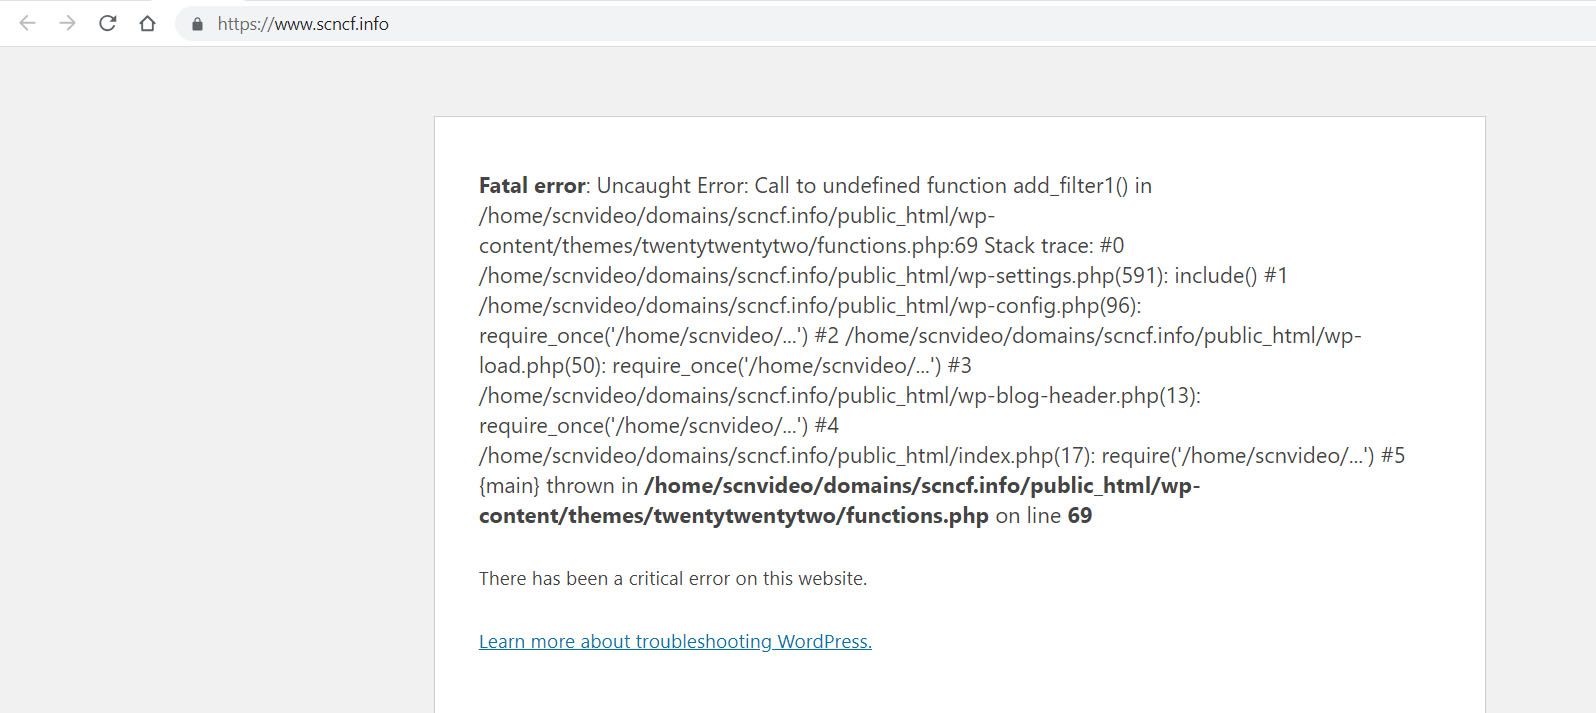
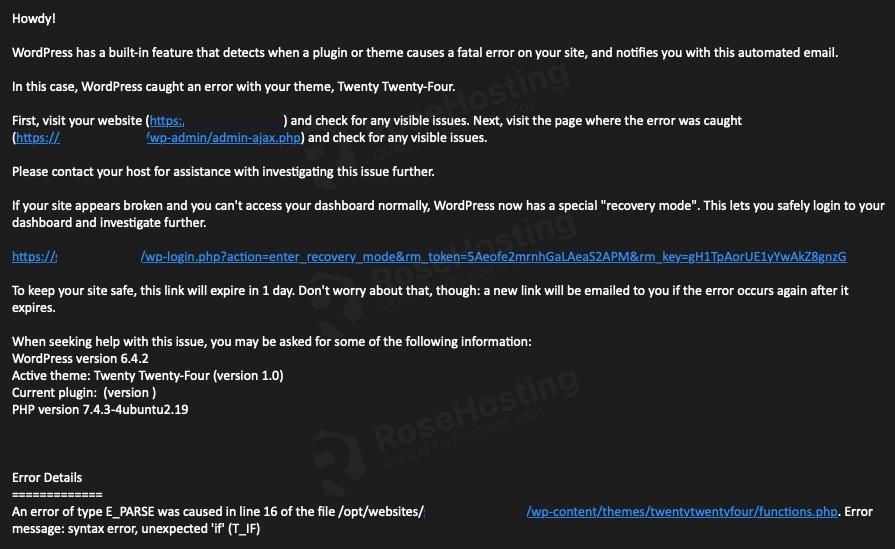
- PHP Errors: WordPress relies on PHP, and coding mistakes or incompatibilities in PHP version can cause critical failures.
- Corrupted Core Files: If core WordPress files become corrupted during an update or due to server issues, errors can occur.
- Server Configuration Problems: Incorrect server settings or issues with your hosting provider can also lead to critical errors.
Understanding these common causes can help you narrow down the source of the problem, making it easier to fix. Sometimes, the issue is as simple as a plugin update gone wrong, while other times it might require deeper technical troubleshooting. Next, we’ll look at some practical steps to diagnose and resolve these errors effectively.
3. Step-by-Step Guide to Troubleshoot and Resolve the Error
Facing a critical error on your WordPress site can be pretty nerve-wracking, but don’t worry—there’s a systematic way to troubleshoot and fix it. Let’s walk through a simple, step-by-step process to get your site back up and running smoothly.
Step 1: Switch to a Default Theme
Your theme might be causing the issue. To test this, switch to a default WordPress theme like Twenty Twenty-Three. You can do this easily via your hosting dashboard or by accessing your site files through FTP:
- Navigate to wp-content/themes
- Rename your active theme’s folder (e.g., from my-theme to my-theme-backup)
- WordPress will automatically fallback to a default theme if available
If the site loads without the error, your theme was likely the culprit. Consider updating or replacing it.
Step 2: Deactivate Plugins
Plugins are often the root cause of critical errors. To check if a plugin is causing the issue:
- Access your site’s files via FTP or File Manager.
- Navigate to wp-content/plugins.
- Rename the plugins folder to plugins_backup.
- Then, create a new folder named plugins.
- Move each plugin folder back one at a time, activating plugins individually.
- Refresh your site after activating each plugin to identify the problematic one.
If the error appears after activating a specific plugin, consider updating, replacing, or deleting it.
Step 3: Enable Debug Mode
Turning on debug mode helps identify the actual error message. To do this:
- Access your wp-config.php file.
- Find the line that says / That’s all, stop editing! Happy publishing. /.
- Add the following lines just above it:
define('WP_DEBUG', true);define('WP_DEBUG_LOG', true);define('WP_DEBUG_DISPLAY', false);
Save the file and reload your site. Check the wp-content/debug.log file for detailed error messages, which can help pinpoint the problem.
Step 4: Fix or Replace the Faulty Component
Once you identify the cause, take appropriate action:
- If a plugin is faulty, update or replace it.
- If a theme is causing issues, switch to a default theme and consider updating or reinstalling your theme.
- If core files are corrupted, consider reinstalling WordPress manually or via your hosting dashboard.
Remember to revert debug mode to false once you’re done troubleshooting to keep your site secure.
Step 5: Clear Cache and Test
After making changes, clear your browser cache and any caching plugins or server caches you might have. Then, visit your website to see if the critical error is gone. If it’s fixed, great! If not, move on to debugging tools or seek professional help.
4. How to Use Debugging Tools to Identify the Issue
Debugging tools are your best friends when it comes to figuring out what’s causing that critical error. They provide detailed insights that can save you hours of guesswork. Here’s how you can leverage these tools effectively.
Using the Built-in WordPress Debugging
As we touched on earlier, enabling WP_DEBUG is the first step. When activated, WordPress will log errors to a file, typically located at wp-content/debug.log. Here’s what to do:
- Edit your wp-config.php file.
- Set
define('WP_DEBUG', true);anddefine('WP_DEBUG_LOG', true);. - Visit your site and reproduce the error.
- Check the debug.log file for detailed error messages.
This log can reveal PHP errors, deprecated functions, or conflicts that aren’t immediately visible.
Using Browser Developer Tools
Sometimes, the issue could be with scripts or CSS conflicts. Open your browser’s developer console (usually by pressing F12 or right-clicking and choosing “Inspect”) and look for:
- Console Errors: JavaScript errors that might break site functionality.
- Network Tab: Failed requests or resources not loading properly.
This quick check can point you toward frontend issues or missing files that could be contributing to the error.
Employing Debugging Plugins
If you prefer a more user-friendly approach, consider installing debugging plugins like:
- Query Monitor: Provides comprehensive debugging info, including database queries, PHP errors, hooks, and more.
- Debug Bar: Adds a debug menu to the WordPress admin bar, offering insights into PHP errors, cache, and queries.
These plugins display real-time info right within your admin dashboard, making it easier to identify conflicts or issues quickly.
Using External Debugging Tools
For advanced troubleshooting, tools like Xdebug (a PHP extension) can be installed on your server. Xdebug provides detailed stack traces and profiling info, which is especially useful when dealing with complex bugs.
Note: Setting up Xdebug requires some server access and technical know-how, but it’s a powerful resource if you’re comfortable with it.
Interpreting the Data and Taking Action
Once you gather error messages or clues from these tools, look them up online. Many WordPress errors are common and have documented solutions. Use forums, the official WordPress support site, or developer resources to interpret the logs and errors.
Remember, the key is to approach debugging systematically: identify the error, research it, and then apply the fix. If you’re ever stuck, don’t hesitate to ask for help from a developer or support community!
5. Restoring Your Website from Backup if Necessary
If you’ve tried everything and your website still isn’t functioning properly, restoring from a backup might be your best bet. Think of it as hitting the reset button — bringing your site back to a previous, healthy state. But before you do anything, make sure you have a recent backup. If you don’t, it’s worth setting up a backup system for future safety.
Here’s a simple step-by-step on how to restore your WordPress site from a backup:
- Identify your backup source: Did you use a plugin like UpdraftPlus, BackWPup, or a hosting provider’s backup feature? Find the most recent backup file.
- Download the backup files: Ensure you have access to the backup files on your computer or cloud storage.
- Access your hosting control panel: Log into your hosting account (like cPanel or similar).
- Use the backup restore feature: Many hosting providers offer a one-click restore option. If you’re using a plugin, navigate to its restore section.
If you’re restoring manually, here’s what to do:
- Upload your database backup: Use phpMyAdmin to import your database SQL file. Make sure to select your site’s database and click “Import.”
- Replace WordPress files: Use an FTP client (like FileZilla) to upload your backed-up WordPress files, overwriting the existing ones.
- Update configuration if needed: Check your wp-config.php file for correct database credentials.
Important: Always make sure to back up your current site before restoring, just in case something goes wrong during the process. Once the restore is complete, clear your browser cache and check your website thoroughly. If the critical error persists, it might be time to consult a professional developer or your hosting support team.
6. Preventative Measures to Avoid Future Critical Errors
The best way to handle critical errors is to prevent them from happening in the first place. Here are some practical tips you can implement to keep your WordPress site healthy and avoid those dreaded critical errors:
1. Keep Everything Updated
WordPress core, themes, and plugins should always be up-to-date. Developers release updates to fix bugs, patch security vulnerabilities, and improve compatibility. Set your site to update automatically if possible, or check regularly.
2. Use Reliable Plugins and Themes
Not all plugins or themes are created equal. Stick with reputable, well-reviewed options from trusted sources. Avoid installing too many plugins, especially ones you don’t need, as they can conflict or introduce vulnerabilities.
3. Regular Backups
Set up automated backups with plugins like UpdraftPlus or through your hosting provider. Store backups off-site (cloud storage, Dropbox, etc.) so you can restore quickly if needed.
4. Test Changes in a Staging Environment
If your host offers staging sites, use them to test updates or new plugins before applying those changes to your live site. It’s a safe space to catch issues early without affecting your visitors.
5. Monitor Your Site’s Health
Tools like Google Search Console, uptime monitoring services, and security plugins can alert you to problems early. The sooner you catch issues, the easier they are to fix.
6. Limit Plugin and Theme Changes
Only install plugins and themes that are actively maintained and compatible with your version of WordPress. Remove any unused or outdated plugins to minimize potential conflicts.
7. Implement Security Measures
Use security plugins like Wordfence or Sucuri to protect your site from malicious attacks, which can cause critical errors or data loss.
8. Keep an Eye on Error Logs
Regularly review your server’s error logs to spot issues early. Many hosting providers offer access to logs through their control panels.
By following these preventative steps, you’ll significantly reduce the chances of encountering critical errors, ensuring your website stays up, running, and secure for your visitors. Remember, a proactive approach is always better than reactive fixes!
7. When to Seek Professional Help for WordPress Critical Errors
While many small issues on your WordPress site can be tackled with a bit of troubleshooting, there are times when it’s best to call in the experts. Recognizing these moments can save you a lot of frustration and prevent further damage to your site.
So, when should you consider seeking professional help? Here are some key signs:
- Persistent or Recurrent Errors: If you’ve tried basic fixes like disabling plugins or switching themes and the error keeps coming back, it might be time to get a pro involved.
- Complex Database Issues: Problems involving database corruption or complex SQL errors can be tricky to resolve without proper tools and expertise.
- Data Loss or Backup Failures: If your site is experiencing data loss or backup errors, professionals can help recover your data safely and implement better backup strategies.
- Server or Hosting-Related Problems: Sometimes, the issue stems from server misconfigurations or hosting limitations. Your hosting provider or an experienced developer can diagnose and resolve these.
- Security Breaches or Malware: Critical errors might be a symptom of malware infection or security breaches. Professionals can thoroughly scan, clean, and secure your site.
- Lack of Technical Skills or Time: If you’re not comfortable with troubleshooting, or simply don’t have the time, hiring a WordPress expert is a smart move.
Remember, attempting to fix a critical error without sufficient knowledge can sometimes make things worse. When in doubt, consulting a professional ensures your site gets the attention it needs without risking additional issues.
Finding the right help can be as simple as reaching out to a trusted developer or using reputable WordPress support services. Investing in professional assistance might cost a bit upfront, but it often saves you money and headache in the long run.
8. Conclusion and Tips for Maintaining a Healthy WordPress Site
Dealing with a critical error on your WordPress site can be stressful, but with the right approach, you can fix the issue and keep your website running smoothly. Remember, prevention is always better than cure, so adopting good maintenance habits is key to avoiding future headaches.
Here are some essential tips to help you maintain a healthy WordPress site:
| Tip | Description |
|---|---|
| Regular Backups | Always keep backups of your site. Use plugins like UpdraftPlus or BackupBuddy to automate backups and store them safely off-site. |
| Keep Everything Updated | Update WordPress core, themes, and plugins regularly. Updates often include security patches and bug fixes that protect your site. |
| Use Trusted Plugins and Themes | Only install plugins and themes from reputable sources. Regularly review and delete unused or outdated ones. |
| Implement Security Measures | Install security plugins like Wordfence or Sucuri Security, use strong passwords, and enable two-factor authentication. |
| Monitor Site Performance and Errors | Use tools like Google Search Console or website monitoring services to catch issues early and keep your site healthy. |
Finally, stay informed about WordPress best practices and community updates. Being proactive helps you prevent most critical errors before they happen.
Remember, your website is often your first impression for visitors and customers. Taking the time to maintain it properly ensures it remains secure, fast, and reliable. If you ever find yourself overwhelmed, don’t hesitate to reach out to professionals—your site’s health depends on it!