In today’s globalized world, reaching audiences in their native language can make a huge difference for your website’s success. Luckily, WordPress makes it pretty straightforward to build multi-language sites, even if you’re not a developer. Whether you’re running a small blog, a business site, or an online store, offering content in multiple languages can boost engagement, improve user experience, and open doors to international markets. In this guide, we’ll explore how to add translations to your navigation menus, ensuring your visitors can effortlessly switch between languages and find what they’re looking for.
Understanding the Importance of Translatable Navigation Menus
When you think about a great website, one of the first things users notice is the navigation menu. It’s like the map that guides visitors through your content. Now, imagine visiting a site where the navigation is only in one language — it can feel limiting or confusing for non-native speakers. That’s why having translatable navigation menus isn’t just a nice-to-have; it’s essential for creating an inclusive, user-friendly experience.
Here’s why translatable navigation menus matter:
- Improved User Experience: Visitors can easily find what they’re looking for in their preferred language, reducing frustration and bounce rates.
- Enhanced Accessibility: Multi-language navigation makes your site accessible to a broader audience, including international users.
- SEO Benefits: Search engines favor sites that serve relevant content to different regions and languages, boosting your visibility.
- Professional Appearance: A site that seamlessly switches between languages feels more polished and trustworthy.
Think of your navigation menu as the backbone of your website’s structure. When it’s easy to understand and navigate, visitors stay longer, explore more, and are more likely to convert. Ensuring that your menus are translatable is a key step in creating a truly multi-language website that feels natural and welcoming to everyone, regardless of their language background.
3. Choosing the Right Multi-Language Plugin for WordPress
When it comes to making your WordPress website accessible to a global audience, selecting the right multi-language plugin is a crucial first step. There are plenty of options out there, but not all will fit your specific needs. So, how do you pick the best one? Let’s walk through some key considerations to keep in mind.
First, think about ease of use. If you’re not a developer, you’ll want a plugin that’s user-friendly and straightforward to set up. Many popular options come with intuitive interfaces that make translating menus and navigation links a breeze.
Second, consider compatibility. Your plugin should work seamlessly with your current theme and other plugins. Check the plugin documentation and reviews to ensure there are no known conflicts.
Third, look at features. For navigation translation, features like menu synchronization, language switchers, and automatic detection can really enhance the user experience. Some plugins also support manual translations for more control, while others offer automatic translation powered by AI or third-party services.
Next, evaluate performance. A bulky plugin can slow down your website, so opt for lightweight options that won’t impact load times significantly.
Finally, consider support and updates. A well-maintained plugin with active support can save you headaches down the road. Check the plugin’s update history and user reviews to gauge reliability.
Some popular multi-language plugins worth exploring include:
- WPML – The veteran in the field, ideal for complex sites needing robust translation management.
- Polylang – Free and flexible, perfect for small to medium sites with simple navigation needs.
- TranslatePress – Visual and user-friendly, great for translating menus directly from the frontend.
Take your time to explore these options, maybe even test a few in a staging environment, to see which one feels right for your website. The goal is to find a plugin that makes adding translations to your navigation as smooth as possible without sacrificing website performance or user experience.
4. Step-by-Step Guide to Adding Translations to Your WordPress Navigation
Now that you’ve chosen your multi-language plugin, it’s time to get hands-on and add translations to your website’s navigation. Don’t worry—it’s simpler than you might think! Here’s a step-by-step guide to walk you through the process.
Step 1: Install and Activate Your Chosen Plugin
First things first, head over to your WordPress dashboard, navigate to Plugins > Add New, and search for your selected plugin (e.g., WPML, Polylang, or TranslatePress). Install and activate it. Most plugins will prompt you to configure initial settings after activation.
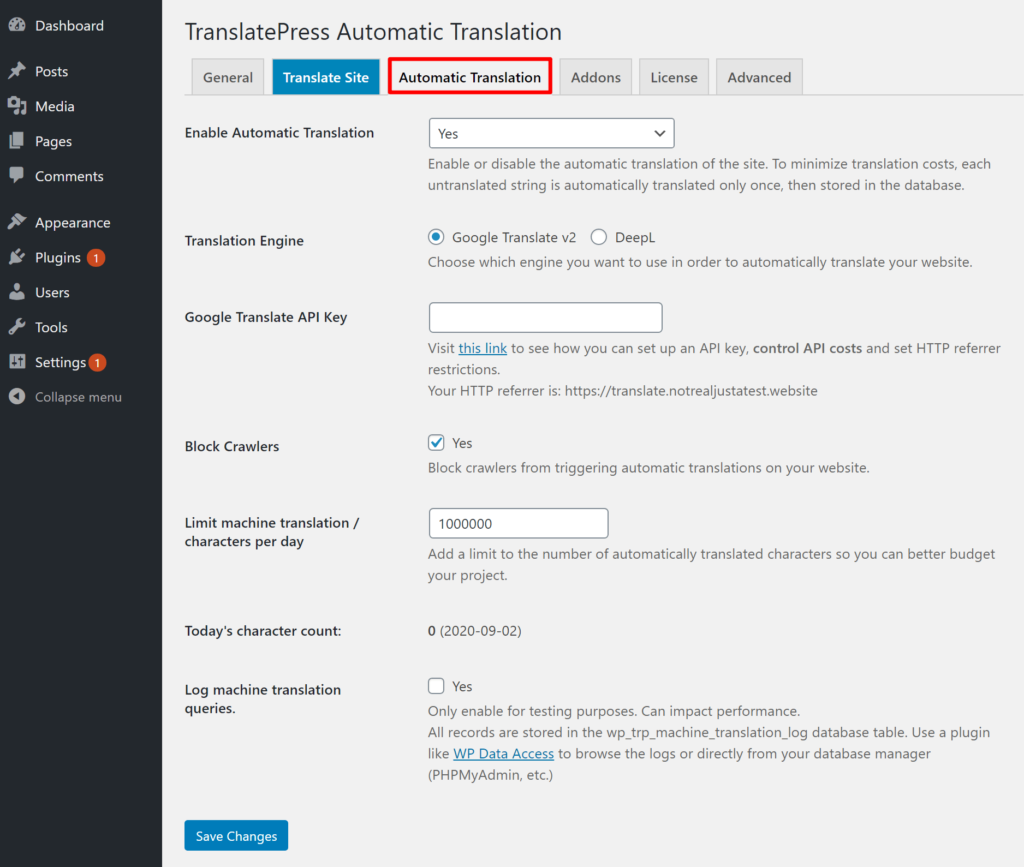
Step 2: Configure Basic Settings
Follow the plugin’s setup wizard or go to its settings page. Here, you’ll typically:
- Select the default site language.
- Add additional languages you want to support.
- Set up language switchers if available.
This setup ensures your site recognizes multiple languages and provides options for visitors to select their preferred language.
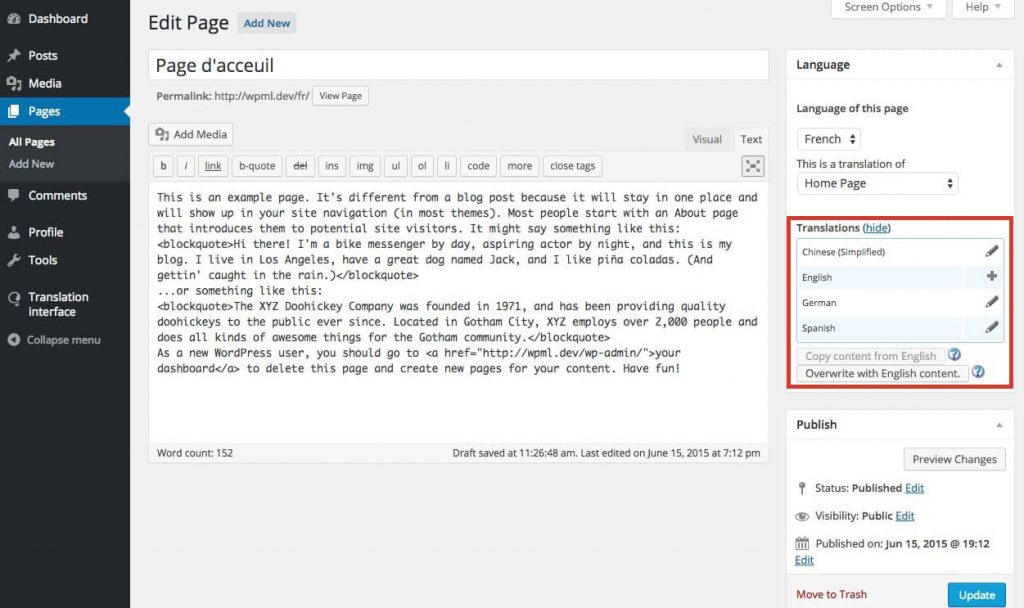
Step 3: Translate Your Navigation Menus
Next, navigate to Appearance > Menus. You’ll see your existing menus, but now, with multi-language support, you’ll have options to add translations.
- Select the menu you want to translate.
- For each language, create a duplicate menu or translate existing menu items.
- Make sure to translate menu labels, links, and any other relevant items to match each language.
Some plugins, like WPML, allow you to directly translate menus from the menu management page, while others might require you to create separate menus per language.
Step 4: Assign Menus to Language-Specific Locations
Once your translated menus are ready, assign them to the correct language-specific theme locations. For example, your English menu goes to the primary location for English visitors, and your French menu to the French section.
Step 5: Add a Language Switcher to Your Site
To let visitors switch between languages easily, add a language switcher widget or menu. Most plugins provide a widget you can drag into your sidebar or footer, or a menu you can place in your header. Customize its appearance to match your site’s design.
Step 6: Test Your Translations
Finally, visit your website in different languages or use incognito mode to test the navigation. Ensure the menus display correctly, links lead to the right pages, and the switcher works smoothly. Make adjustments as needed.
And that’s it! With these steps, you’ll have a fully functional, multi-language navigation system that helps your international visitors navigate your site comfortably. Remember, maintaining translations is an ongoing process, so revisit and update your menus as your website grows and evolves.
5. Best Practices for Managing Multi-Language Navigation Menus
When it comes to running a multi-language website, your navigation menus are like signposts guiding visitors to the content they’re most interested in. Managing these menus effectively can make a huge difference in user experience and overall site professionalism. Here are some best practices to keep your navigation clean, intuitive, and user-friendly across all languages.
Keep Consistent Structure
Ensure that your menus follow a similar structure in every language. For example, if you have “Home,” “About Us,” “Services,” and “Contact” in your English menu, aim to have the same order and hierarchy in your other language menus. This consistency helps users find what they’re looking for quickly, regardless of their language.
Use Clear and Contextually Appropriate Translations
It’s tempting to rely on machine translation tools, but for navigation labels, it’s best to use professional translations or native speakers. Clear, culturally appropriate labels improve usability and avoid confusion. Remember, a label like “Shop” might translate differently depending on the region, so double-check for context.
Organize Menus with Logical Hierarchies
Break down complex menus into logical categories and subcategories. Use dropdowns wisely to keep the main menu uncluttered. For multi-language sites, make sure submenus are also properly translated and structured similarly across languages.
Leverage Plugins for Easy Management
If you’re using translation plugins like WPML or Polylang, take advantage of their menu management features. They often allow you to create separate menus for each language or translate menus directly. This makes updates more manageable and keeps your site organized.
Test Across Devices and Languages
Always test your multi-language menus on different devices and browsers. Check that menu items display correctly and that translations make sense. Sometimes, a menu that looks perfect on desktop might be cluttered or cut off on mobile, so keep mobile responsiveness in mind.
Keep Navigation Simple
Less is more. Avoid overwhelming visitors with too many options in each language. Focus on the most important pages and content. Well-organized, simple menus enhance navigation and encourage users to explore more.
6. Troubleshooting Common Issues with Translated Navigation
Even with the best intentions, you might run into some hiccups when managing translated navigation menus. Don’t worry—many issues are straightforward to fix once you know what to look for. Here’s a quick guide to common problems and how to troubleshoot them.
Issue: Missing Menu Items in a Language
Cause: Sometimes, menu items don’t appear in the translated version because they weren’t properly assigned or translated.
- Check your translation plugin’s menu settings.
- Ensure each menu is assigned to the correct language.
- Verify that you’ve translated all menu labels.
Issue: Language Switcher Not Displaying Correctly
Cause: The language switcher might not be configured properly or conflicting with your theme.
- Double-check the plugin’s settings for the switcher placement.
- Make sure the switcher is enabled on all pages.
- Test on different devices to see if styling issues are causing display problems.
Issue: Translated Menus Overlapping or Not Formatting Properly
Cause: CSS conflicts or theme issues can cause layout problems.
- Inspect the menu with browser developer tools to identify CSS conflicts.
- Adjust your theme’s styling or add custom CSS to fix layout issues.
- Ensure your theme is compatible with your translation plugin.
Issue: Translations Not Saving or Updating
Cause: Permission issues or plugin conflicts might prevent saving translations.
- Clear your site cache and browser cache.
- Update your plugins and WordPress core to the latest versions.
- Check file permissions on your server if necessary.
Helpful Tips:
- Always keep backups before making significant changes.
- Use staging environments to test updates or fixes.
- Consult your plugin’s documentation or support forums—they often have specific solutions for common issues.
Managing multi-language navigation can be a smooth process once you understand these common pitfalls and how to troubleshoot them. With patience and attention to detail, your visitors will enjoy a seamless browsing experience in their preferred language!
7. Additional Tips for Optimizing Your Multi-Language Website’s Navigation
Creating a multi-language website is a fantastic way to reach a broader audience, but just translating your content isn’t enough. To truly make your site user-friendly and accessible, you’ll want to optimize your navigation for all visitors, no matter their language or device. Here are some handy tips to take your multi-language navigation to the next level:
Keep Navigation Consistent Across Languages
Consistency helps users feel comfortable as they navigate your site. Use similar menu structures, iconography, and terminology across all languages. For example, if you have a “Contact Us” link in English, translate it accurately and place it in the same position in every language menu. This familiarity reduces confusion and makes exploring your site a breeze.
Use Clear and Recognizable Labels
Even when translating menu items, aim for clarity. Avoid overly complex or literal translations that might confuse visitors. Sometimes, a simple icon or universally understood symbol (like a magnifying glass for search) complements text, especially if your audience includes non-native speakers.
Implement Language Switcher Placement Strategically
The language switcher should be easy to find, ideally in the top header or a prominent spot on your site. Test different placements—left, right, or center—to see which works best for your visitors. Remember, a well-placed switcher encourages users to explore your content in their preferred language without frustration.
Optimize for Mobile Devices
Many users browse on smartphones or tablets, so ensure your navigation menus are mobile-friendly. Use responsive design techniques so menus adapt smoothly to smaller screens. Consider using collapsible or hamburger menus for compact, clutter-free navigation.
Test Navigation in Multiple Languages
Don’t just assume everything works smoothly. Regularly test your site in all supported languages to check for broken links, incorrect translations, or layout issues. Getting feedback from native speakers can also help you spot nuances or cultural considerations that might improve user experience.
Leverage Analytics to Understand User Behavior
Use tools like Google Analytics to see how visitors navigate your site in different languages. Which menu items are most clicked? Are visitors dropping off on certain pages? This data can guide you to refine your navigation further, ensuring it aligns with user preferences.
8. Conclusion and Next Steps for Your Multi-Language WordPress Site
Congratulations! You’ve learned how to add translations to your WordPress navigation, making your website more accessible and user-friendly for visitors around the world. Remember, a well-structured navigation system not only improves usability but also boosts your site’s credibility and engagement.
As you move forward, here are some next steps to keep your multi-language website thriving:
- Regularly update translations: Languages evolve, and so should your content. Keep translations fresh and accurate.
- Gather user feedback: Ask your international visitors about their experience. Are the menus intuitive? Is there anything confusing?
- Monitor site performance: Use analytics to see how different language versions perform and identify areas for improvement.
- Stay informed about best practices: Web design trends and translation tools evolve. Keep your site optimized with the latest techniques and plugins.
- Expand your language offerings: As your site grows, consider adding more languages to reach even broader audiences.
Building a multi-language website is an ongoing journey, but with thoughtful navigation and continuous improvements, you’ll create an inclusive, engaging experience for users worldwide. Keep experimenting, listening to your audience, and refining your site—your global community will thank you!