WordPress themes are the backbone of your website’s visual appearance and layout. They provide the aesthetics, structure, and sometimes functionality to your site. With thousands of options available—from minimalist designs to elaborate layouts—choosing the right theme can profoundly impact your site’s user experience, functionality, and overall appeal. In this guide, we’ll explore the essentials of WordPress themes and how to safely change them to elevate your website.
Why Change Your WordPress Theme?
There are several compelling reasons to consider changing your WordPress theme. Whether you’re a novice or a seasoned website owner, adapting your theme can enhance your site’s performance and aesthetics. Here are a few key reasons:
- Fresh Look: Sometimes, an update or a change can breathe new life into your website, attracting visitors with a fresh design.
- Improved Functionality: New themes often come equipped with better features, offering more flexibility and functionality to your site.
- Mobile Responsiveness: With an increasing number of users accessing sites via mobile devices, a modern theme ensures that your site looks good on all screen sizes.
- Performance Enhancements: Older themes might be slow and bulky; switching to a lightweight theme can result in faster loading times.
- SEO Benefits: Many new themes are optimized for search engines, helping your website rank better in search results.
- Security: Keeping your theme updated is crucial; older themes may have vulnerabilities that could expose your site to risks.
Before you dive into changing your theme, it’s beneficial to assess what you currently have and what you’re looking for in the new one. This ensures that the transition is smooth and aligns with your website goals.
Preparing for Theme Changes
Before you dive into changing your WordPress theme, it’s essential to make some preparations. Think of this as laying the groundwork for a successful transition. By following these steps, you can reduce potential issues and ensure a smoother experience.
Here’s what you should do:
- Review Current Settings: Take a moment to look through the settings of your current theme. This includes widgets, menus, and customizations. Jot them down or take screenshots. You’ll want to replicate these settings later if necessary.
- Choose the Right Time: Timing can be everything when making changes. Ideally, choose a period when your website experiences the least amount of traffic. Late nights or weekends may be great options.
- Check Compatibility: Ensure that the new theme is compatible with your current plugins and WordPress version. A good practice is to check the theme documentation or reviews for any mention of common conflicts.
- Consider Child Themes: If you’re looking to make customizations, consider using a child theme. This separate theme inherits the functions and styling of the parent theme but allows you to make changes without affecting the original.
- Take a Screenshot of Your Site: Before making any changes, take a clear screenshot of your current website. This will serve as a reference point for how things used to look.
By following these steps, you’re not only preparing yourself but also your website for a seamless theme change. This way, when you finally hit that “Activate” button, you can do so with confidence!
How to Backup Your Website
Backing up your website might not be the most glamorous part of changing themes, but it’s undoubtedly one of the most crucial. A backup acts as a safety net, ensuring that if something goes wrong during or after the theme switch, your site can be restored to its previous state.
Here’s how you can back up your WordPress site effectively:
Methods for Backing Up:
- Manual Backup:
- Export Database: Using phpMyAdmin, you can export your database. Just select your database, click on “Export,” and follow the prompts.
- Download Files: Use an FTP client to download your entire WordPress directory to your computer.
- Using a Backup Plugin: There are many plugins available that simplify the backup process. Some popular options include:
- UpdraftPlus
- BackupBuddy
- VaultPress
- Hosting Provider Backups: Some hosting companies provide automatic backups as part of their service. Check with your hosting provider to see if this option is available.
After completing any of these backup methods, it’s wise to verify that your backup is functioning correctly. You can do this by attempting to restore a small part of your site to ensure everything saved properly.
Ultimately, a solid backup offers peace of mind. Yes, it takes a little time, but investing these moments now will save you from potential headaches down the road!
5. Exploring New Themes
So, you’ve decided it’s time for a change. Maybe your current WordPress theme feels outdated, or perhaps you’re just looking for something fresh to captivate your audience. Exploring new themes can be an exciting part of the website redesign process, and there are several great places to start!
First, you can browse the official WordPress Theme Directory. Here, you will find thousands of themes, many of which are free! Use the filtering options to narrow down your choices by features, layout, or purpose. Looking for a clean blog theme? Or perhaps an e-commerce option? You’re likely to find a treasure trove of choices!
Another option is to check out third-party theme marketplaces like ThemeForest or Elegant Themes. These platforms often offer premium themes with additional features and support. They usually come with more customization options and a unique touch, making it easier to stand out in a crowded online space.
Consider joining WordPress-focused communities or forums like Reddit’s r/Wordpress or the WordPress Support Forums. Here, you can request recommendations based on your specific needs, or even learn about upcoming themes being developed by the community.
Lastly, when exploring new themes, always read user reviews and check the theme’s update history. A theme that is regularly updated is more likely to be secure and compatible with the latest WordPress version. Remember, the goal is to find a theme that aligns with your brand aesthetics while being functional and user-friendly!
6. Installing a New Theme
Once you’ve found the perfect theme that resonates with your brand, it’s time for the exciting part: installing it! The process is relatively simple, but taking a few precautions can ensure everything goes smoothly.
1. Backup Your Site: Before you dive into the installation process, it’s vital to back up your existing site. Use plugins like UpdraftPlus to create a full backup. This way, if anything goes wrong, you can easily restore your site to its previous state.
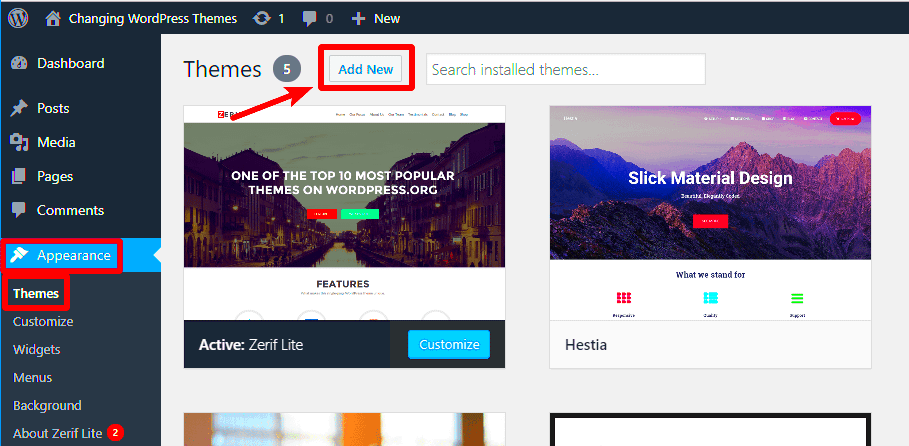
2. Login to Your Dashboard: Head over to your WordPress admin area. Navigate to Appearance > Themes. Here, you’ll see your current theme along with options to add new ones.
3. Add New Theme: Click on the Add New button. You can either search for the theme you want or upload a theme you’ve downloaded from a third-party site. If you’re uploading, click the Upload Theme button and select the theme file from your computer.
4. Install and Activate: After selecting the theme, click on the Install Now button. Once it’s installed, the option to activate will appear. Click Activate to make your new theme live on your site!
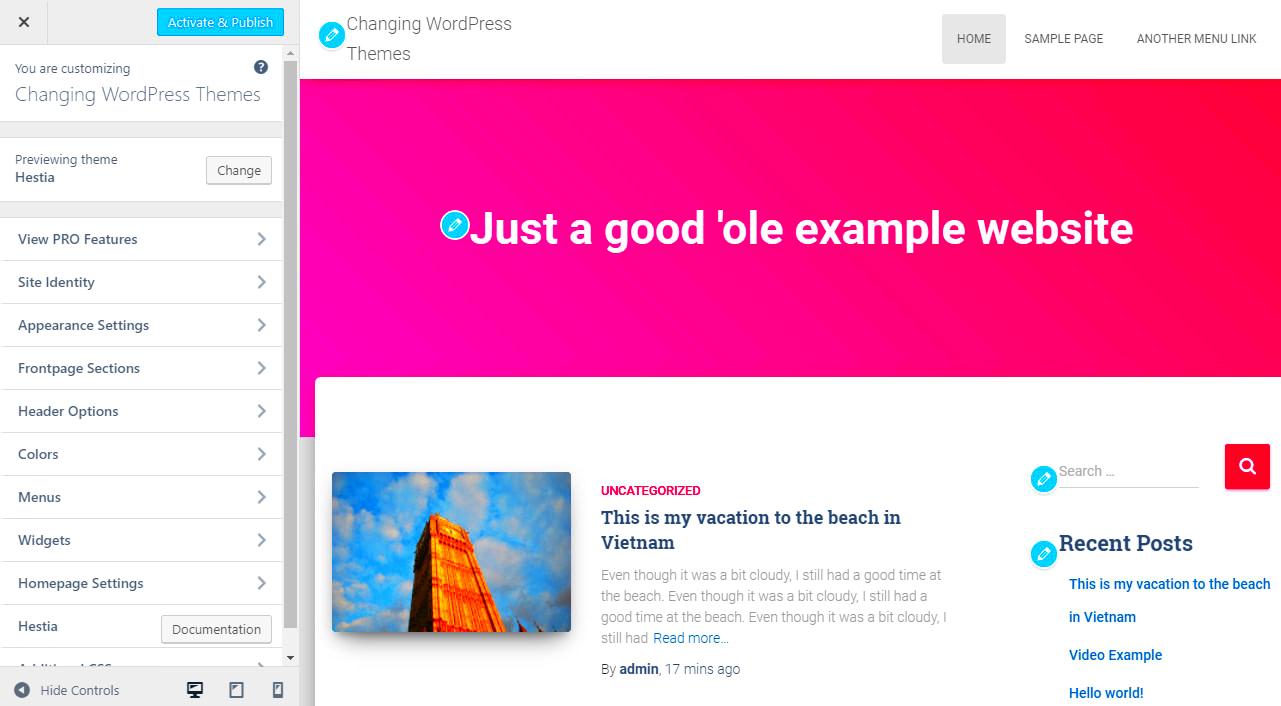
5. Customize Your Theme: After activation, navigate to Appearance > Customize to begin personalizing your theme. Here, you can adjust your site’s colors, typography, layout, and various other elements that represent your brand best.
6. Check Your Site: Finally, make sure to visit your website front-end and see if everything looks fine. Check for any issues in layout or functionality.
In conclusion, installing a new theme can open doors to a more lovely and functional website. Just remember to backup and proceed with caution!
7. Customizing Your New Theme
Congratulations! You’ve successfully changed your WordPress theme and are now basking in the fresh new look of your site. But wait, it doesn’t stop there! Customizing your new theme is where the real magic happens. This is your chance to inject your personality into your website and make it truly yours.
First off, let’s talk about the customizing features you might encounter in your WordPress dashboard. These typically include:
- Site Identity: Here, you can add your site title, tagline, and logo. Make sure to keep them relevant and aligned with your brand.
- Colors: This section allows you to choose your primary colors, ensuring that they fit your brand’s palette.
- Header & Footer Settings: Customize what appears in your header and footer, such as menus, widgets, or additional text.
- Typography: Don’t underestimate the power of good fonts! Choose appealing font styles and sizes that enhance readability and aesthetics.
- Layout Options: Depending on your theme, you might have various layout choices, such as grid or list format for blog posts.
Once you’ve made changes, remember to preview them before they go live. This step is crucial to ensure everything looks just right. And don’t forget to frequently save your changes! Customizing can be a time-consuming process, but it’s so rewarding when your website reflects your unique vision.
8. Testing Your New Theme
Now that you’ve customized your new WordPress theme, it’s time for an essential step: testing. Testing ensures that everything is functioning correctly and that your users have a seamless experience on your site. After all, you want your visitors to enjoy their time on your blog or shop!
Here are some important aspects to test:
- Responsive Design: Check how your website looks on different devices, such as smartphones, tablets, and desktops. WordPress themes should be mobile-friendly, so make sure your content is just as appealing on smaller screens.
- Page Load Speed: Use tools like Google PageSpeed Insights to assess your site’s load time. A slow website can deter visitors.
- Functionality of Plugins: Ensure all your plugins are working harmoniously with the new theme. Sometimes, certain themes can conflict with plugins, leading to errors or sluggish performance.
- SEO Settings: Conduct a quick review of your SEO settings. Ensure that SEO titles, meta descriptions, and other elements are still intact after the theme change.
- User Experience: Navigate through your site as if you were a visitor. Is it easy to find information? Are the menus intuitive? Gathering feedback from trusted friends or colleagues can also help in identifying navigation issues.
Once you’ve tested everything thoroughly, you can confidently launch your site with the new theme. Enjoy the process, and remember—it’s all about creating the best experience for your audience!
Troubleshooting Common Issues
Switching your WordPress theme can be exciting, but occasionally, you might run into some hiccups along the way. Don’t fret! Identifying and troubleshooting these common issues is part of the process and can be tackled effectively. Here are some issues you might encounter during a theme change and tips on how to fix them:
- Site Appearance Issues: If your site looks broken or messy after switching themes, it could be due to missing styles or JavaScript files. Check if the new theme is activated and whether you’ve properly imported any necessary customization options or demo content.
- Plugin Conflicts: Sometimes, your plugins might not play well with the new theme. If the site is behaving oddly, try disabling all plugins and reactivating them one by one to identify the troublemaker.
- Widgets Not Appearing: If your sidebar widgets have disappeared, this could be because some themes do not support the same widget locations. You may need to add them back manually in the Widgets section of the Customizer.
- Missing Menu Items: After changing themes, your menu might not appear as expected. You may need to recreate your menu and assign it to the new theme’s menu location via Appearance > Menus.
- Performance Sluggishness: If your site is running slowly, it might be due to unoptimized images or code from your previous theme. Consider optimizing images and using a caching plugin to speed things up.
By addressing these common concerns, you can ensure a smoother transition between themes and keep your site looking sharp and functioning well!
Conclusion and Best Practices
Changing your WordPress theme can seem daunting, especially if you’re new to the platform. However, with the right approach and a solid understanding of the process, you can enhance your website’s look and feel without too much hassle. Here are some best practices to keep in mind:
- Backup Your Site: Always back up your files and database before making any significant changes to your site. This way, you can restore it if things don’t go as planned.
- Read Theme Documentation: Familiarize yourself with the new theme’s documentation. Many themes come with specific installation and setup instructions that can help you maximize their features.
- Test Your Site: After switching themes, take the time to thoroughly test your website. Check on different devices and browsers to ensure consistency and functionality.
- Customize with Care: While personalization is key to branding, don’t overdo it. Keep the user experience in mind and aim for clean, user-friendly design adjustments.
- Stay Updated: Keep both your theme and plugins updated to the latest versions. This helps with security, performance, and compatibility with new versions of WordPress.
In conclusion, changing your WordPress theme can invigorate your website and enhance its functionality. With careful planning and adherence to best practices, you can make this transition an effortless and rewarding experience. Happy theming!

