WordPress themes are the backbone of your website’s appearance and functionality. They determine the layout, design, and overall user experience of your site. By understanding what themes are and how they work, you can make informed choices that will elevate your online presence. Whether you’re looking for a sleek portfolio, an engaging blog, or a robust e-commerce platform, there’s a theme tailored for your needs.
Choosing the Right Theme for Your Website

Selecting the right WordPress theme is a critical step in building your website. With thousands of options available, it can be overwhelming. However, by considering a few key factors, you can narrow down your choices and find the perfect theme for your project. Here’s a handy guide to help you through the process:
- Identify Your Purpose: Determine what your website will primarily focus on. Is it a blog, a business site, an online store, or a portfolio? Your theme should fit your goals.
- Consider Responsiveness: Make sure your theme is mobile-friendly. A responsive design ensures your website looks great on all devices, which is crucial in today’s mobile-centric world.
- Customization Options: Look for themes with easy customization features. You’ll want to make changes without diving deep into code.
- Loading Speed: Choose a lightweight theme that won’t slow down your site. Fast-loading websites improve user experience and SEO.
- SEO Friendliness: Opt for themes optimized for search engines. This will help you rank better and attract organic traffic.
- Check Reviews and Ratings: Before committing, read user reviews and check ratings for the themes you’re considering. This can provide insights into their reliability.
By taking these factors into account, you can confidently choose a theme that not only represents your brand but also enhances your website’s overall performance.
Installing a WordPress Theme via the Dashboard

If you’re looking to spruce up your website, installing a new WordPress theme directly through your dashboard is one of the easiest ways to do it. This method is perfect for beginners, as it doesn’t require any technical skills or additional tools. Ready to dive in? Let’s get started!
First things first, you’ll need to log in to your WordPress admin area. Once you’re logged in, follow these simple steps:
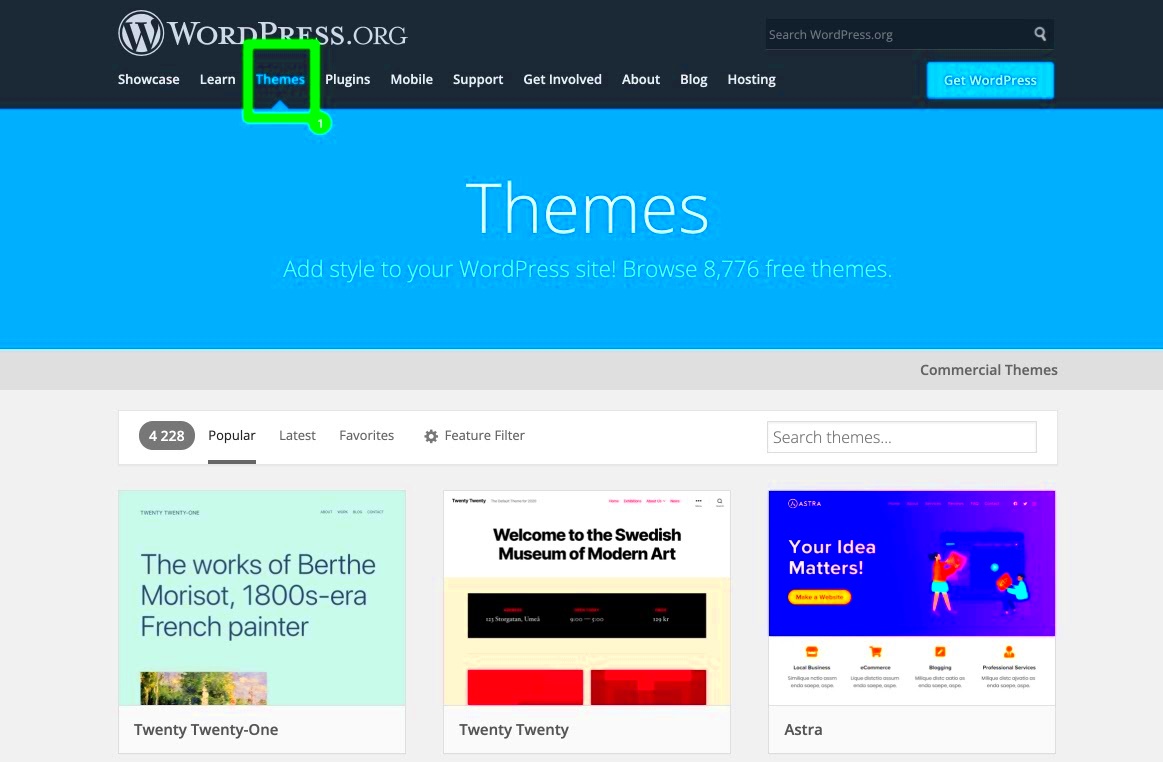
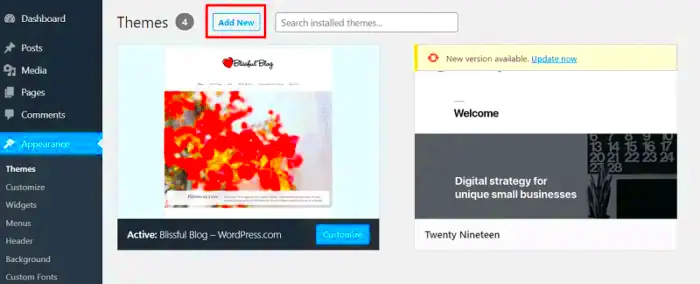
- Navigate to the Appearance Menu: On the left-hand side menu, hover over the “Appearance” option and click on “Themes.”
- Add New Theme: At the top of the Themes page, you’ll see an “Add New” button. Click on it to access the theme repository.
- Explore Theme Options: You can browse featured themes, popular themes, or search for a specific theme using the search bar. Take your time to find one that resonates with your website’s brand.
- Preview the Theme: Before you commit, click the “Preview” button to see how the theme looks. This step is crucial to ensure it fits your aesthetic.
- Install the Theme: Once you’ve found the perfect theme, just click on the “Install” button. After installation, you’ll have the option to activate the theme immediately.
And voilà! You’ve successfully installed a new WordPress theme through your dashboard. Now, you can head to the “Customize” section under Appearance to tweak different aspects of your new theme, such as colors, fonts, and layouts, to make it uniquely yours.
Installing a WordPress Theme Using FTP
If you have a specific theme that you’ve downloaded from a site outside the WordPress repository, you’ll need to use FTP (File Transfer Protocol) to install it. While this method sounds technical, it’s pretty straightforward once you get the hang of it! Let’s break it down together.
First, make sure you have an FTP client installed, like FileZilla, and that you have your FTP login credentials handy. Here’s how to install your theme via FTP:
- Connect to Your Server: Open your FTP client and enter your server’s host name, username, and password to connect.
- Navigate to WP Content: Once connected, navigate to
/wp-content/themes/in your WordPress installation directory. This is where all your theme files live. - Upload Your Theme: Locate the theme zip file you downloaded and extract it. Then, drag and drop the extracted folder into the
themesdirectory of your server. - Check Your Theme: After the upload is complete, log in to your WordPress dashboard, go to “Appearance” > “Themes.” You should see the newly uploaded theme there.
- Activate Your Theme: Click the “Activate” button to set your new theme live. You can customize it afterward to suit your style.
There you have it! Installing a WordPress theme using FTP might seem a bit daunting at first, but once you go through the process a couple of times, you’ll find it’s a handy skill to have in your toolkit. Happy theming!
Activating Your New Theme
Once you’ve found the perfect WordPress theme and uploaded it to your site, the next big step is activating that theme. This process is straightforward but crucial as it makes your new theme live for the world to see. So, let’s walk through the steps together!
Firstly, head over to your WordPress dashboard. From there, you’ll need to click on “Appearance” and then select “Themes.” In this section, you will see a collection of themes installed on your WordPress site, including the one you just uploaded.
Here’s how to activate your theme:
- Find the theme you want to activate. Look for the thumbnail of your new theme.
- Hover over the theme’s thumbnail, and you should see an “Activate” button appear.
- Click that button, and voilà! Your new theme is now active.
After activating, it’s always a good practice to visit your website. Just click on your site’s name at the top left of the dashboard to see how your new theme looks. Keep an eye out for any layout issues or elements that might not fit your vision.
Lastly, don’t hesitate to explore the customization options available with your new theme. Most themes come with their own unique set of settings that can help you tweak its appearance to better match your brand. Happy activating!
Customizing Your WordPress Theme
Now that you’ve activated your new WordPress theme, it’s time to bring your unique vision to life through customization! This step is where the magic happens, as you can tailor everything from colors to layouts to suit your brand or personal style.
To kick things off, navigate to the “Appearance” section in your dashboard and click on “Customize.” This will open the WordPress Customizer, a fantastic tool that allows you to see changes in real-time as you adjust various elements.
Here are some common customization options you’ll find:
- Site Identity: Change your site title and tagline. You can also upload a site logo here.
- Colors: Select your color scheme. Many themes allow you to choose primary and secondary colors, making a big impact on your site’s look.
- Header Image: Add a header image that reflects your brand. This is often one of the first things visitors notice.
- Menus: Create custom menus to help visitors navigate your site more easily. You can add pages, categories, and custom links.
- Widgets: Manage sidebar and footer widgets to display additional content like recent posts, social links, or search bars.
Customization options may vary depending on the specific theme you’ve chosen, so be sure to explore all the available settings. As you customize, always remember to hit “Publish” to save your changes. And don’t be shy to try different options – it’s all about finding what resonates with you and your audience. Happy customizing!
Using the WordPress Customizer
The WordPress Customizer is like your magic wand for personalizing your website. It provides a straightforward and user-friendly interface that lets you tweak your theme settings in real-time. You can make changes and see how they look before actually applying them to your site, which is super handy!
To access the Customizer, just navigate to the dashboard, hover over “Appearance,” and click on “Customize.” Once you’re in, you’ll notice a wide array of options on the left sidebar. Here’s what you can expect to find:
- Site Identity: This is where you can upload your logo, change the site title, and edit your tagline. Making a strong first impression is key!
- Colors: Change the color scheme of your site. Choose colors that reflect your brand’s personality.
- Menus: Create and manage your navigation menus. This will help your visitors find their way around your site easily.
- Widgets: Add or rearrange widgets in your sidebars. Widgets can display recent posts, comments, or even social media feeds!
- Homepage Settings: Decide whether you want your homepage to display your latest posts or a static page.
Make sure you hit the “Publish” button at the top when you’re done customizing! The best part? You can go back at any time to adjust your settings as your brand evolves.
Editing Theme Settings and Options
Once you’ve made your way through the Customizer, you might realize that there are even more options hidden in your theme’s settings. Most pretty good themes come with their own set of unique options; think of it as an additional layer of customization beyond what the Customizer offers.
To find these options, head back to the dashboard, then to “Appearance” and look for “Theme Options” (or something similar depending on your theme). You’ll see various tabs or sections where you can edit specific settings. Here’s a brief overview of what you might find:
- General Settings: Here you can control overall layout, choose a sidebar position, or adjust background settings.
- Typography: Change font styles, sizes, and colors. Consistency and readability are vital for keeping your audience engaged!
- Header Options: Customize your header layout—choosing between different styles, or even adding a social media icon bar.
- Footer Options: Decide what information to show at the footer of your site—think about how you want to present your brand.
- SEO Settings: Some themes include options that help optimize your site for search engines right within the theme controls. That’s a bonus!
After tweaking the settings, always remember to save your changes. Your site should start taking shape just the way you envision it!
9. Adding and Managing Plugins for Extended Functionality
When it comes to enhancing your WordPress site, plugins are your best friends! They allow you to add features that don’t come standard with WordPress, giving you the ability to customize your site to fit your needs. Whether you’re looking to improve SEO, add social media sharing buttons, or integrate contact forms, there’s a plugin out there for you.
Here’s a simple guide on how to add and manage plugins:
- Navigate to the Plugins section: From your WordPress dashboard, click on ‘Plugins’ in the left sidebar.
- Add New: Click on the ‘Add New’ button at the top. You’ll be taken to a page that showcases popular plugins, and you can search directly using the search bar.
- Install a Plugin: Once you find a plugin you want, click the ‘Install Now’ button. After installation, remember to click ‘Activate’ to make it functional on your site.
- Manage Your Plugins: To manage your installed plugins, go back to the Plugins page. From here, you can deactivate, delete, or update plugins as needed.
For optimal performance, it’s important to regularly update your plugins. This not only introduces new features but also fixes bugs and security vulnerabilities. Just keep in mind, having too many plugins can slow down your site, so choose wisely!
10. Making Advanced Customizations with Page Builders
If you’re looking to create a truly unique website without writing a single line of code, page builders are the way to go. Tools like Elementor, Beaver Builder, and WPBakery make it super easy to design stunning layouts with a simple drag-and-drop interface.
Here’s how you can get started with page builders:
- Choose a Page Builder: Some popular options include Elementor, Divi, and Beaver Builder. Look for one that fits your style and needs.
- Install Your Chosen Page Builder: Just like plugins, you’ll install the page builder through the ‘Plugins’ section of your WordPress dashboard.
- Create a New Page: After activation, go to ‘Pages’ and click ‘Add New’. You’ll notice a button to use the page builder you installed.
- Design Your Page: Open the page builder interface. From here, you can add elements like text blocks, images, videos, and buttons—customizing their sizes and positions with ease.
One of the great things about page builders is the real-time preview feature, allowing you to see changes as you make them. Plus, many page builders offer templates and blocks that can help speed up the design process. Don’t hesitate to experiment; creativity is key!
11. Testing Your Website for Responsiveness and Compatibility
So, you’ve worked hard to install and customize your WordPress theme—great job! But hold on a second. Before you launch your site into the digital world, it’s crucial to make sure that it looks good and functions well across various devices and browsers. This is where testing for responsiveness and compatibility comes into play.
Why is Responsiveness Important?
In today’s tech-savvy world, your website will be viewed on a plethora of devices, including smartphones, tablets, and desktops. A responsive design ensures that your site adjusts seamlessly to fit screens of different sizes. If your site isn’t responsive, you risk losing potential visitors who might bounce off if they can’t navigate easily.
Testing for Responsiveness:
- Use browser developer tools: Right-click on your website and select “Inspect.” Then, click on the mobile icon to check how your site looks on different devices.
- Mobile-Friendly Test: Use Google’s Mobile-Friendly Test tool. Just enter your URL, and it’ll let you know if your site meets mobile standards.
- Different Screen Sizes: Explore how your site appears on a variety of screen sizes using tools like ResponsiveChecker and BrowserStack.
Testing for Compatibility:
It’s also vital to test your website across various browsers like Chrome, Firefox, and Safari. Each browser can interpret HTML and CSS differently, so make sure everything renders as expected. Here’s how:
- Cross-browser testing tools: Use services like BrowserStack or CrossBrowserTesting to quickly test how your site looks across different browsers.
- Manual checks: Sometimes, a manual check is best. Launch your site on different browsers and see how it performs.
By taking the time to test your website for responsiveness and compatibility, you’re ensuring a better experience for your users, which can lead to increased engagement and conversions. Trust me, it’s worth the effort!
12. Conclusion and Best Practices
So, you’ve journeyed through the exhilarating process of installing and customizing your WordPress theme. It’s a lot, right? But let’s take a moment to recap and highlight some best practices you should keep in mind as you move forward.
Final Thoughts: Your website is often the first impression potential visitors get of your brand, so making it visually appealing and user-friendly is essential. Here’s a summary of what we discussed:
- Choose the Right Theme: Go for one that aligns with your brand goals and is responsive.
- Customize Wisely: Make your site stand out, but don’t go overboard with flashy elements that can overwhelm visitors.
- Test for Responsiveness and Compatibility: Always check how your site looks and functions across different devices and browsers.
Best Practices to Follow:
| Practice | Description |
|---|---|
| Update Regularly | Keep your WordPress version, themes, and plugins up to date to maintain security and functionality. |
| Backup Your Site | Regular backups can save you a ton of headaches in case something goes wrong. |
| Optimize for Speed | Use caching plugins and optimize images to improve loading times. |
By following these tips and best practices, you’ll set yourself up for success in the WordPress realm. Now get out there, showcase your website, and watch as it grows!


