Welcome to the world of WordPress! If you’re just starting out, one crucial aspect you’ll encounter is menus. They might seem small, but they play a significant role in your website’s layout and usability. Think of menus as the roadmap to your site; they guide users to various sections, helping them navigate your content seamlessly. In this guide, we’ll explore what WordPress menus are, their importance, and how you can set them up to enhance your site’s functionality.
Understanding the Importance of Menus in Website Navigation

Now that we know what menus are, let’s dig into why they’re so essential for your WordPress site. Well-organized menus contribute significantly to user experience and can affect how visitors interact with your content. Here’s why menus matter:
- Enhanced User Experience: A well-structured menu allows users to find what they’re looking for quickly without unnecessary hassle. This leads to a better overall experience.
- Improved Site Structure: Menus help to define the hierarchy of your content. By categorizing your pages logically, users can easily understand the layout of your site.
- SEO Benefits: Search engines love clear navigation! Well-defined menus can help search engines crawl your site more effectively, potentially improving your search rankings.
- Increased Engagement: When users can easily navigate your site, they’re more likely to explore various pages and spend more time engaging with your content.
- Highlighting Key Pages: Menus allow you to showcase important pages, such as contact information, services, or products, making them easily accessible to visitors.
To illustrate, here’s a simple table showcasing the key benefits of menus:
| Benefit | Description |
|---|---|
| Enhanced User Experience | Users find information quickly and easily. |
| Improved Site Structure | Organizes content into logical categories. |
| SEO Benefits | Helps search engines crawl effectively. |
| Increased Engagement | Encourages users to explore more content. |
| Highlighting Key Pages | Makes vital information readily accessible. |
In summary, effective use of menus not only enhances the usability of your site but also positively influences SEO and user engagement. So let’s get started on creating menus that will take your WordPress site to the next level!
Types of Menus in WordPress
When it comes to WordPress, understanding the different types of menus is crucial for creating a seamless user experience on your site. Let’s dive into the main types of menus you’ll encounter:
- Primary Menu: This is typically the main navigation menu displayed at the top of your website. It usually contains links to key pages like Home, About, Services, and Contact. A well-structured primary menu helps visitors find their way around easily.
- Secondary Menu: Sometimes referred to as a footer or utility menu, this typically appears in the footer area or on pages where less important links are featured. It can include links to privacy policies, terms of service, or social media accounts.
- Custom Menus: WordPress allows you to create custom menus tailored to your preference. You can include specific categories, tags, or even custom links to various external sites. This flexibility lets you curate the user experience.
- Mobile Menus: With the increasing use of mobile devices for browsing, having a special mobile menu can enhance user engagement. These menus often simplify navigation to fit smaller screens, providing easy access to important sections.
Choosing the right type of menu for your website not only improves navigation but also enhances the overall aesthetic appeal. Understanding these menu types is the first step toward creating a more engaging visitor experience.
Accessing the Menu Settings in Your WordPress Dashboard
Accessing the menu settings in your WordPress dashboard is where the magic happens! Here’s a step-by-step guide to get you there:
- Log into Your WordPress Dashboard: Go to your website URL followed by “/wp-admin,” and enter your credentials.
- Navigate to the Appearance Tab: Once logged in, look for the “Appearance” option located on the left-hand menu. Click on it to expand the options available.
- Select Menus: In the Appearance submenu, you’ll find “Menus.” Click on it to be directed to the menu management screen.
Once you’re in the Menus section, you’ll see options for creating a new menu or editing an existing one. Make sure your new menu is assigned to the correct location, and you can begin adding items to it. Here are a few additional tips:
| Tip | Description |
|---|---|
| Use Clear Labels | Make sure menu item names are clear and descriptive for better user clarity. |
| Organize by Importance | Position the most important pages at the top of the menu for easy access. |
| Responsive Design | Always check how your menu looks on mobile devices! |
Accessing the menu settings is straightforward and opens up a world of possibilities for customizing how users interact with your site. Happy menu building!
Creating Your First WordPress Menu
Starting your journey with WordPress menus can feel exciting yet slightly overwhelming. But don’t worry, creating your first menu is a straightforward process! Here’s a simple step-by-step guide to help you through it.
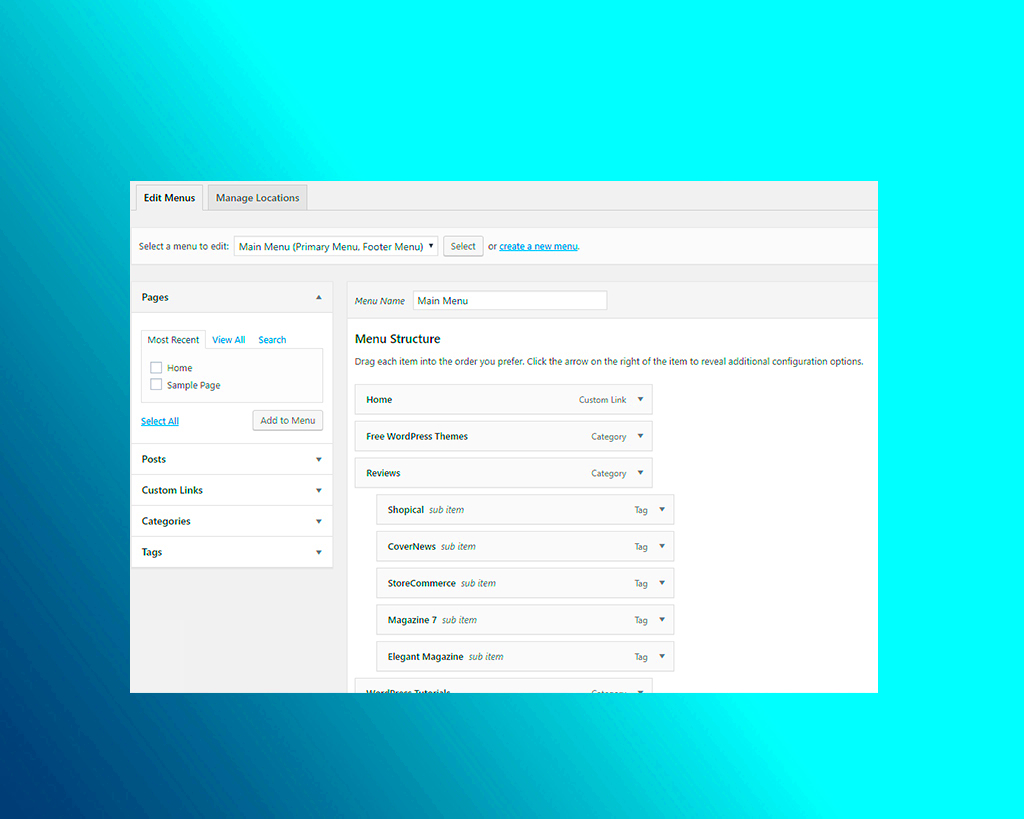
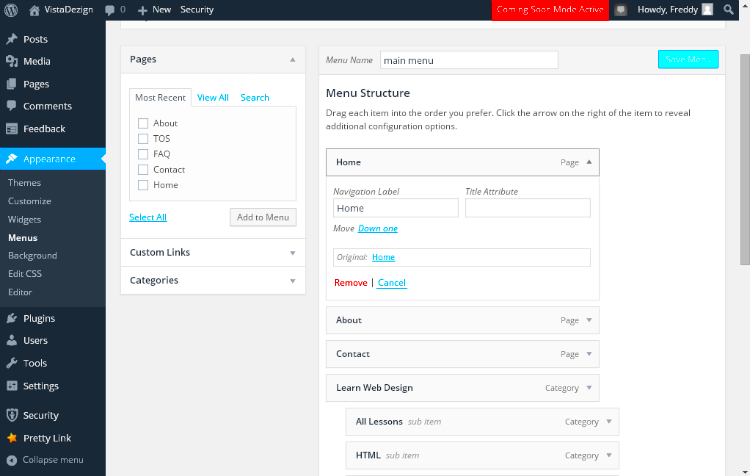
First off, navigate to your WordPress dashboard. On the left sidebar, find Appearance and click on Menus. This will bring you to the menu editor page where all the magic happens. If you haven’t created a menu before, you’ll need to give it a name. Something like “Main Menu” works perfectly fine. Just enter your menu name in the designated field and hit the Create Menu button.
Now, let’s add some structure! WordPress will show you available pages, posts, and other items you can add to your newly-created menu. To add an item, simply select a checkbox next to it and click Add to Menu. Once added, you can rearrange the order of your menu items by dragging them up or down. Want to create a submenu? Just drag an item slightly to the right, and it will become a dropdown item!
Lastly, don’t forget to assign your menu to a particular location. Most themes have predefined locations where you can display your menu. Look for the Menu Settings section and select the location you prefer. Once you’re ready, click on the Save Menu button. That’s it! You’ve created your first WordPress menu, and your website’s navigation is already taking shape!
Adding Pages, Posts, and Custom Links to Your Menu
Now that you have your first WordPress menu set up, let’s dive into adding more content to it. Whether you want to link to pages, posts, or even external websites, it’s all very possible with just a few clicks.
To begin, go back to the Menus section in your WordPress dashboard. You’ll see the menu you created previously. On the left side, you’ll find sections like Pages, Posts, and Custom Links. Here’s how you can add each:
- Adding Pages: In the Pages section, you’ll see a list of all your published pages. Simply check the boxes next to the pages you want in your menu and click Add to Menu.
- Adding Posts: If you want to share your latest blog posts directly in your menu, head to the Posts section. Similar to pages, check the boxes beside the posts you wish to include and hit Add to Menu.
- Adding Custom Links: This is where you can really get creative! In the Custom Links section, you can add a URL (for external sites) and give it a label (like “Contact Us” or “Blog”). Enter the details and click Add to Menu.
Once you’ve added everything, remember to drag and drop your items to rearrange them as you see fit. Don’t forget to save your changes! After saving, head over to your website, and you’ll see the new additions in your menu, ready for your visitors to navigate!
7. Organizing Menu Items: Drag-and-Drop Functionality
One of the most user-friendly features of WordPress menus is the drag-and-drop functionality. It’s like rearranging blocks in a fun game—simple and intuitive! With this feature, you can easily organize your menu items to suit your website’s needs.
To get started, follow these straightforward steps:
- Navigate to the WordPress dashboard.
- Click on “Appearance.”
- Select “Menus.”
Once you’re there, you’ll see a list of all the pages, posts, and custom links that you can include in your menu. Just click and drag the items to rearrange them as you see fit. It’s that easy! You can move items up or down on the list or from one location to another within your menu.
Here are some tips to keep in mind while organizing your menu items:
- Keep it simple: Too many items can overwhelm your visitors—limit your menu to the most important links.
- Logical order: Arrange items in a way that makes sense for your content hierarchy.
- Preview changes: Always check the preview to ensure the new order works well before saving.
With a little bit of time, you’ll have a well-organized menu that improves the overall user experience. So go ahead, experiment, and create a navigation structure that truly resonates with your audience!
8. Creating Submenus for Better Navigation
Creating submenus in WordPress is a fantastic way to enhance your site’s navigation without cluttering your main menu. Submenus allow you to group related items under a parent item, making it easier for users to find what they’re looking for. Think of it as creating folders within a filing cabinet—everything has its place!
Here’s how to create submenus:
- Access the “Menus” section in your WordPress dashboard.
- Once there, add your desired menu items if you haven’t already done so.
- To create a submenu, simply drag an item slightly to the right underneath the parent menu item. You’ll notice it indents—this indicates it’s a submenu!
| Parent Menu Item | Submenu Item |
|---|---|
| Services | Consulting |
| Services | Web Development |
| About Us | Our Team |
Tips for Effective Submenus:
- Limit depth: Try to avoid multiple layers of submenus; they can confuse visitors.
- Descriptive labels: Use clear names for your submenu items so that users know what to expect.
- Test your navigation: Ensure everything works smoothly across devices.
By adding submenus, you’re not just decluttering; you’re enhancing the user experience, guiding visitors to their desired content with ease!
Assigning Your Menu to a Specific Location
Once you’ve created your menu, the next step is to assign it to a specific location on your WordPress site. Think of your menu as the roadmap for your visitors, guiding them to important sections of your site. To assign your menu correctly, follow these simple steps!
First, navigate to the WordPress Dashboard. From the left-hand menu, find and click on Appearance and then select Menus. Here you’ll see the menu you just created. But hold on! Creating the menu is just half the job; now you need to ensure it shows up where you want it.
At the top of this page, you’ll notice a section called Menu Settings. Within this section, you might see various locations labeled like “Primary Menu,” “Footer Menu,” or others depending on your theme. Each theme typically supports different menu locations.
- Check the Available Locations: Click on the “Manage Locations” tab to get a glimpse of all the possible spots your menu can occupy.
- Assign Your Menu: From the dropdown next to the location you want, select the menu you’ve just created.
- Save Your Changes: Don’t forget to click the “Save Changes” button to make your assignment permanent!
Once you’ve done this, it’s time to visit your website and see your newly assigned menu in action! This is a critical step because having your menu in the right spot enhances navigation, leading to a better user experience.
Customizing Menu Appearance with CSS
If you’re looking to give your WordPress menu a unique flair, customizing its appearance with CSS is the way to go! Unlike basic settings where you can only change colors or styles, CSS allows you to take complete control over how your menu looks. It might sound a bit technical, but don’t worry—we’ll break it down together!
To get started with CSS customization, you’ll need to access the Customizer. Head over to Appearance > Customize, and then look for the Additional CSS option on the left sidebar. This is where the magic happens!
You can add various CSS properties to modify the appearance of your menu. Here are some common styles you might consider:
| CSS Property | Description |
|---|---|
background-color |
Change the background color of the menu. |
font-size |
Adjusts the size of the text in the menu. |
padding |
Creates space around each menu item. |
border |
Adds borders around the menu items. |
For example, if you want to change the background color of your menu to blue and the font color to white, you could use the following CSS:
nav { background-color: blue;}nav a { color: white;}After adding your custom CSS, make sure to click the “Publish” button at the top to see your changes live. Customizing your menu with CSS not only enhances its appearance but also helps it fit seamlessly into your site’s overall design. So, give it a whirl and watch your menu transform!
Best Practices for Effective WordPress Menus
Creating an effective WordPress menu can significantly enhance the user experience on your website. Here are some best practices that every WordPress user should consider when organizing their menus:
- Keep It Simple: Avoid cluttering your menu with too many items. A simple and clear menu helps visitors navigate effortlessly. Aim for a maximum of 7-8 top-level items.
- Use Descriptive Labels: Make sure your menu items are labeled clearly. Instead of using vague terms, opt for descriptive titles that tell visitors exactly what to expect when they click.
- Prioritize Important Pages: Place your most important pages at the beginning of your menu. This could include your homepage, about page, and contact information, helping users find crucial information quickly.
- Group Related Items: Organize similar items into dropdown menus or submenus. This not only saves space but also gives your menu a clean and organized appearance.
- Avoid Dropdown Overload: While dropdowns are handy, too many can overwhelm users. Limit the levels of dropdowns and ensure they are easy to use on mobile devices.
- Consider Mobile Users: Ensure your menus are mobile-friendly. Test how your menu behaves on smaller screens and adjust accordingly to provide a seamless experience.
- Regularly Update Your Menu: Keep your menu content fresh. Regularly review and update your menu based on new content, seasonal promotions, or user feedback.
By following these best practices, you can create menus that not only look great but are also intuitive and user-friendly, ultimately driving user engagement on your site.
Common Issues and Troubleshooting WordPress Menus
Even with the best intentions and practices, problems can arise with WordPress menus. Here are some common issues users face, along with troubleshooting tips to resolve them:
| Issue | Description | Solution |
|---|---|---|
| Menu Items Missing | Sometimes, menu items may not appear as expected. | Ensure that the pages are published and not in draft mode. Check the menu settings to confirm the items are added. |
| Dropdown Menus Not Working | Dropdown menus can become unresponsive. | Check your theme settings and ensure that JavaScript is enabled. Refresh your cache and try again. |
| Incorrect Menu Order | The order of menu items may not reflect your preferences. | In the menu settings, drag and drop the items into the desired order and save the changes. |
| Responsive Design Issues | Menus can look good on a desktop but become problematic on mobile. | Test your menu across different devices and use a responsive theme. Adjust menu settings as necessary. |
| Styling Problems | Menus may not visually fit within your design. | Inspect the menu’s CSS and consider using custom CSS to match your site’s aesthetics. Themes often provide custom styling options too. |
By understanding these common issues and how to resolve them, you can maintain an effective and user-friendly menu on your WordPress site. Always remember to keep a backup of your site before making significant changes, just in case something goes awry!
Conclusion: Mastering Menus for a Better User Experience
In the journey of navigating through WordPress, understanding and mastering menus is a vital step that can significantly enhance the user experience on your website. Menus not only serve as the navigational backbone but also play a crucial role in guiding visitors toward important information effectively. Here’s a summary of the key aspects to keep in mind:
- Menu Structure: Organize your menu logically to promote easy navigation.
- Custom Links: Use custom links to direct users to external sites or specific resources.
- Dropdown Menus: Implement dropdowns for hierarchical content organization, keeping your main menu uncomplicated.
- Mobile Responsiveness: Ensure menus function well across all devices, especially smartphones.
Here’s a simple comparison table to illustrate menu types:
| Menu Type | Features | Best Used For |
|---|---|---|
| Primary Menu | Top-level navigation | Main site structure |
| Footer Menu | Static links at the bottom | Supplemental content |
| Contextual Menu | Links related to current page | Specific content areas |
By mastering menus, you not only improve site navigation but also promote user engagement and satisfaction. Take the time to refine your menus, and your visitors will thank you for it!


