In the world of WordPress, plugins are like magical little tools that enhance your website’s functionality. Whether you’re looking to add a contact form, optimize your SEO, or manage your social media, there’s likely a plugin that can help. With thousands of options available, it’s easy to customize your site to fit your needs; however, with great power comes great responsibility. Let’s dive into what makes WordPress plugins so crucial!
Understanding the Importance of Plugin Management
Managing your WordPress plugins isn’t just about adding new features. It’s an essential practice that directly affects both your site’s performance and security. Here are a few reasons why plugin management should be a top priority:
- Performance Optimization: Too many plugins can slow down your website. Regularly reviewing and removing unnecessary plugins can significantly improve loading times.
- Security Reasons: Plugins can be vulnerable to attacks if not updated regularly. A well-managed plugin setup minimizes your risk of breaches.
- Compatibility Issues: Sometimes, plugins don’t play nicely together. Managing them can help identify conflicts that could disrupt your site’s functionality.
- Enhancing User Experience: A cluttered site with poorly managed plugins can confuse visitors. Keeping plugins organized ensures your site remains user-friendly.
To visualize this, consider a table that summarizes some best practices for plugin management:
| Best Practice | Description |
|---|---|
| Regular Updates | Always keep your plugins updated to the latest versions for optimal security and performance. |
| Periodic Review | Evaluate your installed plugins regularly and remove those that are no longer needed. |
| Use Trusted Sources | Only install plugins from reputable developers to reduce security risks. |
| Limit the Number of Plugins | Aim to use only the plugins necessary for your site’s functionality to improve performance. |
In essence, a well-managed plugin strategy not only keeps your WordPress website running smoothly but also enhances its security and user experience. Yes, it may take a bit of time, but trust me, your visitors will thank you for it!
Assessing Your Plugin Needs
When it comes to managing WordPress plugins, the first step is understanding your specific needs. Plugins can add a plethora of functionalities to your site, but having too many can lead to conflicts, slow loading times, and even security vulnerabilities. So, how do you discern what plugins are actually essential for your website? Let’s break it down!
Start by considering the purpose of your website. Is it a blog? An e-commerce store? Or perhaps a portfolio site? Understanding your site’s primary goals will guide your plugin decisions. Here’s a quick checklist to help you assess:
- Functionality: What specific features do you need? Think about contact forms, SEO tools, or social media integration.
- Performance: Consider how each plugin might affect your site’s speed and performance. Research how lightweight the plugins are.
- Compatibility: Check if the plugins you’re considering can get along with your active theme and existing plugins.
- Support and Updates: Look for plugins that are frequently updated and well-supported. Reading recent reviews can be helpful.
Once you have this information, create a list of must-haves versus nice-to-haves. By doing this, you ensure you’re not just grabbing plugins because they look fancy, but rather because they serve a genuine purpose for your site. Remember: Quality over quantity is key!
How to Install Plugins Effectively
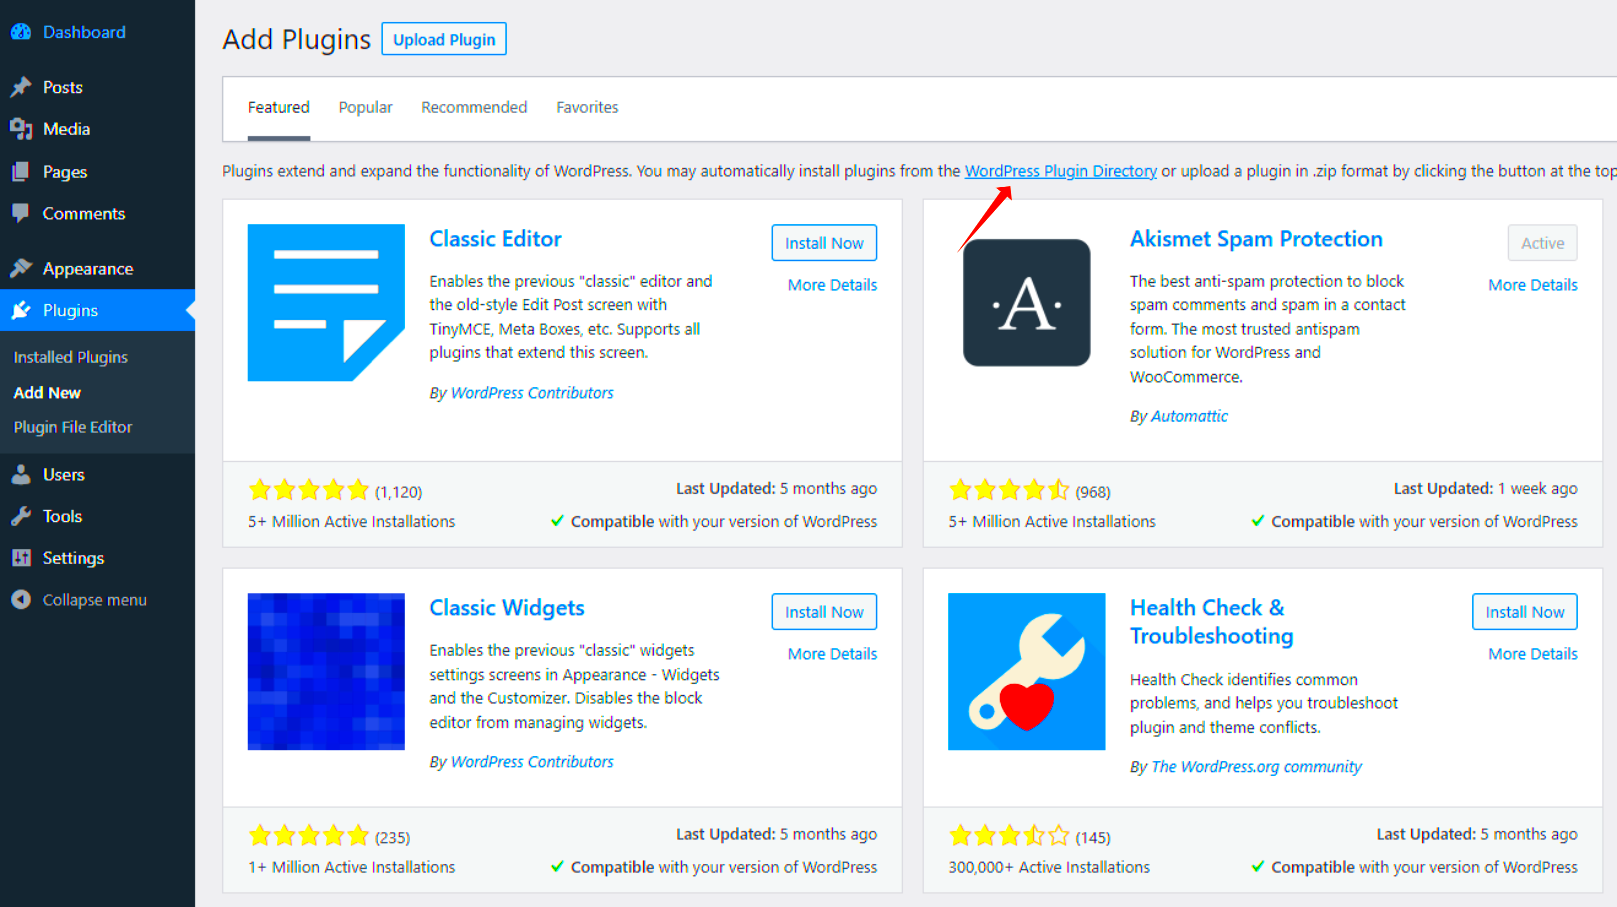
Installing WordPress plugins might seem straightforward, but there are best practices you should follow to ensure everything goes smoothly. Let’s walk through this process in a way that’s easy to digest!
To begin with, there are two main methods for installing plugins: through the WordPress Dashboard and uploading a plugin file directly. Here’s how:
Installing via the WordPress Dashboard
- Login to your WordPress Admin Panel.
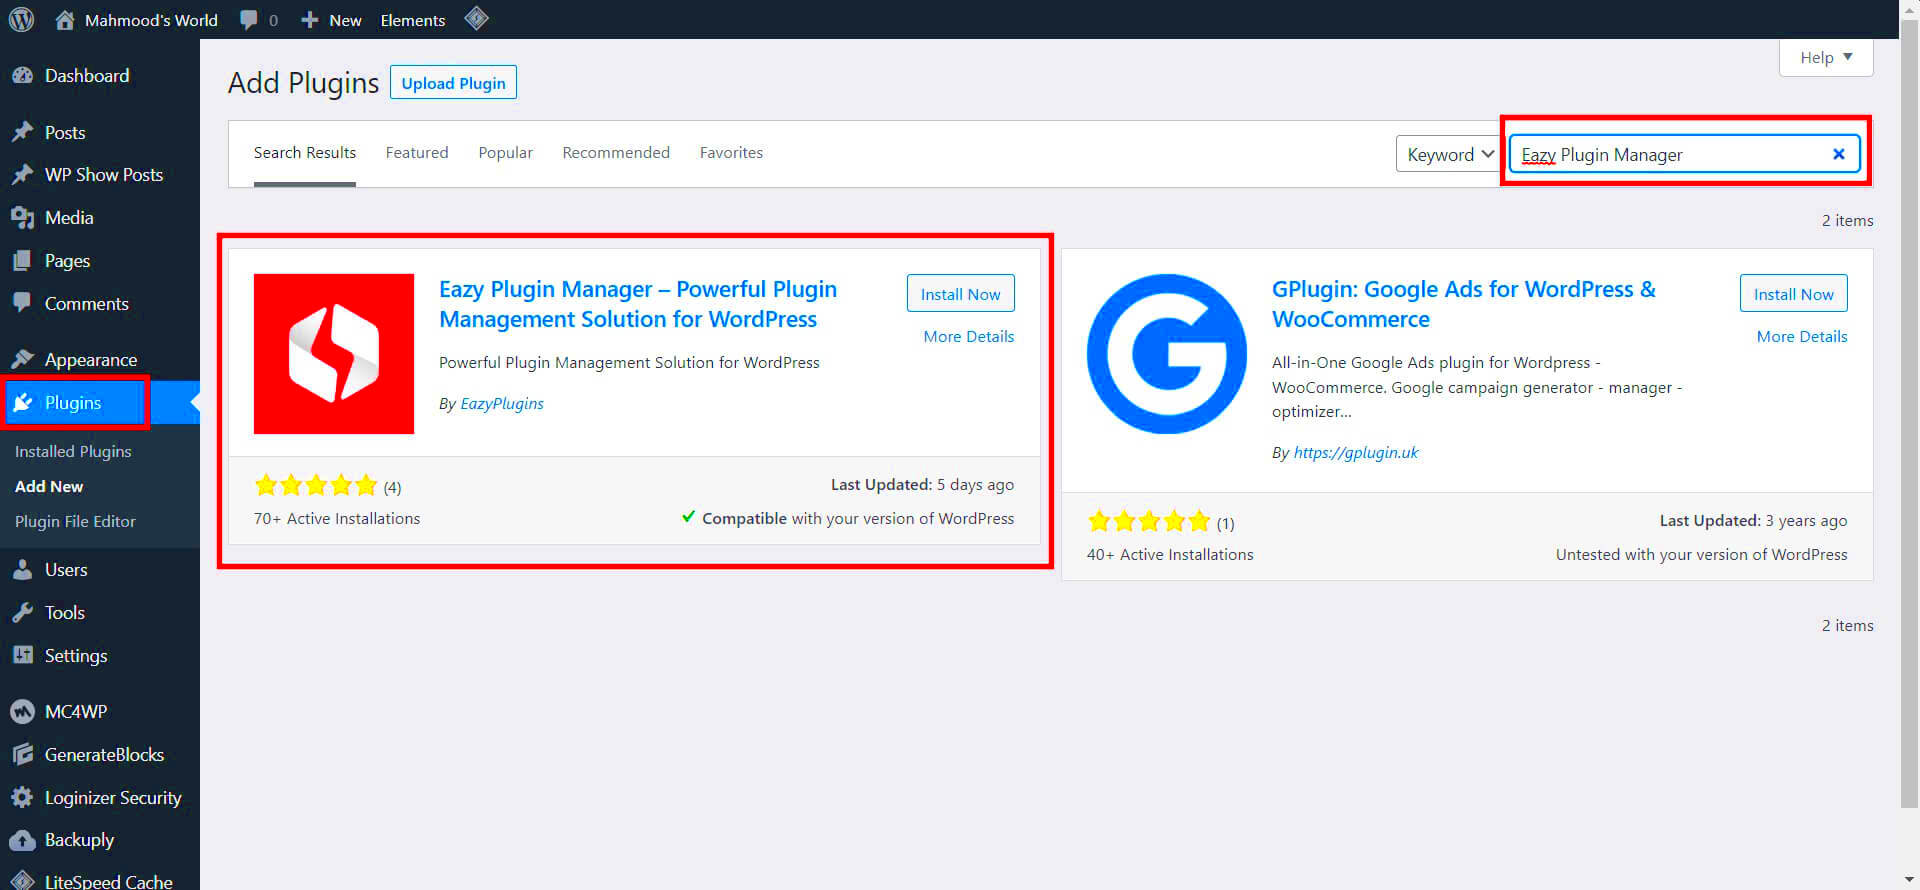
- Navigate to Plugins > Add New.
- Use the search bar to find the plugin you’re interested in.
- Click the Install Now button, and once installed, hit Activate.
Uploading a Plugin Manually
Sometimes, you may have a plugin downloaded as a ZIP file. Here’s how to upload it:
- Go to Plugins > Add New in your dashboard.
- Click on the Upload Plugin button.
- Select the ZIP file from your computer and click Install Now.
- Once the installation is complete, activate your plugin.
After activation, be sure to configure any necessary settings to make the plugin work optimally for your site. Always back up your site before adding or updating plugins to safeguard against potential issues. So there you have it! Installing plugins effectively can set a solid foundation for a well-balanced and functional WordPress site. Happy plugin managing!
Managing and Updating Your Plugins
Managing and updating your WordPress plugins doesn’t have to be a daunting task. In fact, it can be quite straightforward once you get the hang of it! Regularly updating your plugins is crucial for ensuring the security and performance of your website. Now, let’s break down how to effectively manage and update your plugins with ease.
To begin, always check for updates. You can easily spot plugins that need updating by navigating to your WordPress dashboard. If updates are available, you’ll see notifications right in the ‘Plugins’ section. You can update plugins individually or select multiple plugins to update them all at once. Here’s a quick guide:
- Navigate to Plugins > Installed Plugins.
- Look for plugins with a yellow notification label indicating an update is available.
- Select the plugin(s) you want to update.
- Click on the Update Now button.
It’s essential to back up your website before performing updates, especially for critical plugins. This way, if anything goes wrong, you can easily restore your site to its previous state. Plus, be sure to check the compatibility of the plugins with your current version of WordPress. This information is usually available in the update notification.
Lastly, don’t forget to test your website after updates. Check that everything is functioning correctly, and remember to keep your plugins organized, enabling only those you truly use. A clean plugin environment leads to better performance!
Deactivating and Deleting Unused Plugins
We’ve all done it: installed plugins that seemed useful at the time but ended up gathering digital dust. But don’t worry! Deactivating and deleting unused plugins is a simple task that can greatly enhance your website’s performance and security.
When you deactivate a plugin, you’re essentially turning it off without deleting it. This is a good first step if you’re unsure whether you might need the plugin again in the future. Here’s how you can deactivate a plugin:
- Go to Plugins > Installed Plugins.
- Find the plugin you want to deactivate.
- Click on the Deactivate link.
Now, if you’ve decided that a particular plugin is no longer useful, it’s best to delete it altogether. Here’s the step-by-step guide:
- Like before, navigate to Plugins > Installed Plugins.
- Find the plugin you wish to remove.
- Click on the Deactivate link first (if not already deactivated).
- After deactivation, click the Delete link.
- Confirm your choice, and poof—it’s gone!
Remember, less is often more. Keeping only the necessary plugins not only improves site speed but also reduces security risks. Regularly auditing your plugins ensures your WordPress site remains efficient and secure. So, take a moment each month to review and tidy up those plugins!
7. Using a Plugin Management Tool
Managing WordPress plugins can sometimes feel like juggling too many balls at once. With countless options available, it’s easy to get overwhelmed. That’s where a plugin management tool comes in handy! These tools streamline the way you handle your plugins, making the entire process much simpler.
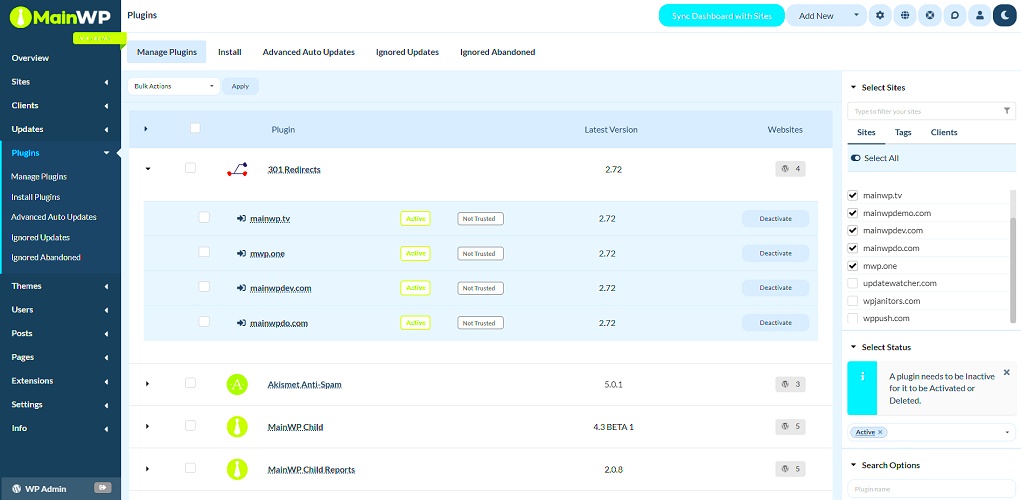
A plugin management tool essentially acts as your personal assistant for all things plugins. Here’s what it typically does:
- Centralized Control: Manage all plugins from a single dashboard, reducing the need to toggle back and forth between your website’s backend.
- Update Notifications: Receive alerts for updates, ensuring your plugins remain current and secure.
- Performance Monitoring: Monitor the performance of your plugins, allowing you to detect any that may be slowing down your site.
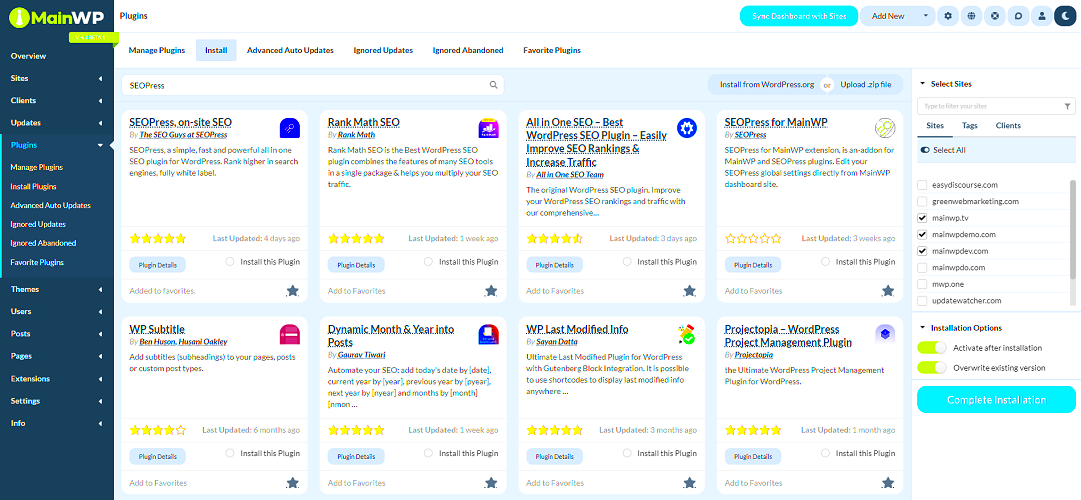
- Bulk Actions: Perform bulk updates, installations, or deletions, saving you time and effort.
- User Roles and Permissions: Manage who has access to install or modify plugins, which is crucial for team-based workflows.
Popular plugin management tools like ManageWP or InfiniteWP allow you to manage multiple WordPress sites in one place. Whether you’re a freelancer juggling several client sites or just someone looking to simplify your plugin management strategy, these tools can be a game-changer!
8. Best Practices for Plugin Management
When it comes to plugin management, a few best practices can make a world of difference. Adopting these habits will help keep your website running smoothly and securely.
- Choose Wisely: Always evaluate plugins before installing. Look for reputable developers, recent updates, and positive reviews. This initial research can save you a lot of headaches later.
- Regular Updates: Keeping plugins updated is crucial. Most updates include patches for security vulnerabilities, new features, or performance improvements. Set a regular schedule to check for these updates!
- Limit Plugin Use: Avoid installing too many plugins. Each additional plugin can slow down your website, increase security risks, and complicate management. Stick to essential plugins that truly enhance your site’s functionality.
- Backup Before Changes: Always back up your site before adding, updating, or deleting plugins. This ensures you can restore your site in case something goes wrong.
- Test Changes in Staging: If possible, test any plugin changes on a staging site before applying them to your live site. This helps prevent unexpected issues that could disrupt user experience.
By following these best practices, you’ll not only enhance the security and performance of your WordPress site but also make your plugin management process much more efficient and hassle-free!
Troubleshooting Common Plugin Issues
Managing WordPress plugins can sometimes feel like a delicate balancing act, especially when conflicts arise. However, troubleshooting common plugin issues doesn’t have to be daunting. Here are some frequent problems you might encounter and easy steps to resolve them.
- Plugin Conflicts: If your site starts acting strangely after installing a new plugin, there might be a conflict with an existing one. To resolve this, deactivate all plugins and reactivate them one by one to identify the troublemaker. Once found, check for updates or consider looking for alternatives.
- Site Slowdown: Some plugins can slow down your site significantly. Use tools like Google PageSpeed Insights to pinpoint any culprits. You might need to remove or replace plugins that affect performance adversely.
- Error Messages: Don’t panic! Error messages often come with a line number indicating where the issue lies. Take note of it, and you might be able to troubleshoot based on the specific context of that error.
- Compatibility Issues: Plugins may not be compatible with your current WordPress version. Always ensure that you’re using the right plugins that match your WordPress version. Checking the plugin’s page on the WordPress repository can provide compatibility information.
- Update Problems: Sometimes, a failed update can cause chaos. If a plugin refuses to update, try deactivating it before updating or even delete and reinstall it if necessary.
Remember, regular backups are your best defense against potential plugin mishaps. Always keep your site backed up, and you’ll be prepared for any unforeseen hitches.
Conclusion: Streamlining Your WordPress Experience
In conclusion, managing your WordPress plugins can significantly streamline your website experience. With the right strategies in place, you can ensure that your site runs smoothly, remains secure, and provides the best user experience possible. Here are a few essential tips to wrap it all up:
- Regular Maintenance: Make it a habit to check your plugins regularly. Update them, deactivate unnecessary ones, and keep a watch on performance.
- Prioritize Quality: Always go for reputable plugins with high ratings and regular updates. Quality often trumps quantity when it comes to plugins.
- Monitor Performance: Use performance monitoring tools to keep an eye on your site’s speed and responsiveness.
- Security First: Be cautious about the plugins you install. Stick to those that adhere to security best practices to protect your site.
Remember, your website is a reflection of your brand and business. By managing your WordPress plugins effectively, you not only enhance functionality but also improve overall user experience. Streamlined, efficient, and well-managed plugins can make all the difference—so take the time to cultivate a solid plugin strategy!

