Want to make your WordPress website more organized and user-friendly? Dropdown menus are a fantastic way to showcase multiple pages or categories without cluttering your main navigation. They allow visitors to find what they’re looking for quickly and give your site a professional, polished look. Whether you’re a beginner or have some experience, adding dropdown menus is straightforward once you know the steps. In this guide, we’ll walk through the process step-by-step, making it easy for you to enhance your website’s menu system effortlessly.
Preparing Your Pages for the Dropdown Menu
Before diving into the actual menu creation, it’s important to ensure your pages are ready to be included in a dropdown. Think of this as setting the stage for a smooth performance. First, review your pages and decide which ones you want to group under a dropdown menu. Usually, these are related pages, like “Services” with sub-pages like “Consulting,” “Support,” and “Development.”
Next, make sure each page has a clear and descriptive title — this will be what visitors see in the menu. If some pages aren’t ready yet, consider editing or publishing them beforehand to avoid missing links later. It’s also helpful to organize your pages in the WordPress admin area so you can easily locate and manage them during menu creation.
Additionally, if you plan to add categories or custom post types to your dropdown, ensure those are set up correctly in your WordPress dashboard. This preparation step saves time and prevents headaches down the line. Think of it as laying a solid foundation so your dropdown menu will work smoothly and look great on your site.
3. Accessing the WordPress Menus Editor
Alright, now that you have a clear idea of what kind of menu you want to create, it’s time to dive into the WordPress dashboard to access the Menus editor. Don’t worry—it’s pretty straightforward! First, log in to your WordPress admin area. Once you’re in, look for the Appearance section in the left-hand menu. Hover over it or click on it, and you’ll see a submenu pop up.
From that submenu, select Menus. This will bring you to the Menus page, where all the magic begins. Here, you’ll find an interface that might seem a little overwhelming at first, but let’s break it down:
- Menu Structure Area: This is where your menu items will appear. You can add, rearrange, or nest pages here.
- Pages Box: On the left side, you’ll see a list of your existing pages. If you don’t see it, click on the Pages tab to expand it.
- Manage Locations: This is where you assign your menus to specific areas of your theme, like the header or footer.
Remember, if you haven’t created a menu yet, you’ll see an option to Create a new menu. We’ll cover that in the next section, so don’t worry if it’s blank for now. Just familiarize yourself with the layout, and you’re ready to start building!
4. Creating a New Menu and Adding Pages
Now that you’re inside the Menus editor, it’s time to get your menu set up from scratch. Here’s how to do it step-by-step:
Step 1: Create a New Menu
- Click on the Create a new menu link, usually near the top of the page.
- Give your menu a name, like Main Navigation or Header Menu. This name is just for your reference, so pick something meaningful.
- Click the Create Menu button to confirm.
Step 2: Add Pages to Your Menu
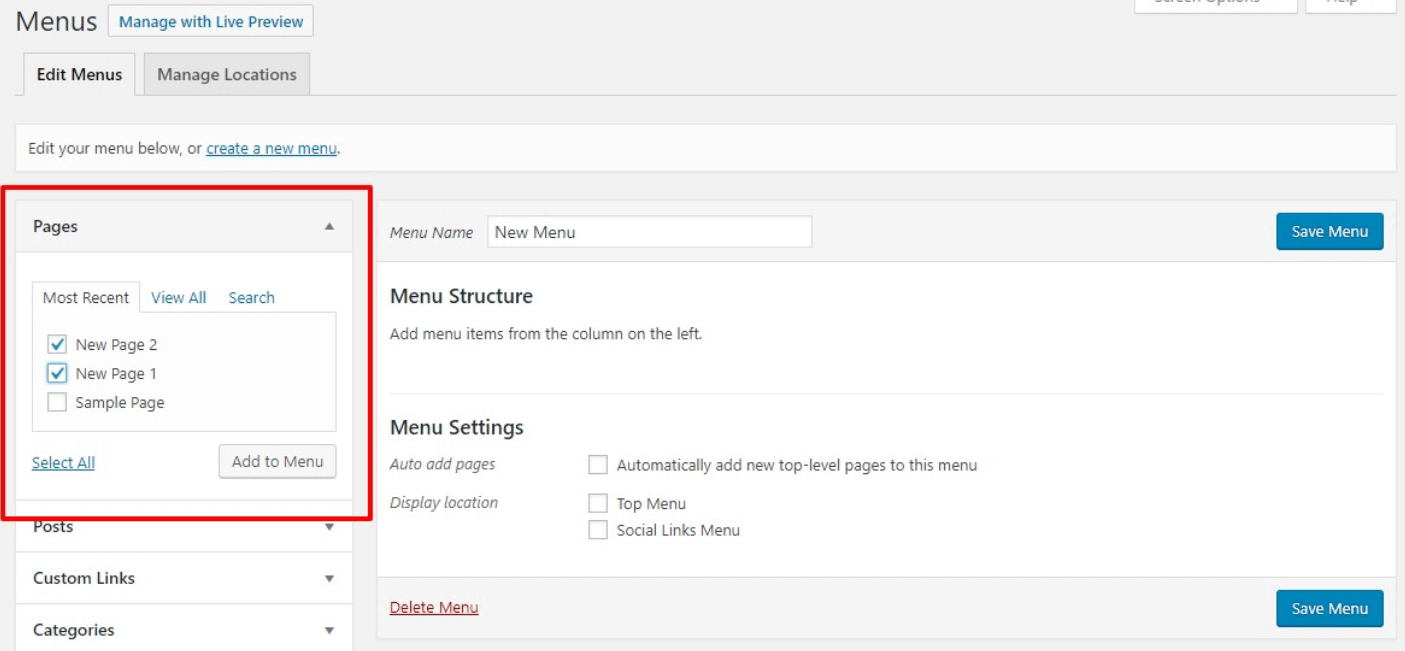
Once your new menu is created, you’ll see your menu structure area ready to go. To add pages:
- Go to the Pages box on the left. If your pages aren’t listed, click the View All tab to see all pages or use the Search feature to find specific ones.
- Select the checkboxes next to the pages you want to add to the menu.
- Click the Add to Menu button. The selected pages will appear in your menu structure area.
Step 3: Organize Your Menu Items
Now, you’ll want to arrange your pages into a logical order or create dropdowns:
- To reorder, simply drag and drop menu items into your preferred sequence.
- To create a dropdown (sub-menu), drag a page slightly to the right underneath another page. This nesting indicates it’s a child item, and it will appear as a dropdown menu.
Step 4: Assign the Menu to a Location
Finally, make sure your menu appears on your site:
- Scroll down to the Menu Settings area, where you’ll see options like Display location.
- Select the theme location where you want your menu to appear (e.g., Primary Menu or Header).
- Click Save Menu to make everything official.
And voilà! You’ve just created a new menu with pages and even set up a dropdown. Feel free to go to your website and refresh the page to see your new navigation in action. It’s a simple process once you get the hang of it, and with a little practice, you’ll be customizing your menus like a pro!
5. Adding Pages as Dropdown Items
Now that you’ve created your main menu and your pages, it’s time to add some of those pages as dropdown items. This step allows visitors to easily navigate through your website by hovering over a menu item and revealing related pages underneath. It’s a great way to organize your site and make important sections more accessible.
Here’s how you can add pages as dropdown items in WordPress:
- Navigate to your Menus: In your WordPress dashboard, go to Appearance > Menus. This is where all the magic happens.
- Select your menu: If you have multiple menus, make sure you’re editing the correct one from the dropdown at the top.
- Choose pages to add: On the left side, you’ll see a list of your pages. Check the boxes next to the pages you want to include in the menu.
- Add to Menu: Click the Add to Menu button. Your selected pages will now appear at the bottom of the menu structure on the right.
- Position your pages: Drag and drop the newly added pages to position them under the main menu item you want as the parent. To create a dropdown, you’ll want to position these pages slightly indented under the parent item.
Tip: When you drag a page slightly to the right underneath the main menu item, it becomes a dropdown item. The indentation indicates that it’s a child of the parent menu item.
Once you’ve added and positioned your pages as dropdown items, don’t forget to click Save Menu. That’s it—you’ve set up your dropdown menu with pages now ready to be displayed on your site!
6. Arranging Menu Items and Dropdown Structure
Now that you’ve added your pages as dropdown items, the next step is to organize the menu structure to ensure it looks neat and functions smoothly. Proper arrangement helps visitors find what they’re looking for quickly and creates a professional look for your website.
Here’s a simple guide to arranging your menu items and dropdowns effectively:
| Step | Action | Tips |
|---|---|---|
| 1 | Drag and Drop | Click and hold a menu item to move it. Drag to reorder your main menu items or to nest dropdown items under a parent. |
| 2 | Indent for Dropdowns | To create a dropdown, slightly indent the child items underneath the parent menu item. The indentation visually indicates hierarchy. |
| 3 | Group Related Pages | Place related pages close together and under the same parent to keep your menu logical and user-friendly. |
| 4 | Preview Changes | Use the Preview button to see how your menu looks in real-time before saving. |
| 5 | Test the Dropdowns | Hover over your parent menu items on the frontend to ensure dropdowns appear correctly and links work. |
Extra Tips: Keep your menu simple and avoid nesting too many levels. Usually, two levels—main items and one dropdown—is enough for most websites. Too many layers can be confusing and may not display well on mobile devices.
Remember, the goal is to make navigation intuitive. Take some time to arrange your menu items thoughtfully, and your visitors will thank you for the smooth browsing experience!
7. Saving Your Menu and Assigning It to a Location
Great job! You’ve added your pages and created your dropdown structure. Now, it’s time to save everything and tell WordPress where to display this menu on your site. Think of this step as finalizing your menu and placing it in the right spot so visitors can easily find it.
First, look for the “Save Menu” button — it’s usually below the menu structure area. Click it to ensure all your recent changes are saved. If you skip this step, your menu won’t appear or reflect the updates you just made.
Assigning the Menu to a Location
After saving, you need to assign your menu to a predefined location. WordPress themes typically come with specific menu locations, such as:
- Primary Menu
- Header Menu
- Navigation Menu
- Footer Menu
To assign your menu:
- Scroll down to the “Menu Settings” or “Manage Locations” tab — depending on your theme and setup.
- Find the location where you want your menu to appear. This could be labeled as Primary, Main, or something similar.
- Select your newly created menu from the dropdown list next to that location.
- Click Save Changes.
And voilà! Your menu is now linked to a specific spot on your website. Remember, if you have multiple menus, you can assign different ones to different locations, like a secondary menu in the footer or sidebar.
Pro Tip
If you’re using a page builder or a highly customizable theme, you might find additional options for menu placement. Always check your theme’s documentation or settings panel for the best way to display your menu exactly where you want it.
8. Testing the Dropdown Menu on Your Website
Now that you’ve saved and assigned your menu, it’s time for the fun part — testing! You want to make sure everything looks good and works smoothly so visitors get a seamless experience.
Check on Your Live Site
Open your website in a new browser tab or window. Hover over the menu item that contains your dropdown. If everything is set up correctly, you should see the submenu appear smoothly, revealing your pages.
Test All Links
- Click on each main menu item to ensure it leads to the correct page.
- Hover over dropdown items to verify they display properly.
- Click on each submenu link to confirm they navigate to the right pages.
Look for Common Issues
- Dropdown not appearing: Double-check that you assigned the menu to the correct location and that your theme supports dropdowns.
- Broken links: Ensure each menu link points to the right URL or page.
- Layout issues: Sometimes, CSS conflicts can cause display problems. Try viewing your site on different devices or browsers.
Make Adjustments as Needed
If you notice any glitches or issues, go back to Appearance > Menus in your WordPress dashboard. Here, you can tweak your menu structure, change the order of items, or adjust the submenu hierarchy. Don’t hesitate to experiment until everything looks and functions perfectly.
Remember, testing is an ongoing process. Whenever you add new pages or make significant changes, revisit your menu to ensure it continues to serve your visitors well. A well-tested dropdown menu makes navigation a breeze and keeps your site looking professional!
9. Tips for Customizing Your Dropdown Menu Appearance
Now that you’ve set up your dropdown menu with all the pages you want, it’s time to make it look just the way you envision. Customizing the appearance of your dropdown can really enhance your site’s overall vibe and make navigation more engaging for visitors. Here are some practical tips to help you style your menu like a pro:
Use Custom CSS
If you’re comfortable with CSS, this is your best friend for detailed styling. You can target specific menu items or the entire menu to change fonts, colors, spacing, and hover effects. For example, to change the background color of dropdown items on hover, you could add something like:
/ Change background color on hover /.menu-item-has-children:hover > ul { background-color: f0f0f0;}
Just add your custom CSS to your theme’s stylesheet or through the Customizer under Appearance > Customize > Additional CSS.
Adjust Spacing and Padding
To make your menu look less cramped or more spacious, tweak the padding around your menu items. This can be done with CSS too. For example:
.menu-item { padding: 10px 15px;}
This creates space around each menu link, making the dropdown easier to read and click.
Choose Complementary Colors and Fonts
Consistency is key when customizing. Pick a color palette that matches your branding, and choose fonts that are easy to read. Use tools like Google Fonts to find stylish options and incorporate them into your theme if needed. If your theme allows, change the font directly in the Customizer, or use CSS like:
.menu { font-family: 'Open Sans', sans-serif;}
Enhance with Icons or Indicators
Adding small icons next to menu items with submenus can guide visitors intuitively. You can add icons using CSS background images or inline SVGs, or by using icon font libraries like Font Awesome. For example, adding a downward arrow to indicate dropdowns:
.menu-item-has-children::after { content: " &9660;"; font-size: 0.8em;}
Test Responsiveness
Ensure your dropdown looks great on all devices. Use your browser’s developer tools to preview your site on mobile and tablet screens. Adjust padding, font size, and spacing as needed to keep navigation clear and accessible.
10. Conclusion and Final Tips for Managing WordPress Menus
Congratulations! You’ve learned how to create, organize, and customize dropdown menus in WordPress step-by-step. Managing menus effectively can greatly improve your site’s usability and visitor experience. Here are some final tips to keep your menus in tip-top shape:
- Keep it simple: Avoid overwhelming visitors with too many menu items. Use dropdowns to organize related pages neatly.
- Regularly review your menus: As your website grows, revisit your menus to add new pages or remove outdated links. This keeps navigation fresh and relevant.
- Use descriptive labels: Clear, concise menu labels help visitors find what they’re looking for without confusion.
- Prioritize important pages: Place your most important pages at the top level for easy access. Less critical pages can go into dropdowns.
- Test on different devices: Check how your menus look and function on desktops, tablets, and smartphones. Make adjustments to ensure seamless navigation everywhere.
- Leverage plugins if needed: If you want more advanced menu features like mega menus or animations, consider plugins like Max Mega Menu or WP Mega Menu. They can add extra flair without much hassle.
Remember, a well-organized and attractive menu not only helps visitors navigate your site easily but also reflects your brand’s professionalism. Keep experimenting with styles, stay updated with new WordPress features, and don’t hesitate to ask for feedback from friends or users. Happy menu managing!