If you’ve ever clicked on a call-to-action (CTA) button on a website and found yourself scrolling down to a specific part of the page, you’ve experienced what’s called “anchoring.” In WordPress, anchoring is a simple yet powerful technique that allows you to link directly to a particular section within a page. This means visitors can jump straight to the information they’re interested in—like your pricing, contact form, or a special offer—without scrolling through the entire page. It’s a user-friendly way to improve navigation, boost engagement, and make your site feel more professional. And the best part? You don’t need to be a coding expert to set it up!
Understanding the Benefits of Linking CTA Buttons to Specific Sections
Linking your CTA buttons directly to specific sections on your WordPress page can make a huge difference in how visitors interact with your site. Here are some key benefits:
- Enhanced User Experience: Visitors can find what they’re looking for quickly and easily, which keeps them engaged and reduces frustration.
- Increased Conversion Rates: When your CTA buttons lead directly to relevant content or forms, users are more likely to take the desired action—whether that’s signing up, making a purchase, or contacting you.
- Streamlined Navigation: Instead of scrolling endlessly, users can jump to important sections with a single click, making your site feel more intuitive.
- Better Content Organization: You can structure your content into sections and guide visitors smoothly through your message, from introduction to call to action.
- Mobile-Friendly Benefits: On smaller screens, quick jumps to sections are especially helpful, creating a seamless experience across all devices.
Implementing this technique isn’t just about aesthetics; it’s about creating a smarter, more effective website that guides visitors effortlessly toward your goals. Whether you’re promoting a new product, gathering leads, or highlighting an event, linking your CTA buttons to specific sections makes your site more dynamic and user-centric. Plus, with just a few simple steps, you can start harnessing these advantages today!
3. Step-by-Step Guide to Creating Anchor Links in WordPress

Ready to make your website more user-friendly by adding smooth navigation? Creating anchor links in WordPress is easier than you might think! Let’s walk through the simple steps to set this up so your visitors can jump straight to the sections they care about.
Step 1: Identify the Section You Want to Anchor
First, decide which part of your page you want to link to. It could be a specific paragraph, a product list, a sign-up form, or any other section. Make sure this section is distinct and relevant for your call-to-action.
Step 2: Add an Anchor ID to Your Section
In WordPress, you can add an anchor ID directly into your content. If you’re using the Gutenberg editor:
- Select the block where your section begins.
- In the block settings on the right, look for the “Advanced” section.
- Type a unique name in the “HTML Anchor” field—like
section-offer.
This creates an invisible identifier that browsers can target for navigation.
Step 3: Create Your Call-to-Action Link
Next, you’ll link to that anchor from your CTA button, text, or menu. To do this:
- Highlight the text or select the button you want to turn into a link.
- Insert your link in the format:
section-offer. - If linking from a different page, include the full URL followed by the anchor, like
https://yourwebsite.com/pagesection-offer.
Step 4: Save and Test
Once everything’s set, save your post or page. Then, preview it and click your CTA. It should smoothly scroll you right to the designated section!
Extra Tips:
- Use descriptive, easy-to-remember anchor IDs.
- Avoid spaces—use hyphens or underscores instead.
- Test on different devices to ensure smooth navigation.
And that’s it! With just a few simple steps, you turn static links into powerful navigation tools that enhance user experience.
4. Using HTML Anchor Tags for Smooth Navigation
While WordPress offers a straightforward way to add anchors via the editor, understanding how to manually use HTML anchor tags gives you even more control. Plus, if you’re customizing your site’s code directly, this technique is super helpful.
What Is an HTML Anchor Tag?
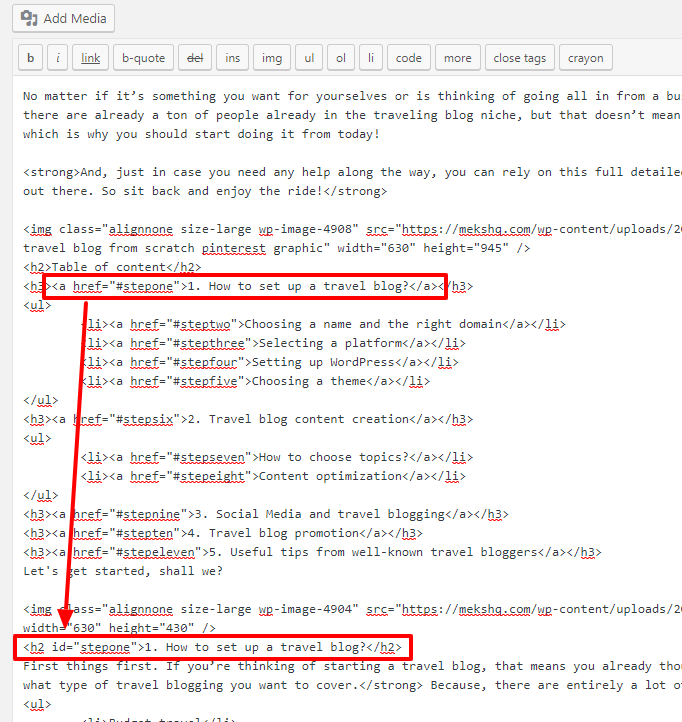
It’s a simple <a> tag with an href attribute pointing to an ID on the page. For example:
<a href="section-offer">Go to Special Offer</a>
This creates a clickable link that, when clicked, takes the user to the element with the matching ID.
How to Use It for Smooth Navigation
Here’s a quick example:
<!-- Your CTA link --><a href="special-section">Learn More About Our Service</a><!-- Target Section --><div id="special-section"> <h2>Special Offer!</h2> <p>Here's where your visitors land after clicking the link.</p></div>
When visitors click the link, the page scrolls smoothly (if your theme supports it) to the section with id="special-section".
Enabling Smooth Scrolling
Most modern themes automatically support smooth scrolling. But if yours doesn’t, or you want to customize it, you can add a bit of CSS:
html { scroll-behavior: smooth;}
This CSS makes all anchor link jumps smooth instead of instant.
Benefits of Using HTML Anchor Tags
- Full control over link placement and styling.
- Easy to add custom IDs anywhere in your code.
- Great for manual tweaks or advanced customizations.
Remember, always double-check your IDs and links to make sure everything points correctly. With this simple method, you can create intuitive navigation paths that guide your visitors exactly where you want them to go, enhancing their experience and increasing engagement.
5. Implementing Anchor Links with WordPress Block Editor (Gutenberg)
Alright, now that you’ve got a good grasp on what anchors are and why they’re super helpful, let’s dive into how you can set them up using the WordPress Block Editor, also known as Gutenberg. The good news? It’s pretty straightforward and doesn’t require any fancy coding skills!
First things first, you’ll want to identify the section on your page where you want the anchor link to lead. For example, maybe you have a “Features” section that you want visitors to jump to directly from your call-to-action button.
Here’s a simple step-by-step guide:
- Edit your page or post where the section is located.
- Locate the block for the section you want to anchor. This could be a Heading block, a Group block, or any other block containing your content.
- Add a Custom HTML anchor:
In the Block Settings panel (usually on the right side), look for the “Advanced” section. If you don’t see it, make sure your block is selected.
1. Click on the block you want to anchor.2. Scroll down to the "Advanced" section in the settings sidebar.3. Find the "HTML anchor" field.4. Enter a unique ID here — for example, features or pricing.This ID will serve as your anchor point. Remember, it should be unique across your page to avoid conflicts.
Next, you’ll need to link to this anchor from your call-to-action button or link. To do that:
- Edit your CTA button or link.
- Set the URL as
your-anchor-id. For example, if your anchor ID isfeatures, the link will befeatures.
Once you update the page and view it live, clicking on that link will smoothly scroll the visitor directly to the section you marked with your anchor ID. Easy peasy!
And the best part? This method keeps everything within the block editor, no need for custom code snippets or plugins. It’s perfect for quick, clean setups especially if you’re already comfortable with Gutenberg.
6. Adding Custom IDs to Your Sections for Effective Anchoring
While the Block Editor makes it pretty simple to add anchor IDs, sometimes you might need a bit more control or want to add anchors to elements that don’t have a dedicated “HTML anchor” field. That’s when adding custom IDs directly into your HTML becomes handy.
Here’s what you need to know to do this effectively:
Using the Custom HTML Block
If you’re comfortable working with HTML, you can add your own IDs manually:
- Add a Custom HTML block to your page where you want the anchor.
- Insert your HTML code, for example:
<section id="testimonials"> <h2>Testimonials</h2> <p>Here's what our happy clients say...</p></section>This method gives you ultimate control. You can assign IDs to any element, whether it’s a <div>, <section>, or even a paragraph tag.
Adding IDs to Existing Blocks
In some themes or plugins, you might notice that certain blocks don’t have an “HTML anchor” field. In those cases, you can:
- Edit the block and look for an option to add custom attributes. Some advanced plugins or themes support this.
- If you can’t find an option, switch to the HTML editor of the block (by selecting the block and clicking the three-dot menu > Edit as HTML).
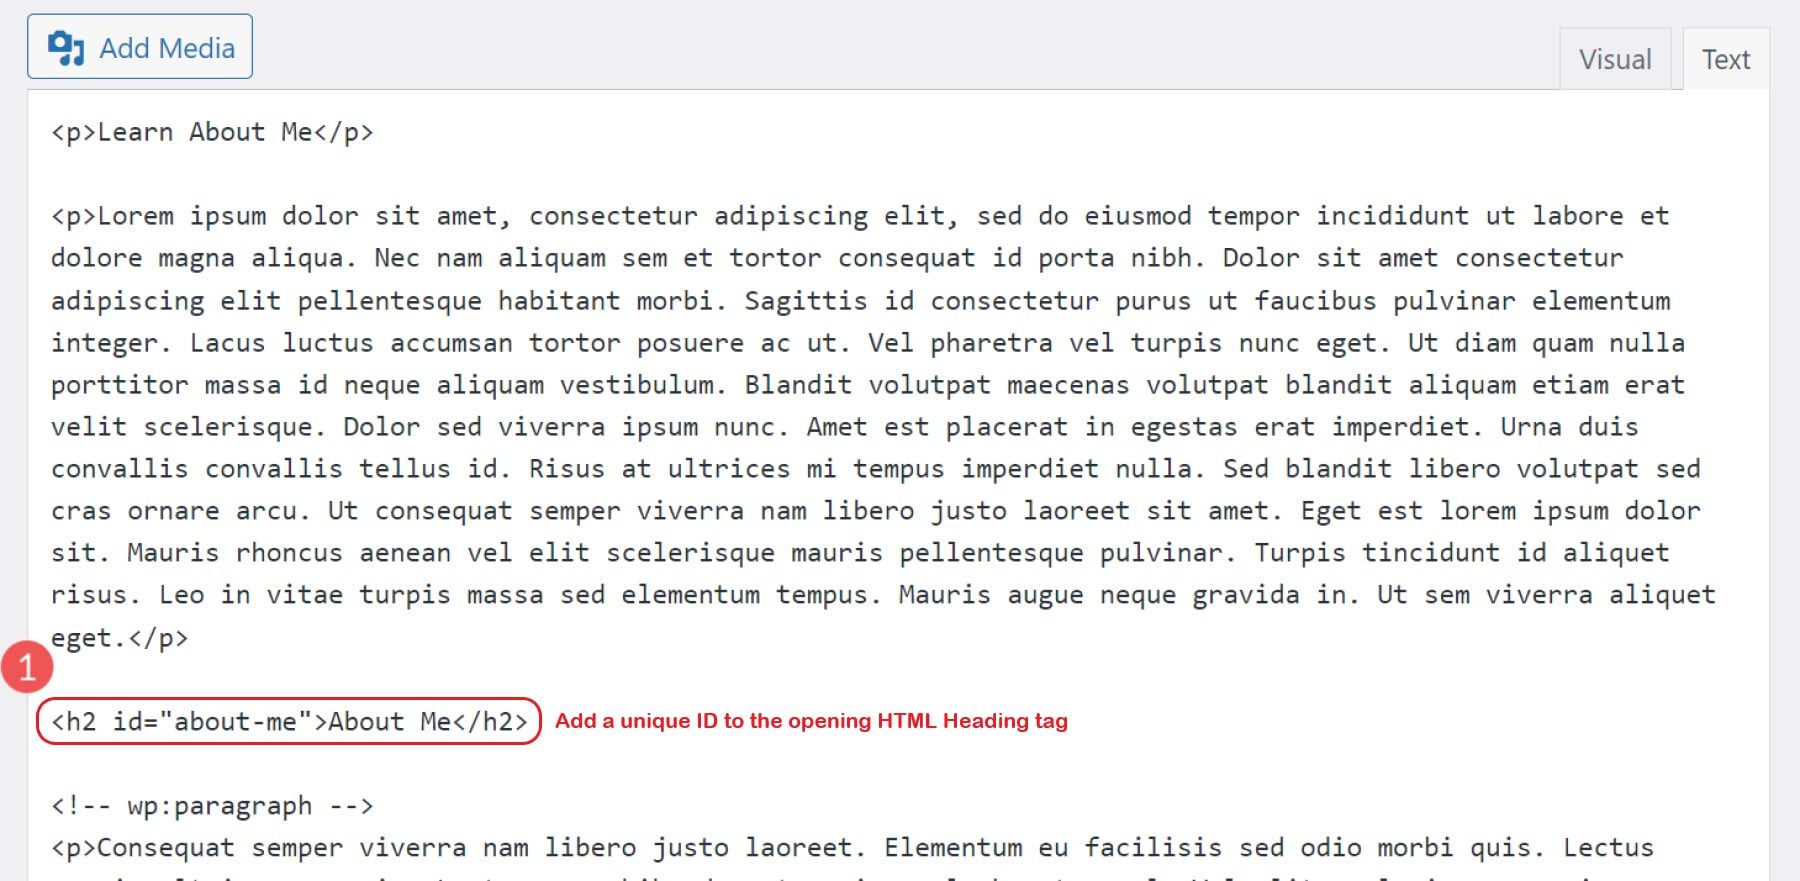
- Manually add the ID attribute to the element. For example:
<h2 id="about-us">About Us</h2>Remember, whenever you add custom IDs, ensure they’re unique across your entire page to prevent any navigation issues.
Finally, to link to these custom IDs, just create a link pointing to your-custom-id. For example, Learn more about us.
By mastering how to add custom IDs, you gain the flexibility to create precise, user-friendly navigation on your website. It’s a simple step that makes a big difference in user experience and site engagement!
7. Testing and Troubleshooting Your Anchor Links
Great, you’ve set up your anchor links — now what? The last thing you want is visitors clicking on your call-to-action, only to find that the page scrolls to the wrong spot or doesn’t work at all. Testing and troubleshooting are key to ensuring your anchor links do exactly what you want.
First things first: test thoroughly. Click on your CTA button or link from different devices and browsers. Sometimes, what works perfectly on Chrome on your desktop might act a little differently on Safari or mobile browsers. Make sure to check on both desktop and mobile to get a full picture.
Here are some common issues and how to fix them:
- Link not navigating to the right section: Double-check the
hrefattribute in your link. It should match theidof the target section exactly. Remember, IDs are case-sensitive, sosection1is different fromSection1. - Page jumps but not smoothly: If you’re aiming for a smooth scroll, but the jump feels abrupt, you might need to add some CSS or JavaScript to enhance the user experience. For example, adding
scroll-behavior: smooth;to your CSS can do the trick. - Anchor links broken after theme updates or plugin installations: Sometimes, updates might change how your theme or plugins handle IDs. Revisit your anchor links and ensure the IDs are still present and unique. Clearing cache and regenerating permalinks can also help.
Tips for troubleshooting: Use your browser’s developer tools (right-click and choose “Inspect”) to verify that the ID exists on the page and that your link points to the correct one. The Elements tab will show you your HTML structure, making it easy to spot typos or misplaced IDs.
Finally, remember to test any changes you make immediately. Small tweaks can sometimes cause unexpected issues, so testing early and often helps you catch problems before they affect your visitors.
8. Best Practices for Using Anchor Links in Your Website Design
Using anchor links effectively can significantly improve your website’s navigation, making it easier for visitors to find the information they’re after. But to get the most out of this technique, it’s important to follow some best practices that enhance usability and keep your design looking professional.
Here are some tried-and-true tips:
- Be consistent with your IDs and links: Use clear, descriptive IDs that match the content they point to. For example, if you have a section about pricing, use
id="pricing"and link topricing. Consistency helps both users and search engines understand your structure. - Prioritize accessibility: Ensure your links are easy to identify and click. Use adequate contrast and larger clickable areas, especially on mobile. Also, consider screen readers — make sure your anchor links have descriptive text that explains where they go.
- Use smooth scrolling for a better experience: Adding a bit of CSS like
html { scroll-behavior: smooth; }creates a gentle scroll, making navigation feel more natural and less jarring. - Keep your navigation simple: Don’t overdo it. Use anchor links sparingly, mainly for long content pages or single-page sites. Too many links can be overwhelming and confusing.
- Provide a way to return to the top: Especially on long pages, include a “Back to Top” link or button. It’s a small detail that greatly enhances user convenience.
- Test your anchor links regularly: As your site evolves, IDs may change or get removed. Regularly check that all your anchor links still work correctly, especially after theme updates or content changes.
By following these best practices, you not only improve user experience but also create a website that feels polished and professional. Anchor links are a simple yet powerful tool — use them wisely, and they’ll make your site navigation smoother and more intuitive for everyone.
Conclusion and Additional Resources for WordPress Anchoring Techniques
In summary, mastering the art of anchoring sections in WordPress enhances user experience by enabling smooth navigation and quick access to important content. Using simple techniques like anchor links combined with clear section IDs can dramatically improve your website’s usability without the need for complex plugins or custom code. Remember, consistency in your anchor link structure and proper organization of your sections are key to a seamless experience for your visitors.
For further improvement, explore these additional resources:
- Official WordPress Documentation: Learn about HTML anchors and best practices in WordPress.
- Plugins: Consider lightweight plugins like Page Scroll to ID for advanced scrolling effects.
- CSS Techniques: Enhance anchor navigation with smooth scrolling using simple CSS snippets.
- Online Tutorials: Websites like WPBeginner and WPMU DEV offer step-by-step guides on anchoring and navigation enhancements.
By leveraging these resources and techniques, you can create a more engaging and user-friendly website that guides visitors effortlessly through your content. Keep experimenting with different methods to find what best suits your site’s design and your audience’s needs.