If you’re a WordPress user, you’ve probably heard of Elementor — the popular drag-and-drop page builder that makes designing your website a breeze. But what happens when you want to switch your existing site to Elementor or move from another builder? That’s where Elementor migration comes in. Migrating your site to Elementor can seem daunting at first, but don’t worry! This guide will walk you through the process step-by-step, helping you switch smoothly without losing your content or design. Whether you’re upgrading your site or just exploring new tools, understanding how to migrate effectively is key to a seamless transition.
Reasons to Migrate Your WordPress Site with Elementor
Thinking about migrating your WordPress site to Elementor? There are plenty of good reasons to consider making the switch. Here’s why many website owners choose Elementor as their go-to page builder:
- Ease of Use: Elementor’s intuitive drag-and-drop interface makes designing pages simple, even if you’re not a developer. You can see your changes live, which means less guesswork and more creativity.
- Design Flexibility: With hundreds of pre-designed templates, widgets, and customization options, Elementor allows you to craft unique, professional-looking websites without coding skills.
- Speed and Performance: Elementor is optimized for fast loading times, helping your website perform better in search rankings and provide a better user experience.
- Compatibility and Integrations: Elementor plays nicely with most WordPress themes and plugins, making it easier to add functionality like contact forms, e-commerce, SEO tools, and more.
- Future-Proofing: As Elementor continues to grow and update, migrating to it ensures you stay current with modern web design trends and features.
- Cost-Effective: While there are premium features, the free version of Elementor offers plenty of tools to get started. Plus, migrating your existing site can save time and money in the long run by streamlining your design process.
Overall, migrating your site to Elementor can boost your website’s aesthetics, functionality, and ease of management. Whether you’re looking for a fresh new look or want to simplify your editing process, Elementor provides a robust platform to bring your vision to life.
3. Preparing for Your Elementor Migration
Before diving into the actual migration, it’s essential to get everything in order. Think of this step as laying a solid foundation for a smooth and hassle-free move. Proper preparation can save you time, prevent potential issues, and ensure your website remains functional throughout the process.
First, backup your current website. This is a must-do step—think of it as taking a snapshot of your site before any big change. Use a reliable backup plugin like UpdraftPlus, BackupBuddy, or the backup feature provided by your hosting provider. Ensure your backup includes both files and the database so you can restore everything if needed.
Next, update your WordPress core, themes, and plugins. Running outdated software can cause compatibility issues with Elementor or your new setup. Make sure everything is up-to-date, especially Elementor itself if you already have it installed. This not only improves security but also ensures smoother migration.
It’s also a good idea to review your current website’s structure. Take note of key pages, posts, custom post types, and any special functionalities or plugins you’re using. This helps you plan what to move and what might need adjustments after the migration.
Additionally, check your hosting environment. Ensure your hosting supports the requirements for Elementor and WordPress (like PHP version, MySQL version, and memory limits). If your hosting is outdated, consider upgrading or contacting support to optimize your environment for the migration.
Finally, set up a staging environment if your host offers one. A staging site is a clone of your live website where you can test the migration without affecting your visitors. This is especially helpful if your site is complex or has lots of customizations. Testing on a staging site allows you to iron out issues before going live again.
To summarize, preparation involves:
- Creating a full backup of your site
- Updating WordPress, themes, and plugins
- Reviewing your site’s structure and functionalities
- Ensuring hosting compatibility
- Setting up a staging environment for testing
With these steps completed, you’ll be well on your way to a successful migration. Think of it as packing your bags properly before a big trip—making sure you have everything you need and that you’re ready for the journey ahead!
4. Step-by-Step Process to Migrate Your WordPress Site Using Elementor
Great! You’re now prepared, so let’s walk through the actual migration process. We’ll keep it simple and straightforward, so even if you’re new to this, you’ll find it manageable.
Step 1: Install and Activate Elementor
If you haven’t already, install the Elementor plugin on your WordPress site. Go to Plugins > Add New, search for “Elementor,” then click Install Now and activate it. Make sure you’re using the latest version for compatibility and security.
Step 2: Export Your Current Content (if needed)
If you want to migrate content like pages and posts, consider exporting them as XML files. Navigate to Tools > Export and choose what content to export. This step is optional if you plan to manually recreate pages or if your migration involves a complete clone.
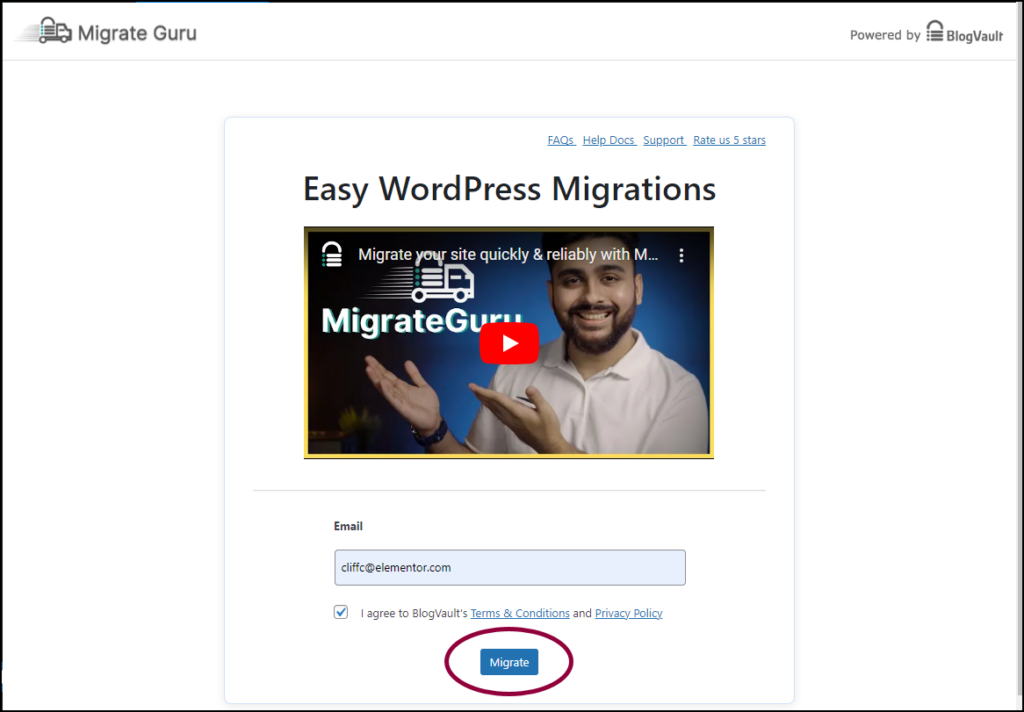
Step 3: Clone Your Site (using a plugin or hosting tools)
To move your entire website, use a migration plugin like All-in-One WP Migration, Duplicator, or your hosting provider’s migration tools. These plugins create an exact copy of your site, including themes, plugins, and database.
- Install and activate your chosen migration plugin
- Follow the plugin’s instructions to create a backup or package of your site
- Download the backup file to your local computer
Step 4: Set Up Your New Hosting Environment
On your new server or hosting account, install a fresh WordPress setup. Many hosts offer one-click installs. Once installed, ensure all settings match your previous environment, especially PHP and MySQL versions.
Step 5: Import Your Site to the New Host
Using the same migration plugin, upload the backup file you created earlier to your new site. Follow the plugin’s prompts to complete the import. This process will replicate your entire website on the new host.
Step 6: Install and Activate Elementor on the New Site
After the import, go to Plugins > Add New, install Elementor, and activate it. If you had a Pro version, ensure you upload your license and activate the plugin accordingly.
Step 7: Review and Test Your Website
Check your site thoroughly on the new host. Verify that pages, posts, images, and functionalities work correctly. Test on different browsers and devices to ensure everything looks good.
- Test your navigation and forms
- Ensure Elementor pages load properly
- Check for broken links or missing media
Step 8: Recreate or Migrate Elementor Pages
If you used a page builder or custom designs, you might need to manually recreate some pages using Elementor. Alternatively, if your migration plugin included page data, it should carry over these designs, but double-check to be safe.
Step 9: Update DNS Settings and Go Live
Once everything looks perfect, update your domain’s DNS records to point to your new hosting server. This can take anywhere from a few minutes to 48 hours to propagate. During this time, your site may experience some downtime, so plan accordingly.
Step 10: Final Checks and Cleanup
After the DNS changes propagate, visit your site to confirm it’s live and functioning correctly. Clear your cache, both on your browser and any caching plugins. Finally, delete any temporary files or staging environments to keep your site tidy.
And there you have it—a complete, step-by-step guide to migrating your WordPress site with Elementor. It might seem a bit overwhelming at first, but if you follow these steps patiently, you’ll have your website up and running on your new setup in no time!
5. Tips for Ensuring a Smooth Migration
Migrating your WordPress site with Elementor doesn’t have to be stressful if you plan ahead and follow some best practices. Here are some handy tips to make your migration as smooth as possible:
- Backup Everything: Before making any changes, always create a full backup of your website—files, database, and settings. This way, if something goes wrong, you can easily revert back to the original version.
- Test on a Staging Site: Instead of migrating directly on your live site, set up a staging environment. This is a clone of your website where you can test the migration process without affecting your visitors.
- Use Reliable Migration Plugins: There are several trusted plugins designed specifically for WordPress migrations, like Duplicator, All-in-One WP Migration, or WP Migrate DB. These tools simplify the process and reduce errors.
- Check Compatibility: Make sure your new hosting environment, themes, plugins, and Elementor itself are compatible and up to date. Outdated software can cause conflicts during migration.
- Document Your Settings: Keep a record of your site’s configurations, customizations, and plugin settings. This helps you quickly reapply or troubleshoot if needed.
- Plan Your Downtime: Schedule your migration during low-traffic hours to minimize impact on your visitors. Notify your audience beforehand if necessary.
- Perform a Dry Run: Many migration plugins allow you to do a test migration. Use this feature to identify potential issues before executing the final move.
- Post-Migration Checks: After migration, thoroughly test your website on the new server. Check your pages, forms, and especially Elementor-built sections to ensure everything looks and functions correctly.
By following these tips, you’ll significantly reduce the chances of encountering major issues during your migration. The goal is to make the transition seamless so you can focus on creating great content and engaging your audience without unnecessary stress.
6. Common Challenges During Elementor Migration and How to Overcome Them
Migrating with Elementor can sometimes come with its own set of challenges. But don’t worry—most of these are manageable with a bit of troubleshooting and preparation. Let’s look at some common hurdles and how you can tackle them:
1. Lost or Broken Layouts
Issue: After migration, some pages built with Elementor may not display correctly, or layouts might be broken.
Solution: Ensure that Elementor and all related plugins are updated to their latest versions. Clear the cache and regenerate CSS & Data in Elementor’s settings. If layouts are still broken, try re-saving the affected pages with Elementor in the new environment.
2. Missing Images or Media Files
Issue: Media files sometimes don’t transfer properly, resulting in missing images or broken links.
Solution: Use migration tools that include media files or ensure you migrate the wp-content/uploads directory. After migration, regenerate thumbnails via a plugin like Regenerate Thumbnails, and update any broken links.
3. Compatibility Conflicts
Issue: Conflicts between themes, plugins, or Elementor versions can cause errors or visual issues.
Solution: Test your site thoroughly in a staging environment first. Keep everything updated and deactivate plugins one by one to identify conflicts. Consider switching to a cleaner, compatible theme if needed.
4. Performance Issues
Issue: Your migrated site might load slowly, especially if media files or scripts are not optimized.
Solution: Optimize images, minify CSS and JS files, and consider using a CDN (Content Delivery Network). Also, check server performance and upgrade if necessary.
5. SEO and URL Problems
Issue: URLs may change, or SEO settings might be lost, affecting your search rankings.
Solution: Use SEO plugins like Yoast SEO to export/import SEO settings. Ensure your permalinks are correctly configured after migration. Redirect old URLs if needed to preserve SEO juice.
Remember, most issues can be prevented with thorough testing and backups. If you encounter a problem, take a deep breath, consult the community forums or documentation, and troubleshoot step-by-step. Migration doesn’t have to be a nightmare—approach it with patience, and you’ll be enjoying your new site in no time!
7. Post-Migration Checklist and Final Steps
Congratulations! You’ve successfully migrated your WordPress site with Elementor. But before you start celebrating, there are a few important steps to ensure everything runs smoothly and your visitors have a seamless experience.
Post-Migration Checklist:
- Check your website’s front end: Visit your site on different devices and browsers to ensure everything looks good and functions correctly. Look out for broken images, missing styles, or layout issues.
- Test all links and forms: Click through internal and external links, and submit any contact forms or other interactive elements to verify they work properly.
- Verify media files: Ensure all images, videos, and other media elements have transferred correctly and display as intended.
- Update permalinks and URLs: Double-check that your URLs are consistent and point to the correct content. Update any hard-coded links if necessary.
- Check SEO settings: Review your SEO plugin settings (like Yoast or All in One SEO) to make sure meta titles, descriptions, and schema markups are intact.
- Test site speed: Use tools like Google PageSpeed Insights or GTmetrix to ensure your site loads quickly. Optimize images or plugins if needed.
- Backup your site: Now that everything is in place, create a fresh backup. This ensures you have a restore point in case any issues arise later.
- Monitor your analytics: Check Google Analytics or other tracking tools to confirm data is being collected properly.
Final Steps:
- Update DNS settings: If your domain was pointing elsewhere during migration, update your DNS records to point to the new hosting/server. Remember, DNS propagation can take up to 48 hours.
- Clear caches: Clear your website cache, CDN cache, and browser cache to ensure visitors see the latest version of your site.
- Notify your audience: If the migration involved downtime or changes, inform your users through newsletters or social media to keep them in the loop.
- Monitor for issues: Keep an eye on error logs, broken links, or any unusual activity over the next few days. Address any problems promptly.
- Update internal links and resources: Check for any hardcoded URLs that may still point to old domains or servers and update accordingly.
By following this checklist and final steps, you’re setting your website up for success post-migration. It might seem like a lot, but taking your time now prevents headaches later!
8. Conclusion and Additional Resources for a Successful Migration
Migrating your WordPress site with Elementor doesn’t have to be intimidating. With proper planning, backups, and a step-by-step approach, you can move your website smoothly and confidently. Remember, the key is to stay organized, test thoroughly, and keep backups at every critical point.
As you settle into your new setup, don’t forget that the internet is full of helpful resources and communities ready to support you. Here are some additional tools and guides to keep handy:
| Resource | Description | Link |
|---|---|---|
| WordPress Codex | The official documentation for WordPress users, offering detailed guides and troubleshooting tips. | https://codex.wordpress.org/ |
| Elementor Blog and Help Center | Official tutorials, updates, and tips for making the most of Elementor. | https://elementor.com/help/ |
| WPBeginner | A beginner-friendly site with tutorials, guides, and tips for WordPress users of all levels. | https://www.wpbeginner.com/ |
| Backup Plugins (e.g., UpdraftPlus) | Reliable plugins to automate backups and restore points, crucial for safe migrations. | https://wordpress.org/plugins/updraftplus/ |
| Hosting Support | Most hosting providers offer dedicated support to assist with migrations and DNS updates. | Check your hosting provider’s support resources or contact their helpdesk. |
Don’t forget, patience and thorough testing are your best friends during this process. Take your time, follow the steps, and soon enough, you’ll have a fully functional, optimized WordPress site ready to impress your visitors.
If you encounter challenges, forums like Stack Exchange, WordPress.org support, or Elementor’s community forums can be invaluable. Happy migrating!