If you’re looking to establish a strong online presence in El Salvador or want a domain that reflects your local identity, a .com.sv domain might be just what you need. These domains are the country code top-level domains (ccTLDs) for El Salvador and are perfect for businesses, organizations, or personal projects linked to this vibrant country. Not only do they lend credibility and trustworthiness, but they also help with local SEO, making it easier for people nearby to find you. Plus, owning a .com.sv shows your commitment to your community and adds a professional touch to your website.
Prerequisites for Connecting Your .com.sv Domain to WordPress
Before you start connecting your .com.sv domain to your WordPress site, there are a few essential things you’ll need ready. First, ensure you have access to your domain registrar account—where you purchased or registered your .com.sv domain. You’ll need to log in to manage DNS settings. Second, your website should already be set up with WordPress—either hosted on a provider like Bluehost, SiteGround, or a custom server. It’s also helpful to have your hosting account details handy, especially your nameservers or IP address, depending on your setup.
Additionally, make sure you have a clear idea of what DNS records you need to update, such as nameservers or A records. Having a basic understanding of DNS management can save you time and avoid confusion. Lastly, consider backing up your current website and DNS settings before making changes—it’s always better to be safe than sorry! Once you have these prerequisites in place, you’re all set to start connecting your .com.sv domain to your WordPress site smoothly and confidently.
3. Registering and Managing Your .com.sv Domain

So, you’ve decided to get a .com.sv domain for your website — great choice! These domains are a fantastic way to showcase your presence in El Salvador or target a local audience. The first step is registering your domain, which is pretty straightforward, but it’s important to understand the process so you can manage it smoothly down the line.
To start, you’ll want to find an accredited domain registrar that offers .com.sv domains. Some popular options include GoDaddy, Namecheap, or local registrars that specialize in Latin American domains. Once you pick a registrar, you’ll search for your desired domain name to see if it’s available. If it is, you can proceed to purchase it. If not, don’t worry — most registrars will suggest similar names or variations you might like.
Key Tips for Registering Your Domain:
- Choose a memorable, relevant name: Your domain should reflect your brand or website’s purpose.
- Check the registration period: You can usually register for 1 year or multiple years — registering for longer can sometimes give you discounts.
- Review renewal policies: Make sure you’re aware of renewal costs and policies to avoid losing your domain unexpectedly.
- Enable domain privacy protection: If available, this keeps your contact info private and reduces spam.
Once your purchase is complete, most registrars will give you a control panel or dashboard where you can manage your domain settings. This is where you’ll handle DNS records, renewals, and other configurations. Keep your login details safe because you’ll need them whenever you want to make changes or renew your domain.
Managing Your Domain
Managing your .com.sv domain is all about keeping your contact info up-to-date, renewing on time, and configuring DNS settings when needed. Many registrars offer user-friendly interfaces, but it’s good to familiarize yourself with their specific setup.
From your dashboard, you can:
- Update contact information: Ensure your email and contact details are current so you receive important notifications.
- Renew your domain: Set reminders or enable auto-renewal to keep your domain active without interruption.
- Manage DNS settings: This is crucial when connecting your domain to WordPress or other services.
- Enable security features: Like two-factor authentication, to protect your account.
Remember, your domain is an asset for your website, so treat it with care. Regularly check your registration status and keep your contact info current to avoid losing access or domain expiration issues. Now that your domain registration and management are sorted, you’re ready to move on to the next step: updating DNS settings for your .com.sv domain to connect it with your WordPress site.
4. Updating DNS Settings for Your .com.sv Domain

Now that you’ve registered and have control over your .com.sv domain, it’s time to point it to your WordPress site by updating the DNS settings. Think of DNS (Domain Name System) as the phonebook of the internet — it tells browsers where to find your website when someone types your domain.
Don’t worry — this process is usually straightforward, especially with user-friendly registrar dashboards. Here’s a step-by-step guide to help you get your DNS settings right:
Step 1: Gather Your Hosting Details
- Hosting provider’s nameservers or DNS records: Usually provided in your hosting account dashboard or welcome email. These could be custom nameservers like ns1.yourhost.com and ns2.yourhost.com, or specific DNS records such as A records or CNAMEs.
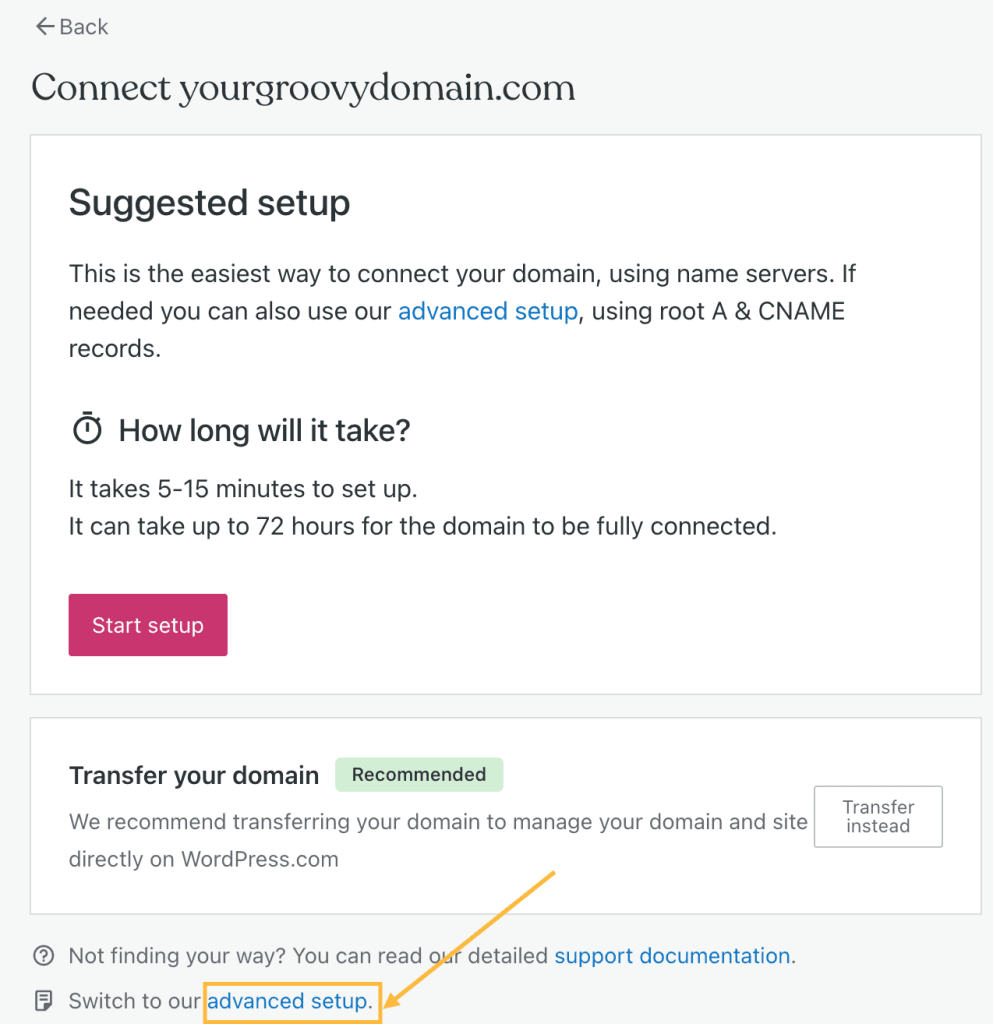
Step 2: Log Into Your Registrar’s Dashboard
Access your domain management panel through your registrar’s website. Find the section labeled DNS Management, Name Servers, or similar.
Step 3: Change Nameservers or Configure DNS Records
- If using custom nameservers: Replace the existing nameservers with the ones provided by your hosting provider. Save the changes and wait for DNS propagation (can take up to 48 hours, but usually faster).
- If updating DNS records directly: You’ll add or modify A records pointing to your server’s IP address, or add CNAME records if instructed by your host.
Step 4: Verify the Changes
Once you’ve made updates, it’s good to verify that your domain is pointing correctly to your website. You can use tools like DNSChecker or dig commands if you’re comfortable with terminal commands. These tools will show if your DNS records have propagated globally.
Additional Tips:
- Be patient: DNS changes can take some time to fully propagate across the internet.
- Keep your previous DNS records: Just in case, take screenshots or notes of your current DNS setup before making changes.
- Consult your hosting provider: If you run into issues, their support team can guide you through the correct DNS settings.
And that’s it! Once your DNS settings are correctly configured and propagated, your .com.sv domain will point to your WordPress site. The final step is to make sure your WordPress settings are aligned with your domain name — but that’s a topic for the next part of this guide. Happy connecting your domain to your website!
5. Configuring Your WordPress Site to Use the New Domain

Great! Now that your domain is pointing to your hosting server, it’s time to tell your WordPress site to recognize and use this new domain. This step is crucial because, without proper configuration, your site might still be accessible via the old URL or not display correctly.
First, log into your WordPress admin dashboard. Once inside, follow these simple steps:
- Navigate to Settings > General
- Look for the fields labeled WordPress Address (URL) and Site Address (URL)
- Replace the existing URLs with your new domain, for example, https://yourdomain.com.sv
- Scroll down and click Save Changes
Important: If your WordPress site was originally set up with a different domain, you may need to update these URLs in your database directly, especially if you can’t access the admin area. Tools like phpMyAdmin or plugins such as Better Search Replace can help you perform bulk updates safely.
Next, check your site’s permalinks. Go to Settings > Permalinks and simply click Save Changes. This refreshes your URL structure and ensures all links point correctly to your new domain.
Additionally, if you’re using any caching plugins or CDN services, clear their caches to make sure your changes are reflected immediately.
Once you’ve completed these steps, visit your website in a new browser tab. You should see your site loading with the new domain name. If not, don’t worry—double-check your DNS settings and ensure your domain is fully propagated. Sometimes, DNS changes can take a few hours up to 48 hours to fully update across the internet.
6. Verifying and Testing the Domain Connection
Now that your WordPress site is configured to use the new domain, it’s essential to verify everything is working correctly. Proper testing helps catch issues early and ensures a smooth experience for your visitors.
Here are some practical steps to verify and test your domain connection:
- Visit Your Website: Open a new browser window and enter your domain URL. Check if your website loads correctly without errors and displays the expected content.
- Check for SSL/TLS Certificates: If you’ve set up HTTPS, verify that your SSL certificate is active. You should see a padlock icon in the address bar. If not, you may need to install or renew your SSL certificate. Many hosting providers offer free SSL options like Let’s Encrypt.
- Test Internal Links and Resources: Navigate through your site and click on internal links. Make sure images, CSS, JavaScript files, and other resources load properly without 404 errors.
- Use Online Tools: Tools like Why No Padlock or SSL Labs can help diagnose SSL issues.
- Check Mobile Responsiveness: Open your site on different devices or use browser tools to see how your site looks and functions on mobile and tablet screens.
- Test from Different Locations: If possible, use VPNs or online proxy services to access your site from different geographical locations to verify DNS propagation worldwide.
- Use Analytics and Monitoring Tools: Implement tools like Google Analytics and Google Search Console. These platforms can alert you if there are issues with your site or domain.
If you encounter issues such as broken links, images not loading, or security warnings, revisit your DNS settings, SSL configuration, and WordPress URL settings. Remember, DNS propagation can sometimes cause temporary issues, so patience is key.
Finally, inform your audience about your new domain through email newsletters, social media, or your existing communication channels. This helps ensure your visitors update their bookmarks and links to your site.
Congratulations! You’ve successfully connected and verified your .com.sv domain with your WordPress site. Enjoy your new online presence and the flexibility it offers.
7. Tips for Maintaining Your Domain and Website Connection
Once you’ve successfully connected your .com.sv domain to your WordPress site, the journey doesn’t end there. Maintaining that connection is crucial to ensure your website remains accessible, secure, and running smoothly. Here are some practical tips to help you stay on top of your domain and website maintenance:
Regularly Update Your Domain Registration
Make it a habit to check your domain’s registration status periodically. Ensure your contact information is up-to-date with your domain registrar. This way, you’ll receive renewal reminders and avoid losing your domain due to missed payments or outdated info.
Renew Your Domain on Time
- Set reminders: Use calendar alerts or automatic renewal options to prevent accidental lapses.
- Understand renewal policies: Know the renewal periods and fees associated with your .com.sv domain.
Secure Your Website and Domain
Security is vital. Consider implementing the following:
- SSL Certificate: Ensure your site uses HTTPS to encrypt data and build trust with visitors.
- Regular Backups: Backup your website regularly to recover quickly if needed.
- Strong Passwords & 2FA: Protect your domain registrar account and WordPress admin with strong passwords and two-factor authentication.
Monitor Your Website’s Performance
Use tools like Google Analytics and Search Console to keep an eye on traffic, engagement, and potential issues. Regular monitoring helps you spot and fix problems early, keeping your site healthy.
Update WordPress and Plugins
Keeping your WordPress core, themes, and plugins up-to-date not only adds new features but also patches security vulnerabilities. Outdated software can lead to security breaches or site crashes.
Maintain Clear DNS Records
Periodically review your DNS settings to ensure they’re correctly pointing to your hosting server. Avoid unnecessary changes unless you’re upgrading or changing your hosting provider.
Stay Informed and Connected
Follow industry blogs, forums, or newsletters related to domain management and WordPress. Staying informed about best practices, updates, and threats helps you proactively manage your website and domain.
By following these tips, you’ll keep your website running smoothly and protect your valuable online presence. Maintenance might seem like a chore, but it’s an investment that pays off by ensuring your visitors have a seamless experience and your brand remains trustworthy.
8. Conclusion and Additional Resources
Connecting a .com.sv domain to your WordPress site is a rewarding process that opens up new opportunities for your online presence. Whether you’re starting a personal blog, a portfolio, or a business website, having your own custom domain gives you credibility and control. Remember, the key steps involve choosing your domain, registering it, configuring DNS settings, and ensuring your website is properly pointed to your hosting provider.
While the process might seem complex at first, breaking it down into manageable steps makes it much more approachable. Don’t forget to keep your domain and website secure and maintained over time. Regular updates, backups, and monitoring will help you avoid common pitfalls and ensure your site remains accessible and safe for your visitors.
If you’re eager to learn more or need additional help, here are some great resources:
- WordPress Support Forums — for troubleshooting and community advice.
- Domain Name Wire — industry news and tips on domain management.
- WPBeginner — beginner-friendly tutorials on WordPress and hosting.
- ICANN Registrar Directory — find accredited domain registrars for your .com.sv domain.
Remember, your website is an ongoing project. Regularly review your setup, stay informed about best practices, and don’t hesitate to seek help when needed. Happy website building!