Managing a busy WordPress media library can quickly become overwhelming, especially when you start uploading dozens or hundreds of images, videos, and documents. Without proper organization, finding the right media files can feel like searching for a needle in a haystack. Luckily, creating folders within your media library is a simple yet powerful way to keep everything tidy and accessible. In this step-by-step guide, we’ll walk you through how to set up folders in your WordPress media library so you can streamline your workflow and save time. Let’s get started on making your media management more efficient!
Understanding the Benefits of Organizing Your Media Library
When your media library is well-organized, it’s like having a neatly arranged toolbox—you know exactly where everything is, and you can access it quickly. Here are some of the key benefits of creating folders and maintaining a structured media library:
- Faster Content Creation: Instead of wasting time searching through hundreds of files, you can locate images or videos instantly. This speeds up your workflow, allowing you to focus more on creating content rather than hunting for files.
- Improved Collaboration: If you work with a team, organized folders ensure everyone can find and use media assets easily. Clear structure reduces confusion and miscommunication.
- Better File Management: Keeping files sorted by categories—such as blog images, product photos, or event videos—makes it easier to update or replace assets without hassle.
- Enhanced Website Performance: Properly organized media can help avoid duplicate files and reduce clutter, which may contribute to faster website loading times.
- Professional Appearance: An organized media library reflects your attention to detail and professionalism, especially if you’re working with clients or managing multiple websites.
While WordPress doesn’t natively support folder creation within the media library, there are plugins that can help you implement a folder-like structure. This organizational method not only makes managing media more intuitive but also helps maintain a clean, efficient digital workspace. The next sections will guide you through the process of setting up these folders and maximizing their benefits.
3. Choosing the Right Plugin to Create Folders in WordPress
When it comes to organizing your media library with folders, the first step is picking the right plugin. With so many options out there, it can feel a bit overwhelming. But don’t worry — I’ve got your back! The key is to find a plugin that’s user-friendly, reliable, and compatible with your version of WordPress.
Here are some important factors to consider when selecting a plugin:
- Ease of Use: You want a plugin that makes creating and managing folders straightforward. No complicated setups or confusing interfaces.
- Compatibility: Ensure the plugin works well with your current WordPress version and other plugins you have installed.
- Features: Some plugins offer additional features like drag-and-drop organization, nested folders, or media search capabilities. Decide what’s most important for your workflow.
- Support and Updates: Opt for plugins that are regularly maintained and come with good support options. This helps keep things running smoothly and securely.
Popular options include:
| Plugin Name | Highlights | Rating |
|---|---|---|
| FileBird – WordPress Media Library Folders | User-friendly, drag-and-drop, supports nested folders | 4.8/5 |
| WP Media Folder | Advanced folder management, filtering options | 4.7/5 |
| Folder Plugin for Media Library | Simple setup, easy folder creation | 4.5/5 |
Read reviews, check out demos if available, and consider your specific needs before making a choice. Remember, the goal is to streamline your media management, so pick a plugin that makes your life easier!
4. Installing and Activating the Media Library Folder Plugin
Great! Once you’ve chosen the perfect plugin for creating folders, it’s time to install and activate it. Here’s a simple step-by-step guide to help you do just that:
- Login to your WordPress Dashboard: Head over to your website’s admin area by entering your credentials.
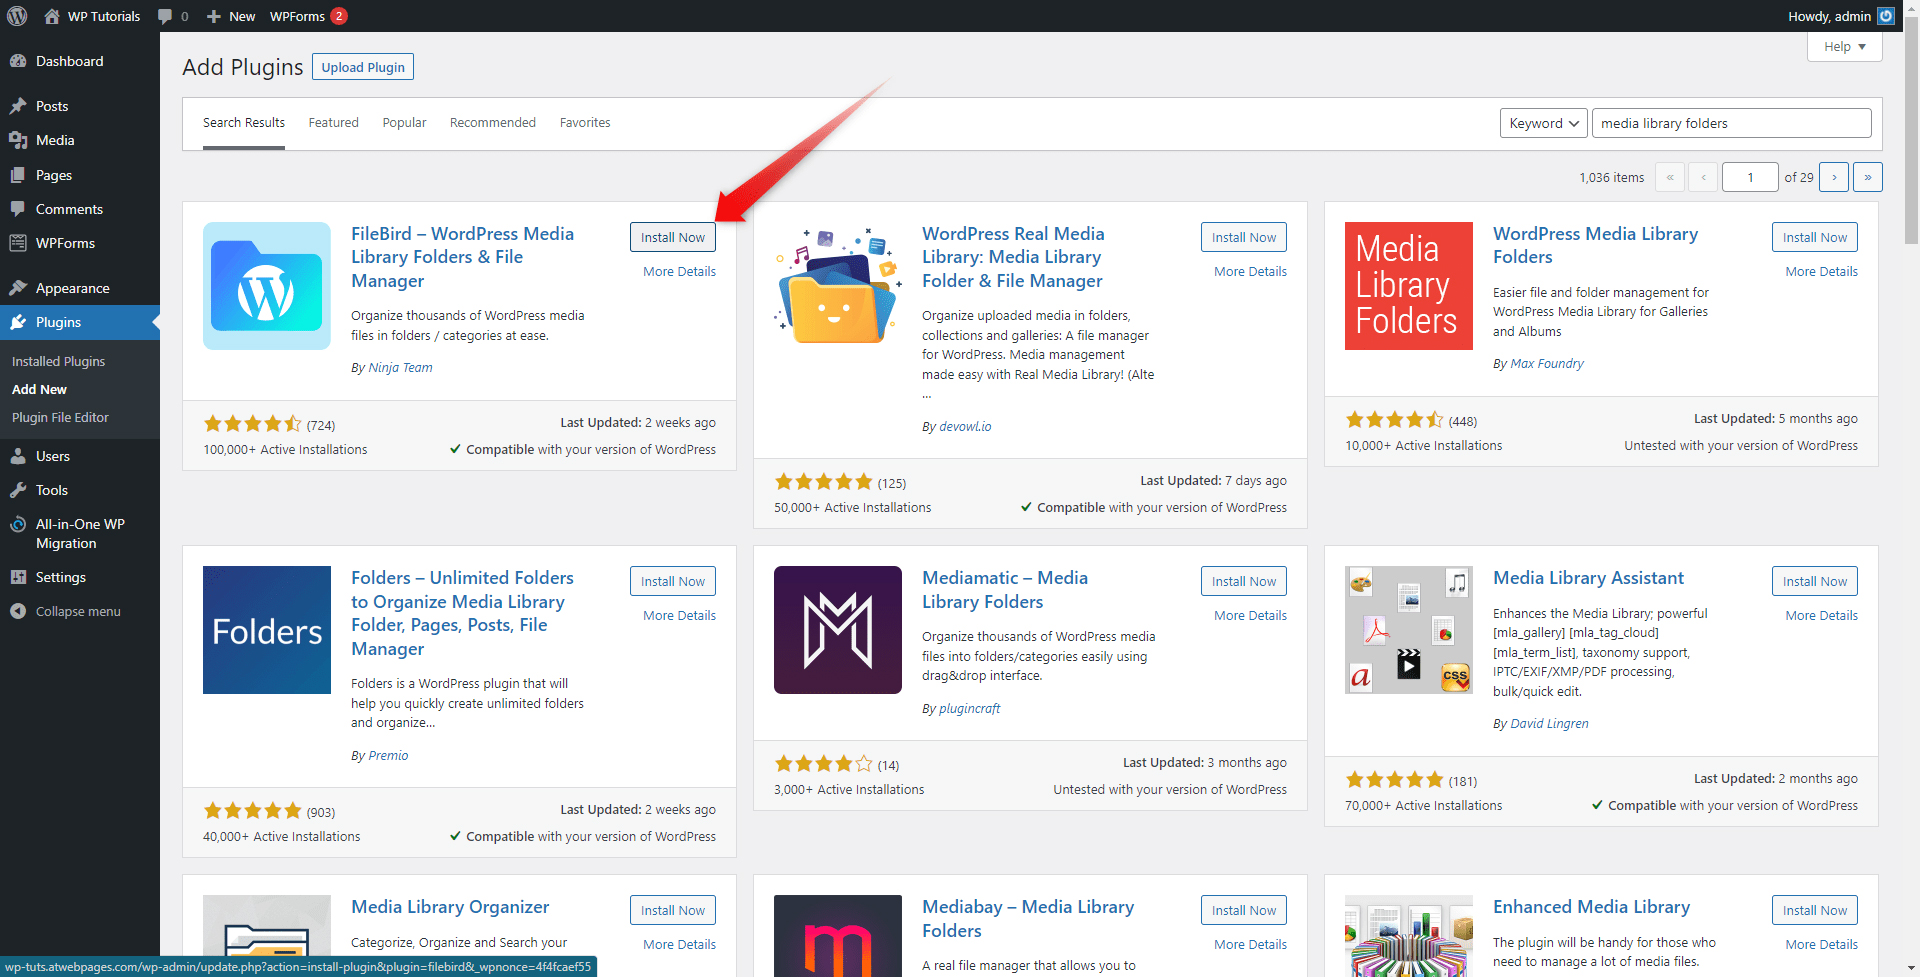
- Navigate to Plugins > Add New: On the left-hand menu, find the “Plugins” section and click “Add New.”
- Search for Your Chosen Plugin: In the search bar, type the name of the plugin you selected, like “FileBird” or “WP Media Folder.”
- Install the Plugin: Once you see it in the search results, click the “Install Now” button. WordPress will handle the download and installation automatically.
- Activate the Plugin: After installation, click the “Activate” button. This will enable the plugin and make it ready for use.
And that’s it! Your plugin is now installed and activated. Usually, a new menu or options will appear in your Media Library or under Settings, depending on the plugin. Some plugins might also add a dedicated folder management interface directly within your Media Library, making it super easy to start organizing your files.
If you encounter any issues during installation, double-check that your WordPress version is compatible, or consult the plugin’s documentation for troubleshooting tips. Remember, keeping your plugins updated is essential for security and optimal performance.
5. Creating Folders in Your WordPress Media Library
So, you’re ready to start organizing your media files and want to create folders in your WordPress Media Library? Great choice! While WordPress doesn’t offer native folder support, there are some fantastic plugins that make this super easy and straightforward. Let’s walk through the general process so you can get started.
First, you’ll need a plugin that adds folder functionality. Popular options include FileBird, Folder Plugin, or WP Media Folder. For this example, we’ll use FileBird since it’s user-friendly and widely used.
Once you’ve chosen and installed your plugin:
- Activate the plugin through your WordPress dashboard.
- Navigate to Media > Library. You should see a new sidebar or interface with folder options.
- Create a new folder by clicking on the Add New Folder button, typically found at the top or within the interface.
- Name your folder appropriately—think about what type of media it will hold. For example, “Product Images,” “Blog Banners,” or “Event Photos.”
- Click Create or Save to finalize the folder creation.
And that’s it! You’ve just created your first folder in your WordPress Media Library. The interface might vary slightly depending on the plugin you choose, but most are designed to be intuitive and simple to navigate.
Remember, the goal here is to make your media easier to find and manage later. So, take a moment to think about your folder structure before creating a lot of folders — this will save you some headaches down the line.
6. Organizing Your Media Files into Folders
Now that you’ve set up your folders, it’s time to start organizing your media files. This step is where you really start to see the benefits of a well-structured library. Here’s how to do it smoothly:
- Bulk select files – Most plugins allow you to select multiple files at once. Use checkboxes or drag to select several images or media files.
- Assign files to folders – Once selected, you can usually drag and drop files into the desired folder, or use a context menu to move them.
- Use descriptive folder names – Clear, consistent naming helps you quickly locate media later. For example, instead of “Folder 1,” name it “Spring Campaign Photos.”
- Maintain consistency – Regularly update and organize your media as you upload new files. This prevents clutter and confusion in the long run.
Here are some practical tips for effective media organization:
| Tip | Why It Matters |
|---|---|
| Plan your folder hierarchy | Having a logical structure from the start makes it easier to find files later. |
| Use subfolders | Break down large categories into smaller, more specific groups. |
| Regularly review and clean up | Remove outdated or duplicate files to keep things tidy. |
Remember, organization isn’t a one-and-done task. Make it a habit to file new media into the correct folders immediately after upload. This way, your WordPress Media Library remains a well-oiled machine, saving you time and frustration whenever you need to find that perfect image or video.
In short, creating folders and organizing your files might seem like a small step, but it makes a huge difference in managing your website content effectively. Happy organizing!
7. Tips for Maintaining an Organized Media Library
Keeping your WordPress media library tidy might not sound like the most exciting task, but trust me, it makes a huge difference in your website’s overall management and performance. Once you’ve set up your folders and started organizing your media, the key is to stay consistent. Here are some practical tips to help you maintain an organized media library:
Be Consistent with Naming Conventions
Choose a clear and descriptive naming system for your media files. For example, use keywords that describe the content, like “summer-sale-banner.jpg” or “product-launch-2024.png”. Consistent naming helps you quickly locate files and understand their purpose at a glance, especially when you have hundreds or thousands of media items.
Regularly Delete Unused Media
Over time, your media library can become cluttered with images or files that no longer serve a purpose. Regularly review your library and delete outdated or unused media to keep things streamlined. This not only declutters your library but can also improve your website’s loading times.
Use Descriptive Alt Text and Metadata
Adding detailed alt text and descriptions to your images not only boosts SEO but also helps you locate media easily through search functions. When files are well-documented, you’ll find it easier to manage and reuse media assets effectively.
Create a Media Management Routine
Set aside a little time weekly or monthly to review and organize your media library. During this routine, update file names, delete duplicates, and ensure files are in the correct folders. Making this a habit prevents clutter from piling up and keeps your media assets well-organized over the long run.
Leverage Search and Filtering Features
Take advantage of WordPress’s built-in search and filtering options. These features help you quickly locate specific media files without scrolling endlessly. Pair these with your folder structure for maximum efficiency.
8. Additional Plugins and Tools for Media Management
If you find managing your media library increasingly challenging as your website grows, don’t worry—there are fantastic plugins and tools designed to make your life easier. Here are some popular options:
Media Library Organizer
- What it does: Adds advanced folder and taxonomy features to your media library, allowing for more granular organization.
- Why it’s helpful: Easily categorize media files with custom folders, tags, and filters. It’s perfect for large sites with lots of media assets.
FileBird – WordPress Media Library Folders
- What it does: Provides a drag-and-drop interface to create nested folders within your media library.
- Why it’s helpful: User-friendly and intuitive, making organization straightforward even for beginners.
WP Media Folder
- What it does: Offers a visual folder structure, bulk media management, and integration with popular page builders.
- Why it’s helpful: Enhances the default media library with advanced features like filtering by media type, date, or folder.
Enhanced Media Library
- What it does: Adds custom taxonomies to media items, allowing you to categorize media by tags, types, or other criteria.
- Why it’s helpful: Improves searchability and organization, especially when dealing with diverse media assets.
Other Useful Tools
- Bulk Upload Tools: Plugins like “Add From Server” or “Media Sync” help you upload and organize large batches of files efficiently.
- Media Libraries Analytics: Tools that track media usage can help identify unused files, guiding cleanup efforts.
By combining these plugins with good organizational habits, you’ll keep your media library manageable, faster to navigate, and more professional-looking. Remember, a well-organized media library isn’t just about aesthetics—it’s about saving you time, reducing frustration, and making your website management much smoother.
9. Frequently Asked Questions About Media Library Organization
Organizing your WordPress media library can seem like a daunting task at first, especially if you’ve accumulated hundreds or even thousands of media files. To help clear up some common concerns, here are some frequently asked questions—and their answers—to guide you on your journey to a neater, more manageable media library.
Q1: Do I need to use plugins to organize my media library?
While you can organize your media library manually using folders or categories, plugins make the process much easier and more efficient. They provide user-friendly interfaces, bulk editing features, and additional tools to help you keep everything tidy. Some popular options include WP Media Folder, FileBird, and Media Library Organizer. However, if you prefer a simple setup or have a small media collection, manual organization might suffice.
Q2: Will organizing my media files affect their URLs or links?
Great question! In most cases, reorganizing or moving media files within the library does not change their URLs, especially if you’re using a media organization plugin that manages the file paths internally. However, if you manually move files via FTP or other methods, you might need to update links or regenerate thumbnails. Always back up your site before making significant changes, and test links afterward to ensure everything remains functional.
Q3: How can I prevent my media library from becoming cluttered again?
Consistency is key! Develop a naming and organizational system early on. Use descriptive filenames, categorize media files as soon as you upload them, and regularly delete unused or outdated files. Installing an organizational plugin with features like tagging or categorization can also help maintain order over time.
Q4: Is it safe to delete media files I no longer need?
Yes, but proceed with caution. Before deleting anything, double-check that the media isn’t embedded in any pages or posts. Many plugins also offer a way to see where media is used, preventing accidental broken links. Always back up your media library before bulk deletions, just in case you want to restore files later.
Q5: Can I organize media files by file type or date?
Absolutely! Many media management plugins allow you to filter files by type (images, videos, documents) or by upload date. This makes it easier to locate specific files quickly and keeps your library well-organized according to your preferred system.
10. Conclusion and Final Tips
Congratulations! You’ve now learned the importance of organizing your WordPress media library and the step-by-step methods to get started. A well-organized media library not only saves you time but also makes your website look more professional and easier to manage in the long run.
Final Tips to Keep Your Media Library Tidy:
- Plan your folder structure before uploading large batches of media. Think about categories, project types, or content relevance.
- Use descriptive filenames that clearly indicate the content of each file. For example, “Summer_Beach_Photos_2024.jpg” is better than “IMG1234.jpg.”
- Leverage plugins to automate organization, tagging, and bulk management features.
- Regularly review and delete unused files. Keeping only relevant media reduces clutter and improves website performance.
- Back up your media library periodically. This way, if something goes wrong, you’ll have a safe restore point.
Remember, the key to a successful media organization is consistency. Spend a little time setting up your system now, and you’ll thank yourself later when managing your website becomes much smoother. Happy organizing!