If you’re a WordPress user, you know how quickly your site can grow with new posts. Sometimes, though, you might find yourself in a situation where you want to start fresh—maybe you’ve changed your content strategy, want to clear out outdated posts, or just need a clean slate. Deleting all your posts might sound overwhelming, but with the right tools and steps, it’s easier than you think. In this guide, we’ll walk you through how to delete all your WordPress posts in just a few clicks, saving you time and effort.
Reasons You Might Want to Delete All Posts
There are plenty of reasons why you might decide to wipe out all your posts on WordPress. Here are some common scenarios:
- Starting a New Blog or Site: If your niche or focus has shifted completely, you might want to remove old content to make way for new, relevant posts.
- Cleaning Up Outdated Content: Over time, some posts become outdated or irrelevant. Deleting them can improve your site’s overall quality and user experience.
- Reducing Website Clutter: A large number of old posts can slow down your site or make it harder for visitors to find recent content. Clearing out the clutter helps streamline your site.
- Preparing for a Redesign: When giving your website a fresh look, removing old posts can make the transition smoother and prevent outdated content from clashing with your new design.
- Managing Storage and Performance: Excessive content can impact your hosting performance. Deleting unnecessary posts can help optimize site speed and storage.
Whatever your reason, it’s good to know there are straightforward ways to delete all posts without manually removing each one. In the next sections, we’ll explore how to do this efficiently and safely.
3. Preparing Your Website Before Bulk Deletion

Before you dive into deleting all your posts, it’s super important to get your website ready. Think of it as preparing your workspace before starting a big project. You want to make sure everything is organized, backed up, and that you understand what’s about to happen.
First things first, back up your website. Accidents happen, and once you delete your posts, they’re gone unless you have a backup. There are plenty of plugins like UpdraftPlus or BackupBuddy that make this process easy. Just install one, run a quick backup, and store it safely. That way, if you change your mind or need to restore some content later, you’re covered.
Next, review your content and site structure. Are there posts you want to keep? Maybe some are still relevant or important. You might want to export specific posts or categories before deleting everything. WordPress offers built-in export tools under the Tools > Export section, which allows you to save a copy of your content in case you want to restore or review it later.
It’s also smart to deactivate plugins that might interfere. Some plugins, especially SEO or content management ones, could conflict with bulk deletion processes. Temporarily deactivate them to avoid any issues. And if you’re using a caching plugin, clear your cache after deleting posts to see the latest changes.
Finally, inform your team or users if your website is active and has visitors. Letting people know about the upcoming changes can help manage expectations. And if you’re running a business site, double-check that deleting posts won’t affect your SEO or customer experience.
Taking these steps might seem like extra work, but they’ll save you headaches down the line. Preparing your website ensures a smooth, safe, and efficient bulk deletion process—so you can start fresh or reorganize without fear of losing important content.
4. Methods to Delete All Posts on WordPress
Now that your website is prepped and ready, let’s talk about how you can actually delete all your posts. There are a few straightforward methods, depending on your comfort level with plugins, manual actions, or even SQL queries. Here’s a quick rundown:
Method 1: Using a Plugin (easiest for most users)
- Install a bulk delete plugin like “Bulk Delete” or “WP Bulk Delete” from the WordPress plugin repository.
- Activate the plugin and go to its settings page.
- Select the criteria for deletion—either all posts or specific categories, tags, or dates.
- Click the delete button and wait for the process to finish. The plugin will handle the heavy lifting for you!
This method is user-friendly, safe, and doesn’t require any technical skills. Just be sure to review your selections before confirming the deletion.
Method 2: Using the Built-in Post Management
If you have a manageable number of posts, you can delete them manually:
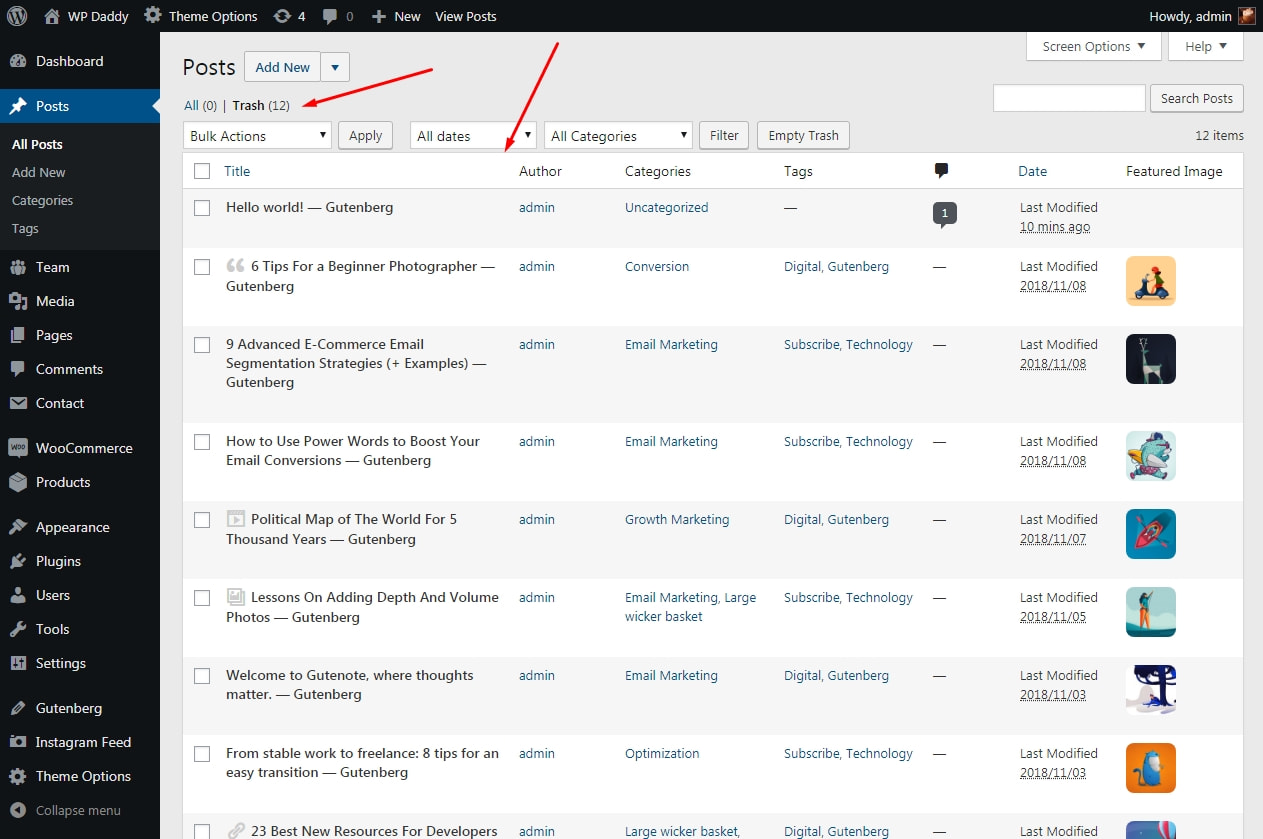
- Navigate to Posts > All Posts in your WordPress dashboard.
- Select the checkbox at the top to choose all posts on the current page.
- Use the Bulk Actions dropdown to select “Move to Trash” and click Apply.
- Repeat these steps if you have multiple pages of posts.
- Finally, go to the Trash tab and click “Empty Trash” to permanently delete everything.
This is suitable for small sites but can be tedious if you have hundreds or thousands of posts.
Method 3: Using phpMyAdmin (for advanced users)
If you’re comfortable with databases and have access to your hosting control panel, you can run a SQL query:
DELETE FROM wp_posts WHERE post_type = 'post';
This command deletes all posts from the database. Make sure to back up your database before executing, as this action is irreversible. Also, replace wp_ with your actual table prefix if different.
Method 4: Using WP-CLI (command line interface)
For developers or those with server access, WP-CLI offers a quick way:
wp post delete $(wp post list --post_type=post --format=ids) --force
This command deletes all posts immediately. Again, ensure you have a backup before running this command. It’s fast and effective, especially for large sites.
Whether you choose a plugin, manual deletion, database commands, or WP-CLI, the key is to pick the method that fits your comfort level and site size. With the right approach, you’ll have your WordPress site cleared out in just a few clicks or commands—ready for new content or a fresh start!
5. Using Plugins for Bulk Post Deletion
If you’re looking to delete a large number of posts quickly and efficiently, using a plugin can be a real lifesaver. There are several WordPress plugins designed specifically for bulk managing and deleting posts, making the process straightforward—even if you’re not super tech-savvy.
One popular choice is Bulk Delete. This plugin allows you to delete posts based on various filters, such as post type, category, tags, date range, and more. It’s especially handy if you want to delete specific groups of posts without affecting the rest of your site.
Here’s how you can use a plugin like Bulk Delete:
- Install and activate the plugin: Head over to your WordPress dashboard, navigate to Plugins > Add New, search for Bulk Delete, and click Install Now. Once installed, activate it.
- Configure your deletion criteria: After activation, go to Tools > Bulk Delete. You’ll see options to filter posts by:
- Post type (posts, pages, custom post types)
- Categories or tags
- Date range (e.g., posts older than a year)
- Author, status, or specific IDs
Using plugins is a great way to save time and reduce mistakes, especially when managing large sites or doing regular cleanup. Just remember to back up your site beforehand, so you can restore your posts if something unexpected happens.
Other plugins worth exploring include WP Bulk Delete and Advanced Bulk Edit. Check their features and see which fits your needs best!
6. Deleting Posts Manually via the WordPress Dashboard
If you prefer a more hands-on approach or have a smaller batch of posts to delete, doing it manually through your WordPress dashboard is simple and effective. It’s perfect when you want precise control over which posts to remove.
Here’s a step-by-step guide:
- Log into your WordPress admin dashboard: Go to your website’s admin login page and enter your credentials.
- Navigate to the Posts section: On the left sidebar, click on Posts > All Posts. This will show a list of all your published posts.
- Select the posts you want to delete: You can do this in a couple of ways:
- Use the checkboxes next to each post to select multiple posts at once.
- If you want to delete all posts on the page, check the top checkbox to select all listed posts.
This method is especially useful if you want to delete only certain posts and keep others intact. It’s straightforward, requires no additional plugins, and gives you complete control over the deletion process.
Remember, once you empty the trash, the posts are gone forever. So, double-check your selections before confirming deletion!
7. Using SQL Queries to Remove All Posts (Advanced Method)
If you’re comfortable working directly with your website’s database, using SQL queries can be a super quick way to delete all your WordPress posts. But heads up—this method requires a bit of technical know-how, and messing around with SQL can be risky if you’re not careful. So, make sure you back up your database before diving in!
Here’s the general idea: you’ll run a SQL command that deletes all entries from the wp_posts table where the post_type is post. This removes all blog posts but leaves pages and other content intact.
Steps to follow:
- Backup Your Database: Always, always, always create a backup before running SQL commands. Use your hosting provider’s backup tools or a plugin.
- Access Your Database: Log in to phpMyAdmin or any database management tool your host provides.
- Run the SQL Query: Enter the following command:
DELETE FROM wp_posts WHERE post_type = 'post';
Note: If your table prefix isn’t wp_, replace it with your actual prefix.
- Verify and Clear Caches: After executing the command, check your site to confirm posts are gone. If you’re using caching plugins or server-side cache, clear those to see the changes immediately.
Important Reminder: This method deletes your posts permanently. It doesn’t go to trash like the WordPress admin does. So, double-check everything before executing the query!
Also, if you want to delete related metadata, comments, or other data, you’ll need to run additional SQL commands or clean up via plugins. And if you’re not comfortable with SQL, it’s better to stick with safer methods or seek help from a developer.
8. Important Tips and Precautions Before Deleting Posts
Before you hit delete, it’s crucial to pause and think about the consequences. Deleting posts is a powerful action, and once they’re gone, they’re hard to recover unless you’ve prepared in advance. Here are some essential tips and precautions to keep in mind:
- Backup Everything: Always create a full backup of your website and database. This way, if something goes wrong or you change your mind, you can restore your site to its previous state.
- Understand What You’re Deleting: Double-check which posts you’re about to delete. Are they drafts, published posts, or pages? Use filters to target specific content.
- Test in a Staging Environment: If possible, perform the deletion on a staging site first. This helps you see the effects without risking your live site.
- Consider the Impact on SEO and Traffic: Deleting popular posts can affect your search engine rankings and visitor experience. Think about whether you really want to remove all posts or just outdated ones.
- Use the Trash Carefully: Remember, deleting posts via the admin panel moves them to Trash first. Emptying Trash permanently deletes them. If you want to delete all posts quickly, consider emptying Trash after moving posts there first.
- Be Cautious with Bulk Actions: When selecting multiple posts for deletion, double-check your selections to avoid accidental removal of important content.
- Remember the Permanence: Especially when using SQL queries or plugins that delete permanently, there’s no easy undo button. Make sure you’re ready to part with the content.
By following these tips, you can safely tidy up your WordPress site without risking data loss or unintended consequences. If you’re ever unsure, consult with a developer or a WordPress expert before proceeding. Better safe than sorry!
9. Restoring Deleted Posts from Backup
If you’ve accidentally deleted a post or two and realize it after some time, don’t worry—there’s usually a way to bring it back, especially if you’ve been proactive with backups. Restoring deleted posts from a backup might sound intimidating, but with the right tools, it’s pretty straightforward.
First things first, it’s essential to have a recent backup of your WordPress site. Many hosting providers offer backup options, or you might be using a plugin like UpdraftPlus, BackupBuddy, or Jetpack Backup. These tools make restoring your site, including specific posts, a breeze.
Steps to Restore Deleted Posts from Backup
- Check Your Backup Files: Log into your backup plugin or hosting control panel and locate your most recent backup. Ensure that it includes the post you want to recover.
- Restore the Backup: Follow your backup plugin’s instructions to restore the entire site or specific database tables. Usually, restoring just the database table for posts (wp_posts) is enough to recover deleted posts without affecting other site content.
- Use Database Management Tools: If you’re comfortable with databases, you can directly access your site’s database via phpMyAdmin. Locate the wp_posts table, find the post you want to recover, and change its post_status from trash or deleted back to publish.
- Verify the Restoration: After restoring, visit your site’s admin panel and check the Posts section to see if the deleted post is back. Make sure everything looks right and functions properly.
Important Tips
- Always back up before restoring: Restoring can overwrite current content, so make sure you save your latest changes.
- Test on a staging site: If possible, perform the restore on a staging environment first to prevent any accidental data loss on your live site.
- Seek professional help if needed: If you’re unsure, consult a developer or your hosting support—they can help you restore your posts safely.
Remember, prevention is better than cure. Regular backups ensure you can recover quickly from accidental deletions or other mishaps. So, make it a habit to back up your site regularly!
10. Conclusion and Final Thoughts on Managing Your WordPress Posts
Managing your WordPress posts might seem daunting at first, especially when dealing with large volumes or accidental deletions. But with a clear strategy and the right tools, it becomes much more manageable. Whether you’re cleaning out old content, organizing your posts, or recovering deleted ones, you now have the essential steps to keep your site tidy and up-to-date.
Here’s a quick recap of the key takeaways:
- Regular Backups: Always keep recent backups so you can restore posts if needed.
- Bulk Deletion: Use built-in features or plugins to delete multiple posts efficiently.
- Using Plugins: Consider plugins like WP Bulk Delete for more advanced management.
- Restoring Deleted Posts: Leverage your backups or database tools to recover lost content.
- Stay Organized: Categorize and tag your posts for easier management in the future.
By incorporating these practices into your routine, you’ll find managing your WordPress posts much less stressful. Remember, your website is an ongoing project—regular maintenance keeps it running smoothly and looking professional.
If you ever feel overwhelmed, don’t hesitate to seek help from the WordPress community or professional developers. With a little effort, you’ll keep your site fresh, relevant, and engaging for your visitors.
Happy blogging and managing your WordPress site! With these tips, you’re well on your way to becoming a pro at handling your posts. Just take it one step at a time, and soon managing your content will feel like second nature.