In the realm of WordPress, plugins are powerful tools that enhance the functionality and features of your website. However, there are times when you may want to prevent users—especially those who have access to the admin panel—from deactivating certain plugins. Disabling plugin deactivation can be crucial for keeping essential features intact, maintaining site performance, and ensuring security. In this post, we’ll explore how to effectively disable plugin deactivation and the implications of doing so.
Understanding the Risks of Disabling Plugin Deactivation
While preventing plugin deactivation can offer several advantages, it’s important to understand that this approach comes with its own set of risks. Here are some key points to consider:
- Reduced User Flexibility: By disabling plugin deactivation, you limit the ability of other administrators or users to manage the plugins. This can lead to frustration, especially if they need to troubleshoot issues quickly.
- Potential for Broken Functionality: If a plugin becomes outdated or conflicts with other plugins or themes, users won’t be able to deactivate it to remedy the situation. This can result in a website that’s difficult to manage.
- Increased Security Risks: Continuously running a problematic plugin without the option to deactivate it can expose your site to vulnerabilities. If a plugin is compromised, it’s essential to disable it immediately.
- Dependency Issues: Some plugins rely on others to function properly. If a plugin is disabled, it may affect the performance of other dependent plugins, leading to further complications.
In summary, while disabling plugin deactivation can be beneficial for maintaining the integrity of crucial plugins, it’s vital to weigh these advantages against the potential risks involved. Make an informed decision that considers both the needs of your website and the management capabilities of your team.
3. Methods to Disable Plugin Deactivation
When it comes to managing your WordPress site, controlling which plugins can be deactivated is essential for maintaining stability and performance. Fortunately, there are several methods to accomplish this, ensuring that critical plugins remain active without interruption. Here’s a breakdown of the most effective methods:
- Using User Roles and Permissions: By altering user roles, you can limit who has the authority to deactivate plugins. For instance, you can assign the ‘Administrator’ role only to trusted members. Additionally, plugins like User Role Editor can help you customize permissions further.
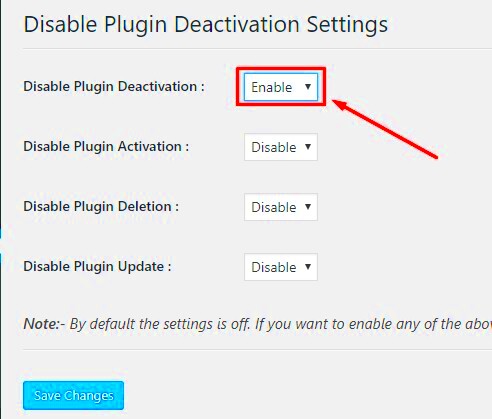
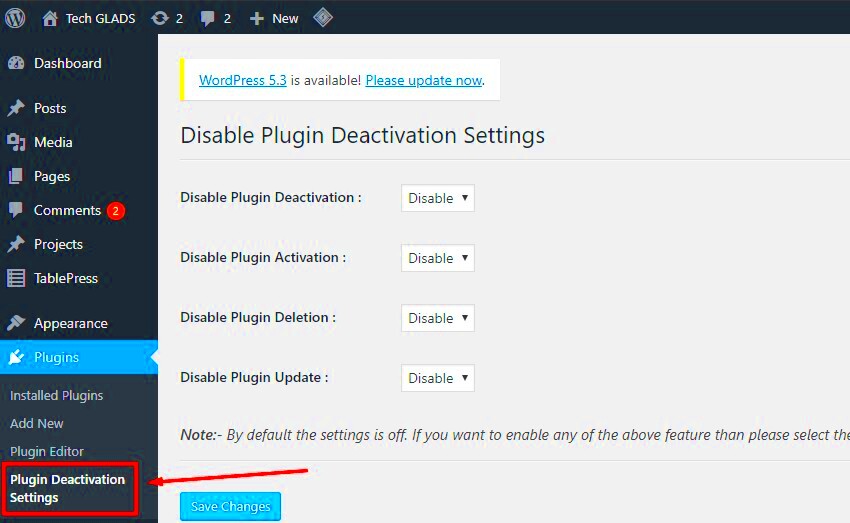
- Plugin Settings: Some plugins come with built-in settings that prevent deactivation by default. Check the documentation or settings of each plugin to see if this feature exists. If it does, enable it to prevent accidental deactivations.
- Security Plugins: Implementing security plugins can deter malicious attempts to deactivate plugins. Plugins like Wordfence or Sucuri can notify you about unauthorized changes and even restrict access to sensitive settings.
- Custom Hooks: If you’re comfortable with coding, you can use WordPress hooks in your theme’s functions.php file to create a customized solution. For example, you might intercept the deactivation process and deny it based on certain conditions.
Whichever method you choose, it’s vital to ensure that your core plugins remain active for your site to function smoothly. Keeping plugins in check can save you a lot of trouble down the road!
4. Using Code Snippets to Prevent Deactivation
For those who are a bit tech-savvy or eager to dive into WordPress’s coding potential, using code snippets is a powerful way to prevent plugin deactivation. Adding custom code to your theme’s functions.php file can help you lock down specific plugins from being deactivated without your explicit permission. Here’s how you can do it:
First, you’ll want to back up your site. Accidentally breaking your site with code changes can happen, and having a backup can rescue your hard work!
function prevent_plugin_deactivation($plugin) { $forbidden = array('plugin-folder/plugin-file.php'); // Replace with your plugin path if (in_array($plugin, $forbidden)) { wp_die('You cannot deactivate this plugin.'); }}add_action('plugin_deactivate', 'prevent_plugin_deactivation');How This Code Works:
- Function: The `prevent_plugin_deactivation` function checks if a specific plugin is in the array of forbidden plugins.
- Hook: The function hooks onto the activation process using `add_action`, triggering whenever a plugin is attempted to be deactivated.
- Error Message: If someone tries to deactivate a forbidden plugin, WordPress will display an error message, halting the process.
Customize the `$forbidden` array with the paths of plugins you want to protect. It’s a straightforward yet effective solution, giving you peace of mind that essential functionality stays intact, no matter who’s accessing the admin panel.
5. Utilizing WordPress Hook: ‘pre_disable_plugin’
When it comes to limiting the deactivation of plugins in WordPress, utilizing hooks can be one of the most effective strategies. The ‘pre_disable_plugin’ hook is an action hook that gets triggered right before a plugin is deactivated. By tapping into this particular hook, you can put barriers in place that will prevent users from deactivating plugins altogether.
Here’s how you can use this hook effectively:
- First, you’ll need access to the functions.php file of your active theme or create a custom plugin.
- Next, you’ll write a function that checks whether the user has the appropriate permissions to deactivate the plugin.
- Finally, you’ll use the add_action function to link your custom function to the ‘pre_disable_plugin’ hook.
Here’s a quick snippet to illustrate:
add_action('pre_disable_plugin', 'restrict_plugin_deactivation');function restrict_plugin_deactivation($plugin) { if (!current_user_can('manage_options')) { wp_die('You do not have sufficient permissions to deactivate this plugin.'); }}With this script, anyone who lacks the manage_options capability—like editors or subscribers—will be prevented from deactivating the plugin. This way, you maintain control and ensure that essential functionalities do not get disrupted inadvertently.
6. Setting Permissions for User Roles
Another method to control plugin deactivation in WordPress involves adjusting user role permissions. By default, WordPress has a well-defined set of user roles such as Administrator, Editor, Author, Contributor, and Subscriber. Each of these roles has specific capabilities, including the ability to activate or deactivate plugins.
To prevent certain users from deactivating plugins, you can modify their capabilities through a variety of methods:
- Using a User Role Editor Plugin: A user role editor plugin like Members or User Role Editor will allow you to easily adjust user permissions without diving into code.
- Code Modification: If you prefer a coding approach, you can utilize the add_cap and remove_cap functions to customize user capabilities directly in your theme’s functions.php file.
Here’s an example of how to remove the deactivation capability:
if ( ! function_exists('remove_plugin_capabilities') ) { function remove_plugin_capabilities() { $role = get_role('editor'); // Target the 'editor' role if ( $role ) { $role->remove_cap('activate_plugins'); $role->remove_cap('deactivate_plugins'); } } add_action('admin_init', 'remove_plugin_capabilities');}With the above code snippet, editors will no longer have the ability to activate or deactivate plugins. This setup not only secures your plugins but also ensures that vital features remain functional.
7. Testing and Implementing Changes Safely
When it comes to managing plugins in WordPress, testing changes before rolling them out is critical. Making alterations without proper precautions can lead to unexpected issues, including functionality failures or site crashes. Here’s how you can ensure that you’re making changes in a safe manner:
- Create a Staging Environment: Always begin by setting up a staging site. This is a clone of your live site where you can test changes without affecting your actual site. Many hosting providers offer easy staging setup options.
- Back Up Your Site: Before making any changes, always perform a complete backup of your site. Use plugins like UpdraftPlus or BackWPup to ensure you have a saved version that you can revert to if things go awry.
- Document Changes: Keep a log of any changes or updates you are making. This documentation helps you track what you’ve modified and simplifies troubleshooting if something goes wrong.
- Test One Change at a Time: Whether you’re disabling a particular plugin or implementing a new one, make your changes one at a time. This approach makes it easier to identify what caused an issue if one arises.
- Check Site Performance: After implementing changes, closely monitor your site’s performance. Tools like Google PageSpeed Insights can help you track any impact on load times.
By following these steps, you can minimize risks and ensure that your site runs smoothly even as you manage your plugins. Testing protects your hard work and makes the update process much less stressful!
8. Conclusion: Best Practices for Plugin Management
Managing plugins effectively in WordPress isn’t just about knowing how to disable them; it’s about adopting best practices that keep your site secure, functional, and optimized. Here are some top practices you should consider:
- Keep Plugins Updated: Regular updates are crucial for security and functionality. Outdated plugins can become vulnerabilities, so check for updates frequently.
- Limit the Number of Plugins: More plugins don’t always mean better functionality. Each additional plugin can increase security risks and slow down site performance. Try to use only the necessary plugins.
- Use Trusted Sources: Install plugins from credible sources such as the WordPress Plugin Directory. Check reviews and ratings before adding them to your site.
- Disable Unused Plugins: If you’re not actively using a plugin, it’s wise to disable or uninstall it. This action decreases the potential attack surface for hackers.
- Regular Monitoring: Make it a habit to regularly audit your plugins. Look for any that require updates, have poor reviews, or seem to cause conflict with your site.
By implementing these best practices, you’ll ensure that your site remains functional and secure while maximizing performance. Remember, managing plugins is not just a task—it’s an ongoing commitment!

