If you’re running a website on WordPress, you’ve probably seen those eye-catching banners or headers at the top of pages — often called hero announcement headers. They’re great for grabbing visitors’ attention, sharing important news, or highlighting special offers. But what if you want to customize or update your hero header to better suit your current needs? Don’t worry! Editing your hero announcement header in WordPress might sound intimidating at first, but with a few simple steps, you can make it look exactly how you want. Let’s walk through the basics so you can get started today.
Understanding the Importance of the Hero Announcement Header
The hero announcement header isn’t just a pretty banner — it’s a powerful tool to communicate key messages instantly. Think of it as the digital equivalent of a storefront sign that tells visitors what’s new, important, or exciting about your website or business. A well-designed hero header can:
- Grab attention immediately — drawing visitors in within seconds.
- Guide user actions — encouraging clicks, sign-ups, or purchases.
- Set the tone or branding — showing your personality or professionalism right away.
- Highlight promotions or updates — making sure your audience doesn’t miss your latest offers or news.
Ignoring the importance of this header can mean missing out on opportunities to engage visitors and convert them into customers or followers. Plus, a dynamic and updated hero announcement header keeps your site feeling fresh and relevant. Whether you want to promote a new product, announce an event, or simply share a welcoming message, customizing your hero header ensures your website communicates effectively and leaves a lasting impression. Think of it as your website’s first handshake — make it strong, inviting, and aligned with your goals.
3. Prerequisites for Editing Your Hero Header in WordPress
Before you dive into editing your hero announcement header, there are a few important prerequisites to keep in mind. Being prepared will make the process smoother and less stressful. First off, you should have access to your WordPress admin dashboard. If you’re not logged in, go ahead and log in with your username and password.
Next, it’s helpful to know what theme or page builder you’re using, as different themes or plugins handle headers differently. For example, popular page builders like Elementor, Beaver Builder, or WPBakery often have their own ways to customize headers. Check if your theme has a dedicated header section or if you’re using a plugin for header customization.
Also, having a backup of your website is always a good idea before making significant changes. You can use plugins like UpdraftPlus or BackupBuddy to create a quick backup. This way, if something doesn’t go as planned, you can restore your site easily.
If you plan to make visual edits, ensure you have a clear idea of what you want your new header to look like—think about the message, colors, and call-to-action. Having these details ready will save you time and help you communicate your vision if you’re working with a developer or designer.
Finally, familiarize yourself with the editing tools or page builder interface you’re going to use. Many themes come with their own customization options, but knowing how to navigate the editor or builder interface will make the process much faster. If you’re new to this, consider browsing the documentation or tutorials related to your theme or plugin for a quick overview.
4. Step-by-Step Guide to Editing Your Hero Announcement Header
Now that you’ve prepared, let’s walk through the process of updating your hero announcement header in WordPress. Follow these steps, and you’ll have a fresh, engaging header in no time!
Step 1: Log into Your WordPress Dashboard
Start by logging into your WordPress admin area. Usually, you can do this by visiting yourdomain.com/wp-admin and entering your credentials. Once logged in, you’ll see the dashboard, which is your control panel for making changes.
Step 2: Locate the Header or Hero Section
Depending on your setup, the hero announcement header might be part of your theme’s customization options, a specific page, or a header builder plugin. Here’s where to look:
- Appearance > Customize: Many themes offer header customization options here.
- Pages > All Pages: If your hero is part of a specific page, edit that page directly.
- Plugins: If using a header builder plugin, navigate to its section, usually under the Plugins menu or a dedicated menu item.
Step 3: Access the Header Editor or Builder
Once you’ve located the section, open it. If your theme has a customizer, you’ll see a live preview on the right and options on the left. For page builders, click on the “Edit with [Your Builder]” button. This will open a visual editor where you can manipulate elements directly.
Step 4: Edit the Announcement Text and Call-to-Action
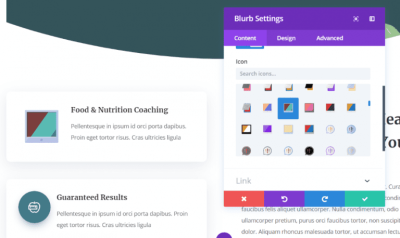
Look for the text block or widget that contains your hero announcement message. Click on it to edit. Here, you can:
- Change the wording: Make it more engaging or update the offer.
- Adjust styling: Modify fonts, colors, or sizes to match your branding.
- Add or update buttons: Include a call-to-action, like “Learn More” or “Get Started.”
Step 5: Replace or Update Background Images or Colors
If your hero header includes a background image or color, locate those settings. Many builders allow you to:
- Upload a new background image or select from your media library.
- Change the overlay colors or opacity for better contrast.
- Adjust the padding or margins to ensure the header looks balanced.
Step 6: Preview and Save Your Changes
Always preview your edits before publishing. Use the preview button to see how your new header looks across devices. If everything looks good, save or publish your changes.
Step 7: Clear Cache and Verify
If you’re using caching plugins or a CDN, clear your cache to ensure your visitors see the latest version. Then, visit your website on different devices or browsers to confirm your hero announcement header looks perfect.
And that’s it! With these straightforward steps, you can keep your website fresh and your visitors engaged with a compelling hero announcement header. Feel free to experiment with different messages, visuals, and calls to action to see what resonates best with your audience.
5. Customizing the Header Text and Design Elements
Now that you’ve got your hero announcement header in place, it’s time to make it truly your own. Customizing the header text and design elements allows you to communicate your message effectively while matching your website’s style. Let’s walk through how to do this seamlessly.
Editing the Header Text
Most WordPress themes or page builders provide an intuitive way to change the header text. Typically, you’ll find this in the widget or block settings. Here’s a simple process:
- Navigate to the section where your hero header is located, often via the Customizer or page editor.
- Click on the header block or widget to open its settings.
- Look for the text field labeled “Header Text,” “Title,” or similar.
- Type in your new message—whether it’s a catchy headline, a call-to-action, or a welcoming phrase.
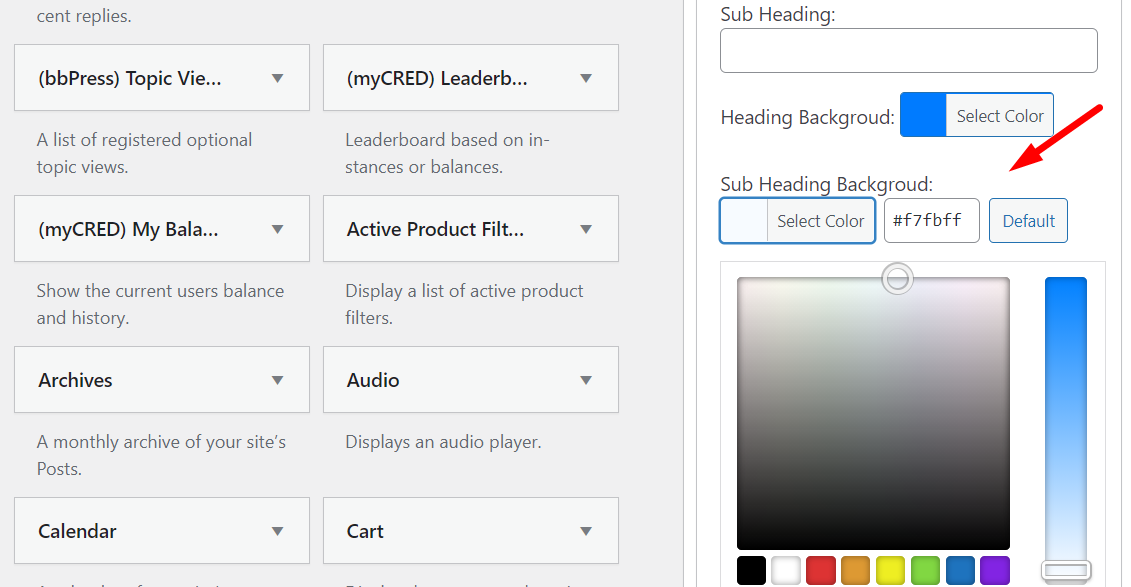
Design Elements You Can Customize
Beyond just the text, the visual appeal plays a big role. Here are some common design options you might find:
- Fonts: Choose from a variety of font styles to match your branding. Many themes support Google Fonts or custom font uploads.
- Colors: Adjust background colors, text colors, or overlay transparency to make your header pop or blend softly.
- Images & Backgrounds: Swap out background images or add a gradient overlay for a sleek look.
- Buttons & Call-to-Action (CTA): Add or customize buttons with different colors, sizes, and links to guide visitors.
- Spacing & Alignment: Tweak padding, margins, and alignment to ensure everything looks balanced.
Most theme customizers or page builders have a visual editor, so you can see your changes in real-time. Don’t be afraid to experiment—small tweaks can make a big difference in how your announcement header engages visitors.
6. Previewing and Publishing Your Changes
Once you’re satisfied with your header’s text and design, it’s time to see how everything looks on your live site before making it public. Previewing is a crucial step to ensure everything appears just right across different devices and screen sizes.
How to Preview Your Changes
Depending on the tool you’re using, the process might vary slightly, but generally:
- Look for a “Preview” button, usually located at the top or bottom of your editor.
- Click it to open a new tab or window that shows a live preview of your site with your latest edits.
- Check the appearance on different devices if your tool allows—many page builders have device preview modes for desktop, tablet, and mobile.
Making Adjustments After Preview
If something looks off—like text overlapping, poor contrast, or misaligned buttons—you can go back to the editor, tweak the settings, and preview again. This iterative process ensures your header looks polished and professional.
Publishing Your Changes
Once you’re happy with how everything appears in the preview, it’s time to publish:
- Click the “Publish” or “Update” button in your editor.
- Some themes or builders might ask for confirmation—just follow the prompts.
- After publishing, refresh your website to see the live changes in action.
Remember, if you ever want to revert or make further edits, you can always return to the customizer or page builder and repeat the preview and publish steps. Taking the time to preview ensures your announcement header looks great across all devices and provides the best experience for your visitors.
7. Tips for Creating an Engaging and Effective Hero Announcement Header
So, you want your hero announcement header to really grab attention and communicate your message clearly? Great! A well-crafted hero header can boost engagement, encourage clicks, and set the tone for your entire website. Here are some tips to make yours stand out:
Keep It Clear and Concise
Your headline should immediately tell visitors what you’re offering or announcing. Avoid jargon or overly complicated language. Think of it as a quick elevator pitch — simple, direct, and compelling.
Use Eye-Catching Visuals
Pair your header text with a high-quality background image or graphic that complements your message. Visuals should be relevant and add to the overall aesthetic without overwhelming the text.
Prioritize Readability
Choose fonts, sizes, and colors that contrast well with your background. Make sure your text is easy to read on all devices, from desktops to smartphones. Sometimes, a semi-transparent overlay behind the text can improve readability over busy images.
Incorporate a Clear Call-to-Action (CTA)
Tell visitors what you want them to do next. Whether it’s “Learn More,” “Get Started,” or “Shop Now,” your CTA should be prominent and inviting. Use contrasting colors or buttons to make it stand out.
Be Authentic and Brand-Aligned
Your header should reflect your brand’s voice and personality. Whether you’re playful, professional, or innovative, ensure your message and visuals align with your brand identity.
Test Different Variations
Don’t be afraid to experiment! Try different headlines, images, or CTA buttons to see what resonates best with your audience. Use A/B testing tools if possible to gather data on what performs well.
Keep Mobile in Mind
Remember, many visitors will see your header on a mobile device. Make sure the design is responsive, the text is legible, and the CTA is easy to tap. Preview your header on various devices to ensure it looks perfect everywhere.
8. Troubleshooting Common Issues When Editing Your Hero Header
Editing your hero announcement header in WordPress is usually straightforward, but sometimes things don’t go as planned. Here are some common issues you might encounter and how to fix them:
Issue: Changes Not Showing Up
Possible Cause: Caching issues or browser cache.
Solution: Clear your site’s cache (if you’re using a caching plugin) and your browser cache. After clearing caches, refresh your page to see the updates. Sometimes, simply doing a hard refresh (Ctrl + Shift + R on Windows or Cmd + Shift + R on Mac) does the trick.
Issue: Header Looks Off or Broken Layout
Possible Cause: Conflicting CSS styles or theme limitations.
Solution: Use your browser’s developer tools (right-click > Inspect) to identify CSS conflicts. You might need to add custom CSS to fix alignment or spacing issues. If you’re unsure, reaching out to your theme’s support or a developer can save you time.
Issue: Text Overlaps or Is Cut Off
Possible Cause: Insufficient padding or font size issues.
Solution: Adjust padding/margins in your header settings, or try reducing the font size slightly. Preview on different devices to ensure consistency.
Issue: CTA Button Not Working or Not Visible
Possible Cause: Incorrect link URL or CSS hiding the button.
Solution: Double-check the link URL for typos. Make sure the button isn’t hidden by CSS rules. If the button is styled with custom CSS, verify that styles are correctly applied.
Issue: Header Not Responsive on Mobile
Possible Cause: Theme or plugin conflicts, or lack of responsive design settings.
Solution: Ensure your theme supports responsive headers. Use mobile preview options in WordPress customizer or your browser developer tools to identify issues. Adjust your header settings or CSS as needed to improve mobile responsiveness.
Remember, editing your hero header is an iterative process. Don’t get discouraged if things don’t look perfect right away. Take it step by step, test thoroughly, and you’ll have a stunning header that effectively communicates your message and delights your visitors!
Additional Resources for Customizing Your WordPress Header
To enhance your understanding and streamline the process of customizing your WordPress hero announcement header, there are several valuable resources available. These tools and guides can help you achieve a professional look tailored to your website’s branding and style.
First, consider exploring the official WordPress documentation on theme customization. It provides detailed instructions and best practices for editing headers, especially if you’re using custom themes or page builders. Visit the WordPress Theme Developer Resources for comprehensive guides.
Next, numerous tutorials and video guides are available on platforms like YouTube and Udemy. These resources walk you through step-by-step processes for editing headers, adding custom CSS, and using popular plugins like Elementor and Beaver Builder.
Additionally, consider leveraging third-party plugins specifically designed for header customization, such as:
- Header Footer Elementor: Allows you to easily create and customize headers with drag-and-drop features.
- My Header Footer: Provides simple options for adding custom headers and footers without coding.
For more advanced customization, understanding CSS and PHP can be invaluable. Websites like CSS-Tricks and WordPress Developer Resources offer tutorials and code snippets to help you fine-tune your header’s appearance and functionality.
In conclusion, these resources empower you to personalize your hero announcement header effectively, whether you prefer guided tutorials, plugins, or hands-on coding. Combining these tools and knowledge will make your header stand out and better engage your visitors.