If you’re gearing up to launch your WordPress website but need to bring in collaborators like developers, designers, or content creators, knowing how to safely grant access is key. You want to ensure they can do their job without giving away more than they should or risking your site’s security. Whether you’re working with a team or just testing things out, understanding how to control access before going live helps keep your site safe, organized, and ready for the big day. Let’s explore how to manage user access smoothly and confidently.
Understanding User Roles and Permissions in WordPress
WordPress has a built-in system called user roles that determines what each person can see and do on your site. Think of these roles as different levels of access—kind of like roles in a movie set, where each person has a specific part to play. Knowing these roles helps you give just the right amount of access without overexposing your site.
Here are the main default roles in WordPress:
- Administrator: Has full control over everything—installing plugins, changing themes, managing users, and more. Only give this role to trusted people.
- Editor: Can publish, edit, and delete posts and pages. Great for content managers or writers.
- Author: Can create and publish their own posts but can’t edit others’ work. Ideal for guest bloggers or contributors.
- Contributor: Can write and edit their own posts but cannot publish them. Useful for drafts or review stages.
- Subscriber: Can only manage their own profile and view content. Perfect for users who need to log in but don’t need editing rights.
Understanding these roles is the first step in controlling who can do what on your site. If the default roles don’t quite fit your needs, you can also add custom roles or tweak permissions with plugins. This way, you can tailor access precisely for your team, ensuring everyone has the right tools to do their job without risking your site’s integrity. Managing user roles thoughtfully can save you headaches and make your site launch process much smoother.
3. Creating a New User Account for Your Collaborator
So, you’re ready to bring someone else into your WordPress project—whether it’s a developer, designer, or content creator. The first step is creating a new user account for them. This way, you can give them access to your site without sharing your personal login details, which is much safer and more professional.
It’s pretty straightforward to set this up. Just follow these simple steps:
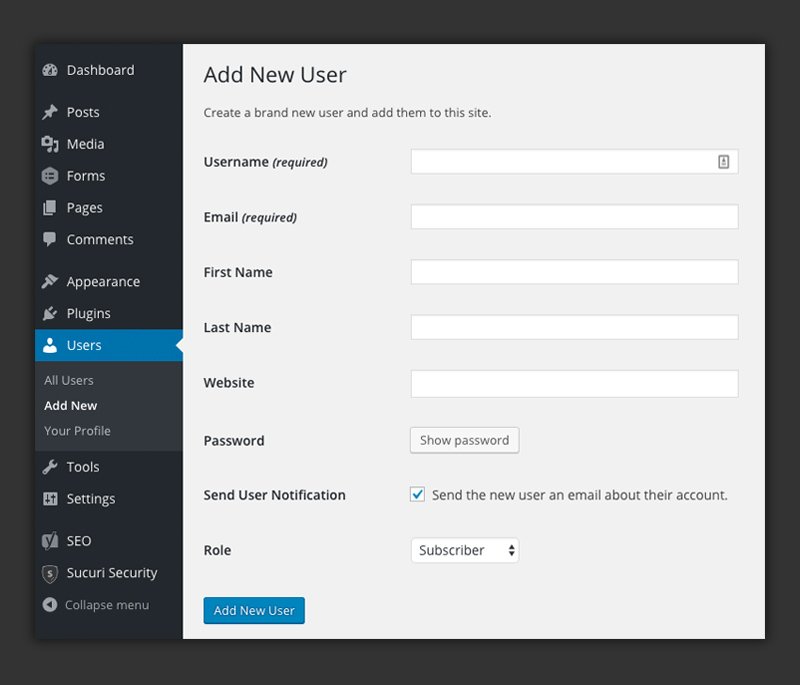
- Log into your WordPress admin dashboard. This is usually at yoursite.com/wp-admin.
- Navigate to the Users section. You’ll see this on the left sidebar—click on “Users” and then select “Add New.”
- Fill out the user details. Here’s what you’ll need:
- Username: Choose a unique username for your collaborator.
- Email: Enter their email address so they can receive login info and notifications.
- First Name & Last Name: Optional but helpful for organization.
- Password: Generate a strong password or create one yourself. You can also click “Send User Notification” to email them their login details.
- Set their user role. You’ll choose this in the next step, so don’t worry about it for now.
- Click “Add New User.” And that’s it! Your collaborator now has their own account with access tailored to your settings.
This method keeps things secure and manageable, especially when multiple people need access at different times. Plus, if you need to revoke access later, you can simply deactivate or delete their account. It’s a clean, professional way to collaborate without sharing passwords or risking security.
4. Assigning the Appropriate User Role for Your Needs
Now that you’ve created a user account, the next step is assigning the right role. WordPress offers several predefined roles, each with different levels of access and capabilities. Picking the right one ensures your collaborator can do what they need without overstepping boundaries or risking your site’s security.
Here’s a quick rundown of the most common roles:
| Role | Description | Capabilities |
|---|---|---|
| Subscriber | Can only manage their profile. Useful if they need to leave comments or update their info. | Read |
| Contributor | Can write and manage their own posts but cannot publish them. | Write, Edit own posts |
| Author | Can publish and manage their own posts. Good for guest bloggers or content creators. | Publish, Edit, Delete own posts |
| Editor | Can manage and publish all posts, including those written by others. Ideal for content managers. | Edit, Publish, Delete all posts and pages |
| Administrator | Full access to all site features. Best reserved for site owners or trusted team members. | All capabilities, including site settings and user management |
So, how do you decide which role to assign? It really depends on what your collaborator needs to do:
- If they’re just providing feedback or updating their profile, Subscriber works fine.
- If they’re writing content but not publishing, go with Contributor.
- If they’re ready to publish their own posts, assign Author.
- For managing multiple posts and editing content created by others, Editor is the way to go.
- If they need full control over the site, including settings and user management, only grant them the Administrator role—and do so cautiously!
Remember, you can always change a user’s role later if their responsibilities shift. Assigning the proper role from the start helps keep your site secure and your workflow smooth. It’s all about giving people just enough access to get the job done without risking unintended changes or security issues.
5. Using Plugins to Manage User Access and Permissions
When it comes to giving someone access to your WordPress site, especially before going live, plugins can be your best friends. They make managing user roles and permissions straightforward, without the need for complex coding. Whether you want to grant limited access or full admin rights, there’s a plugin out there that fits your needs.
One popular option is MemberPress. It’s primarily used for memberships but also offers robust user management features. With MemberPress, you can create custom roles, set specific permissions, and control what each user can see or do on your site. This way, you can, for instance, let a developer access only the backend editing tools without letting them see sensitive data.
Another great plugin is User Role Editor. It’s simple and effective for customizing roles and capabilities. You can tweak existing roles like Editor, Contributor, or Author, or create new ones tailored to your project. For example, you could create a “Content Reviewer” role with limited access to approve posts but no publishing rights.
Here’s how you might go about using a plugin like User Role Editor:
- Install and activate the plugin from the WordPress plugin repository.
- Navigate to “Users” > “User Role Editor” in your dashboard.
- Select the role you want to modify or create a new one.
- Check or uncheck capabilities such as editing posts, managing plugins, or accessing settings.
- Assign the role to your collaborator’s user account.
Remember, always test new roles with a test account if possible. This way, you ensure the permissions are set correctly and your site’s security remains intact.
Using plugins not only helps you control access efficiently but also offers flexibility as your project evolves. You can easily adjust permissions, revoke access, or upgrade roles without fussing with code or risking security breaches.
6. Sharing Login Details Securely with Your Collaborator
Once you’ve set up the appropriate user roles and permissions, it’s time to share the login details with your collaborator. But how do you do this securely? Sharing passwords can be risky if not handled carefully, so it’s essential to follow best practices to protect your site and data.
First and foremost, avoid sending passwords via insecure channels like plain email or messaging apps that don’t encrypt messages. Instead, consider these safer options:
- Password Managers: Use tools like LastPass, Dashlane, or 1Password. These allow you to share passwords securely without revealing the actual password text. Your collaborator can access the password directly within the manager, which encrypts the data.
- Encrypted Messaging: If you must send login details directly, use encrypted messaging apps like Signal or WhatsApp (end-to-end encryption). Still, this method isn’t as secure as a password manager sharing feature.
- Temporary Passwords: Create a strong, temporary password for initial access. Change the password once your collaborator has completed their tasks, especially before going live.
When sharing login credentials, include clear instructions:
- How to access the site (e.g., URL, login page)
- How to change their password after logging in
- Any specific areas they should focus on or restrictions to keep in mind
Encourage your collaborator to use unique, strong passwords and to enable two-factor authentication (2FA) if your site supports it. This adds an extra layer of security and helps protect your site from unauthorized access.
Finally, always keep track of who has access and revoke permissions once their work is done or before you go live. Regularly reviewing user accounts and permissions is a good security habit that keeps your site safe and secure during the development process.
7. Best Practices for Managing Access Before Launch
Giving someone access to your WordPress site before going live is a big step—it’s like handing over the keys to your new car! You want to make sure that only the right people have the right level of access, and that everything stays secure. Here are some best practices to keep in mind:
1. Use Role-Based Access Controls
WordPress has built-in user roles like Administrator, Editor, Author, Contributor, and Subscriber. Each role has specific permissions. Assign roles based on what the user needs to do:
- Administrator: Full control over the site—use sparingly!
- Editor: Can publish and manage posts and pages.
- Author: Can write, edit, and publish their own posts.
- Contributor: Can write and manage their own posts but can’t publish.
- Subscriber: Can only manage their profile.
Assigning roles appropriately ensures users only access what they need, reducing the risk of accidental changes or security issues.
2. Create Temporary or Limited Accounts
If someone only needs access for a short period—say, a developer fixing a bug or a designer working on visuals—consider creating temporary accounts with limited permissions. Once their job is done, disable or delete those accounts to keep things tidy.
3. Use Strong, Unique Passwords
Never underestimate the power of a strong password. Encourage your team to use complex passwords, and consider using a password manager to generate and store them securely. This helps prevent unauthorized access.
4. Enable Two-Factor Authentication (2FA)
Adding an extra layer of security with 2FA can make all the difference. Many security plugins like Wordfence or Jetpack support 2FA, making it harder for hackers to gain access—even if they have a password.
5. Limit Login Attempts and Monitor Activity
Install security plugins that limit login attempts and track user activity. This way, if someone tries to brute-force their way in, you’ll be alerted or blocked.
6. Keep Everything Up to Date
Ensure WordPress core, themes, and plugins are all up to date. Updates often include security patches that protect your site from vulnerabilities.
7. Regular Backups
Before giving access, and throughout the pre-launch process, back up your site regularly. If anything goes wrong, you can restore to a safe point without stress.
8. Testing User Access to Ensure Proper Permissions
Once you’ve set up user accounts and assigned roles, don’t just assume everything works perfectly. Testing user access is a crucial step to ensure that everyone can do what they’re supposed to without overstepping boundaries.
Why Test User Permissions?
Imagine a contributor trying to publish a post—they should see the publish button, but they shouldn’t have access to change site settings. Or a subscriber should only be able to view content, not edit it. Testing helps catch these issues early.
Steps to Test User Access
- Create Test Accounts: Use different email addresses for each role you’ve assigned.
- Log in as Each User: Make sure to test all their capabilities—creating, editing, publishing, and deleting content.
- Check Restricted Areas: Verify that users cannot access admin panels or settings outside their permission scope.
- Test User Experience: Ensure the interface is clear and that users only see options relevant to their roles.
- Document Findings: Keep notes of any permissions issues or confusing interfaces so you can fix them before launch.
Tools to Help Test User Access
Consider using plugins like User Role Editor or Members. These tools allow you to simulate different user roles, edit permissions on the fly, and ensure everything functions smoothly.
Final Tips
Don’t forget to:
- Log out and test the site from a guest or incognito window to see what an actual visitor experiences.
- Ask a trusted team member or a friend to test access from their account—fresh eyes can uncover issues you might miss.
By thoroughly testing user access, you ensure a smooth launch where everyone can do their part without risking the security or integrity of your site. It’s all about setting your team up for success and peace of mind!
Conclusion and Tips for Maintaining Site Security
Ensuring your WordPress site remains secure while granting access is crucial to protect your content, user data, and overall site integrity. Always remember to assign role-specific permissions, providing only the necessary access to minimize potential risks. Regularly update your WordPress core, themes, and plugins to patch security vulnerabilities. Use strong, unique passwords for all user accounts and enable two-factor authentication whenever possible.
Implementing a robust backup strategy is essential. Schedule regular backups so you can quickly restore your site if needed. Consider using security plugins like Wordfence or Sucuri to monitor and defend against threats. Keep an eye on user activity logs to detect any suspicious behavior early. Additionally, limit the number of users with admin privileges and review access permissions periodically to ensure they align with current roles.
Remember: security is an ongoing process, not a one-time setup. Educate your team about best practices and the importance of maintaining security standards. By following these tips, you can confidently grant access to collaborators or developers without compromising your site’s safety. Staying vigilant and proactive will help you enjoy a smooth, secure launch and continued peace of mind as your site grows.