If you’ve ever faced a frustrating “memory exhausted” error on your WordPress site or noticed your website slowing down unexpectedly, you’re not alone. These issues often stem from insufficient memory limits allocated to your server or hosting environment. Luckily, there are straightforward ways to boost your WordPress memory to ensure your site runs smoothly and efficiently. Using tools like the Elementor plugin, which is known for its powerful page-building capabilities, can be even more effective when your site’s memory is optimized. In this post, we’ll explore practical strategies to increase your
Understanding the Importance of Memory in WordPress Performance
Think of your WordPress website as a busy office. Memory (or RAM) is like the desk space and resources that allow your staff—your website’s processes and plugins—to work efficiently. When there’s not enough memory, your site struggles to handle multiple tasks simultaneously, leading to slow load times, errors, or even crashes. This is especially true if you’re using resource-heavy plugins like Elementor, which can require significant memory to function smoothly. Adequate memory ensures all your site’s components—images, scripts, plugins, and themes—operate harmoniously, providing visitors with a seamless experience. So, understanding and optimizing your WordPress memory isn’t just technical mumbo jumbo; it’s the key to keeping your website fast, reliable, and user-friendly.”
3. Checking Your Current WordPress Memory Limit
Before you start tweaking your WordPress site to boost its memory, it’s a good idea to know exactly what your current memory limit is. This helps you understand whether you need to increase it or if everything is already optimized. Luckily, checking your current memory limit is pretty straightforward, and there are a few simple ways to do it.
One of the easiest methods is using a plugin. There are many plugins designed to display server information, including your memory limit. For example, you can install a plugin like WP Server Stats or Site Health Status. Once installed and activated, navigate to your plugin’s page or the WordPress Site Health tool (found under Tools > Site Health), and look for the server or PHP information section. Here, you’ll see your current PHP memory limit listed clearly — something like 128MB or 256MB.
If you prefer a more hands-on approach, you can also check your memory limit via a simple PHP info file:
- Create a new file named phpinfo.php in your WordPress root directory.
- Add the following code:
<?php phpinfo(); ?>
- Save the file and visit http://yourdomain.com/phpinfo.php in your browser.
- Look for the memory_limit setting in the PHP info page. It will tell you your current memory limit.
Important: Remember to delete the phpinfo.php file after checking your info for security reasons.
Knowing this, if your memory limit is low (say 64MB or less), you might want to consider increasing it to improve performance, especially if you’re using Elementor and running many plugins or complex pages.
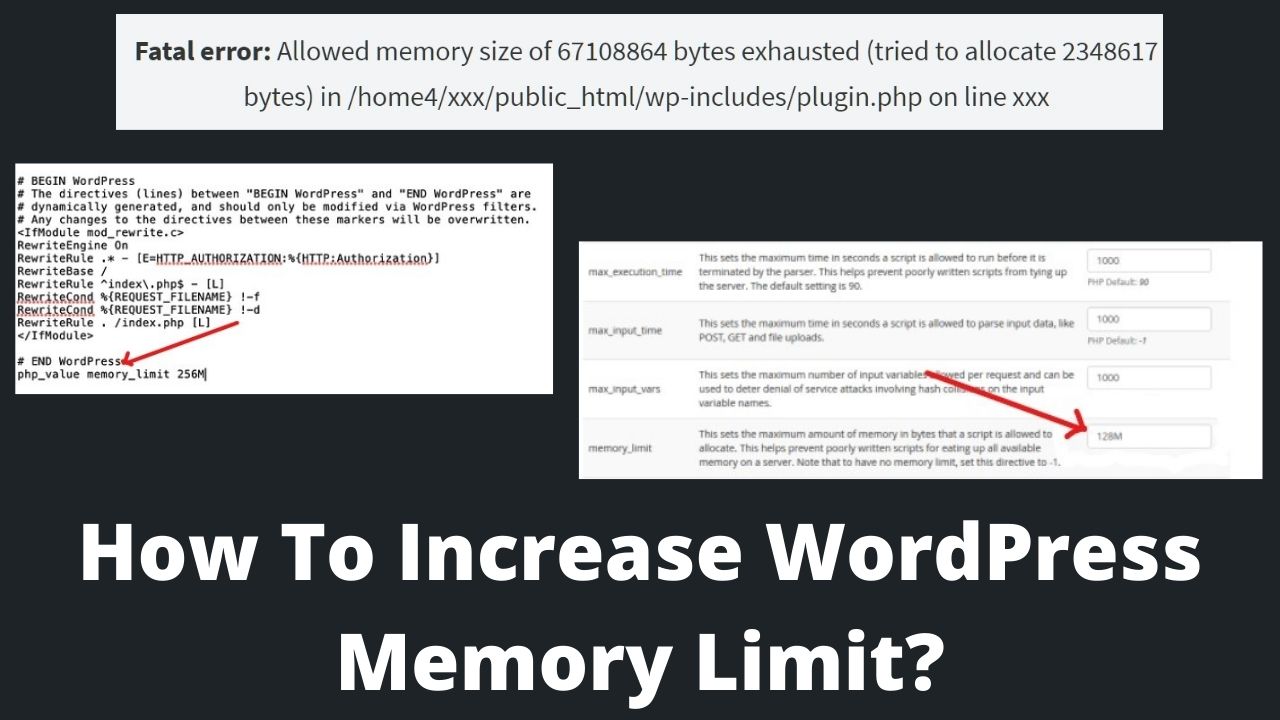
4. Increasing Memory Limit Through wp-config.php File
One of the most common ways to increase your WordPress memory limit is by editing the wp-config.php file. This file acts as the main configuration hub for your WordPress site, so a small change here can make a big difference.
Here’s how you can do it:
- Access your website’s files via an FTP client like FileZilla or through your hosting provider’s file manager.
- Navigate to the root directory of your WordPress installation — usually named public_html or similar.
- Locate the wp-config.php file and download a backup before making any changes. This way, you can restore it if something goes wrong.
- Open the file in a text editor and look for a line that says / That’s all, stop editing! Happy publishing. /.
- Just above this line, add the following code:
define('WP_MEMORY_LIMIT', '256M');
Here, you can set the value to whatever you need, like 128M, 256M, or even higher if your hosting allows it. Save the changes and upload the file back to your server.
After doing this, it’s a good idea to verify whether the change took effect. You can do this by revisiting the PHP info file you created earlier or by using a plugin to check the site health status and see if the memory limit has increased.
Note: Some hosting providers restrict how high you can set the PHP memory limit. If you find that increasing it in wp-config.php doesn’t work, check with your host’s support or documentation.
Increasing your memory limit through wp-config.php is a quick and effective way, especially if you have access to your server files. It helps ensure your WordPress and Elementor-powered pages run smoother, especially when working with large images, complex designs, or numerous plugins. Just remember to always keep backups before making changes, and test your site thoroughly afterward.
5. Adjusting PHP Settings to Allocate More Memory
One of the most straightforward ways to give your WordPress site a boost in memory is by tweaking your PHP settings. Think of PHP as the engine behind your website — the more resources it has, the smoother and faster your site will run. If your site is experiencing sluggishness or errors related to memory, increasing your PHP memory limit can be a game-changer.
First, you’ll want to check your current PHP memory limit. You can do this by installing a simple plugin like “Display PHP Version” or by creating a small PHP info file. Once you know your current limit, you can decide how much you want to increase it.
Here’s how you can do it:
- Via wp-config.php: Access your site files through FTP or your hosting file manager. Locate the
wp-config.phpfile in your root directory. Add the following line just before the line that says/ That's all, stop editing! Happy publishing. /:
define('WP_MEMORY_LIMIT', '256M');This line increases your memory limit to 256MB, which is usually enough for most WordPress sites, especially if you’re using Elementor. Feel free to adjust the value based on your hosting plan and needs.
- Via php.ini: If you have access to your server’s php.ini file, locate the line that says
memory_limitand set it like so:
memory_limit = 256MIf you can’t access php.ini, contact your hosting provider and ask them to increase the PHP memory limit for you.
Remember, not all hosting environments allow unlimited or very high memory limits, so always check your hosting documentation or support if you’re unsure. Increasing your PHP memory is a simple yet powerful step toward improving your site’s performance, especially when running resource-heavy plugins like Elementor.
6. Using the Elementor Plugin to Optimize Memory Usage
Elementor is a fantastic page builder that lets you craft beautiful, dynamic websites with ease. However, because of its powerful features and flexibility, it can sometimes consume more memory than you’d like, especially on larger sites or when using lots of widgets and templates. The good news? There are several ways to optimize Elementor’s memory footprint and keep your site running smoothly.
Here are some practical strategies:
1. Optimize Your Elementor Settings
- Disable Unused Features: Within Elementor’s settings, turn off features you don’t use, such as Google Fonts or certain animations. This reduces the amount of data loaded on each page.
- Limit Revisions and Autosaves: Frequent autosaves and revisions can bloat your database and increase memory usage. You can limit revisions by adding this to your
wp-config.php:
define('WP_POST_REVISIONS', 3);- Use a Cache Plugin: Caching reduces the load on your server and speeds up page rendering. Popular options include W3 Total Cache or WP Rocket.
2. Use Lightweight Themes and Plugins
Heavy themes and plugins can increase memory consumption. Stick to well-coded, lightweight themes compatible with Elementor. Also, review your active plugins and deactivate those that aren’t essential.
3. Manage Elementor Templates and Widgets Wisely
- Limit the Number of Templates: Only keep necessary templates and delete unused ones to reduce database size.
- Optimize Widgets: Some widgets, like background videos or sliders, can be resource-intensive. Use them sparingly or replace them with lighter alternatives.
4. Use Server-Side Optimization Techniques
- Enable Server Caching: If your host supports server-side caching, enable it to serve static content quickly.
- Optimize Images: Compress images using tools like Smush or ShortPixel. Large images can significantly increase load times and memory usage.
5. Regularly Update Elementor and WordPress
Developers continually improve plugin and core software efficiency. Keeping everything updated ensures you’re benefiting from the latest performance enhancements and bug fixes.
By combining these strategies, you can make the most of Elementor’s powerful features without overloading your server’s memory. Remember, a well-optimized site not only performs better but also provides a better experience for your visitors!
7. Best Practices for Managing Memory in WordPress and Elementor
When it comes to keeping your WordPress site running smoothly, especially if you’re using Elementor, managing memory effectively is key. A well-optimized site not only loads faster but also reduces the chances of encountering those frustrating memory errors. So, what are some best practices you can adopt? Let’s dive in!
1. Keep Your Plugins and Themes Updated
Outdated plugins and themes can sometimes be bloated or contain bugs that lead to higher memory usage. Make it a habit to regularly check for updates and keep everything current. Developers often optimize their code in newer versions, which means better performance and less strain on your server.
2. Optimize Images and Media Files
Large image files can significantly increase memory load. Use image optimization plugins like Smush or ShortPixel to compress images without losing quality. Also, consider lazy loading images so they only load when visible on the screen, reducing initial memory consumption.
3. Use a Caching Plugin
Caching reduces server load and speeds up page delivery, which in turn minimizes memory usage. Popular options include W3 Total Cache, WP Rocket, or WP Super Cache. Proper caching means your server doesn’t have to generate pages from scratch every time someone visits.
4. Limit Post Revisions and Transients
WordPress saves multiple revisions of your posts, which can accumulate over time and use up storage and memory. You can limit revisions in your wp-config.php file or install plugins that clean up old revisions. Similarly, transient data (temporary cached data) should be cleared periodically.
5. Use Lightweight Plugins and Themes
Not all plugins and themes are created equal. Opt for well-coded, lightweight options. Avoid installing unnecessary plugins that you don’t really need—they can bloat your site and increase memory consumption.
6. Monitor Your Server Resources
Use tools like Query Monitor or New Relic to keep an eye on resource usage. These tools help identify plugins or scripts that are consuming excessive memory, enabling you to troubleshoot and optimize accordingly.
7. Configure PHP Memory Limit Properly
Ensure your PHP memory limit is set high enough to handle your site’s demands. You can increase it by editing your wp-config.php file or contacting your hosting provider. A common setting is 256MB, but some high-traffic sites might need more.
By following these best practices, you’ll create a more efficient environment for WordPress and Elementor, reducing the chances of memory-related hiccups and making your website faster and more reliable.
8. Common Troubleshooting Tips for Memory-Related Issues
Even with the best practices in place, sometimes you’ll run into memory issues. Don’t worry — many of these problems are manageable with a few troubleshooting steps. Here’s a handy guide to help you identify and fix common memory-related issues in WordPress using Elementor.
1. Check Your Error Logs
Start by reviewing your server’s error logs. They often contain clues about what’s causing memory exhaustion. If your hosting panel provides access, look for fatal errors related to memory. This can point you toward specific plugins or themes causing the problem.
2. Increase PHP Memory Limit
If you see errors like “Allowed memory size exhausted,” try increasing the PHP memory limit. You can do this by adding the following line to your wp-config.php file:
define('WP_MEMORY_LIMIT', '256M');Adjust the value as needed, but be cautious not to exceed your hosting provider’s maximum allowed limit.
3. Deactivate Recently Added Plugins
If the issue started after installing or updating a plugin, try deactivating it temporarily. Sometimes, poorly coded plugins can cause memory leaks or spikes. Reactivate them one by one to identify the culprit.
4. Switch to a Default Theme
If you’re using a custom or heavy theme, switch temporarily to a default WordPress theme like Twenty Twenty-Three. If the problem disappears, your theme might be causing the high memory usage.
5. Optimize or Remove Heavy Content
Large pages with lots of images, videos, or complex layouts can consume a lot of memory. Simplify your pages or optimize media files to reduce load. Consider removing or archiving old, heavy content that’s no longer needed.
6. Use a Staging Environment for Testing
Before making major changes, test fixes on a staging site. This prevents downtime or further issues on your live site while troubleshooting.
7. Consult Your Hosting Provider
If you’re still experiencing issues, contact your hosting support. They can help you analyze server resources, increase limits, or identify server-side problems that might be affecting your site’s memory.
8. Consider Upgrading Hosting
Shared hosting environments sometimes have limited resources. Upgrading to a VPS or managed WordPress hosting can provide more dedicated resources, reducing memory problems significantly.
Memory issues can be frustrating, but with patience and the right approach, they’re usually solvable. Keep monitoring your site, stay proactive with updates, and don’t hesitate to seek help when needed. Your website’s performance depends on it!
Conclusion and Final Tips to Boost Your WordPress Site Performance
Enhancing your WordPress site’s memory and overall performance is essential for providing a seamless user experience and improving your search engine rankings. By implementing the strategies discussed, such as optimizing images, leveraging caching plugins, and utilizing the Elementor plugin effectively, you can significantly boost your website’s efficiency. Remember, a well-optimized site not only loads faster but also retains visitors and encourages engagement.
Here are some final tips to maximize your site’s performance:
- Regularly Update Plugins and Themes: Keep all components up-to-date to benefit from security patches and performance improvements.
- Use a Content Delivery Network (CDN): Distribute your content across multiple servers worldwide to reduce load times.
- Optimize Your Database: Clean up unnecessary data and overhead to improve response times.
- Limit Use of Heavy Plugins: Only install essential plugins and deactivate or delete unused ones.
- Monitor Site Performance: Regularly check your site’s speed with tools like Google PageSpeed Insights or GTmetrix to identify and fix issues promptly.
By applying these best practices consistently, you’ll ensure your WordPress website remains fast, reliable, and capable of handling increased traffic. Remember, ongoing maintenance and optimization are key to sustaining high performance in the long run.