Plugins are the backbone of WordPress, adding countless functionalities to your website without needing to code. Whether you want to enhance SEO, improve performance, or add new features, plugins make it easy. But what if you want to install multiple plugins at once? Well, you’re in luck! In this guide, we’ll walk through the process of installing multiple plugins in WordPress efficiently, saving you time and effort. Ready to dive in? Let’s get started!
Understanding Plugins in WordPress
Before we jump into the installation process, it’s crucial to understand what plugins are and how they work in WordPress. Think of plugins as apps for your WordPress site. They add functionality and features that can be easily integrated without altering the core software. Here’s a quick breakdown:
- Functionality: Plugins can perform a range of functions, from basic tasks like adding contact forms to complex systems like e-commerce solutions.
- Customization: They enable you to customize your website to fit your needs, offering a plethora of options for layout, design, and usability.
- Efficiency: By installing multiple plugins, you can streamline your website management and improve performance without extensive coding knowledge.
There are thousands of plugins available in the WordPress repository, categorized into:
| Category | Examples |
|---|---|
| SEO | Yoast SEO, Rank Math |
| Security | Wordfence, Sucuri |
| E-commerce | WooCommerce, Easy Digital Downloads |
| Performance | W3 Total Cache, WP Super Cache |
Understanding these aspects will not only help you choose the right plugins but will also make managing your WordPress site a breeze. So, let’s get ready for the next step—installing those plugins!
Why Install Multiple Plugins at Once?
When you’re managing your WordPress site, you may find yourself needing several plugins to enhance functionality, improve user experience, or simply make your life easier. But why not install them all at once? Here are some compelling reasons to batch your plugin installations:
- Time Efficiency: Installing plugins one by one can be a tedious task. By installing multiple plugins simultaneously, you can save a significant amount of time. This allows you to get straight to customizing your site rather than wasting time on repetitive clicks.
- Enhanced Workflow: Managing plugins is a vital part of maintaining a website. By installing multiple plugins at once, you minimize interruptions to your workflow. This means less context switching, which can be a productivity killer.
- Consistency in Updates: It’s easier to keep track of updates when you install multiple plugins at the same time. You can check for all updates regularly, ensuring that your site’s performance and security are always top-notch.
- Streamlined Testing: After installing multiple plugins, you’ll want to check them for compatibility. Managing your plugins in batches allows you to assess how well they work together, which can help you troubleshoot issues more effectively.
Overall, installing multiple plugins at once not only saves time but helps streamline your website management process, ultimately leading to a more efficient and organized site.
Preparing for the Installation
Before diving into the exciting task of installing multiple plugins, it’s crucial to prepare. Without the right foundation, you may end up with conflicts, slow performance, or even security risks. Here’s how you can set yourself up for success:
- Backup Your Site: Always begin by backing up your WordPress website. This includes your database and files. In case something goes wrong, you can restore your site to its previous state quickly. Use popular plugins like UpdraftPlus or BackWPup for easy backups.
- Check Compatibility: Not all plugins work seamlessly together. Review the compatibility of the plugins you plan to install. Check the plugin documentation and user comments to ensure they can coexist without issues.
- Research and Select Quality Plugins: Opt for plugins with good reviews and a solid track record. Look for active installations, regular updates, and support from developers. Avoid plugins with few downloads or outdated features.
- Document Your Process: Create a simple checklist of the plugins you want to install. This helps you keep track of every step and ensures you don’t miss anything important during the process. You can even note down the purpose of each plugin for easy future reference.
By taking these preparatory steps, you’ll set a solid groundwork for your successful multiple plugin installations. This ensures that your site remains safe, optimized, and ready for growth.
Method 1: Using the WordPress Dashboard
If you’re looking to install multiple plugins in WordPress without the hassle of uploading files individually, the WordPress Dashboard is your best friend! This method is straightforward and user-friendly, making it a favorite among WordPress users.
Here’s how it works:
- Log into Your WordPress Admin Panel: Start by accessing your WordPress admin area. You can typically reach this by going to yourwebsite.com/wp-admin and entering your credentials.
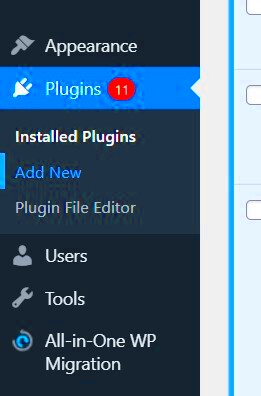
- Navigate to Plugins: Once logged in, look for the “Plugins” option in the left sidebar. Click on it to expand the menu options.
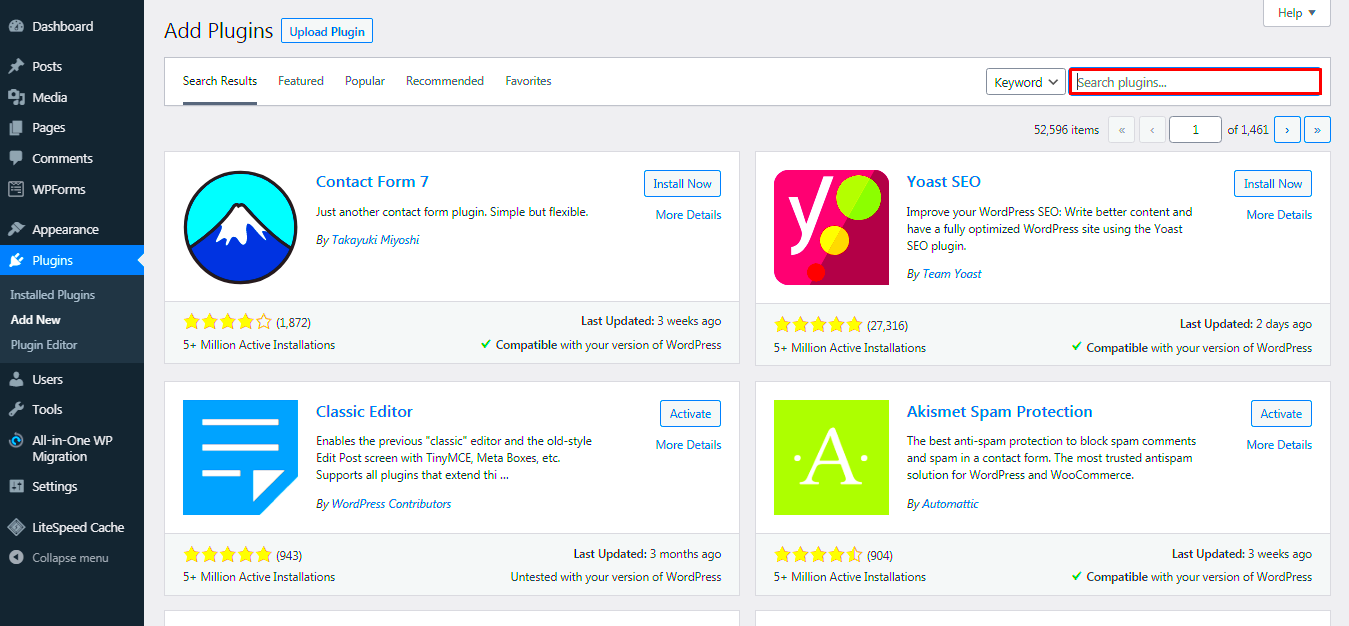
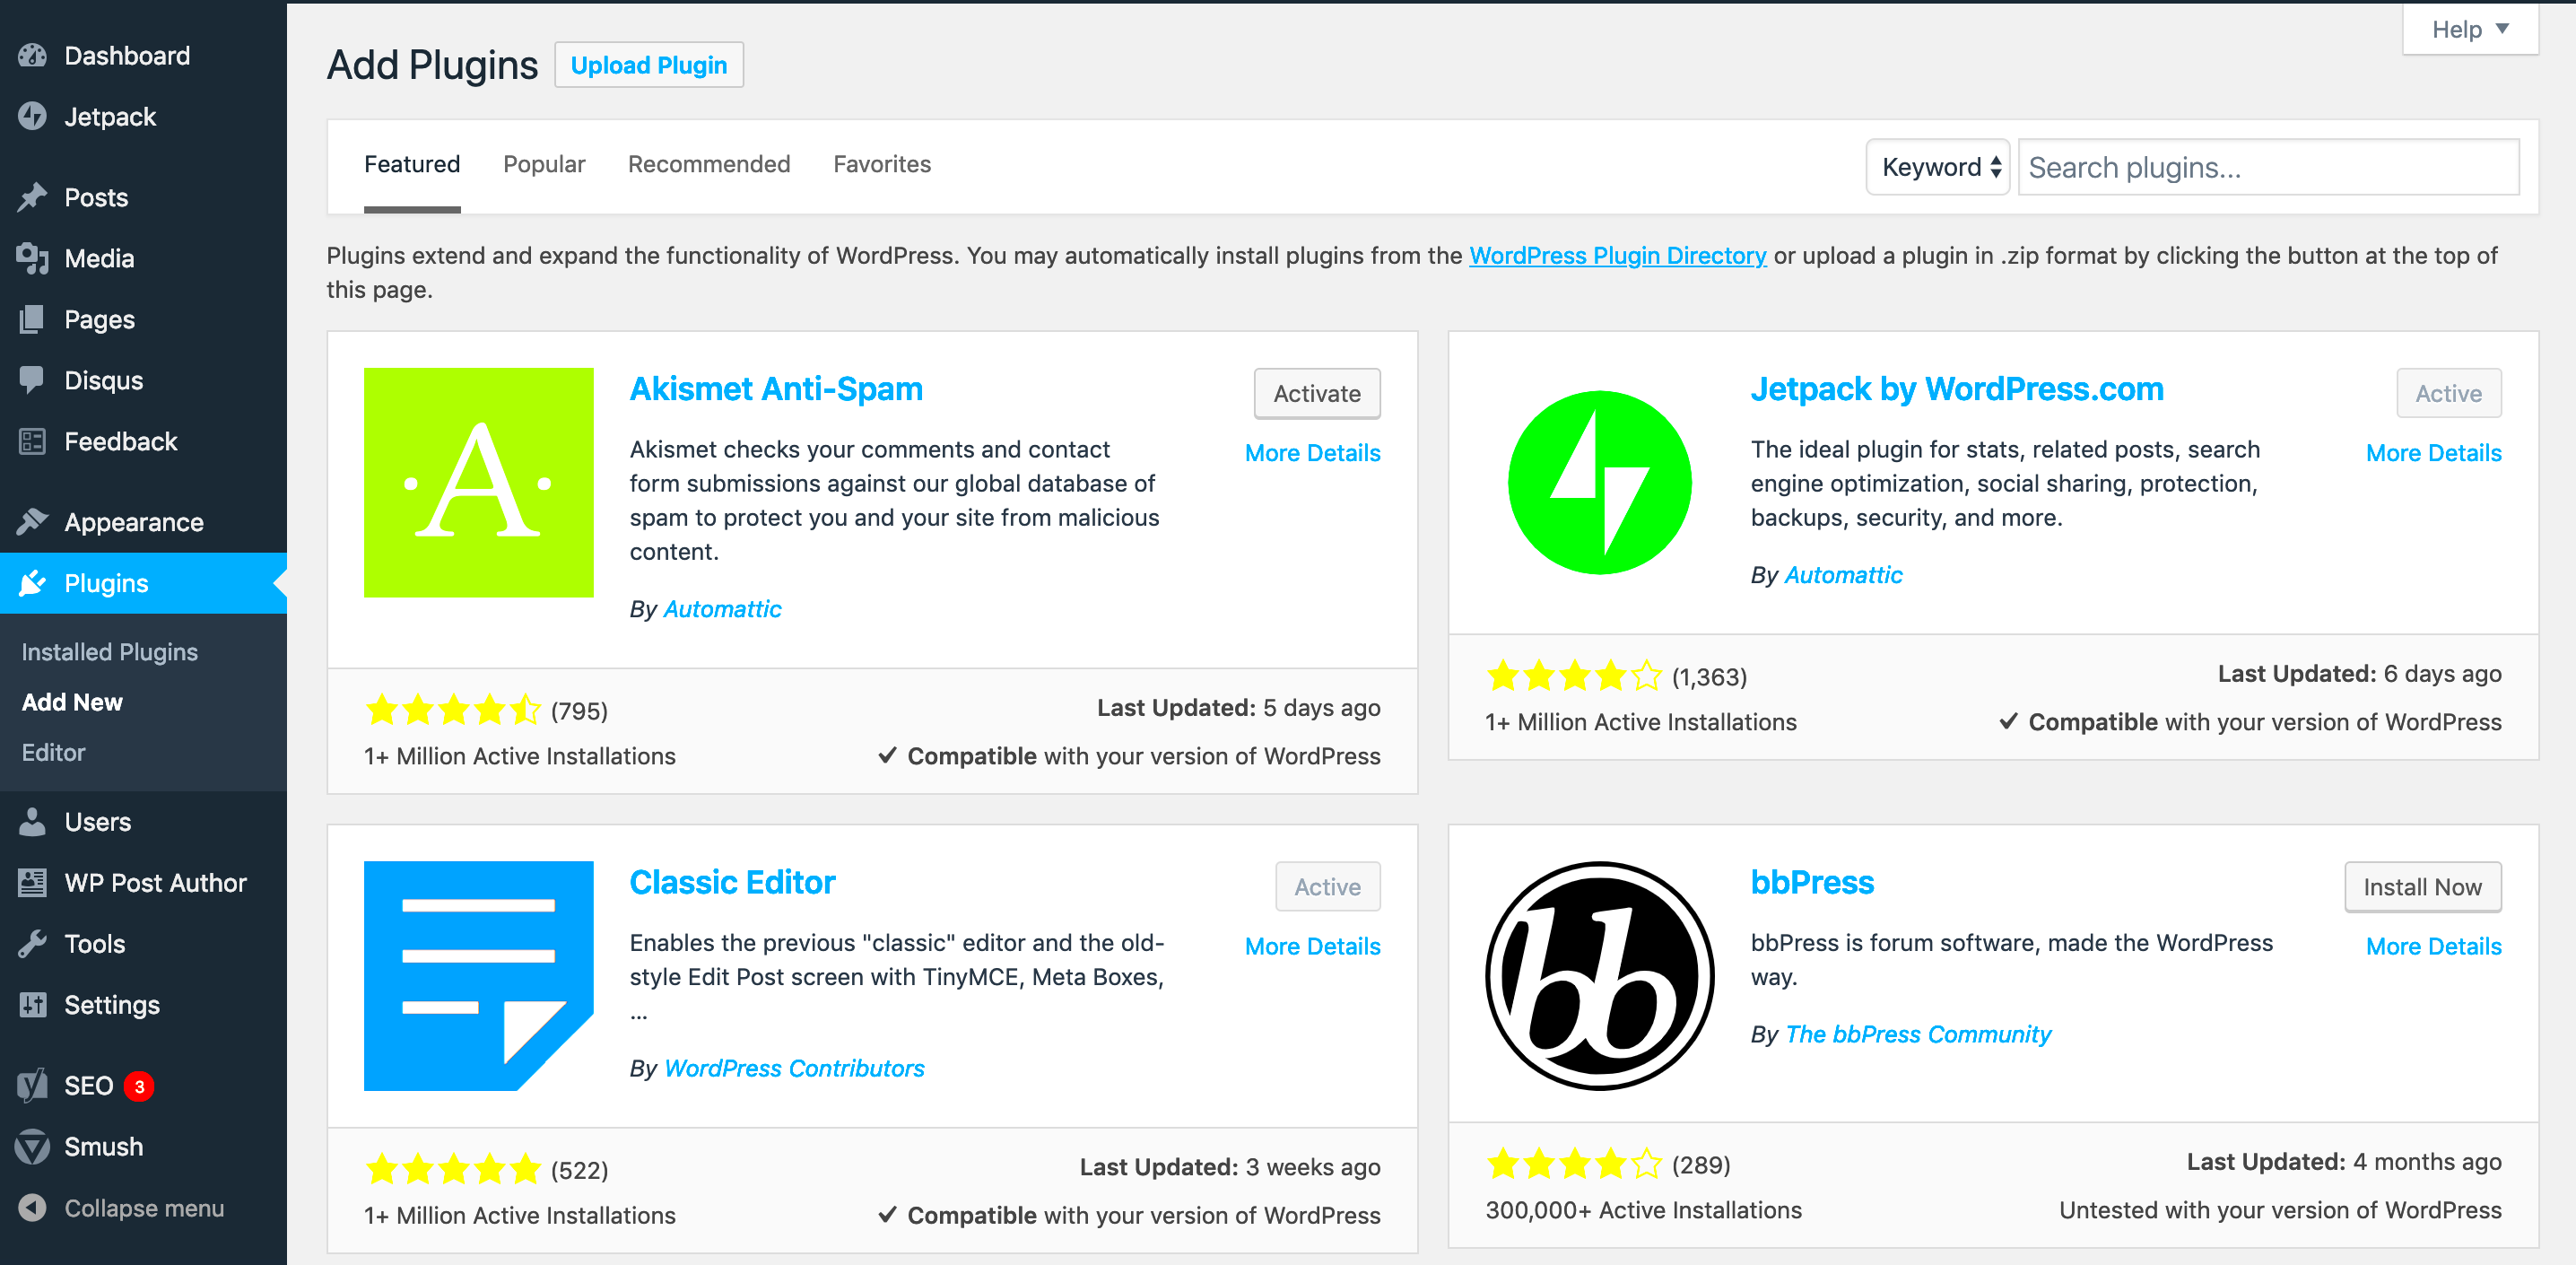
- Add New: Click the “Add New” button at the top of the Plugins page. This will take you to the plugin repository, showcasing thousands of plugins.
- Search or Browse: You can either use the search bar to find specific plugins, or you could browse the featured, popular, or recommended plugins. This is a great way to discover new tools!
- Install Multiple Plugins: As you browse, you can hit the “Install Now” button on each plugin you want to add. You can do this for several plugins in one go!
- Activate Them: After installation, you’ll see an “Activate” button next to each plugin. Click to activate them, or choose to activate them later from the Plugins page.
And there you go! You’ve successfully installed multiple plugins directly through the WordPress dashboard. This method is not only efficient but also helps you keep track of available plugins, ensuring your site runs smoothly with added functionalities!
Method 2: Bulk Uploading via Zip Files
If you have several plugins that aren’t available in the WordPress repository or if you prefer to have them bundled up in a zip file, bulk uploading is the way to go. This method is particularly beneficial for developers or users who want to install premium plugins quickly. Let’s break it down!
Here’s how to upload multiple plugins as zip files:
- Download the Plugins: First, ensure that you have all the plugin zip files downloaded on your computer. They should be from a trusted source to avoid malware risks.
- Log into Your WordPress Admin Panel: Head to your WordPress admin panel, similar to the previous method.
- Navigate to Plugins: Click on “Plugins” in the left sidebar.
- Add New: Just like before, click the “Add New” button at the top.
- Upload Plugin: Instead of browsing the repository, click the “Upload Plugin” button next to the title.
- Select and Upload: Click “Choose File,” and select one of the downloaded zip files. After that, click “Install Now.” Repeat this for each zip file.
- Activate the Plugins: Once all plugins are installed, go back to the “Installed Plugins” page, and you’ll see them listed. You can activate them from there.
And voila! By following these steps, you’ve successfully bulk uploaded multiple plugins using zip files, which can save you quite a bit of time and effort. Keep in mind that having the right plugins can significantly boost your site’s performance and functionality!
Method 3: Using a Plugin Management Tool
Alright, let’s dive into the world of plugin management tools! If you’ve been using WordPress for a while, you probably know that managing multiple plugins one by one can feel like an endless task. That’s where a plugin management tool comes to rescue you! Not only do these tools help install multiple plugins efficiently, but they also provide options for keeping plugins updated and managing their settings all in one place.
One of the popular plugin management tools is WP-CLI (WordPress Command Line Interface). With WP-CLI, you can install, activate, deactivate, and even delete plugins from the command line. Pretty nifty, right? Here’s a basic rundown on how to use WP-CLI:
- First, ensure you have WP-CLI installed on your server.
- Open your terminal and navigate to your WordPress directory.
- To install multiple plugins, use the command:
wp plugin install plugin-slug-1 plugin-slug-2 plugin-slug-3. - After installing, you can activate them in one go by typing:
wp plugin activate plugin-slug-1 plugin-slug-2 plugin-slug-3.
Another tool you might want to consider is ManageWP. This handy service allows you to manage multiple WordPress sites from a single dashboard. You can install plugins, perform backups, and even monitor performance. With ManageWP, you’ll find:
- An intuitive user interface.
- The ability to manage all your sites in one place.
- Single-click installation of multiple plugins.
Using a plugin management tool not only saves time but also streamlines your WordPress workflow. So, why not give it a go?
Post-Installation Steps
Congratulations! You’ve successfully installed multiple plugins in your WordPress site! But hold on, before you get too carried away, there are a few more steps to take to ensure everything runs smoothly. Post-installation is just as critical as the installation process itself.
First things first: Activate Your Plugins. After installation, your new plugins aren’t enabled automatically. You can quickly activate them by going to the ‘Plugins’ section in your WordPress dashboard, finding your newly installed plugins, and hitting the ‘Activate’ button for each one. Alternatively, if you’ve used a management tool, you might be able to activate all of them with a single click!
Next, it’s essential to configure settings. Each plugin usually comes with its own set of settings. Navigate to each plugin’s settings page (found typically under the ‘Settings’ menu or directly below the plugin’s name) to tweak them according to your needs. Some useful settings to check include:
- Plugin permissions and access roles.
- Performance settings (like caching or optimization options).
- Appearance settings for visuals and styles.
Lastly, don’t forget to test your website after installing new plugins. Check for any conflicts or slow loading times. You can run a performance test using tools like Google PageSpeed Insights or GTmetrix. This helps catch any potential issues before they become a significant problem.
Now that you’ve finished these post-installation steps, you’re all set! Regularly check your plugins for updates and keep an eye on their performance to ensure optimal functionality on your WordPress site.
Troubleshooting Common Issues
While installing multiple plugins in WordPress can streamline your site’s functionality, it doesn’t always go as smoothly as planned. Here are some common issues you might encounter and how to troubleshoot them:
- Plugin Conflicts: Sometimes, plugins may conflict with one another, causing errors or unexpected behavior. If you notice your site acting weird after installation, try deactivating the most recent plugins one by one to identify the culprit.
- Memory Limit Errors: If your installation fails due to a memory limit issue, you might see an error message indicating that the memory allocated to PHP is insufficient. You can resolve this by increasing your memory limit in the
wp-config.phpfile. Simply add the linedefine('WP_MEMORY_LIMIT', '256M');to give your site a boost. - File Permissions: If you’re having trouble installing plugins, it could be related to file permissions on your server. Ensure that the
wp-content/pluginsdirectory has the correct permissions set, typically755for folders and644for files. - Failed Installations: Sometimes, a plugin doesn’t install correctly, which can lead to errors. If this happens, try reinstalling the plugin. If the problem persists, consider downloading the plugin manually from the WordPress repository and uploading it through FTP.
- White Screen of Death: This dreaded issue can occur for several reasons, often linked to a plugin conflict or memory limits. To diagnose, deactivate all plugins by renaming the
pluginsfolder via FTP. Reactivate them one by one to pinpoint the issue.
By knowing how to tackle these common issues, you can maintain a smoother WordPress experience when installing multiple plugins.
Conclusion
In summary, installing multiple plugins in WordPress at once can significantly enhance the functionality of your website, but it’s essential to approach the process with care. From understanding the capabilities of each plugin to troubleshooting potential issues, keeping a few key principles in mind will make your plugin management far more efficient.
Remember, always:
- Backup Your Site: Before making any major changes, including installing plugins, ensure your site is backed up. This way, you can easily restore it if something goes awry.
- Check Compatibility: Always check if the plugins you intend to install are compatible with your version of WordPress and with each other. This simple step can save you lots of trouble.
- Keep Your Site Updated: Regular updates are essential for security and performance. Keeping your WordPress core, themes, and plugins updated can prevent many issues.
By following this guide and troubleshooting any common issues, you’ll be well on your way to a powerful and efficient WordPress site. Now, get out there, install those plugins, and explore the infinite possibilities that WordPress has to offer!
FAQs
When it comes to installing multiple plugins in WordPress, users often have questions about the process, compatibility, and maintenance. Below are some frequently asked questions that can help clarify common concerns.
- Can I install any plugin I want?
Not all plugins are compatible with every WordPress theme or version. Always check the plugin’s compatibility and read reviews before installation.
- What are the risks of installing multiple plugins at once?
Installing multiple plugins at once can lead to conflicts if they are not properly coded. It is advisable to install them in batches and check for issues after each installation.
- How can I ensure my plugins are up to date?
You can manage your plugin updates within the WordPress dashboard. Regularly check for updates and apply them to maintain security and functionality.
- Is it possible to bulk uninstall plugins?
Yes, you can uninstall multiple plugins by selecting them from the plugin list and choosing ‘Deactivate’ and then ‘Delete’ from the bulk actions dropdown.
- What should I do if a plugin causes issues?
If a plugin creates problems, deactivate it immediately. You can then troubleshoot by reviewing the plugin’s documentation or seeking assistance from the support forum.
Understanding these FAQs can help users effectively navigate the process of installing and managing multiple plugins in WordPress, ensuring a smoother experience overall.

