If you’re diving into the world of website customization, you’ve probably heard of Beaver Builder and WordPress editing. These tools make it super easy for anyone—whether you’re a newbie or a seasoned pro—to craft beautiful, functional websites without needing to code. Beaver Builder is a popular drag-and-drop page builder plugin that integrates seamlessly with WordPress, giving you a visual way to design your pages.
Accessing Your WordPress Dashboard
Let’s start at the very beginning—getting into your WordPress dashboard. Think of the dashboard as the control center of your website. To access it, follow these simple steps:
- Log in to your website: Open your web browser and go to your website’s URL, then add /wp-admin at the end (e.g., www.yoursite.com/wp-admin). This will take you to the login page.
- Enter your credentials: Type in your username and password. If you’re unsure of these details, they should have been set up when you first installed WordPress. If you’ve forgotten your password, click on the “Lost your password?” link to reset it.
- Access the dashboard: Once logged in, you’ll see the WordPress admin dashboard. This is where you manage all aspects of your website—from posts and pages to plugins and settings.
From the dashboard, you’re ready to start editing your pages with Beaver Builder. The next step is to find the page you want to work on and launch Beaver Builder for a seamless editing experience. But first, make sure you have the plugin installed and activated—don’t worry, we’ll cover that in the next section!
3. Locating the Page or Post You Want to Edit
Alright, so you’re ready to start editing your WordPress site with Beaver Builder, but first things first — you need to find that specific page or post you want to work on. Don’t worry, it’s pretty straightforward once you know where to look.
Once you log into your WordPress dashboard, you’ll want to head over to the Pages or Posts section, depending on what you’re editing. Here’s a quick rundown:
- Pages: Best for static content like your homepage, about page, or contact page.
- Posts: Ideal for blog entries, news updates, or any content that’s regularly added or updated.
To find the specific page or post:
- Click on Pages or Posts in the sidebar menu.
- Use the search box if you remember the title or part of it — just type in the name and press Enter.
- Browse through the list if you prefer to scroll manually. You’ll see the titles, publication dates, and sometimes the author’s name, which can help you identify the right content.
Pro tip: If you have a lot of pages or posts, consider adding filters or using the search feature to speed things up. Also, if your site is large, creating a clear naming convention for your pages and posts can save you a ton of time down the line.
Once you’ve found your target page or post, hover over its title. You’ll see a few options pop up — like Edit and View. Now, if you’re planning to edit with Beaver Builder, don’t click Edit just yet. We’re going to go a step further to make sure you’re entering the Beaver Builder interface properly.
4. Using Beaver Builder to Enter the Edit Screen
Great! You’ve located the page or post you want to tweak. Now, let’s get into Beaver Builder so you can start customizing your content visually and easily.
To access the Beaver Builder editing interface, follow these simple steps:
- On the page or post list, hover over your chosen content title.
- Click on the Edit with Beaver Builder button that appears beneath or beside the title. If you don’t see this option, make sure that Beaver Builder is activated and properly installed on your site.
- Once clicked, Beaver Builder will load, and you’ll see a new interface with your page content presented as editable blocks.
What happens next? The Beaver Builder interface is user-friendly and intuitive. You’ll see your page in a visual layout, with tools and options on the top and side menus. You can drag and drop modules, edit text directly, change images, and tweak layouts — all in real-time.
Keep in mind:
- Save your work: Remember to click the Done button in the top right corner when finished, then select Publish to make your changes live.
- Preview: Use the Preview button to see how your edits will look before publishing.
- Back to WordPress: If you want to exit the Beaver Builder editor without saving, just close the window or click the back button in your browser.
And that’s it! With these steps, you’re now ready to dive into editing your pages and posts using Beaver Builder. It’s a fantastic tool that makes customizing your website simple, even if you’re not a coding wizard. Take your time exploring, and soon enough, you’ll be creating beautifully designed pages that truly reflect your brand or personality.
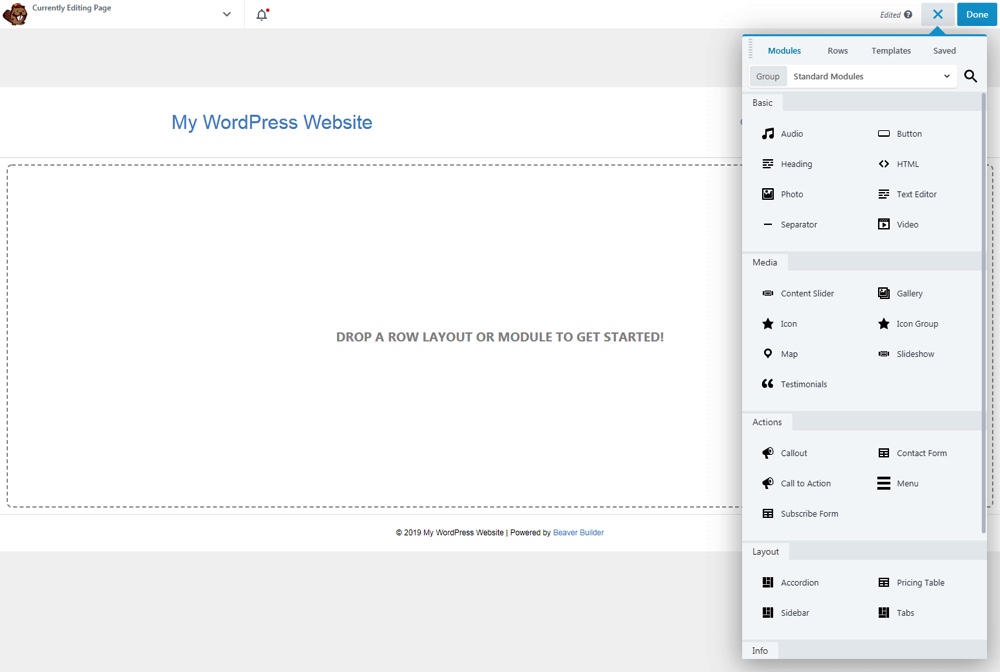
5. Understanding the Beaver Builder Interface
Once you’ve launched the Beaver Builder editor, it’s super helpful to get familiar with its interface so you can navigate confidently and make edits smoothly. Think of the interface as your workspace — it’s designed to be intuitive and user-friendly, even if you’re new to page builders.
At the top, you’ll typically see the Toolbar, which includes options like Save, Publish, Reset, and sometimes History. These are your quick-access buttons for managing your changes. On the right, there might be a Gear icon for global settings or developer options.
On the left sidebar, you’ll find the Modules Panel. This is where all the content blocks and modules live — think text boxes, images, buttons, and more. You can drag these modules directly onto your page. The modules are organized into categories like “Basic,” “Media,” “Content,” and “Advanced” — making it easy to find what you need.
The main part of the screen is your Preview Area — this is where you see your live page as you build or edit. You can click and drag modules into this space or rearrange existing elements with simple drag-and-drop actions. It’s like assembling building blocks, but digitally!
Below or around the workspace, you’ll often find a Settings Panel that appears when you select a module or row. This panel allows you to customize the appearance and behavior of individual elements — such as changing fonts, colors, spacing, and more.
Another handy feature is the Responsive View toggle, which lets you see how your page looks on different devices — desktop, tablet, or mobile. This is crucial to make sure your site looks great everywhere.
Overall, Beaver Builder’s interface is designed to keep your workflow smooth and visual, so you’re not buried in code or complicated menus. Spend a few minutes exploring the modules and options, and you’ll find it becomes second nature in no time!
6. Saving and Exiting the Beaver Builder Editor
When you’re done editing your page, it’s essential to save your work properly so your changes aren’t lost. Luckily, Beaver Builder makes this straightforward. At the top of the interface, you’ll see a few key buttons: Save, Publish, and sometimes Exit.
Saving your changes is as simple as clicking the Save button. This temporarily saves your progress as a draft, allowing you to continue editing later without making your changes live yet. Think of it like hitting the “save” button in a document — your work is stored, but not visible to visitors.
If you’re ready for your changes to go live, click the Publish button. This updates the live website with the latest version of your page. It’s a good idea to preview your page before publishing to make sure everything looks perfect.
When you’re finished editing and want to exit the Beaver Builder interface, look for the Exit or Close button, usually located at the top right corner. Clicking this will bring you back to the WordPress dashboard or the page list. If you’ve made significant changes, Beaver Builder will often prompt you to save or confirm before exiting — don’t forget to save to avoid losing your work!
Some tips for a smooth exit:
- Always save your work before exiting, especially if you’ve made substantial changes.
- Preview your page to verify how it looks before publishing.
- Use the “Exit” option to return to WordPress or the page list, not just closing the tab, to ensure your session ends properly.
And that’s it! With these simple steps, you can confidently save your edits and exit the Beaver Builder editor, knowing your work is safe and your page is ready for visitors. Practice makes perfect, so don’t hesitate to experiment and get comfortable with the interface!
7. Tips for Efficient Editing with Beaver Builder
Editing your WordPress site with Beaver Builder can be a smooth and enjoyable experience—once you know some handy tips to speed things up and avoid common pitfalls. Here are a few tricks to make your editing process more efficient and less stressful.
1. Use the Global Settings and Styles
Beaver Builder allows you to set global styles for fonts, colors, and spacing. Instead of customizing each module individually, define your brand’s look once and apply it across your entire site. This not only keeps your design consistent but also saves a ton of time when making updates in the future.
2. Save and Reuse Rows and Modules
If you’ve crafted a particular section or module that you plan to use on multiple pages—like a call-to-action banner or testimonial block—save it as a reusable template. Simply right-click the row or module and select ‘Save as Template.’ Later, you can insert it anywhere, ensuring design consistency and speeding up your workflow.
3. Use Keyboard Shortcuts
Beaver Builder supports several handy keyboard shortcuts. For example, pressing Alt + Shift + S saves your work instantly. Getting familiar with these shortcuts can significantly reduce the time spent clicking around, letting you focus more on creativity.
4. Preview Responsiveness Frequently
Design isn’t just about how your site looks on a desktop. Beaver Builder offers quick toggles for tablet and mobile views. Regularly preview your pages in these modes to ensure a seamless experience across devices. This habit helps you catch issues early, avoiding last-minute surprises.
5. Keep Your Workspace Organized
As you build, keep your rows, columns, and modules neatly organized. Use descriptive names for saved templates and modules to find them easily later. A clutter-free workspace makes editing faster and more enjoyable.
6. Take Advantage of Undo and Redo
Accidents happen! Don’t forget that Beaver Builder has robust undo and redo options—use Ctrl + Z and Ctrl + Y (or Command equivalents on Mac) to quickly fix mistakes without losing your progress.
By applying these tips, you’ll find yourself editing with more confidence and efficiency, making your website truly shine without feeling overwhelmed.
8. Conclusion and Additional Resources
Congratulations! You’ve now got a solid understanding of how to navigate to and edit your WordPress pages using Beaver Builder. Remember, the key to mastering this tool is practice—so don’t hesitate to experiment with different modules, layouts, and styles. The more you explore, the more intuitive the process becomes.
If you ever feel stuck or want to deepen your understanding, there are plenty of resources available:
- Official Beaver Builder Documentation: Comprehensive guides and tutorials directly from the developers.
- Beaver Builder Community Forums: Connect with other users, ask questions, and share tips.
- Video Tutorials on YouTube: Visual learners will appreciate step-by-step walkthroughs.
- Online Courses and Webinars: Many websites offer in-depth courses on Beaver Builder and WordPress design.
Remember, building a beautiful and functional website is a journey. With patience, practice, and the right resources, you’ll be able to craft pages that not only look great but also provide a fantastic experience for your visitors. Happy building!