If you’re running a WordPress website, you’ve probably heard the buzz about social images and how they impact your content’s reach. But what exactly is social image optimization, and why is it so important? Essentially, it’s about preparing the perfect-sized images that will look great when shared on social media platforms like Facebook, Twitter, and LinkedIn. When done right, optimized images can make your posts more eye-catching, increase engagement, and even drive more traffic to your site. With tools like Elementor, tweaking and managing these images becomes a breeze, ensuring every share counts!
Why Proper Social Image Size Matters for Your Website
Think of social images as your digital billboard—they’re often the first impression your audience gets when your content pops up on their feed. If your images are too small, they might look blurry or pixelated, making your site seem unprofessional. On the other hand, images that are too large can slow down your page load times, which isn’t good for user experience or SEO rankings.
Here’s a quick rundown of why having the right image size is crucial:
- Enhanced Visual Appeal: Properly sized images look crisp and clear, making your content more attractive and share-worthy.
- Better Engagement: Eye-catching images encourage more clicks, likes, and shares, expanding your reach organically.
- Optimized Load Times: Correct dimensions help your pages load faster, keeping visitors engaged and reducing bounce rates.
- Consistent Branding: Using the right sizes ensures your images appear professional and uniform across different platforms.
Most social media platforms recommend specific image sizes for optimal appearance. For example, Facebook prefers images around 1200 x 630 pixels for shared posts, while Twitter recommends 1200 x 675 pixels. Using these sizes helps your images look their best, making your content stand out amidst the digital clutter. With Elementor, you can easily set and tweak these images directly within your WordPress site, ensuring every shared image is perfect for the platform it’s meant for.
3. Steps to Set and Optimize Social Images in WordPress with Elementor

Alright, so you want your social images to stand out and look perfect when someone shares your content? Great! Using Elementor makes this process pretty straightforward. Let me walk you through the essential steps to set and optimize your social images effectively.
Step 1: Prepare Your Images
Before diving into Elementor, ensure your images are high-quality yet optimized for web. Aim for a balance between clarity and file size. For most social platforms, images around 1200 x 630 pixels work well because they display nicely across Facebook, Twitter, and LinkedIn. Use tools like TinyPNG or ImageOptim to compress your images without losing quality.
Step 2: Upload Your Social Image
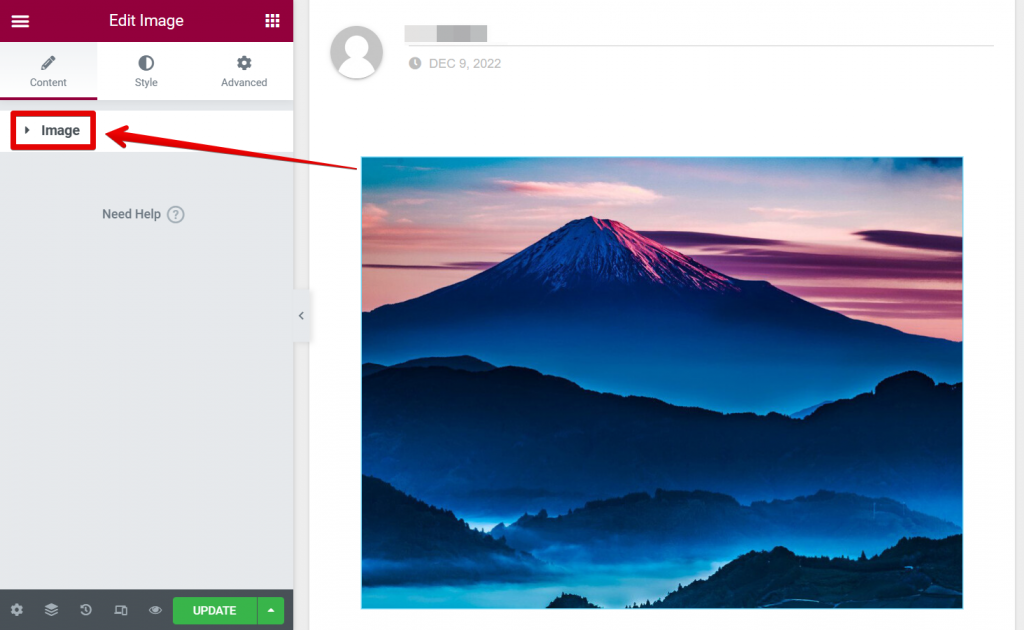
In your WordPress dashboard, navigate to the page or post where you want to add a social image. Open the page with Elementor. Once in the editor, locate the Settings panel (usually on the bottom left).
- Click on Page Settings
- Look for the Social Media tab or section
Here, you should see options to upload your social images. Click Upload Image and select your prepared image file. Make sure to set the image for each platform if options are available, or use a universal image that works well across all.
Step 3: Set Default Social Image in Yoast or SEO Plugin
If you’re using SEO plugins like Yoast SEO, you can also specify social images there for better control. To do this:
- Go to your SEO plugin’s social settings (e.g., Yoast SEO > Social)
- Upload your optimized image in the Facebook or Twitter tab
- Save changes
This ensures that when your content is shared, the correct image appears, even if no specific image is set in Elementor.
Step 4: Preview and Test
After setting everything up, test how your social images will look. Use tools like Facebook’s Sharing Debugger or Twitter’s Card Validator. Enter your URL, and see how your images appear. If they look off, tweak your images or settings accordingly.
Final Tip:
Remember, social images should be compelling! Make sure they’re visually appealing, include your branding subtly, and communicate the essence of your content at a glance. With these steps, your social shares will look professional and inviting, encouraging more clicks and engagement!
4. Best Practices for Creating Eye-Catching Social Images
Creating social images that catch the eye isn’t just about size — it’s about design, message, and relevance. Here are some tried-and-true best practices to help you craft images that grab attention and boost your sharing game.
1. Keep It Simple and Clear
Cluttered images can be overwhelming and confusing. Use minimal text and focus on a strong visual. Think of your social image as a billboard — it needs to communicate your message instantly. Use bold fonts, high contrast, and clear imagery.
2. Use Bright and Contrasting Colors
Colors can evoke emotions and draw the eye. Bright, vibrant colors stand out in feeds. Ensure your text contrasts well with the background, making it easy to read even on small screens.
3. Include Your Branding
Subtle branding helps viewers associate your content with your brand. Incorporate your logo or brand colors, but don’t overpower the main message. A small logo corner works well for recognition without distraction.
4. Use Consistent Style and Templates
Consistency builds brand recognition. Create templates for your social images with set fonts, colors, and layouts. Canva and Adobe Spark are great tools for designing templates that you can reuse.
5. Incorporate Compelling Visuals
Use high-quality photos, icons, or illustrations relevant to your content. Avoid generic stock images; instead, choose visuals that tell a story or evoke emotion.
6. Optimize for Mobile Devices
Most social media browsing happens on phones. Make sure your text is legible on small screens, and your main elements are centered and not too crowded at the edges.
7. Test Different Designs
Don’t settle for one style. Create variations and see which ones perform best. Use A/B testing if possible to optimize engagement.
8. Follow Platform Guidelines
Each platform has recommended image sizes and aspect ratios. Keep your images within these guidelines to avoid cropping or distortion. For example:
| Platform | Recommended Size | Aspect Ratio |
|---|---|---|
| 1200 x 630 px | 1.91:1 | |
| 1024 x 512 px | 2:1 | |
| 1200 x 627 px | 1.91:1 |
Sticking to these sizes ensures your images display correctly without awkward cropping.
Final Thought:
Creating eye-catching social images is an art and science. It takes practice, but by focusing on clarity, branding, and platform-specific sizes, you’ll craft visuals that not only look great but also drive engagement. Keep experimenting, stay consistent, and watch your content get shared more often!
5. Tools and Plugins to Help Optimize Social Media Images
When it comes to making sure your social media images look sharp and attractive, having the right tools and plugins can make a huge difference. Luckily, WordPress offers a variety of options that integrate seamlessly with Elementor and help streamline your image optimization process.
Here are some of the top tools and plugins you might want to consider:
- Smush: This popular plugin automatically compresses your images without losing quality. It also offers lazy loading, which speeds up your site and enhances user experience.
- EWWW Image Optimizer: This plugin provides lossless and lossy compression options. It’s especially good if you want control over the balance between image quality and file size.
- Imagify: Developed by WP Rocket, Imagify optimizes images with a simple interface. It also provides resizing features, which are perfect for social media dimensions.
- ShortPixel Image Optimizer: Known for its high compression rates, ShortPixel preserves image quality while reducing file size, helping your images load faster on social media platforms.
- Social Image Generator: This plugin allows you to create social media optimized images directly from your posts or pages, adding overlays or custom text as needed.
Additionally, many of these plugins can be configured to automatically resize images to specific dimensions suitable for platforms like Facebook, Twitter, or LinkedIn. This saves you time and ensures consistency across your social channels.
For example, with Elementor, you can set up your images within the widget settings, then use these plugins to optimize and resize accordingly. Combining these tools with a consistent workflow can dramatically improve your social media presence, making your images more engaging and shareable.
6. Common Mistakes to Avoid When Optimizing Social Images
Even with the best intentions, it’s easy to stumble into common pitfalls when optimizing social images. Being aware of these mistakes helps ensure your images are both attractive and effective without sacrificing site performance or visual quality.
Here are some pitfalls to watch out for:
1. Using Large or Unoptimized Files
One of the most frequent errors is uploading high-resolution images without compression. Large files can slow down your website and make social media shares look pixelated or blurry. Always optimize your images before uploading, aiming for a balance between quality and file size.
2. Ignoring Platform-Specific Dimensions
Different social media platforms prefer different image sizes. For instance, a Facebook cover photo is different from an Instagram post. Not tailoring your images to these sizes can result in awkward cropping or loss of important visual elements. Use recommended dimensions and test how your images appear before posting.
3. Overloading Images with Text or Overlays
While overlays and text can enhance your images, overdoing it can make them cluttered and hard to read, especially on smaller screens. Keep text minimal, clear, and ensure it complements the image rather than overwhelms it.
4. Neglecting Mobile Optimization
Most social media browsing happens on mobile devices. If your images aren’t optimized for mobile screens—meaning they are clear, correctly sized, and load quickly—they could lead to poor engagement. Always preview how your images look on mobile before finalizing.
5. Forgetting to Test and Preview
Before publishing, take the time to preview how your social images will appear across platforms. Sometimes, what looks great in your editor or on your computer may not translate well on social media. Use platform-specific previews or test posts to ensure everything looks perfect.
By avoiding these common mistakes, you set yourself up for success in creating social media images that are visually appealing, properly optimized, and effective at engaging your audience. Remember, a little extra effort in the optimization process can lead to greater reach and better brand perception!
Conclusion and Final Tips for Effective Social Image Optimization
Optimizing social images in WordPress using Elementor is essential for enhancing your website’s visual appeal and improving engagement on social media platforms. Properly sized images ensure faster load times, better display quality, and a more professional appearance. Remember, each social network has its preferred image dimensions, so tailoring your images accordingly can significantly boost your content’s reach.
Here are some final tips to maximize your social image optimization efforts:
- Always use high-resolution images: Ensure your images are clear and crisp, typically at least 1200 pixels wide for social sharing.
- Consistent branding: Maintain brand colors, logos, and style across all social images for recognition.
- Leverage Elementor’s features: Use the built-in image widgets and size controls to easily adjust dimensions for each platform.
- Test your images: Use social media preview tools or share drafts with colleagues to verify how images appear before publishing.
- Use descriptive and optimized filenames: This helps with SEO and ensures images are easily identifiable.
- Implement Open Graph tags and Twitter Cards: Proper meta tags ensure your images display correctly when shared.
By following these tips and leveraging Elementor’s capabilities, you can ensure your social images are effectively optimized, leading to increased visibility and engagement across all platforms.